一、什么是串口通信?
在日常生活中,串口通信经常用,到要学会串口通信,还是有点难度的,在这里,笔者先讲讲串口是怎样工作的

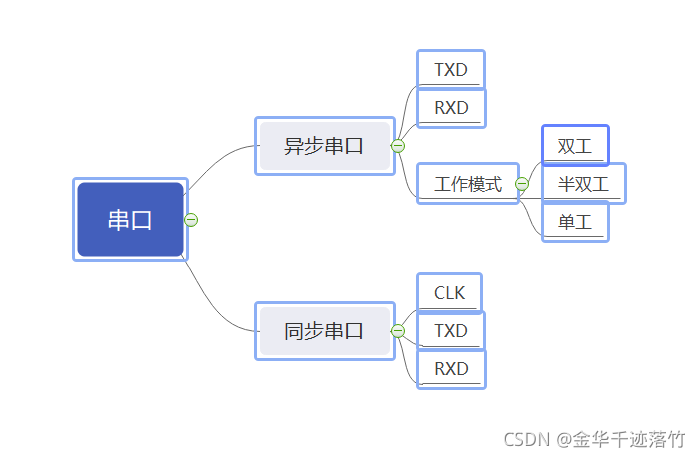
我们在这采用的是异步串口通信,工作模式为半双工,我们之所以采用异步串口是因为用得最广泛,同步串口传输对时钟线要求很高,需要在同一时钟线下进行数据传输,这种传输数据方式 就是并行传输数据,如下图:

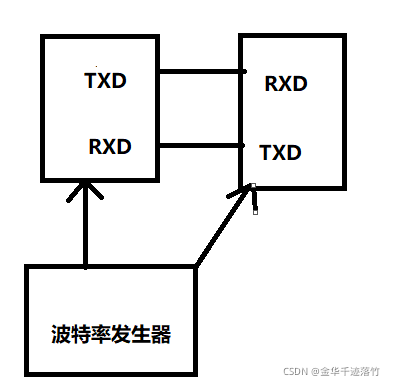
而异步串口通信只需俩根线即可。

在这里,波特率发生器是指单位时间内发送的bit数,我们经常用的有9600bps、115200bps。
还有一个特别重要的概念,就是数据怎么传输的,在传输数据时,首先第一位是起始信号,然后低位在前面,然后8位数据,然后是奇偶校验,后面是停止位,如图:

这里奇偶校验位可以不要,就是10位数据,整个串口传输数据的原理就是这样,剩下的就是代码的东西了。
二、编写代码
uart.c的代码
#include "sys.h"
#include "usart.h"
#include "led.h"


struct __FILE
{
	int handle;

};

FILE __stdout;
//定义_sys_exit()以避免使用半主机模式
void _sys_exit(int x)
{
	x = x;
}
//重定义fputc函数
int fputc(int ch, FILE *f)
{
	while((USART1->SR&0X40)==0);//循环发送,直到发送完毕
    USART1->DR = (u8) ch;
	return ch;
}

void uart_init(u32 bound){
  //GPIO端口设置
  GPIO_InitTypeDef GPIO_InitStructure;
	USART_InitTypeDef USART_InitStructure;
	NVIC_InitTypeDef NVIC_InitStructure;

	RCC_APB2PeriphClockCmd(RCC_APB2Periph_USART1|RCC_APB2Periph_GPIOA, ENABLE);	//使能USART1,GPIOA时钟

	//USART1_TX   GPIOA.9
  GPIO_InitStructure.GPIO_Pin = GPIO_Pin_9; //PA.9
  GPIO_InitStructure.GPIO_Speed = GPIO_Speed_50MHz;
  GPIO_InitStructure.GPIO_Mode = GPIO_Mode_AF_PP;	//复用推挽输出
  GPIO_Init(GPIOA, &GPIO_InitStructure);//初始化GPIOA.9

  //USART1_RX	  GPIOA.10初始化
  GPIO_InitStructure.GPIO_Pin = GPIO_Pin_10;//PA10
  GPIO_InitStructure.GPIO_Mode = GPIO_Mode_IN_FLOATING;//浮空输入
  GPIO_Init(GPIOA, &GPIO_InitStructure);//初始化GPIOA.10

  //Usart1 NVIC 配置
  NVIC_InitStructure.NVIC_IRQChannel = USART1_IRQn;
	NVIC_InitStructure.NVIC_IRQChannelPreemptionPriority=3 ;//抢占优先级3
	NVIC_InitStructure.NVIC_IRQChannelSubPriority = 3;		//子优先级3
	NVIC_InitStructure.NVIC_IRQChannelCmd = ENABLE;			//IRQ通道使能
	NVIC_Init(&NVIC_InitStructure);	//根据指定的参数初始化VIC寄存器

   //USART 初始化设置

	USART_InitStructure.USART_BaudRate = bound;//串口波特率
	USART_InitStructure.USART_WordLength = USART_WordLength_8b;//字长为8位数据格式
	USART_InitStructure.USART_StopBits = USART_StopBits_1;//一个停止位
	USART_InitStructure.USART_Parity = USART_Parity_No;//无奇偶校验位
	USART_InitStructure.USART_HardwareFlowControl = USART_HardwareFlowControl_None;//无硬件数据流控制
	USART_InitStructure.USART_Mode = USART_Mode_Rx | USART_Mode_Tx;	//收发模式

  USART_Init(USART1, &USART_InitStructure); //初始化串口1
  USART_ITConfig(USART1, USART_IT_RXNE, ENABLE);//开启串口接受中断
  USART_Cmd(USART1, ENABLE);                    //使能串口1

}
u8 Res;
void USART1_IRQHandler(void)                	//串口1中断服务程序
	{

			if(USART_GetITStatus(USART1, USART_IT_RXNE) != RESET)  //接收中断(接收到的数据必须是0x0d 0x0a结尾)
			{
				Res =USART_ReceiveData(USART1);	//读取接收到的数据
				if(Res=='1')
				{
					LED0=!LED0;

				}
			}
		}
main.c的主代码
#include "led.h"
#include "delay.h"
#include "key.h"
#include "sys.h"
#include "usart.h"

int main(void)
 {
	delay_init();	    	 //延时函数初始化
	NVIC_PriorityGroupConfig(NVIC_PriorityGroup_2); //设置NVIC中断分组2:2位抢占优先级,2位响应优先级
	uart_init(115200);	 //串口初始化为115200
 	LED_Init();			     //LED端口初始化
	KEY_Init();          //初始化与按键连接的硬件接口
 	while(1)
	{
		USART_SendData(USART1,'f');
		delay_ms(500);
	}
 }
总结
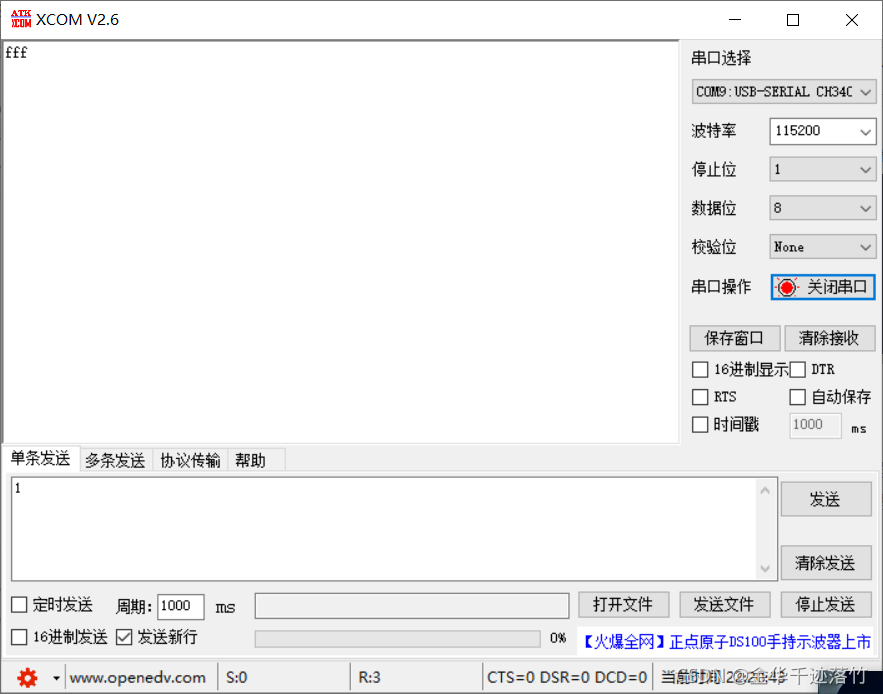
串口以后会经常用,所以这个必须得掌握,因为有时候用于调试用很方便,所以我们需要掌握,但是串口的工作原理有点不好理解,需要我们经常用,如果用UART2和用USART1有点不同,因为USART1挂载的时钟是APB2,而UART2是挂在APB1,下一篇讲解UART2的串口。先看一下实验结果吧。


最后是代码包:链接:https://pan.baidu.com/s/14zaqAw8ALNyrn6tSaJRGRQ
提取码:pohp