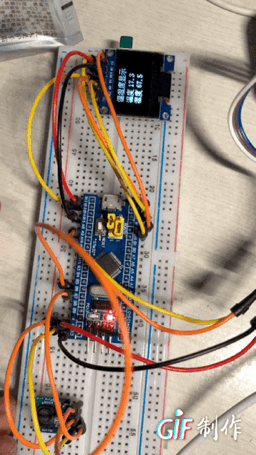
一、实现AHT20温湿度传感器的数据采集
参考上一次实验博客:https://blog.csdn.net/Liang55_55/article/details/121474894
二、主要代码
main函数
#include "delay.h"
#include "usart.h"
#include "bsp_i2c.h"
#include "sys.h"

#include "oled.h"
#include "gui.h"
#include "test.h"

int main(void)
{
	delay_init();	    	       //延时函数初始化
	uart_init(115200);
	IIC_Init();

	NVIC_Configuration(); 	   //设置NVIC中断分组2:2位抢占优先级,2位响应优先级
	OLED_Init();			         //初始化OLED
	OLED_Clear(0);
	while(1)
	{
		//printf("温度湿度显示");
		read_AHT20_once();
		OLED_Clear(0);
		delay_ms(1500);
  }
}
读取并显示温湿度代码
void read_AHT20(void)
{
	uint8_t   i;
	for(i=0; i<6; i++)
	{
		readByte[i]=0;
	}

	//-------------
	I2C_Start();

	I2C_WriteByte(0x71);
	ack_status = Receive_ACK();
	readByte[0]= I2C_ReadByte();
	Send_ACK();

	readByte[1]= I2C_ReadByte();
	Send_ACK();

	readByte[2]= I2C_ReadByte();
	Send_ACK();

	readByte[3]= I2C_ReadByte();
	Send_ACK();

	readByte[4]= I2C_ReadByte();
	Send_ACK();

	readByte[5]= I2C_ReadByte();
	SendNot_Ack();
	//Send_ACK();

	I2C_Stop();

	//--------------
	if( (readByte[0] & 0x68) == 0x08 )
	{
		H1 = readByte[1];
		H1 = (H1<<8) | readByte[2];
		H1 = (H1<<8) | readByte[3];
		H1 = H1>>4;

		H1 = (H1*1000)/1024/1024;

		T1 = readByte[3];
		T1 = T1 & 0x0000000F;
		T1 = (T1<<8) | readByte[4];
		T1 = (T1<<8) | readByte[5];

		T1 = (T1*2000)/1024/1024 - 500;

		AHT20_OutData[0] = (H1>>8) & 0x000000FF;
		AHT20_OutData[1] = H1 & 0x000000FF;

		AHT20_OutData[2] = (T1>>8) & 0x000000FF;
		AHT20_OutData[3] = T1 & 0x000000FF;
	}
	else
	{
		AHT20_OutData[0] = 0xFF;
		AHT20_OutData[1] = 0xFF;

		AHT20_OutData[2] = 0xFF;
		AHT20_OutData[3] = 0xFF;
		printf("lyy");

	}
	/*通过串口显示采集得到的温湿度
	printf("\r\n");
	printf("温度:%d%d.%d",T1/100,(T1/10)%10,T1%10);
	printf("湿度:%d%d.%d",H1/100,(H1/10)%10,H1%10);
	printf("\r\n");*/
	t=T1/10;
	t1=T1%10;
	a=(float)(t+t1*0.1);
	h=H1/10;
	h1=H1%10;
	b=(float)(h+h1*0.1);
	sprintf(strTemp,"%.1f",a);   //调用Sprintf函数把DHT11的温度数据格式化到字符串数组变量strTemp中
    sprintf(strHumi,"%.1f",b);    //调用Sprintf函数把DHT11的湿度数据格式化到字符串数组变量strHumi中
	GUI_ShowCHinese(16,00,16,"温湿度显示",1);
	GUI_ShowCHinese(16,20,16,"温度",1);
	GUI_ShowString(53,20,strTemp,16,1);
	GUI_ShowCHinese(16,38,16,"湿度",1);
	GUI_ShowString(53,38,strHumi,16,1);
	delay_ms(1500);
	delay_ms(1500);
}
三、硬件连接及实现效果
// OLED模块               STM32单片机
//   VCC         接       DC 5V/3.3V      //OLED屏电源正
//   GND         接          GND          //OLED屏电源地
//=======================================液晶屏数据线接线==========================================//
//本模块默认数据总线类型为4线制SPI
// OLED模块               STM32单片机
//   D1          接          PB15        //OLED屏SPI写信号
//=======================================液晶屏控制线接线==========================================//
// OLED模块               STM32单片机
//   CS          接          PB11        //OLED屏片选控制信号
//   RES         接          PB12        //OLED屏复位控制信号
//   DC          接          PB10        //OLED屏数据/命令选择控制信号
//   D0          接          PB13        //OLED屏SPI时钟信号
实现效果
将手放在温度传感器上,温度发生改变

四、总结
这次的实验过程并不难,主要将之前做过的采集温湿度数据添加一个显示模块。
五、参考
https://blog.csdn.net/m0_58414679/article/details/121417333?spm=1001.2014.3001.5501
https://blog.csdn.net/qq_43279579/article/details/111678857