前言
BabyOS 是一套代码框架,好比于乐高积木,提供一些功能模块,按照相对应的使用方法可以快速搭建自己的嵌入式系统。
那么我们说一下想把它移植到别的平台如何操作?
点灯作为第一个目标,那就是移植GPIO操作。
流程
想学习自带例程对应的方法,搞懂之后就移植到自己的目标平台;
自带历程STM32F107


#define GPIO_REG_OFF (0x400UL)
#define GPIO_REG_BASE (0x40010800UL)

typedef struct
{
    volatile uint32_t CRL;
    volatile uint32_t CRH;
    volatile uint32_t IDR;
    volatile uint32_t ODR;
    volatile uint32_t BSRR;
    volatile uint32_t BRR;
    volatile uint32_t LCKR;
} McuGpioReg_t;

static void _GpioConfig(bHalGPIOPort_t port, bHalGPIOPin_t pin, bHalGPIODir_t dir,
                        bHalGPIOPull_t pull)
{
    uint32_t      dir_val  = 4;
    uint32_t      pull_val = 0;
    McuGpioReg_t *pGpio    = (McuGpioReg_t *)(GPIO_REG_BASE + port * GPIO_REG_OFF);

    if (!B_HAL_GPIO_ISVALID(port, pin))
    {
        return;
    }

    if (dir == B_HAL_GPIO_OUTPUT)
    {
        dir_val = (pin == B_HAL_PINAll) ? 0x33333333 : 3;
    }
    else if (pull != B_HAL_GPIO_NOPULL)
    {
        dir_val  = (pin == B_HAL_PINAll) ? 0x88888888 : 8;
        pull_val = (pin == B_HAL_PINAll) ? 0xFFFF : (0X0001 << pin);

        if (pull == B_HAL_GPIO_PULLUP)
        {
            pGpio->BSRR = pull_val;
        }
        else
        {
            pGpio->BRR = pull_val;
        }
    }

    if (pin == B_HAL_PINAll)
    {
        pGpio->CRL = dir_val;
        pGpio->CRH = dir_val;
    }
    else
    {
        if (pin < B_HAL_PIN8)
        {
            pGpio->CRL &= ~(0x0000000F << (pin * 4));
            pGpio->CRL |= (dir_val << (pin * 4));
        }
        else
        {
            pGpio->CRH &= ~(0x0000000F << (pin * 4));
            pGpio->CRH |= (dir_val << (pin * 4));
        }
    }
}

static void _GpioWritePin(bHalGPIOPort_t port, bHalGPIOPin_t pin, uint8_t s)
{
    uint32_t      cs_val = 0x00000001 << pin;
    McuGpioReg_t *pGpio  = (McuGpioReg_t *)(GPIO_REG_BASE + port * GPIO_REG_OFF);
    if (!B_HAL_GPIO_ISVALID(port, pin) || pin == B_HAL_PINAll)
    {
        return;
    }
    if (s == 0)
    {
        cs_val <<= 16;
    }
    pGpio->BSRR = cs_val;
}

static uint8_t _GpioReadPin(bHalGPIOPort_t port, bHalGPIOPin_t pin)
{
    uint32_t      id_val = 0;
    McuGpioReg_t *pGpio  = (McuGpioReg_t *)(GPIO_REG_BASE + port * GPIO_REG_OFF);
    if (!B_HAL_GPIO_ISVALID(port, pin) || pin == B_HAL_PINAll)
    {
        return 0;
    }
    id_val = pGpio->IDR;
    return ((id_val & (0x0001 << pin)) != 0);
}

static void _GpioWrite(bHalGPIOPort_t port, uint16_t dat)
{
    McuGpioReg_t *pGpio = (McuGpioReg_t *)(GPIO_REG_BASE + port * GPIO_REG_OFF);
    if (!B_HAL_GPIO_ISVALID(port, 0))
    {
        return;
    }
    pGpio->ODR = dat;
}

static uint16_t _GpioRead(bHalGPIOPort_t port)
{
    uint32_t      id_val = 0;
    McuGpioReg_t *pGpio  = (McuGpioReg_t *)(GPIO_REG_BASE + port * GPIO_REG_OFF);
    if (!B_HAL_GPIO_ISVALID(port, 0))
    {
        return 0;
    }
    id_val = pGpio->IDR;
    return (id_val & 0xffff);
}

bHalGPIODriver_t bHalGPIODriver = {
    .pGpioConfig    = _GpioConfig,
    .pGpioWritePin  = _GpioWritePin,
    .pGpioWritePort = _GpioWrite,
    .pGpioReadPin   = _GpioReadPin,
    .pGpioReadPort  = _GpioRead,
};
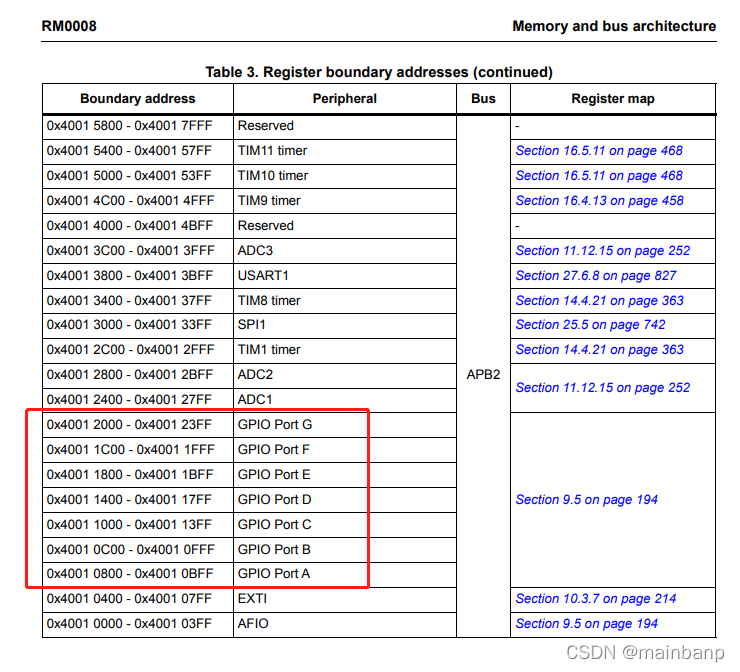
地址映射
首先看到的是GPIO对应的地址映射,那么我们找对应的数据手册查找GPIO寄存器地址映射为:
?#define GPIO_REG_OFF (0x400UL)? //GPIO A,B,C,D 之间的地址偏移量
#define GPIO_REG_BASE (0x40010800UL)? ?//GPIO 起始地址
控制寄存器

与之相对应的代码为:
static void _GpioConfig(bHalGPIOPort_t port, bHalGPIOPin_t pin, bHalGPIODir_t dir,
                        bHalGPIOPull_t pull)
{
    uint32_t      dir_val  = 4;
    uint32_t      pull_val = 0;
    McuGpioReg_t *pGpio    = (McuGpioReg_t *)(GPIO_REG_BASE + port * GPIO_REG_OFF);

    if (!B_HAL_GPIO_ISVALID(port, pin))
    {
        return;
    }

    if (dir == B_HAL_GPIO_OUTPUT)
    {
        dir_val = (pin == B_HAL_PINAll) ? 0x33333333 : 3;  //G OUT Push-pull 50mhz
    }
    else if (pull != B_HAL_GPIO_NOPULL)
    {
        // Input pull-down / pull-up
        dir_val  = (pin == B_HAL_PINAll) ? 0x88888888 : 8;
        pull_val = (pin == B_HAL_PINAll) ? 0xFFFF : (0X0001 << pin);  //SET BIT

        if (pull == B_HAL_GPIO_PULLUP)
        {
            pGpio->BSRR = pull_val;    // pull-up
        }
        else
        {
            pGpio->BRR = pull_val;    //pull-down
        }
    }

    if (pin == B_HAL_PINAll)
    {
        pGpio->CRL = dir_val;
        pGpio->CRH = dir_val;
    }
    else
    {
        if (pin < B_HAL_PIN8)
        {
            pGpio->CRL &= ~(0x0000000F << (pin * 4));
            pGpio->CRL |= (dir_val << (pin * 4));
        }
        else
        {
            pGpio->CRH &= ~(0x0000000F << (pin * 4));
            pGpio->CRH |= (dir_val << (pin * 4));
        }
    }
}
?可以看到主要是通过逻辑判断操做 CRL,CRH,BSRR,BRR寄存器;
更直观的表格

通过上面表格可以看到,dir_val 变量赋值给CRL,CRH,配置port 对应的16个pin;
IO为输出属性时,配置的固定为最大时钟50MHZ输出;
这里,作者在IO操作上进行了精简,输入,输出;浮空,上拉,下拉
typedef enum
{
    B_HAL_GPIO_INPUT,
    B_HAL_GPIO_OUTPUT,
    B_HAL_GPIO_DIR_INVALID,
} bHalGPIODir_t;

typedef enum
{
    B_HAL_GPIO_NOPULL,
    B_HAL_GPIO_PULLUP,
    B_HAL_GPIO_PULLDOWN,
    B_HAL_GPIO_PULL_INVALID,
} bHalGPIOPull_t;
?备注:需要注意的是,在输出上/下拉的时候与PxODR register 没关系,在输入上/下拉的时候会受到PxODR register 值影响,上面代码中,使用的实现是通过BSRR与BRR,并没有直接去操作ODR寄存器。
        if (pull == B_HAL_GPIO_PULLUP)
        {
            pGpio->BSRR = pull_val;
        }
        else
        {
            pGpio->BRR = pull_val;
        }