在stm32项目上移植protobuf
protobuf简介
protobuf是由Google开发的一套对数据结构进行序列化的方法,可用做通信协议,数据存储格式,等等。其特点是不限语言、不限平台、扩展性强,就像XML一样。与XML相比,protobuf更快更小。
和JSON打包数据的作用类似,可以理解成把这个类的所有数据加上帧头帧尾帧校验,然后通过串口,网络等通信格式将数据发送出去,这个过程称为序列化。解包就是把收到序列化的数据反序列化,然后把有效数据放入生成的类中。
在C++下用protobuf传递数据,要先写一个.proto文件,然后在系统环境下编译该文件,或者直接放在CMake里面编译,便可以生成出来一个类(.cpp 和 .h),利用protobuf打包便是打包这个类。
但是并不适合单片机,毕竟平台直接调用库就可以完成,单片机内存本身就比较珍贵,所以如果不是项目需要,我更喜欢字节流或者json。使用protobuf后实际增加内存消耗见下图。

nanopb简介
有聪明的人替我们想到了这个问题,这就是nanopb。nanopb是也是一个轻量的、支持C语言的Protobuf。
下载地址
https://jpa.kapsi.fi/nanopb/download/
下载windows版本(在windows平台更方便,如果你是其他平台自己下载,源码还需要自己重新编译,我没试过)

打开后进入nanopb-0.4.5-windows-x86\nanopb-0.4.5-windows-x86\examples\simple路径,simple例子是最简单的例程,可以根据自己需要修改。
使用的第一步就是先编写 proto文件,这里simple的例子已经给你准备好了。
proto文件是protobuf的核心,使用protoc.exe 工具,将prioto文件生成对应的.c .h文件,然后和
pb.h

pb_common.c

pb_common.h

pb_decode.c

pb_decode.h

pb_encode.c

pb_encode.h
这几个文件一起放到你的stm32工程里就可以了。simple.c文件就是调用这个模块的例程

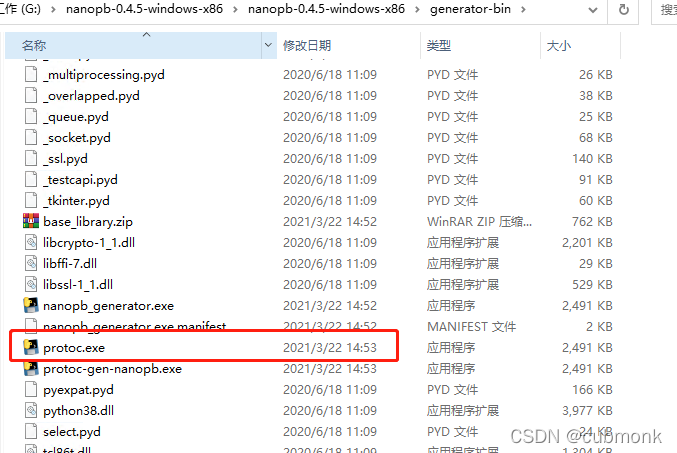
为了能在命令行中任何路径下使用protoc工具,我们需要把protoc.exe所在路径添加到环境变量中,我这里的路径为:
G:\nanopb-0.4.5-windows-x86\nanopb-0.4.5-windows-x86\generator-bin
把这个路径添加到环境变量中。
或者你可以使用绝对路径调用也可以。
我们重新编写一个自己的proto文件,命名为test_update.proto,这里先使用visual studio测试。

进入命令窗口使用protoc --nanopb_out=. test_update.proto

 这里就会生成对应的文件。将这两个文件和之前的 pb.h、pb_common.c、 pb_common.h、 pb_decode.c、 pb_decode.h、pb_encode.c、 pb_encode.h 一起添加到工程里就可以了。
打开 simple.c文件,这里有main函数接口,你可以根据自己需要修改
#include <stdio.h>
#include <pb_encode.h>
#include <pb_decode.h>
#include “test_update.pb.h”
int main()
{
/* This is the buffer where we will store our message. */
uint8_t buffer[128];
size_t message_length;
bool status;
/* Encode our message */
{
    /* Allocate space on the stack to store the message data.
     *
     * Nanopb generates simple struct definitions for all the messages.
     * - check out the contents of simple.pb.h!
     * It is a good idea to always initialize your structures
     * so that you do not have garbage data from RAM in there.
     */
    FirmwareParams message = FirmwareParams_init_zero;

    /* Create a stream that will write to our buffer. */
    pb_ostream_t stream = pb_ostream_from_buffer(buffer, sizeof(buffer));

    //{
    //    type:1//类型:1.发送固件升级通知
    //    size : 100//总大小
    //    version : 1.0//版本
    //    crc : B3EDC986//总包校验
    //}
    //这里初始化数据


    message.size = 100;
    message.type = 1;
    //memcpy((char*)&message.crc, "B3EDC986",sizeof("B3EDC986"));
    //memcpy((char*)&message.version, "1.0", sizeof("1.0"));
   // strcpy((char*)&message.crc, "B3EDC986");
    //strcpy((char*)&message.version, "1.0");
/* message.crc.arg = “B3EDC986”;
message.version.arg = “1.0”;/
/ Now we are ready to encode the message! */
status = pb_encode(&stream, FirmwareParams_fields, &message);
message_length = stream.bytes_written;
    /* Then just check for any errors.. */
    if (!status)
    {
        printf("Encoding failed: %s\n", PB_GET_ERROR(&stream));
        return 1;
    }
}

/* Now we could transmit the message over network, store it in a file or
 * wrap it to a pigeon's leg.
 */

/* But because we are lazy, we will just decode it immediately. */

{
    /* Allocate space for the decoded message. */
    FirmwareParams message_r = FirmwareParams_init_zero;

    /* Create a stream that reads from the buffer. */
    pb_istream_t stream_r = pb_istream_from_buffer(buffer, message_length);

    /* Now we are ready to decode the message. */
    status = pb_decode(&stream_r, FirmwareParams_fields, &message_r);

    /* Check for errors... */
    if (!status)
    {
        printf("Decoding failed: %s\n", PB_GET_ERROR(&stream_r));
        return 1;
    }

    /* Print the data contained in the message. */
    printf("size: %d  size: %d  crc:    %s  version:   %s \n", (int)message_r.size, (int)message_r.type, message_r.crc.arg,message_r.version.arg);
}

return 0;
}
这样测试的话,我们的数据就可以重新解码出来。
这里有个问题就是string类型。在protobuf里,有现成的回调函数可以直接设置,但是nanopb需要自己编写
参考别的博主,具体如下
/**
 编码的回调函数
 **/
bool write_string(pb_ostream_t * stream, const pb_field_t * field, void* const* arg)
{
    char* str = *arg;
    if (!pb_encode_tag_for_field(stream, field))
        return false;

    return pb_encode_string(stream, (uint8_t*)str, strlen(str));
}

/**
 解码回调函数
 **/
bool read_ints(pb_istream_t* stream, const pb_field_t* field, void** arg)
{
    int i = 0;
    char* tmp = *arg;
    while (stream->bytes_left)
    {
        uint64_t value;
        if (!pb_decode_varint(stream, &value))
            return false;
        *(tmp + i) = value;
        i++;
    }
    return true;
}
编码时传入指针和回调函数
        message.crc.funcs.encode = write_string;
        message.crc.arg = &"B3EDC986";

        message.version.funcs.encode = write_string;
        message.version.arg = &"1.0";
解码时传入地址和回调函数
        message_r.crc.funcs.decode = read_ints;
        char tmp[1024] = { 0 };
        message_r.crc.arg = &tmp;

        message_r.version.funcs.decode = read_ints;
        char tmp2[1024] = { 0 };
        message_r.version.arg = &tmp2;
这里需要注意的是,在传输过程中,接收方和发送方应该约定好每个包的大小,方便存储。
例子补充
假如你收到这么一串数据,只告诉你类型是
syntax = “proto3”;
message FirmwareParams {
int32 type = 1;
int32 size= 2;
string version = 3;
string crc = 4;
}
数据流是
{0x8,0x1,0x10,0xe8,0x98,0x4,0x1a,0x3,0x32,0x2e,0x30,0x22,0x8,0x33,0x39,0x45,0x41,0x37,0x37,0x33,0x39};
经过以上解码,可以解出

我的源码
https://download.csdn.net/download/cubmonk/78256589
参考博文
https://blog.csdn.net/shangsongwww/article/details/101066274