UCOSIII-移植
源码下载
本文参考自正点原子视频以及笔记
在官方下载源码
UCOSIII官网

解压后打开官方基于STM32F107移植好的源码

移植
基础工程
- 创建好准备移植的STM32基础工程

- 在工程“UCOSIII移植”中新建文件夹"UCOSIII"用于存放UCOSIII有关源码 从官方拷贝的文件源码全都放于此文件夹下
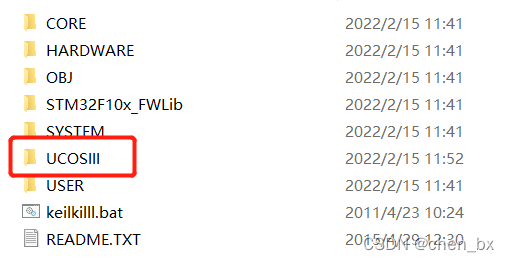
-
将官方移植好的以下三个文件夹路径为
UCOSIII官方STM32F107移植\Micrium\Software复制到我们的工程中UCOSIII目录下路径为UCOSIII移植\UCOSIII

-
工程文件UCOSIII目录下新建UCOS-BSP以及UCOS-CONFIG文件夹

向BSP、CONFIG文件夹添加文件
CONFIG文件夹
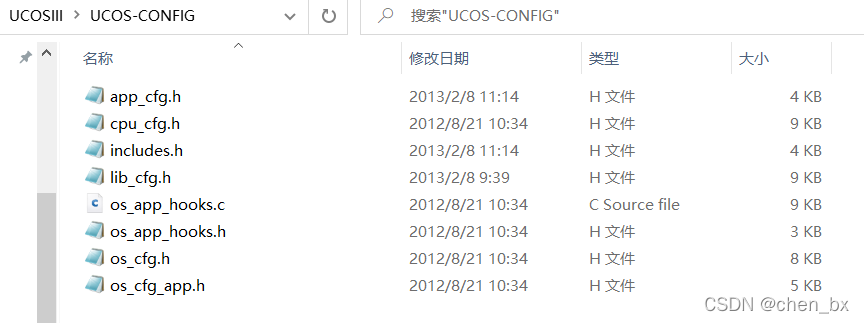
将官方移植源码中 路径为UCOSIII官方STM32F107移植\Micrium\Software\EvalBoards\Micrium\uC-Eval-STM32F107\uCOS-III的以下文件拷贝至我们工程UCOSIII目录下UCOS-CONFIG文件夹中路径为UCOSIII移植\UCOSIII\UCOS-CONFIG

UCOS-CONFIG文件夹添加文件后目录如下
BSP文件夹
将官方移植源码中 路径为UCOSIII官方STM32F107移植\Micrium\Software\EvalBoards\Micrium\uC-Eval-STM32F107\BSP的以下文件拷贝至我们工程UCOSIII目录下UCOS-BSP文件夹中路径为UCOSIII移植\UCOSIII\UCOS-BSP

UCOS-BSP文件夹添加文件后目录如下

工程中添加
- 在keil中添加分组
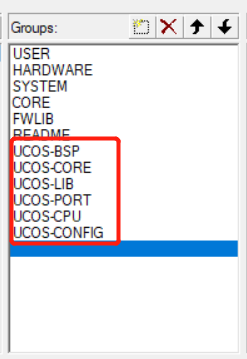
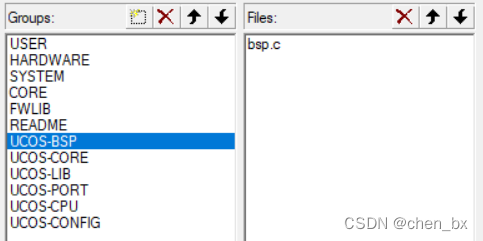
- UCOS-BSP 分组路径为
UCOSIII移植\UCOS-BSP
-
UCOS-CPU 分组路径为
UCOSIII移植\UCOSIII\uC-CPU
使用keil cpu_c.c应选择路径为UCOSIII移植\UCOSIII\uC-CPU\ARM-Cortex-M3\RealView中的cpu_c.c

-
UCOS-LIB 分组路径为
UCOSIII移植\UCOSIII\uC-LIB
使用keil lib_mem_a.asm应选择路径为UCOSIII移植\UCOSIII\uC-CPU\ARM-Cortex-M3\RealView中的lib_mem_a.asm

-
UCOS-PORT 分组路径为
UCOSIII移植\UCOSIII\uCOS-III\Ports
使用keil 选择路径UCOSIII移植\UCOSIII\uCOS-III\Ports\ARM-Cortex-M3\Generic\RealView

-
UCOS-CONFIG 分组路径为
UCOSIII移植\UCOSIII\UCOS-CONFIG

-
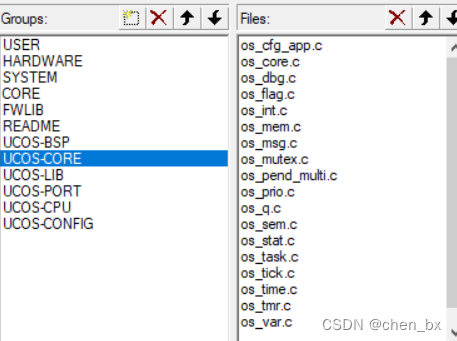
UCOS-CORE 分组路径为
UCOSIII移植\UCOSIII\uCOS-III\Source
魔术棒添加宏

修改文件权限
工程中文件带锁,只有只读的权限

修改文件权限将UCOSIII文件夹右键属性修改

修改bsp.c 、bsp.h 文件
bsp.c、bsp.h使用的是正点原子移植例程中已经修改好的bsp.c、bsp.h文件 将其替换掉工程中的bsp.c、bsp.h文件

编译后无警告错误,至此移植暂为成功,语法上没有错误

修改os_cpu_a.asm文件
使用的是正点原子移植例程中已经修改好的os_cpu_a.asm文件 代码如下 将其拷贝覆盖os_cpu_a.asm文件
;
;********************************************************************************************************
;                                                uC/OS-III
;                                          The Real-Time Kernel
;
;
;                           (c) Copyright 2009-2010; Micrium, Inc.; Weston, FL
;                    All rights reserved.  Protected by international copyright laws.
;
;                                           ARM Cortex-M3 Port
;
; File      : OS_CPU_A.ASM
; Version   : V3.01.2
; By        : JJL
;             BAN
;
; For       : ARMv7M Cortex-M3
; Mode      : Thumb2
; Toolchain : RealView Development Suite
;             RealView Microcontroller Development Kit (MDK)
;             ARM Developer Suite (ADS)
;             Keil uVision
;********************************************************************************************************
;

;********************************************************************************************************
;                                          PUBLIC FUNCTIONS
;********************************************************************************************************

    IMPORT  OSRunning                                           ; External references
    IMPORT  OSPrioCur
    IMPORT  OSPrioHighRdy
    IMPORT  OSTCBCurPtr
    IMPORT  OSTCBHighRdyPtr
    IMPORT  OSIntExit
    IMPORT  OSTaskSwHook
    IMPORT  OS_CPU_ExceptStkBase


    EXPORT  OSStartHighRdy                                      ; Functions declared in this file
    EXPORT  OS_CPU_PendSVHandler

;PAGE
;********************************************************************************************************
;                                               EQUATES
;********************************************************************************************************

NVIC_INT_CTRL   EQU     0xE000ED04                              ; Interrupt control state register.
NVIC_SYSPRI14   EQU     0xE000ED22                              ; System priority register (priority 14).
NVIC_PENDSV_PRI EQU           0xFF                              ; PendSV priority value (lowest).
NVIC_PENDSVSET  EQU     0x10000000                              ; Value to trigger PendSV exception.


;********************************************************************************************************
;                                     CODE GENERATION DIRECTIVES
;********************************************************************************************************

    PRESERVE8
    THUMB

    AREA CODE, CODE, READONLY


;PAGE
;********************************************************************************************************
;                                         START MULTITASKING
;                                      void OSStartHighRdy(void)
;
; Note(s) : 1) This function triggers a PendSV exception (essentially, causes a context switch) to cause
;              the first task to start.
;
;           2) OSStartHighRdy() MUST:
;              a) Setup PendSV exception priority to lowest;
;              b) Set initial PSP to 0, to tell context switcher this is first run;
;              c) Set the main stack to OS_CPU_ExceptStkBase
;              d) Trigger PendSV exception;
;              e) Enable interrupts (tasks will run with interrupts enabled).
;********************************************************************************************************

OSStartHighRdy
    LDR     R0, =NVIC_SYSPRI14                                  ; Set the PendSV exception priority
    LDR     R1, =NVIC_PENDSV_PRI
    STRB    R1, [R0]

    MOVS    R0, #0                                              ; Set the PSP to 0 for initial context switch call
    MSR     PSP, R0

    LDR     R0, =OS_CPU_ExceptStkBase                           ; Initialize the MSP to the OS_CPU_ExceptStkBase
    LDR     R1, [R0]
    MSR     MSP, R1

    LDR     R0, =NVIC_INT_CTRL                                  ; Trigger the PendSV exception (causes context switch)
    LDR     R1, =NVIC_PENDSVSET
    STR     R1, [R0]

    CPSIE   I                                                   ; Enable interrupts at processor level

OSStartHang
    B       OSStartHang                                         ; Should never get here


;PAGE
;********************************************************************************************************
;                                       HANDLE PendSV EXCEPTION
;                                   void OS_CPU_PendSVHandler(void)
;
; Note(s) : 1) PendSV is used to cause a context switch.  This is a recommended method for performing
;              context switches with Cortex-M3.  This is because the Cortex-M3 auto-saves half of the
;              processor context on any exception, and restores same on return from exception.  So only
;              saving of R4-R11 is required and fixing up the stack pointers.  Using the PendSV exception
;              this way means that context saving and restoring is identical whether it is initiated from
;              a thread or occurs due to an interrupt or exception.
;
;           2) Pseudo-code is:
;              a) Get the process SP, if 0 then skip (goto d) the saving part (first context switch);
;              b) Save remaining regs r4-r11 on process stack;
;              c) Save the process SP in its TCB, OSTCBCurPtr->OSTCBStkPtr = SP;
;              d) Call OSTaskSwHook();
;              e) Get current high priority, OSPrioCur = OSPrioHighRdy;
;              f) Get current ready thread TCB, OSTCBCurPtr = OSTCBHighRdyPtr;
;              g) Get new process SP from TCB, SP = OSTCBHighRdyPtr->OSTCBStkPtr;
;              h) Restore R4-R11 from new process stack;
;              i) Perform exception return which will restore remaining context.
;
;           3) On entry into PendSV handler:
;              a) The following have been saved on the process stack (by processor):
;                 xPSR, PC, LR, R12, R0-R3
;              b) Processor mode is switched to Handler mode (from Thread mode)
;              c) Stack is Main stack (switched from Process stack)
;              d) OSTCBCurPtr      points to the OS_TCB of the task to suspend
;                 OSTCBHighRdyPtr  points to the OS_TCB of the task to resume
;
;           4) Since PendSV is set to lowest priority in the system (by OSStartHighRdy() above), we
;              know that it will only be run when no other exception or interrupt is active, and
;              therefore safe to assume that context being switched out was using the process stack (PSP).
;********************************************************************************************************

OS_CPU_PendSVHandler
    CPSID   I                                                   ; Prevent interruption during context switch
    MRS     R0, PSP                                             ; PSP is process stack pointer
    CBZ     R0, OS_CPU_PendSVHandler_nosave                     ; Skip register save the first time

    SUBS    R0, R0, #0x20                                       ; Save remaining regs r4-11 on process stack
    STM     R0, {R4-R11}

    LDR     R1, =OSTCBCurPtr                                    ; OSTCBCurPtr->OSTCBStkPtr = SP;
    LDR     R1, [R1]
    STR     R0, [R1]                                            ; R0 is SP of process being switched out

                                                                ; At this point, entire context of process has been saved
OS_CPU_PendSVHandler_nosave
    PUSH    {R14}                                               ; Save LR exc_return value
    LDR     R0, =OSTaskSwHook                                   ; OSTaskSwHook();
    BLX     R0
    POP     {R14}

    LDR     R0, =OSPrioCur                                      ; OSPrioCur   = OSPrioHighRdy;
    LDR     R1, =OSPrioHighRdy
    LDRB    R2, [R1]
    STRB    R2, [R0]

    LDR     R0, =OSTCBCurPtr                                    ; OSTCBCurPtr = OSTCBHighRdyPtr;
    LDR     R1, =OSTCBHighRdyPtr
    LDR     R2, [R1]
    STR     R2, [R0]

    LDR     R0, [R2]                                            ; R0 is new process SP; SP = OSTCBHighRdyPtr->StkPtr;
    LDM     R0, {R4-R11}                                        ; Restore r4-11 from new process stack
    ADDS    R0, R0, #0x20
    MSR     PSP, R0                                             ; Load PSP with new process SP
    ORR     LR, LR, #0x04                                       ; Ensure exception return uses process stack
    CPSIE   I
    BX      LR                                                  ; Exception return will restore remaining context

    END
修改编译会出现错误

在文件stm32f10x_it.c文件中将PendSV_Handler()函数和SysTick_Handler(void)函数注释
//void PendSV_Handler(void)
//{
//}
//void SysTick_Handler(void)
//{
//}
修改os_cpu_c.c文件
添加 include “includes.h”

编译后

在includes.h中的stm32f10x_lib.h注释掉

修改os_cfg_app.h文件
使用的是正点原子移植例程中已经修改好的os_cfg_app.h文件 代码如下 将其拷贝覆盖os_cfg_app.h文件
/*
************************************************************************************************************************
*                                                      uC/OS-III
*                                                 The Real-Time Kernel
*
*                                  (c) Copyright 2009-2012; Micrium, Inc.; Weston, FL
*                           All rights reserved.  Protected by international copyright laws.
*
*                                       OS CONFIGURATION (APPLICATION SPECIFICS)
*
* File    : OS_CFG_APP.H
* By      : JJL
* Version : V3.03.01
*
* LICENSING TERMS:
* ---------------
*           uC/OS-III is provided in source form for FREE short-term evaluation, for educational use or
*           for peaceful research.  If you plan or intend to use uC/OS-III in a commercial application/
*           product then, you need to contact Micrium to properly license uC/OS-III for its use in your
*           application/product.   We provide ALL the source code for your convenience and to help you
*           experience uC/OS-III.  The fact that the source is provided does NOT mean that you can use
*           it commercially without paying a licensing fee.
*
*           Knowledge of the source code may NOT be used to develop a similar product.
*
*           Please help us continue to provide the embedded community with the finest software available.
*           Your honesty is greatly appreciated.
*
*           You can contact us at www.micrium.com, or by phone at +1 (954) 217-2036.
************************************************************************************************************************
*/

#ifndef OS_CFG_APP_H
#define OS_CFG_APP_H

/*
************************************************************************************************************************
*                                                      CONSTANTS
************************************************************************************************************************
*/

                                                            /* --------------------- MISCELLANEOUS ------------------ */
#define  OS_CFG_MSG_POOL_SIZE            100u               /* Maximum number of messages                             */
#define  OS_CFG_ISR_STK_SIZE             128u               /* Stack size of ISR stack (number of CPU_STK elements)   */
#define  OS_CFG_TASK_STK_LIMIT_PCT_EMPTY  10u               /* Stack limit position in percentage to empty            */


                                                            /* ---------------------- IDLE TASK --------------------- */
#define  OS_CFG_IDLE_TASK_STK_SIZE       128u               /* Stack size (number of CPU_STK elements)                */


                                                            /* ------------------ ISR HANDLER TASK ------------------ */
#define  OS_CFG_INT_Q_SIZE                10u               /* Size of ISR handler task queue                         */
#define  OS_CFG_INT_Q_TASK_STK_SIZE      128u               /* Stack size (number of CPU_STK elements)                */

                                                            /* ------------------- STATISTIC TASK ------------------- */
#define  OS_CFG_STAT_TASK_PRIO  	(OS_CFG_PRIO_MAX-2u)   	/* Priority 统计任务优先级                                 */
#define  OS_CFG_STAT_TASK_RATE_HZ         10u               /* Rate of execution (1 to 10 Hz)                         */
#define  OS_CFG_STAT_TASK_STK_SIZE       128u               /* Stack size (number of CPU_STK elements)                */


                                                            /* ------------------------ TICKS ----------------------- */
#define  OS_CFG_TICK_RATE_HZ            200u               /* Tick rate in Hertz (10 to 1000 Hz)                     */
#define  OS_CFG_TICK_TASK_PRIO             1u               /* Priority 时钟节拍任务,一般设置一个相对较高的优先级      */
#define  OS_CFG_TICK_TASK_STK_SIZE       128u               /* Stack size (number of CPU_STK elements)                */
#define  OS_CFG_TICK_WHEEL_SIZE           17u               /* Number of 'spokes' in tick  wheel; SHOULD be prime     */


                                                            /* ----------------------- TIMERS ----------------------- */
#define  OS_CFG_TMR_TASK_PRIO              2u               /* Priority of 'Timer Task' 定时任务优先级				  */
#define  OS_CFG_TMR_TASK_RATE_HZ         100u               /* Rate for timers (100 Hz Typ.)                          */
#define  OS_CFG_TMR_TASK_STK_SIZE        128u               /* Stack size (number of CPU_STK elements)                */
#define  OS_CFG_TMR_WHEEL_SIZE            17u               /* Number of 'spokes' in timer wheel; SHOULD be prime     */

#endif
修改sys.h文件
将 SYSTEM_SUPPORT_OS宏定义设置为1

测试
使用正点原子main函数进行测试

#include "led.h"
#include "delay.h"
#include "sys.h"
#include "usart.h"
#include "includes.h"


//任务优先级
#define START_TASK_PRIO		3
//任务堆栈大小
#define START_STK_SIZE 		512
//任务控制块
OS_TCB StartTaskTCB;
//任务堆栈
CPU_STK START_TASK_STK[START_STK_SIZE];
//任务函数
void start_task(void *p_arg);

//任务优先级
#define LED0_TASK_PRIO		4
//任务堆栈大小
#define LED0_STK_SIZE 		128
//任务控制块
OS_TCB Led0TaskTCB;
//任务堆栈
CPU_STK LED0_TASK_STK[LED0_STK_SIZE];
void led0_task(void *p_arg);

//任务优先级
#define LED1_TASK_PRIO		5
//任务堆栈大小
#define LED1_STK_SIZE 		128
//任务控制块
OS_TCB Led1TaskTCB;
//任务堆栈
CPU_STK LED1_TASK_STK[LED1_STK_SIZE];
//任务函数
void led1_task(void *p_arg);

//任务优先级
#define FLOAT_TASK_PRIO		6
//任务堆栈大小
#define FLOAT_STK_SIZE		128
//任务控制块
OS_TCB	FloatTaskTCB;
//任务堆栈
__align(8) CPU_STK	FLOAT_TASK_STK[FLOAT_STK_SIZE];
//任务函数
void float_task(void *p_arg);

int main(void)
{
	OS_ERR err;
	CPU_SR_ALLOC();

	delay_init();       //延时初始化
	NVIC_PriorityGroupConfig(NVIC_PriorityGroup_2); //中断分组配置
	uart_init(115200);    //串口波特率设置
	LED_Init();         //LED初始化

	OSInit(&err);		//初始化UCOSIII
	OS_CRITICAL_ENTER();//进入临界区
	//创建开始任务
	OSTaskCreate((OS_TCB 	* )&StartTaskTCB,		//任务控制块
				 (CPU_CHAR	* )"start task", 		//任务名字
                 (OS_TASK_PTR )start_task, 			//任务函数
                 (void		* )0,					//传递给任务函数的参数
                 (OS_PRIO	  )START_TASK_PRIO,     //任务优先级
                 (CPU_STK   * )&START_TASK_STK[0],	//任务堆栈基地址
                 (CPU_STK_SIZE)START_STK_SIZE/10,	//任务堆栈深度限位
                 (CPU_STK_SIZE)START_STK_SIZE,		//任务堆栈大小
                 (OS_MSG_QTY  )0,					//任务内部消息队列能够接收的最大消息数目,为0时禁止接收消息
                 (OS_TICK	  )0,					//当使能时间片轮转时的时间片长度,为0时为默认长度,
                 (void   	* )0,					//用户补充的存储区
                 (OS_OPT      )OS_OPT_TASK_STK_CHK|OS_OPT_TASK_STK_CLR, //任务选项
                 (OS_ERR 	* )&err);				//存放该函数错误时的返回值
	OS_CRITICAL_EXIT();	//退出临界区
	OSStart(&err);  //开启UCOSIII
	while(1);
}

//开始任务函数
void start_task(void *p_arg)
{
	OS_ERR err;
	CPU_SR_ALLOC();
	p_arg = p_arg;

	CPU_Init();
#if OS_CFG_STAT_TASK_EN > 0u
   OSStatTaskCPUUsageInit(&err);  	//统计任务
#endif

#ifdef CPU_CFG_INT_DIS_MEAS_EN		//如果使能了测量中断关闭时间
    CPU_IntDisMeasMaxCurReset();
#endif

#if	OS_CFG_SCHED_ROUND_ROBIN_EN  //当使用时间片轮转的时候
	 //使能时间片轮转调度功能,时间片长度为1个系统时钟节拍,既1*5=5ms
	OSSchedRoundRobinCfg(DEF_ENABLED,1,&err);
#endif

	OS_CRITICAL_ENTER();	//进入临界区
	//创建LED0任务
	OSTaskCreate((OS_TCB 	* )&Led0TaskTCB,
				 (CPU_CHAR	* )"led0 task",
                 (OS_TASK_PTR )led0_task,
                 (void		* )0,
                 (OS_PRIO	  )LED0_TASK_PRIO,
                 (CPU_STK   * )&LED0_TASK_STK[0],
                 (CPU_STK_SIZE)LED0_STK_SIZE/10,
                 (CPU_STK_SIZE)LED0_STK_SIZE,
                 (OS_MSG_QTY  )0,
                 (OS_TICK	  )0,
                 (void   	* )0,
                 (OS_OPT      )OS_OPT_TASK_STK_CHK|OS_OPT_TASK_STK_CLR,
                 (OS_ERR 	* )&err);

	//创建LED1任务
	OSTaskCreate((OS_TCB 	* )&Led1TaskTCB,
				 (CPU_CHAR	* )"led1 task",
                 (OS_TASK_PTR )led1_task,
                 (void		* )0,
                 (OS_PRIO	  )LED1_TASK_PRIO,
                 (CPU_STK   * )&LED1_TASK_STK[0],
                 (CPU_STK_SIZE)LED1_STK_SIZE/10,
                 (CPU_STK_SIZE)LED1_STK_SIZE,
                 (OS_MSG_QTY  )0,
                 (OS_TICK	  )0,
                 (void   	* )0,
                 (OS_OPT      )OS_OPT_TASK_STK_CHK|OS_OPT_TASK_STK_CLR,
                 (OS_ERR 	* )&err);

	//创建浮点测试任务
	OSTaskCreate((OS_TCB 	* )&FloatTaskTCB,
				 (CPU_CHAR	* )"float test task",
                 (OS_TASK_PTR )float_task,
                 (void		* )0,
                 (OS_PRIO	  )FLOAT_TASK_PRIO,
                 (CPU_STK   * )&FLOAT_TASK_STK[0],
                 (CPU_STK_SIZE)FLOAT_STK_SIZE/10,
                 (CPU_STK_SIZE)FLOAT_STK_SIZE,
                 (OS_MSG_QTY  )0,
                 (OS_TICK	  )0,
                 (void   	* )0,
                 (OS_OPT      )OS_OPT_TASK_STK_CHK|OS_OPT_TASK_STK_CLR,
                 (OS_ERR 	* )&err);
	OS_TaskSuspend((OS_TCB*)&StartTaskTCB,&err);		//挂起开始任务
	OS_CRITICAL_EXIT();	//进入临界区
}

//led0任务函数
void led0_task(void *p_arg)
{
	OS_ERR err;
	p_arg = p_arg;
	while(1)
	{
		LED0=0;
		OSTimeDlyHMSM(0,0,0,200,OS_OPT_TIME_HMSM_STRICT,&err); //延时200ms
		LED0=1;
		OSTimeDlyHMSM(0,0,0,500,OS_OPT_TIME_HMSM_STRICT,&err); //延时500ms
	}
}

//led1任务函数
void led1_task(void *p_arg)
{
	OS_ERR err;
	p_arg = p_arg;
	while(1)
	{
		LED1=~LED1;
		OSTimeDlyHMSM(0,0,0,500,OS_OPT_TIME_HMSM_STRICT,&err); //延时500ms
	}
}

//浮点测试任务
void float_task(void *p_arg)
{
	CPU_SR_ALLOC();
	static float float_num=0.01;
	while(1)
	{
		float_num+=0.01f;
		OS_CRITICAL_ENTER();	//进入临界区
		printf("float_num的值为: %.4f\r\n",float_num);
		OS_CRITICAL_EXIT();		//退出临界区
		delay_ms(500);			//延时500ms
	}
}
运行结果
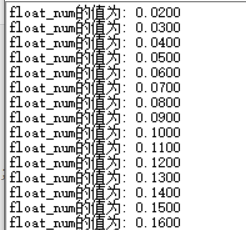
绿灯红灯交替闪烁
证明UCOSIII移植成功,可在工程中编写添加自己的代码