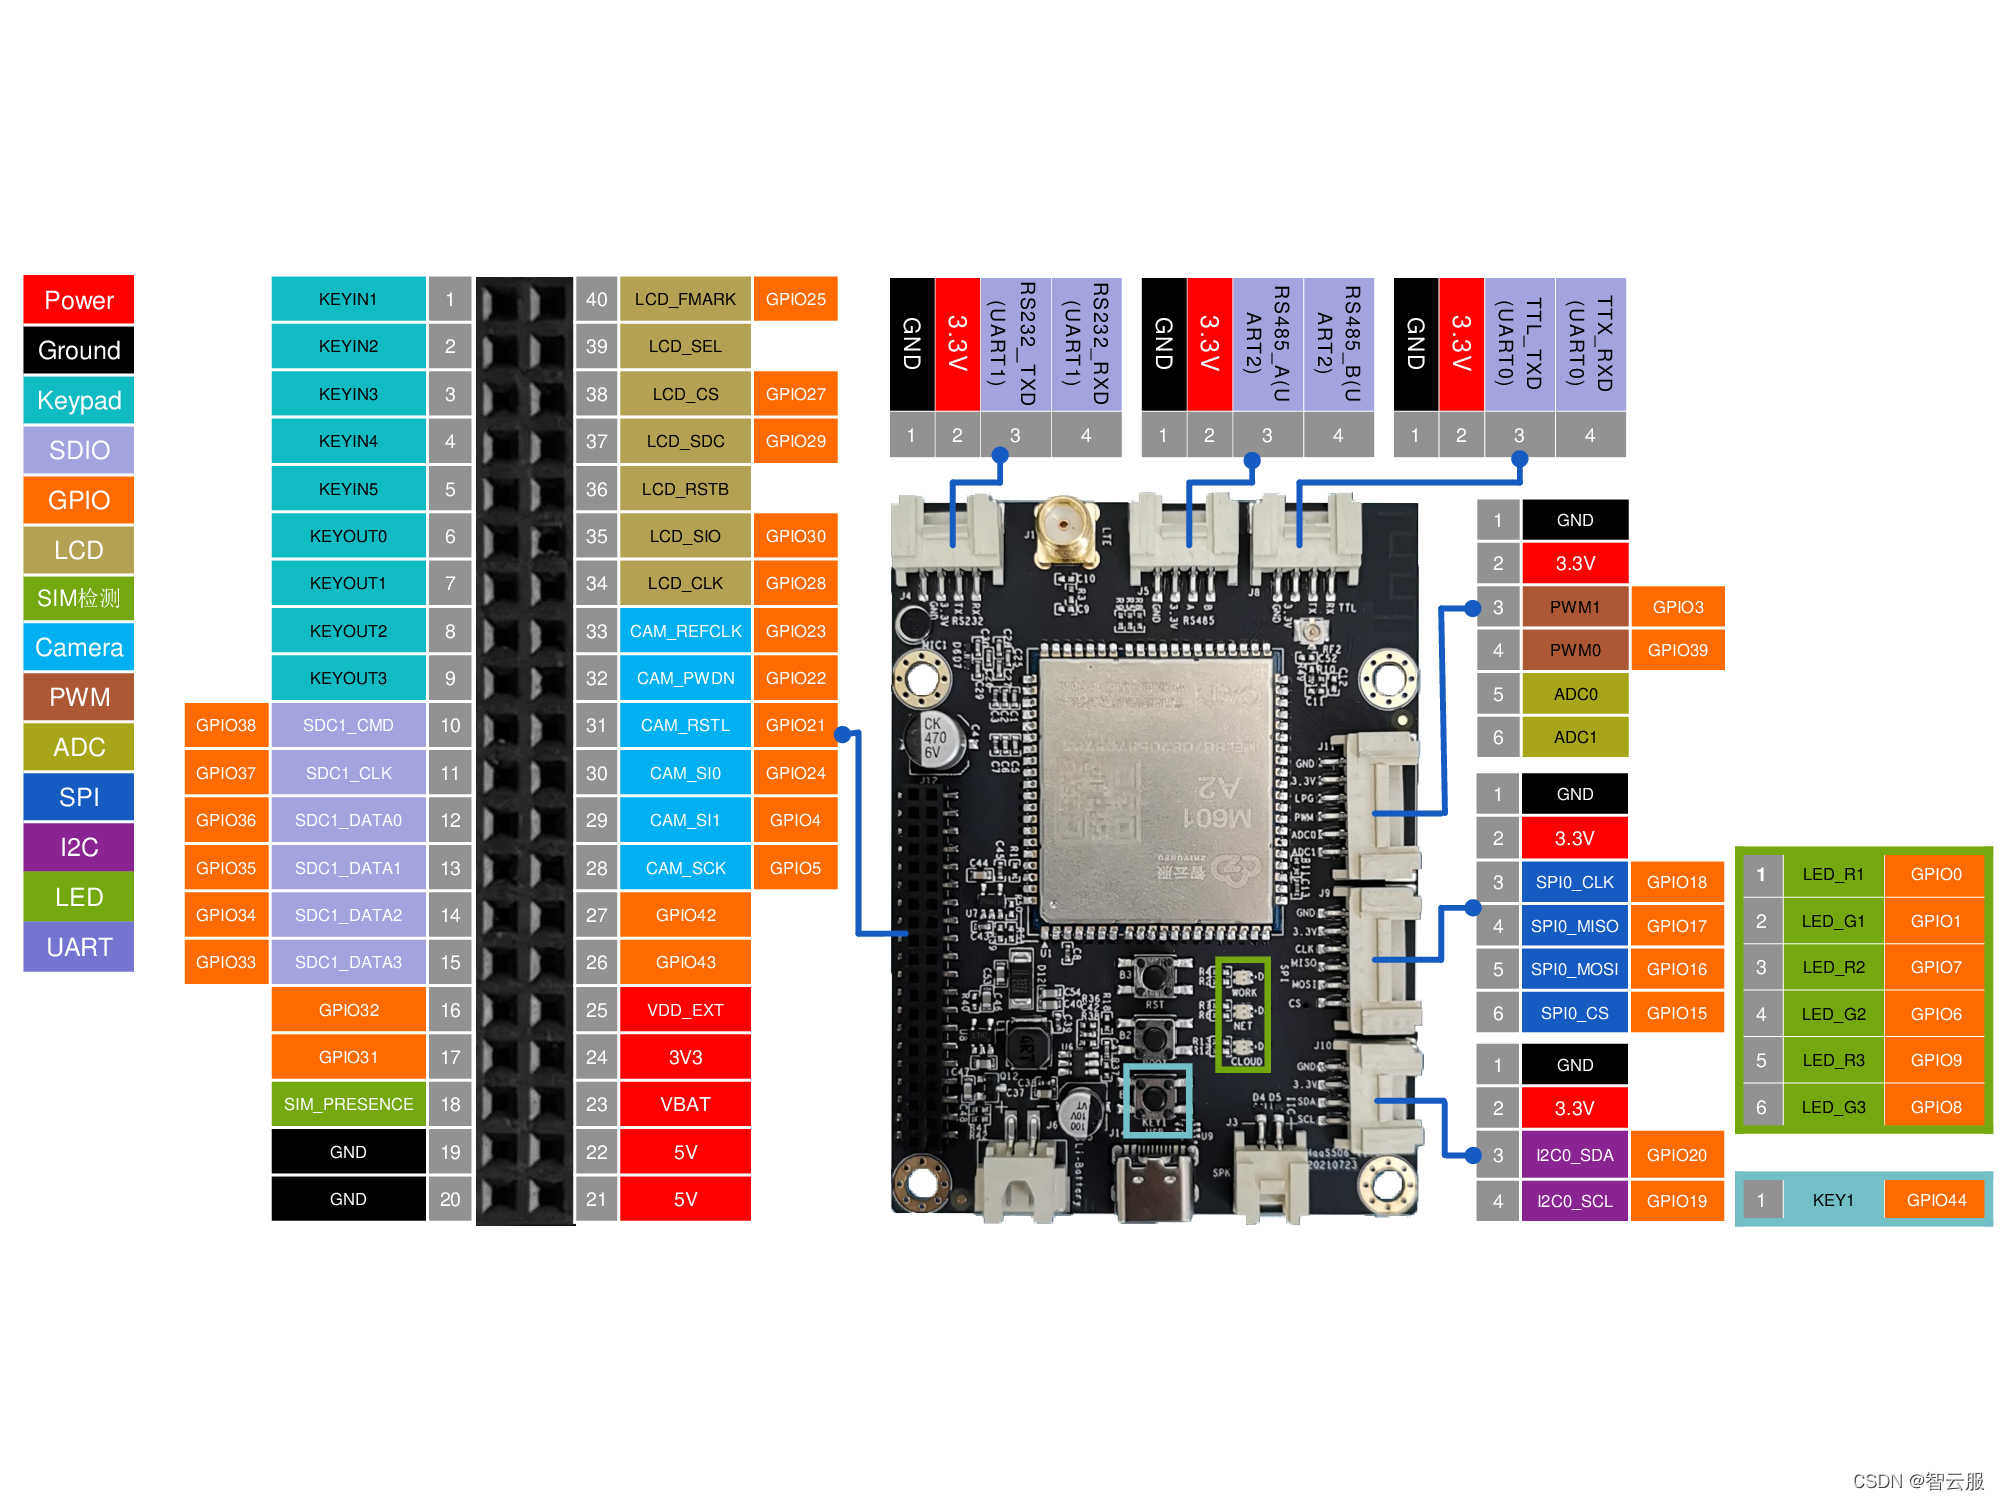
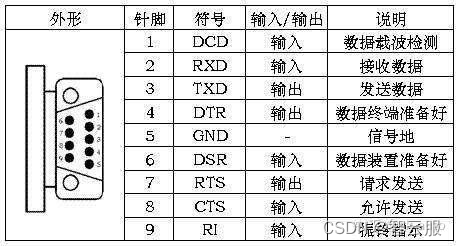
1.硬件图

2.案例
- haas506上有三种UART串口,分别支持TTL、RS-232、RS-485 。
- 下面案例分别检测三种串口的输出。main.py与board.json程序只更改了调用端口。
- 烧录程序时全部默认使用TTL。检测时需要跟换串口连线。

1.TTL
(1)案例说明
- 使用TTL进行数据的发送和读取。由于默认使用TTL作为repl口,所以使用TTL进行数据的发送和接收需要在board.json中进行设置,即将repl口重定向到其他串口上,如RS232。
- 连线如下,电源线不接
| RX | TX | GND |
|---|---|---|
| XT | RX | GND |

(2)main.py
# coding=utf-8
# This is a sample Python script.
import utime
from driver import UART
#串口实例化
uart0=UART()
uart0.open("serial1")
while True:
    #创建一个readBuf字节数组,用于存放串口读取到的数据
    readBuf=bytearray(4)
    #串口读
    readSize=uart0.read(readBuf)
    # #创建一个writeBuf字节数组,将读取到的readBuf中的数据赋值给writeBuf
    # writeBuf0=bytearray(4)
    # writeBuf0[0]=readBuf[0]
    # writeBuf0[1]=readBuf[1]
    # writeBuf0[2]=readBuf[2]
    # writeBuf0[3]=readBuf[3]
    # #打印串口读取到的数据
    # uart0.write(writeBuf0)
    uart0.write(readBuf)
    utime.sleep_ms(1000)
(3)board.json
{
    "name": "haas506",
   "version": "1.0.0",
   "io": {
     "serial1":{
       "type":"UART",
       "port":0,
       "dataWidth":8,
       "baudRate":115200,
       "stopBits":1,
       "flowControl":"disable",
       "parity":"none"
     },
     "serial2":{
       "type":"UART",
       "port":1,
       "dataWidth":8,
       "baudRate":115200,
       "stopBits":1,
       "flowControl":"disable",
       "parity":"none"
     },
     "serial3":{
       "type":"UART",
       "port":2,
       "dataWidth":8,
       "baudRate":115200,
       "stopBits":1,
       "flowControl":"disable",
       "parity":"none"
     }
   },
   "debugLevel": "ERROR",
   "repl":"enable",
   "replPort":1
   }
(4)效果图
当没有数据输入默认接收\0\0\0\0,可以尝试发送不同长度字符串

2.RS232
(1)案例说明
- 使用TTL烧录,使用RS232进行数据的发送和读取。
(2)main.py
# coding=utf-8
# This is a sample Python script.
# coding=utf-8
# This is a sample Python script.
import utime
from driver import UART
#串口实例化
uart1=UART()
uart1.open("serial2")
while True:
    #创建一个readBuf字节数组,用于存放串口读取到的数据
    readBuf=bytearray(4)
    #串口读
    readSize=uart1.read(readBuf)
    # #创建一个writeBuf字节数组,将读取到的readBuf中的数据赋值给writeBuf
    # writeBuf1=bytearray(4)
    # writeBuf1[0]=readBuf[0]
    # writeBuf1[1]=readBuf[1]
    # writeBuf1[2]=readBuf[2]
    # writeBuf1[3]=readBuf[3]
    # #打印串口读取到的数据
    # uart1.write(writeBuf1)
    uart1.write(readBuf)
    utime.sleep_ms(1000)
(3)board.json
{
 "name": "haas506",
"version": "1.0.0",
"io": {
  "serial1":{
    "type":"UART",
    "port":0,
    "dataWidth":8,
    "baudRate":115200,
    "stopBits":1,
    "flowControl":"disable",
    "parity":"none"
  },
  "serial2":{
    "type":"UART",
    "port":1,
    "dataWidth":8,
    "baudRate":115200,
    "stopBits":1,
    "flowControl":"disable",
    "parity":"none"
  },
  "serial3":{
    "type":"UART",
    "port":2,
    "dataWidth":8,
    "baudRate":115200,
    "stopBits":1,
    "flowControl":"disable",
    "parity":"none"
  }
},
"debugLevel": "ERROR"
}
(4)效果图
检测连线如下
| RX | TX | GND |
|---|---|---|
| XT | RX | GND |


3.RS485
(1)案例说明
- 使用TTL烧录,使用RS485进行数据的发送和读取。
(2)main.py
# coding=utf-8
# This is a sample Python script.
import utime
from driver import UART
#串口实例化
uart2=UART()
uart2.open("serial3")
while True:
    #创建一个readBuf字节数组,用于存放串口读取到的数据
    readBuf=bytearray(4)
    #串口读
    readSize=uart2.read(readBuf)
    # #创建一个writeBuf字节数组,将读取到的readBuf中的数据赋值给writeBuf
    # writeBuf2=bytearray(4)
    # writeBuf2[0]=readBuf[0]
    # writeBuf2[1]=readBuf[1]
    # writeBuf2[2]=readBuf[2]
    # writeBuf2[3]=readBuf[3]
    # #打印串口读取到的数据
    # uart2.write(writeBuf2)
    uart2.write(readBuf)
    utime.sleep_ms(1000)
(3)board.json
{
 "name": "haas506",
"version": "1.0.0",
"io": {
  "serial1":{
    "type":"UART",
    "port":0,
    "dataWidth":8,
    "baudRate":115200,
    "stopBits":1,
    "flowControl":"disable",
    "parity":"none"
  },
  "serial2":{
    "type":"UART",
    "port":1,
    "dataWidth":8,
    "baudRate":115200,
    "stopBits":1,
    "flowControl":"disable",
    "parity":"none"
  },
  "serial3":{
    "type":"UART",
    "port":2,
    "dataWidth":8,
    "baudRate":115200,
    "stopBits":1,
    "flowControl":"disable",
    "parity":"none"
  }
},
"debugLevel": "ERROR"
}
(4)效果图
测试连线
| A | B | GND |
|---|---|---|
| A | B | GND |


3.Class-UART函数库
| open | write | read | close | setBaudRate |
|---|---|---|---|---|
| 打开uart | uart写操作 | uart读操作 | 关闭uart | 设置波特率 |
- GPIO
- 实例化
- uart=UART()
- uart.open(params)
- 作用:打开指定的串口,如TTL、RS232、RS485
- 参数:params是一个字符串,需要在board.json中预先定义
- 返回:0成功,其他值则失败
- uart.write(writeBuf)
- 作用:串口写数据
- 参数:writeBuf是一个数组,用来保存待写入的数据,该数据可以通过串口写操作,被发送出去
- 返回:writeBuf数组的长度
- uart.read(readBuf)
- 作用:串口读数据
- 参数:readBuf是一个数组,用来保存通过串口读操作获得的数据
- 返回:readBuf数组的长度
- uart.close()
- 作用:关闭串口
- 返回:0成功,其他值则失败
- uart.setBaudRate(params)
- 作用:设置波特率
- 参数:params是int型数据,配置波特率的值
- 返回:0成功,其他失败
4.总结
本节介绍了如何使用haas506的driver库的UART模块,实现了TTL、RS232、RS485的数据的发送和读取。需要注意的有几点:
- 默认使用TTL作为repl口(交互式输入),如果使用TTL作为串口进行数据的收发,需要在board.json中重定向repl口。配置好就可以使用TTL,同时被重定向的串口(如Rs232),就不能使用uart.write()、uart.read()了。
- 串口的一些配置可以在board.json中进行,如数据长度、校验位、波特率等。
- 如果觉得打印的日志很多,可以将board.json的"debugLevel"的值改为 “ERROR”。
- 波特率可以在board.json中设置,当在调试的时候发现所设置的波特率达不到预期的效果,可以使用setBaudRate()重新设置波特率。
- 烧录程序默认使用TTL。