1.BH1750
(1)介绍
-
BH1750是一种用于两线式串行总线接口的数字型光强度传感器集成电路。这种集成电路可以根据收集的光线强度数据来调整液晶或者键盘背景灯的亮度。利用它的高分辨率可以探测较大范围的光强度变化。
-
器件参数
? ?光照传感器:
??1. 供电:3-5V
??2. 光照范围:0-65535lx
??3. 传感器内置16bitAD转换器
??4. I2C通讯 -
模块实物图1

- 模块实物图2

(2)通信原理
- 通信指令
BH1750内置芯片,通过发送指令来实现通信

- 通信流程
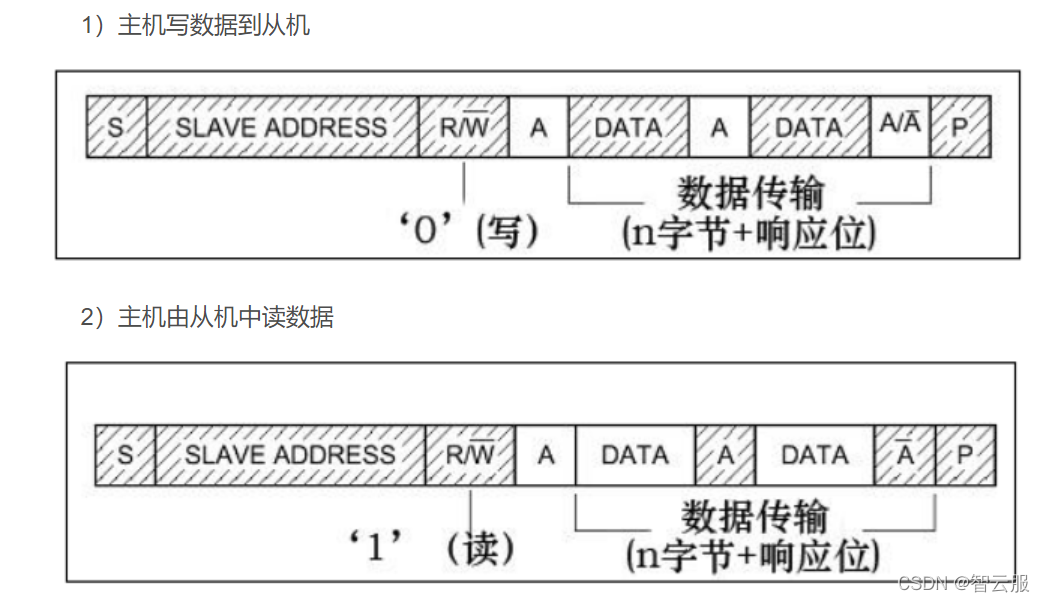
I2C通信数据是一来一回的,主板每次发送数据从器件都需要回应

- 下图显示的是连续H分辨率模式,其他模式流程也是类似的

	主板发送设备地址(写)并等待ACK,发送高分辨率测量指令,等待ACK,停止时序。
	等待传感器第一次高分辨率测量完成(最大时长180ms)。
	读取测量结果。发送设备地址(读),读取高字节和低字节数据,等待ACK,停止时序。
-
测量结果为2字节(高字节High Byte和低字节Low Byte)16进制数据。通过计算转化成十进制数据
光照强度(单位lx)=(High Byte + Low Byte)/ 1.2 * 测量精度
(3)接线
- 将BH1750模块的VCC、GND、SCL、SDA分别接入到haas506开发板的I2C接口上,ADDR引脚不接。
2.测试代码
- main.py
from driver import I2C
import utime  as time
#不同指令
DEVICE     = 0x23
POWER_DOWN = 0x00
POWER_ON   = 0x01
RESET      = 0x07

CONTINUOUS_LOW_RES_MODE = 0x13
CONTINUOUS_HIGH_RES_MODE_1 = 0x10
CONTINUOUS_HIGH_RES_MODE_2 = 0x11
ONE_TIME_HIGH_RES_MODE_1 = 0x20
ONE_TIME_HIGH_RES_MODE_2 = 0x21
ONE_TIME_LOW_RES_MODE = 0x23

def convertToNumber(data):
  return ((data[1] + (256 * data[0])) / 1.2)

def readLight():
    global BH
    readBuf=bytearray(2)
    #尝试更换不同模式
    readBuf[0]=ONE_TIME_HIGH_RES_MODE_1
    BH.read(readBuf,2)
    print(readBuf)
    return convertToNumber(readBuf)

def main():
    global BH
    BH=I2C()
    BH.open('BH1750')
    while True:
        print ("Light Level : " + str(int(readLight())) + " lx")
        time.sleep(1)

if __name__=="__main__":
   main()
- board.json
在board.json中设置BH1750设备地址(0x23),将地址0x23转换成十进制35,填入到devAddr中。
{
    "name": "haas506",
    "version": "2.0.0",
    "io": {
        "ADC0": {
            "type": "ADC",
            "port": 0,
            "sampling": 12000000
        },
        "mpu6050": {
            "type": "I2C",
            "port": 1,
            "addrWidth": 7,
            "freq": 400000,
            "mode": "master",
            "devAddr": 105
        },
        "BH1750": {
            "type": "I2C",
            "port": 1,
            "addrWidth": 7,
            "freq": 400000,
            "mode": "master",
            "devAddr": 35
        },
        "KEY1": {
            "type": "GPIO",
            "port": 44,
            "dir": "irq",
            "pull": "pullup",
            "intMode": "rising"
        },
        "work_led": {
            "type": "GPIO",
            "port": 0,
            "dir": "output",
            "pull": "pulldown"
        },
        "net_led": {
            "type": "GPIO",
            "port": 7,
            "dir": "output",
            "pull": "pulldown"
        },
        "cloud_led": {
            "type": "GPIO",
            "port": 9,
            "dir": "output",
            "pull": "pulldown"
        },
        "d2_led": {
            "type": "GPIO",
            "port": 6,
            "dir": "output",
            "pull": "pulldown"
        },
        "d3_led": {
            "type": "GPIO",
            "port": 8,
            "dir": "output",
            "pull": "pulldown"
        },
        "SPI0": {
        "type": "SPI",
        "port": 0,
        "mode": "master",
        "freq": 2000000
        },
    "serial1":{
        "type":"UART",
        "port":0,
        "dataWidth":8,
        "baudRate":115200,
        "stopBits":1,
        "flowControl":"disable",
        "parity":"none"
    },
    "serial2":{
        "type":"UART",
        "port":1,
        "dataWidth":8,
        "baudRate":115200,
        "stopBits":1,
        "flowControl":"disable",
        "parity":"none"
    },
    "serial3":{
        "type":"UART",
        "port":2,
        "dataWidth":8,
        "baudRate":115200,
        "stopBits":1,
        "flowControl":"disable",
        "parity":"none"
    }
    },
    "debugLevel": "ERROR"
  }
3.测试结果
- 不同光强下传感器的返回值
