Lesson2 - farm
文章目录
微软IoT课程的第二课,是使用IoT去改进和自动化农业生产。
1. Predict plant growth
本节的内容是获取作物的温度(和湿度)。
1.1 数字农业
植物生长依赖的要素:水、光、二氧化碳,适宜的温度。
数字农业相关技术:
- 温度测量;
- 自动浇水(土壤过于干燥时才浇水,而不是定时浇水);
- 使用机器人/无人机检查虫害并使用农药;
将温控与人工照明、肥料和 CO2 水平控制相结合能够实现全年的种植。
温度
本节内容是通过测量空气温度来计算植物的生长和成熟率。
传统控温方式:暖房(人工加热)和温室(阳光)。
例如,一个种植西红柿的商业暖房可以在白天将温度设置为25°C而在晚上设置为20°C,这样能够获得最快的生长。
1.2 CounterFit测温测湿实验
安装温湿传感器依赖库:
pip install counterfit-shims-seeed-python-dht
该库提供的DHT类可以读取温度和湿度两种传感器的值。
CounterFit界面创建湿度传感器(humidity sensor):
- In the Create sensor box in the Sensors pane, drop down the Sensor type box and select Humidity.
- Leave the Units set to Percentage
- Ensure the Pin is set to 5
- Select the Add button to create the humidity sensor on Pin 5
创建温度传感器(temperature sensor):
- In the Create sensor box in the Sensors pane, drop down the Sensor type box and select Temperature.
- Leave the Units set to Celsius(摄氏度)
- Ensure the Pin is set to 6
- Select the Add button to create the temperature sensor on Pin 6
两个传感器可以全部勾选随机值,温度传感器的范围我设置为0-30.
源码位于code-temperature/virtual-device
from counterfit_connection import CounterFitConnection
CounterFitConnection.init('127.0.0.1', 5000)

import time
from counterfit_shims_seeed_python_dht import DHT

sensor = DHT("11", 5)   # DHT11 humidity/temperature sensor
# def __init__(self, dht_type, pin = 12,bus_num = 1):
#     self.__humidity_pin = pin
#     self.__temperature_pin = pin + 1

while True:
    humidity , temp = sensor.read()
    print(f'Humidity {humidity}%')
    print(f'Temperature {temp}°C')

    time.sleep(10)
运行结果:
python app.py
Humidity 42.1%
Temperature 7.19°C
Humidity 5.66%
Temperature 25.41°C
Humidity 32.35%
Temperature 3.13°C
1.3 Growing degree days
生长度日,也称为生长度单位(growing degree units),后面简称GDD。这是根据温度衡量植物生长的一种方式。假设一株植物具有足够的水分、养分和二氧化碳,温度将会决定植物的生长率。
每天的 GDD 越多,植物的生长就越快。
公式:
GDD = (Tmax + Tmin) / 2 - Tbase
Tmax: 每日最高温度
Tmin: 每日最低温度
Tbase: 植物的基础温度
单位:摄氏度
比如,玉米大概需要 800 到 2,700 的 GDD 来成熟,基础温度是 10°C。
如果通过使用物联网设备收集温度数据,农民就可以在植物接近成熟时自动收到通知。
发布端
源码位于code-publish-temperature\virtual-device\temperature-sensor\app.py
这段逻辑通过mqtt协议每10分钟上传/发布一次当前温度,所以是运行在农田里的IoT设备上。
from counterfit_connection import CounterFitConnection
CounterFitConnection.init('127.0.0.1', 5000)

import time
from counterfit_shims_seeed_python_dht import DHT
import paho.mqtt.client as mqtt
import json

sensor = DHT("11", 5)

id = 'E38E4B36-363E-4CB2-B45B-2F86640BA9CE'

client_telemetry_topic = id + '/telemetry'
client_name = id + 'temperature_sensor_client'

mqtt_client = mqtt.Client(client_name)
mqtt_client.connect('test.mosquitto.org')

mqtt_client.loop_start()

print("MQTT connected!")

while True:
    _, temp = sensor.read()
    telemetry = json.dumps({'temperature' : temp})

    print("Sending telemetry ", telemetry)

    mqtt_client.publish(client_telemetry_topic, telemetry)

    time.sleep(10 * 60)
订阅端
源码位于code-server\temperature-sensor-server\app.py
订阅端运行在服务器上,接收来自物联网设备的温度数据,并保存到csv表格里(正常应该是数据库)。如果优化的话,可以在每天晚上计算一下当前积累的GDD,以及还需要的GDD。
import json
import time

import paho.mqtt.client as mqtt

from os import path
import csv
from datetime import datetime

id = 'E38E4B36-363E-4CB2-B45B-2F86640BA9CE'

client_telemetry_topic = id + '/telemetry'
server_command_topic = id + '/commands'
client_name = id + 'temperature_sensor_server'

mqtt_client = mqtt.Client(client_name)
mqtt_client.connect('test.mosquitto.org')

mqtt_client.loop_start()

temperature_file_name = 'temperature.csv'
fieldnames = ['date', 'temperature']

if not path.exists(temperature_file_name):
    with open(temperature_file_name, mode='w') as csv_file:
        writer = csv.DictWriter(csv_file, fieldnames=fieldnames)
        writer.writeheader()

def handle_telemetry(client, userdata, message):
    payload = json.loads(message.payload.decode())
    print("Message received:", payload)

    with open(temperature_file_name, mode='a') as temperature_file:
        temperature_writer = csv.DictWriter(temperature_file, fieldnames=fieldnames)
        temperature_writer.writerow({'date' : datetime.now().astimezone().replace(microsecond=0).isoformat(), 'temperature' : payload['temperature']})

mqtt_client.subscribe(client_telemetry_topic)
mqtt_client.on_message = handle_telemetry

while True:
    time.sleep(2)
先运行订阅端,再运行发布端,本地就会生成temperature.csv。
2. Detect soil moisture
2.1 测量土壤湿度的方法
法一,测电阻。电阻传感器有2个探头可以进入土壤。电流被发送到一个探针,并被另一个接收。然后传感器测量土壤的电阻-测量在第二个探头的电流下降多少。水是电的良导体,所以土壤的含水量越高,电阻就越低。
法二,测电容。电容湿度传感器测量可存储在正极和负极电极板上的电荷量/电容。土壤的电容随着湿度的变化而变化,可以转换为可以通过物联网设备测量的电压。土壤越湿润,输出的电压就越低。
2.2 传感器与IoT设备通信
GPIO(digital)
Some GPIO pins provide a voltage, usually 3.3V or 5V, some pins are ground, and others can be programmatically set to either send a voltage (output), or receive a voltage (input).
You can use GPIO pins directly with some digital sensors and actuators
Analog pins
像Arduino等设备提供了模拟信号引脚,其实就是内置了ADC。
刚刚说的两种传感器都是模拟传感器,所以可以用这种引脚。
Inter Integrated Circuit (I2C)
内置集成电路。
I2C, pronounced I-squared-C, is a multi-controller, multi-peripheral protocol, with any connected device able to act as a controller or peripheral communicating over the I2C bus (the name for a communication system that transfers data). Data is sent as addressed packets, with each packet containing the address of the connected device it is intended for.
需要传感器有自己的地址,比如seeed的光感都有一样的地址,按钮也都有一样的地址。
这种方式没怎么看懂。
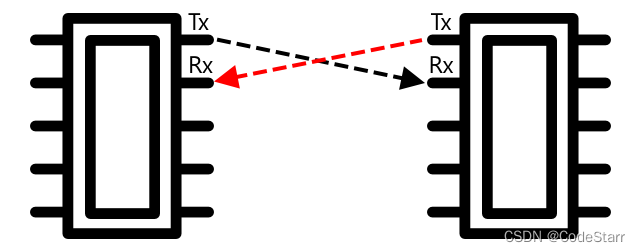
Universal asynchronous receiver-transmitter (UART)

Serial Peripheral Interface (SPI)
SPI is designed for communicating over short distances, such as on a microcontroller to talk to a storage device such as flash memory. It is based on a controller/peripheral model with a single controller (usually the processor of the IoT device) interacting with multiple peripherals. The controller controls everything by selecting a peripheral and sending or requesting data.
SPI controllers use 3 wires, along with 1 extra wire per peripheral. Peripherals use 4 wires. These wires are:
| Wire | Name | Description |
|---|---|---|
| COPI | Controller Output, Peripheral Input | This wire is for sending data from the controller to the peripheral. |
| CIPO | Controller Input, peripheral Output | This wire is for sending data from the peripheral to the controller. |
| SCLK | Serial Clock | This wire sends a clock signal at a rate set by the controller. |
| CS | Chip Select | The controller has multiple wires, one per peripheral, and each wire connects to the CS wire on the corresponding peripheral. |
On a Raspberry Pi you can use GPIO pins 19, 21, 23, 24 and 26 for SPI.
Wireless
比如蓝牙、LoRaWAN 、wifi、Zigbee。
One such example is in commercial soil moisture sensors. These will measure soil moisture in a field, then send the data over LoRaWan to a hub device, which will process the data or send it over the Internet. This allows the sensor to be away from the IoT device that manages the data, reducing power consumption and the need for large WiFi networks or long cables.
Zigbee uses WiFi to form mesh networks between devices, where each device connects to as many nearby devices as possible, forming a large number of connections like a spiders web. When one device wants to send a message to the Internet it can send it to the nearest devices, which then forward it on to other nearby devices and so on, until it reaches a coordinator and can be sent to the Internet.
2.3 CounterFit测量湿度实验
CounterFit传感器和[1.2](# 1.2 CounterFit测温测湿实验)节不一样,这里要用专门的土壤湿度传感器:
- In the Create sensor box in the Sensors pane, drop down the Sensor type box and select Soil Moisture.
- Leave the Units set to NoUnits
- Ensure the Pin is set to 0
- Select the Add button to create the Soil Moisture sensor on Pin 0
源码位于code\virtual-device\soil-moisture-sensor,可以看出需要用到ADC:
from counterfit_connection import CounterFitConnection
CounterFitConnection.init('127.0.0.1', 5000)

import time
from counterfit_shims_grove.adc import ADC

adc = ADC()

while True:
    soil_moisture = adc.read(0)
    print("Soil moisture:", soil_moisture)

    time.sleep(10)
根据read定义,返回的其实还是百分比:
# input voltage / output voltage (%)
def read(self, channel):
    '''
        Read the ratio between channel input voltage and power voltage (most time it's 3.3V).

        Args:
            channel (int): 0 - 7, specify the channel to read

        Returns:
            (int): the ratio, in 0.1%
        '''
    return CounterFitConnection.get_sensor_int_value(channel)
2.4 Sensor calibration
传感器是需要校准的。比如lesson 1 的温度传感器就是校准后才输出摄氏度值的。
Sensors rely on measuring electrical properties such as resistance or capacitance.
Soil moisture is measured using gravimetric or volumetric water content.
大概意思就是,中学物理学的,电阻受温度影响,所以有误差。
3. Automated plant watering
IoT设备功率很小,扛不住浇水器(water pump)。
方法就是,IoT设备先连接一个大功率设备,再连接浇水器。就像电灯开关一样。
IoT devices can usually provide 3.3V or 5V, at less than 1 amp (1A) of current.
3.1 Relays
继电器,核心是一个电磁铁(electromagnet),将电能转换为机械能。
继电器相当于数字执行器,通电则打开它,断电则关闭它。当然也可以用来切换电路(中学都学过),比如CounterFit里面的继电器就是通过短路来不让电磁铁通电。
3.2 CounterFit控制继电器实验
添加一个继电器:
- In the Create actuator box in the Actuators pane, drop down the Actuator type box and select Relay.
- Set the Pin to 5
- Select the Add button to create the relay on Pin 5
源码位于code-relay\virtual-device\soil-moisture-sensor
from counterfit_connection import CounterFitConnection
CounterFitConnection.init('127.0.0.1', 5000)

import time
from counterfit_shims_grove.adc import ADC
from counterfit_shims_grove.grove_relay import GroveRelay

adc = ADC()
relay = GroveRelay(5)

while True:
    soil_moisture = adc.read(0)
    print("Soil moisture:", soil_moisture)

    if soil_moisture > 450:
        print("Soil Moisture is too low, turning relay on.")
        relay.on()
    else:
        print("Soil Moisture is ok, turning relay off.")
        relay.off()

    time.sleep(1)
3.3 引入mqtt
在实际应用中,继电器不应该是由单个土壤湿度传感器控制,而是由一个中心通过多个传感器来判断是否启动。现在引入mqtt协议来实现这一应用。
这次就没有严格的发布端和订阅端了,因为两边都需要订阅和发布topic。
传感器端
运行在放置了湿度传感器的iot设备上。
源码位于code-mqtt\virtual-device\soil-moisture-sensor
from counterfit_connection import CounterFitConnection
CounterFitConnection.init('127.0.0.1', 5000)

import time
from counterfit_shims_grove.adc import ADC
from counterfit_shims_grove.grove_relay import GroveRelay
import json
import paho.mqtt.client as mqtt

adc = ADC()
relay = GroveRelay(5)

id = 'E38E4B36-363E-4CB2-B45B-2F86640BA9CE'

client_telemetry_topic = id + '/telemetry'
server_command_topic = id + '/commands'
client_name = id + 'soilmoisturesensor_client'

mqtt_client = mqtt.Client(client_name)
mqtt_client.connect('test.mosquitto.org')

mqtt_client.loop_start()

def handle_command(client, userdata, message):
    payload = json.loads(message.payload.decode())
    print("Message received:", payload)

    if payload['relay_on']:
        relay.on()
    else:
        relay.off()

mqtt_client.subscribe(server_command_topic)
mqtt_client.on_message = handle_command

while True:
    soil_moisture = adc.read(0)
    print("Soil moisture:", soil_moisture)

    mqtt_client.publish(client_telemetry_topic, json.dumps({'soil_moisture' : soil_moisture}))

    time.sleep(10)
Hub端
控制中心,可以理解成一个小服务器
import json
import time

import paho.mqtt.client as mqtt

id = 'E38E4B36-363E-4CB2-B45B-2F86640BA9CE'

client_telemetry_topic = id + '/telemetry'
server_command_topic = id + '/commands'
client_name = id + 'soilmoisturesensor_server'

mqtt_client = mqtt.Client(client_name)
mqtt_client.connect('test.mosquitto.org')

mqtt_client.loop_start()

def handle_telemetry(client:mqtt.Client, userdata, message):
    payload = json.loads(message.payload.decode())
    print("Message received:", payload)

    command = { 'relay_on' : payload['soil_moisture'] > 450 }
    print("Sending message:", command)

    client.publish(server_command_topic, json.dumps(command))

mqtt_client.subscribe(client_telemetry_topic)
mqtt_client.on_message = handle_telemetry

while True:
    time.sleep(2)
3.4 考虑延时问题
这个灌溉系统(irrigation system)还有个问题,就是水在土壤里蔓延是需要时间的,可能命名已经浇水了,但传感器显示土壤还是干燥。另外水从水泵里出来也需要时间。实际中我们也不可能保证执行器能及时响应。
所以需要掌握好这个延时,不仅传感器要等待一段时间才能再次测量值,而且执行器只需要开启几秒来浇水,具体时间根据水势来判断。
两种方法:
- Change the IoT device code to only send telemetry every minute, this way the watering cycle will be completed before the next message is sent
- Unsubscribe from the telemetry during the watering cycle
一般不用第1种,因为传感器最好保持收集数据的状态。所以我们修改服务端逻辑,浇水期间开启一个线程完成以下任务:
- Unsubscribe
- Send a command to turn the relay on
- Wait for 5 seconds
- Send a command to turn the relay off
- Wait for 20 seconds for the soil moisture levels to stabilize
- Subscribe
源码位于code-timing\server
import json
import time

import paho.mqtt.client as mqtt
import threading

id = '<ID>'

client_telemetry_topic = id + '/telemetry'
server_command_topic = id + '/commands'
client_name = id + 'soilmoisturesensor_server'

mqtt_client = mqtt.Client(client_name)
mqtt_client.connect('test.mosquitto.org')

mqtt_client.loop_start()

water_time = 5
wait_time = 20

def send_relay_command(client, state):
    command = { 'relay_on' : state }
    print("Sending message:", command)
    client.publish(server_command_topic, json.dumps(command))

def control_relay(client):
    print("Unsubscribing from telemetry")
    mqtt_client.unsubscribe(client_telemetry_topic)

    send_relay_command(client, True)
    time.sleep(water_time)
    send_relay_command(client, False)

    time.sleep(wait_time)

    print("Subscribing to telemetry")
    mqtt_client.subscribe(client_telemetry_topic)

def handle_telemetry(client, userdata, message):
    payload = json.loads(message.payload.decode())
    print("Message received:", payload)

    if payload['soil_moisture'] > 450:
        threading.Thread(target=control_relay, args=(client,)).start()

mqtt_client.subscribe(client_telemetry_topic)
mqtt_client.on_message = handle_telemetry

while True:
    time.sleep(2)
4. Migrate your plant to the cloud
Azure广告,如何在azure上创建IoT hub,跳过~
想动手的话在vps上运行个mosquitto即可。
5. Migrate your application logic to the cloud
仍然是广告,大概了解下serverless 这个概念。
Serverless, or serverless computing, involves creating small blocks of code that are run in the cloud in response to different kinds of events.
Serverless is also referred to as Functions as a service (FaaS) as each event trigger is implemented as a function in code.
The serverless model is ideal. You can write a function that is called in response to messages sent from any IoT device that is connected to your cloud-hosted IoT service. Your code will handle all messages sent, but only be running when needed.
6. Keep your plant secure
6.1 Why do you need to secure IoT devices?
IoT安全:
- only expected devices can connect to your cloud IoT service and send them telemetry;
- only your cloud service can send commands to your devices;
- stop data being leaked.
威胁:
- 伪造的iot设备发布(publish)恶意数据;
- 未授权访问;
- 攻击者伪造hub发布指令控制iot设备;
- 入侵iot设备,访问iot网络;
6.2 加密
纯密码学,跳过。
6.3 Secure your IoT devices
X.509 certificates
微软的课件讲的不错,复习一下。
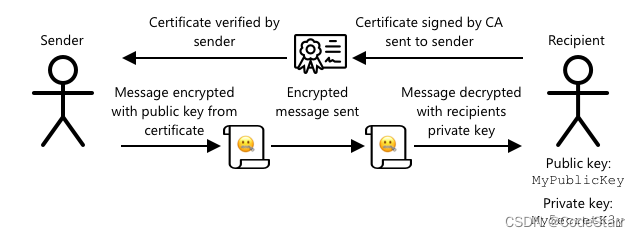
使用公钥密码时,需要x509证书来进行身份验证。它由CA发布并签名,内置(用户的)公钥。
证书上说公钥是谁的,那就是谁的。
总之,密码学的本质是信任问题,CA就是我们信任的第三方机构。

One big advantage of using X.509 certificates is that they can be shared between devices. You can create one certificate, upload it to IoT Hub, and use this for all your devices. Each device then just needs to know the private key to decrypt the messages it receives from IoT Hub.
