综合案例2.0-燃气检测系统
简介
天然气是家庭烹饪取暖主要燃料,其主要成分是甲烷(CH4),同时还含有少量的丙烷,乙烷、丁烷等其他少量气体。天然气本身无色无味,密度比空气少。天然气发生泄漏难以察觉,其在空气中浓度达到5%~15%时,遇明火会发生爆炸。家庭天然气的普及,每年因使用不当、人为因素造成燃气泄漏爆炸事故接连不断。
本案例就是以此背景教开发者一步一步打造燃气泄漏检测系统。
MQ2气体传感器
MQ-2常用于家庭和工厂的气体泄漏监测装置,适宜于液化气、苯、烷、酒精、氢气、烟雾等的探测。故因此,MQ-2可以准确来说是一个多种气体探测器。
原理
MQ-2型烟雾传感器属于二氧化锡半导体气敏材料,属于表面离子式N型半导体。处于200~300摄氏度时,二氧化锡吸附空气中的氧,形成氧的负离子吸附,使半导体中的电子密度减少,从而使其电阻值增加。当与烟雾接触时,如果晶粒间界处的势垒收到烟雾的调至而变化,就会引起表面导电率的变化。利用这一点就可以获得这种烟雾存在的信息,烟雾的浓度越大,导电率越大,输出电阻越低,则输出的模拟信号就越大。
特性
- MQ-2型传感器对天然气、液化石油气等烟雾有很高的灵敏度,尤其对烷类烟雾更为敏感,具有良好的抗干扰性,可准确排除有刺激性非可燃性烟雾的干扰信息。
- MQ-2型传感器具有良好的重复性和长期的稳定性。初始稳定,响应时间短,长时间工作性能好。需要注意的是:在使用之前必须加热一段时间,否则其输出的电阻和电压不准确。
- 其检测可燃气体与烟雾的范围是100~10000ppm(ppm为体积浓度。 1ppm=1立方厘米/1立方米)
- 电路设计电压范围宽,24V以下均可,加热电压5±0.2V
注意:如果加热电压过高,会导致输入电流过大,将内部的信号线熔断,从而器件报废。
准备
本案例需要的硬件
| 器材 | 数量 |
|---|---|
| HaaS506开发板 | 1 |
| MQ2气体传感器 | 1 |
| SIM卡 | 1 |
| 杜邦线 | 若干 |
硬件连接图
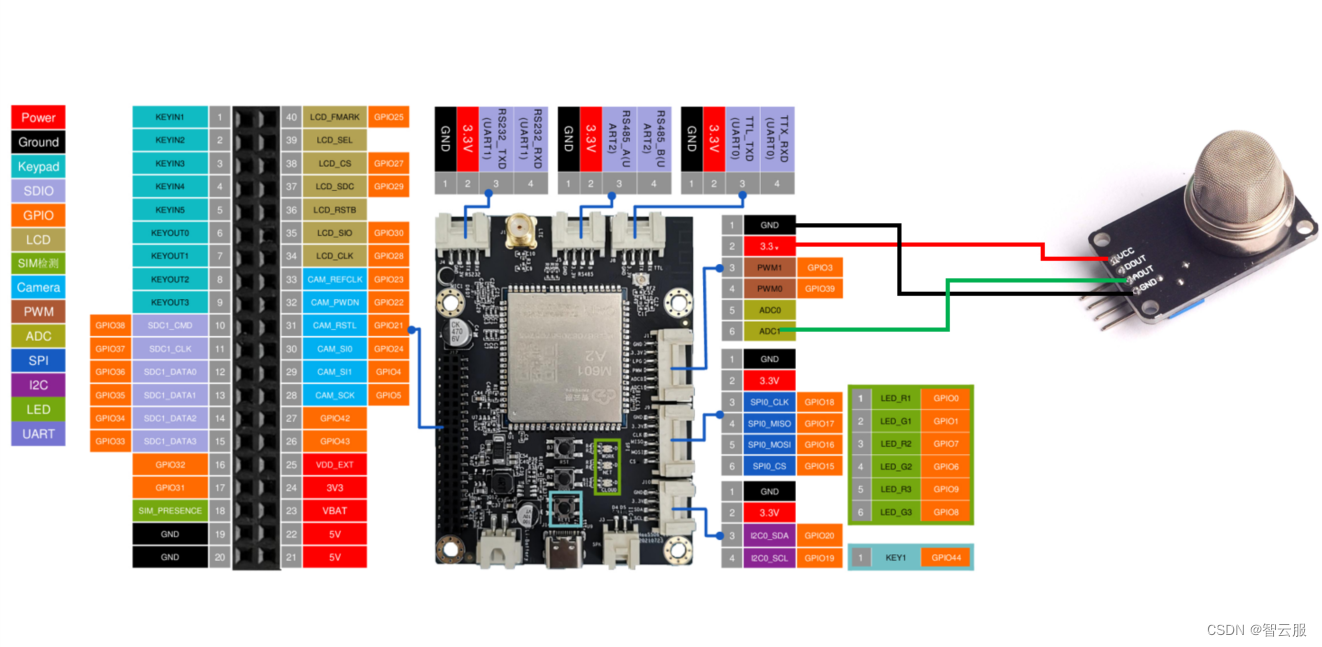
代码流程
1、连接阿里云平台。
2、重复读取MQ2气体传感器电压,将数据上传阿里云。
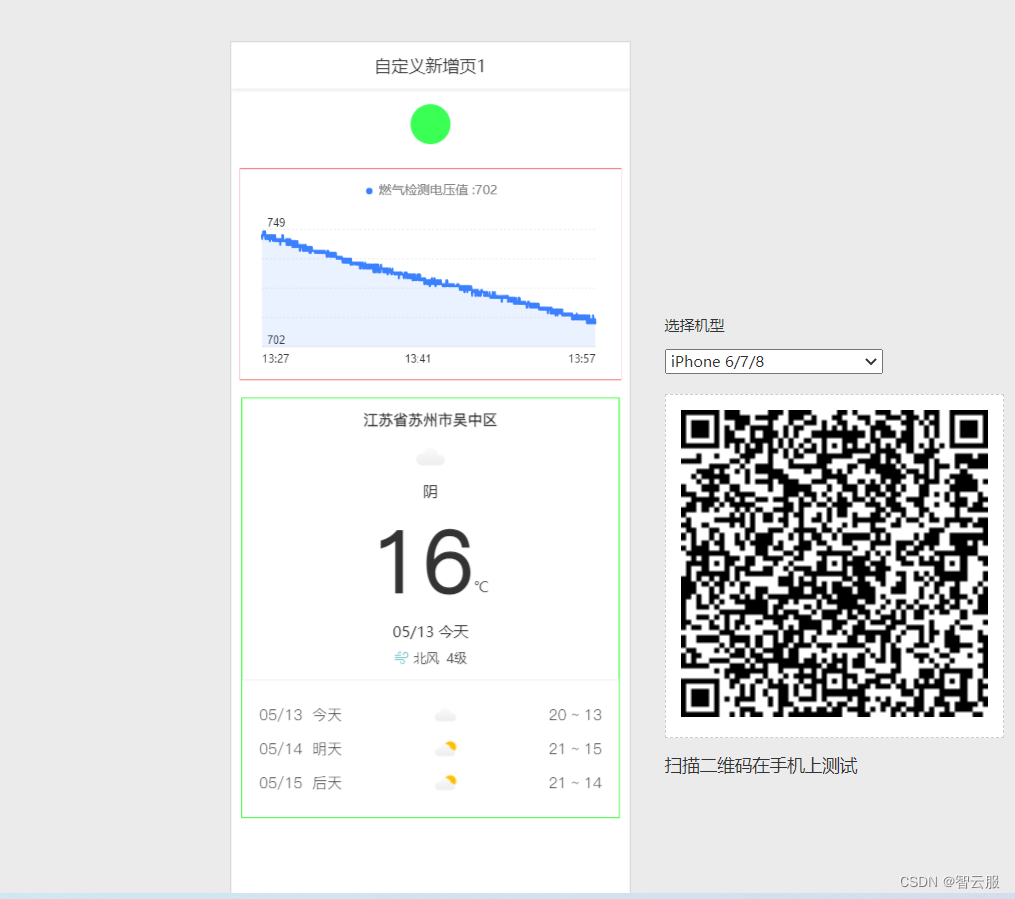
3、使用移动应用功能,显示天气、MQ2气体传感器电压变化、设备报警。
功能实现
1、物联网平台开发
第一次使用物联网平台的读者,需要开通实例后使用物联网平台功能。也可以使用免费的公共实例进行开发,在阿里云物联网平台中,左上角选择‘华东2-上海’,点击‘公共实例’,即可开通。
1、平台产品创建可参考haas506 2.0开发教程-aliyunIoT
2、创建产品属性(添加物模型)
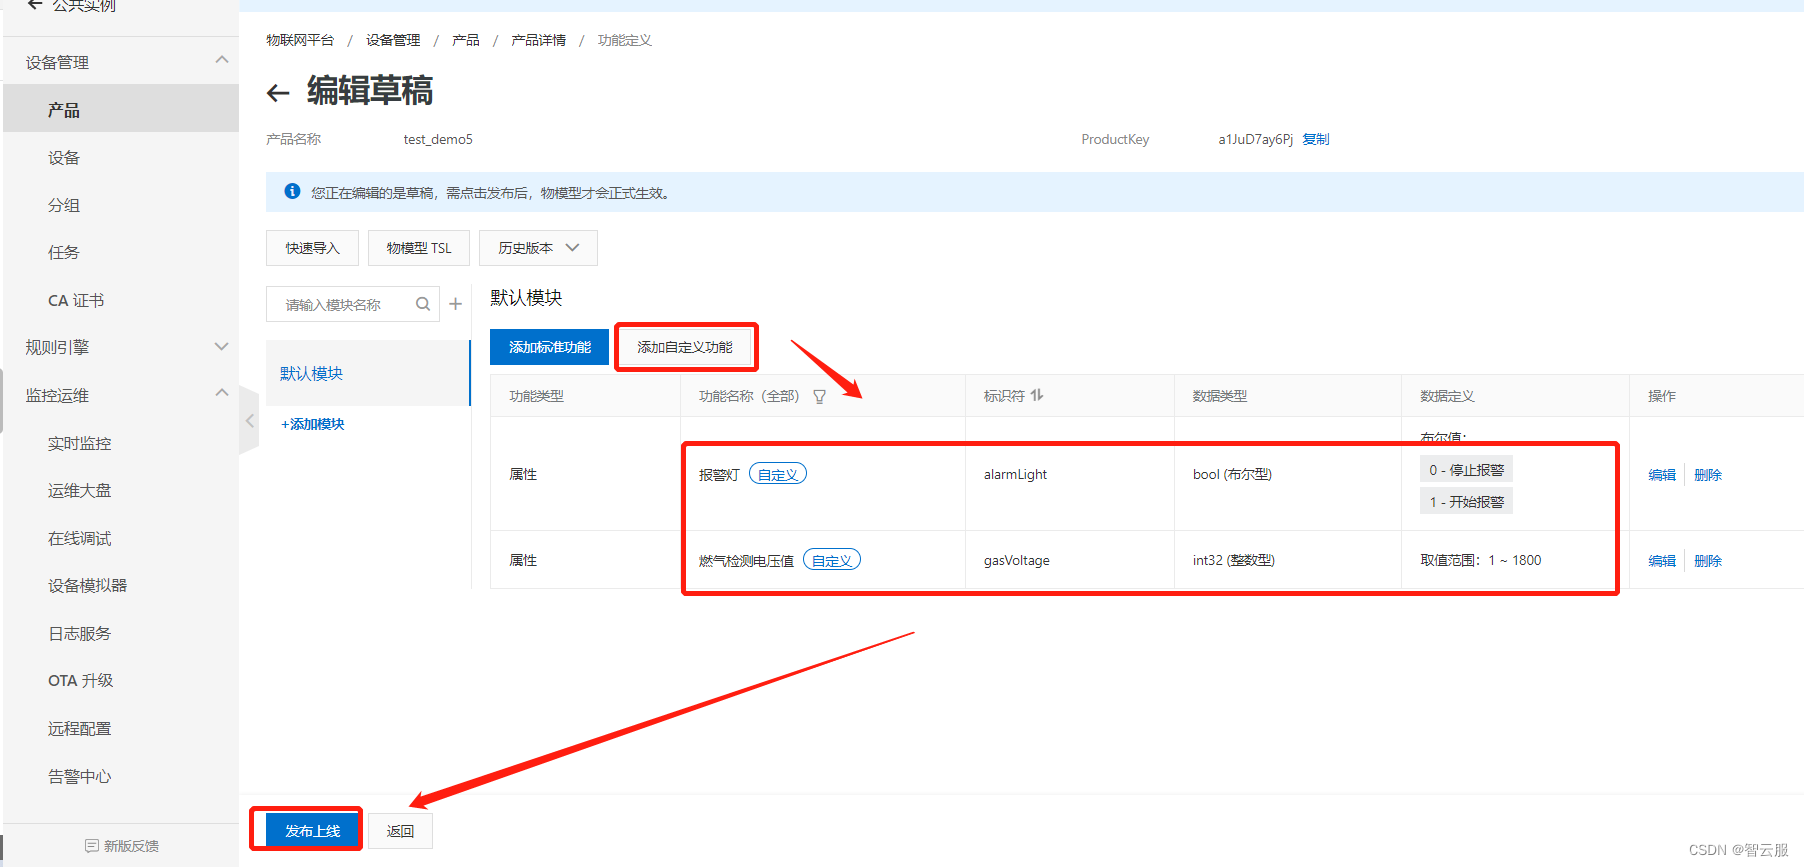
- 选择产品功能定义–编辑草稿

- 添加自定义功能
- 添加标识符与数据类型(标识符要与代码一致)
- 点击发布上线
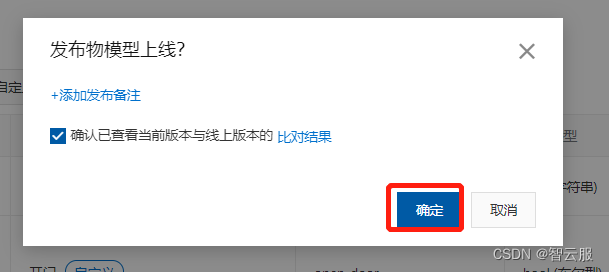
- 点击确定
2、设备端开发
- 第一次使用开发板的读者可以按照haas5062.0开发教程-导学篇搭建开发环境。
- 搭建完后复制以下代码到Visual Studio Code,复制产品证书到代码相应位置。
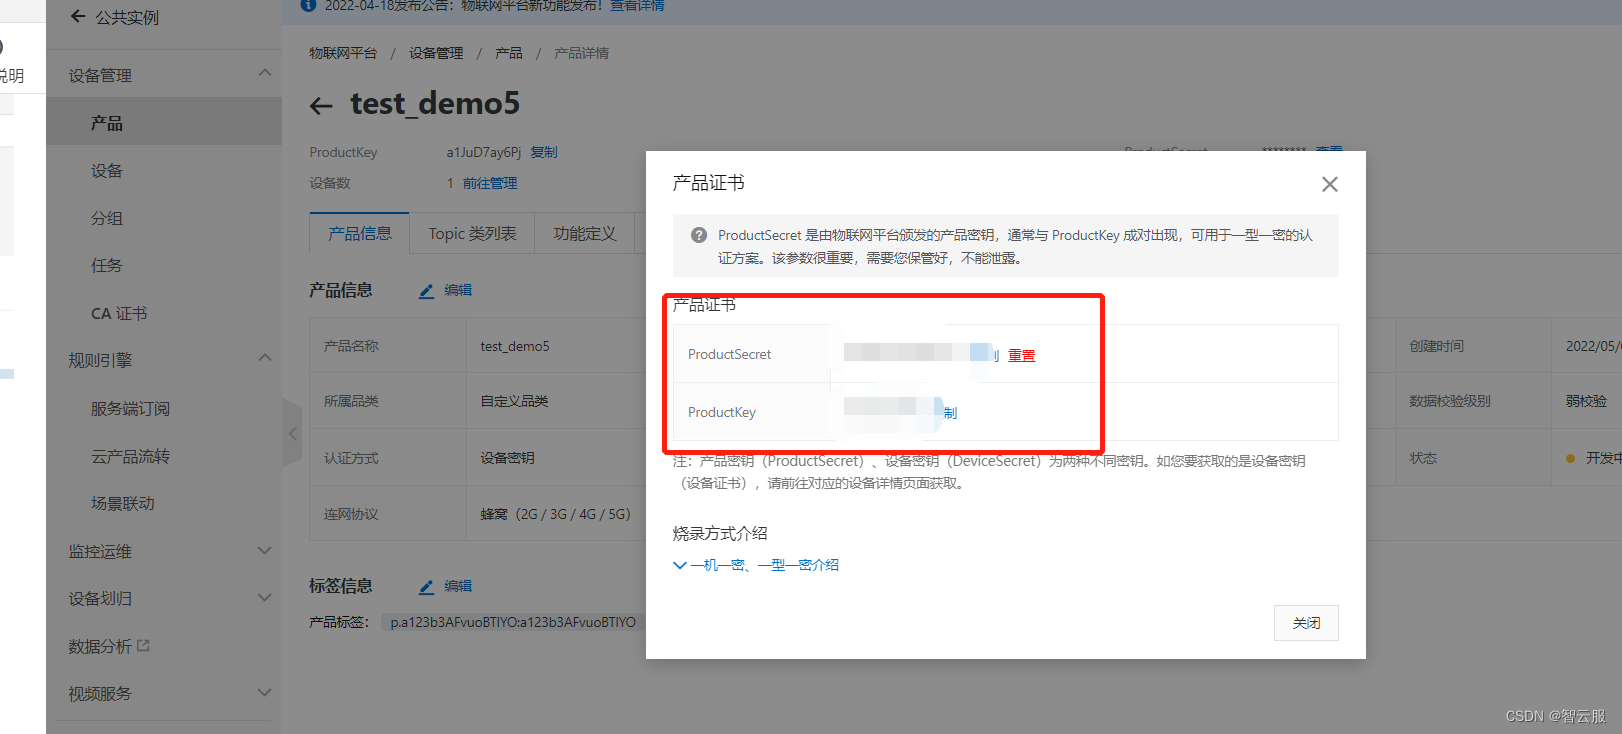
- main.py
# coding=utf-8
from driver import ADC
from driver import GPIO
import network
import ujson
import utime as time
import modem
from  aliyunIoT import Device
import kv


#当iot设备连接到物联网平台的时候触发'connect' 事件
def on_connect(data):
    global module_name,default_ver,productKey,deviceName,deviceSecret,on_trigger,on_download,on_verify,on_upgrade
    print('***** connect lp succeed****')
    data_handle = {}
    data_handle['device_handle'] = device.getDeviceHandle()


#当连接断开时,触发'disconnect'事件
def on_disconnect():
    print('linkkit is disconnected')

#上传报警灯状态
warning_data = {}
#当iot云端下发属性设置时,触发'props'事件
def on_props(request):
    params=request['params']
    params=eval(params)
    warn = params["alarmLight"]
    warning_data["alarmLight"]= warn
    warning_data_str=ujson.dumps(warning_data)
    data1={
        'params':warning_data_str
        }
    device.postProps(data1)


#当iot云端调用设备service时,触发'service'事件
def on_service(id,request):
    print('clound req id  is {} , req is {}'.format(id,request))
#当设备跟iot平台通信过程中遇到错误时,触发'error'事件
def on_error(err):
    print('err msg is {} '.format(err))

#网络连接的回调函数
def on_4g_cb(args):
     global g_connect_status
     pdp = args[0]
     netwk_sta = args[1]
     if netwk_sta == 1:
         g_connect_status = True
     else:
         g_connect_status = False

#网络连接
def connect_network():
     global net,on_4g_cb,g_connect_status
     #NetWorkClient该类是一个单例类,实现网络管理相关的功能,包括初始化,联网,状态信息等.
     net = network.NetWorkClient()
     g_register_network = False
     if net._stagecode is not None and net._stagecode == 3 and net._subcode == 1:
         g_register_network = True
     else:
         g_register_network = False
     if g_register_network:
    #注册网络连接的回调函数on(self,id,func);  1代表连接,func 回调函数  ;return 0 成功
         net.on(1,on_4g_cb)
         net.connect(None)
     else:
         print('网络注册失败')
     while True:
         if g_connect_status:
             print('网络连接成功')
             break
         time.sleep_ms(20)

#动态注册回调函数
def on_dynreg_cb(data):
     global deviceSecret,device_dyn_resigter_succed
     deviceSecret = data
     device_dyn_resigter_succed = True


 # 连接物联网平台
def dyn_register_device(productKey,productSecret,deviceName):
    global on_dynreg_cb,device,deviceSecret,device_dyn_resigter_succed
    key = '_amp_customer_devicesecret'
    deviceSecretdict = kv.get(key)
    print("deviceSecretdict:",deviceSecretdict)
    if isinstance(deviceSecretdict,str):
        deviceSecret = deviceSecretdict

    if deviceSecretdict is None or deviceSecret is None:
        key_info = {
            'productKey': productKey  ,
            'productSecret': productSecret ,
            'deviceName': deviceName
            }
        # 动态注册一个设备,获取设备的deviceSecret
        #下面的if防止多次注册,当前若是注册过一次了,重启设备再次注册就会卡住,
        if not device_dyn_resigter_succed:
            device.register(key_info,on_dynreg_cb)


def upload_value(n):
    global value_data
    value_data["gasVoltage"]= n
    value_data_str=ujson.dumps(value_data)
    data={
        'params':value_data_str
        }
    device.postProps(data)


if __name__ == '__main__':
    ICCID=None
    g_connect_status = False
    net = None
    device = None
    deviceSecret = None
    deviceName = None
    productKey = "a1JuD7ay6Pj"
    productSecret = "yV68ScGy5DgEczVx"
    device_dyn_resigter_succed = False

    # 连接网络
    connect_network()
     # 获取设备的IMEI 作为deviceName 进行动态注册
    deviceName = modem.getDevImei()
    #获取设备的ICCID
    ICCID=modem.sim.getIccid()
    #初始化物联网平台Device类,获取device实例
    device = Device()
    if deviceName is not None and len(deviceName) > 0 :
     #动态注册一个设备
        dyn_register_device(productKey,productSecret,deviceName)
    else:
        print("获取设备IMEI失败,无法进行动态注册")
    while deviceSecret is None:
        time.sleep(0.2)
    print('动态注册成功:' + deviceSecret)

    key_info = {
        'region' : 'cn-shanghai' ,
        'productKey': productKey ,
        'deviceName': deviceName ,
        'deviceSecret': deviceSecret ,
        'keepaliveSec': 60,
        }
    #打印设备信息
    print(key_info)

    #device.ON_CONNECT 是事件,on_connect是事件处理函数/回调函数
    device.on(device.ON_CONNECT,on_connect)
    device.on(device.ON_DISCONNECT,on_disconnect)
    device.on(device.ON_PROPS,on_props)
    device.on(device.ON_SERVICE,on_service)
    device.on(device.ON_ERROR,on_error)
    device.connect(key_info)

    #主程序
    #气体传感器
    adc=ADC()
    adc.open("ADC1")
    value_data = {}
    while True:
        value=adc.readVoltage()
        print('v:',value)
        print('--------------------------------------------')
        upload_value(value)
        time.sleep(1)

    adc.close()
- 使用485串口读取log,配置 “replPort”: 2,串口TTL读取改为0 。
- board.json
{
    "version": "2.0.0",
    "io": {
        "ADC0": {
                "type": "ADC",
                "port": 0,
                "sampling": 12000000
            },
        "ADC1": {
                  "type": "ADC",
                  "port": 1,
                  "sampling": 12000000
            },
        "serial1":{
                "type":"UART",
                "port":0,
                "dataWidth":8,
                "baudRate":115200,
                "stopBits":1,
                "flowControl":"disable",
                "parity":"none"
            },
        "serial2":{
                "type":"UART",
                "port":1,
                "dataWidth":8,
                "baudRate":115200,
                "stopBits":1,
                "flowControl":"disable",
                "parity":"none"
            },
        "serial3":{
                "type":"UART",
                "port":2,
                "dataWidth":8,
                "baudRate":115200,
                "stopBits":1,
                "flowControl":"disable",
                "parity":"none"
            }
        },
    "debugLevel": "ERROR",
    "repl": "enable",
    "replPort": 2
    }
调试
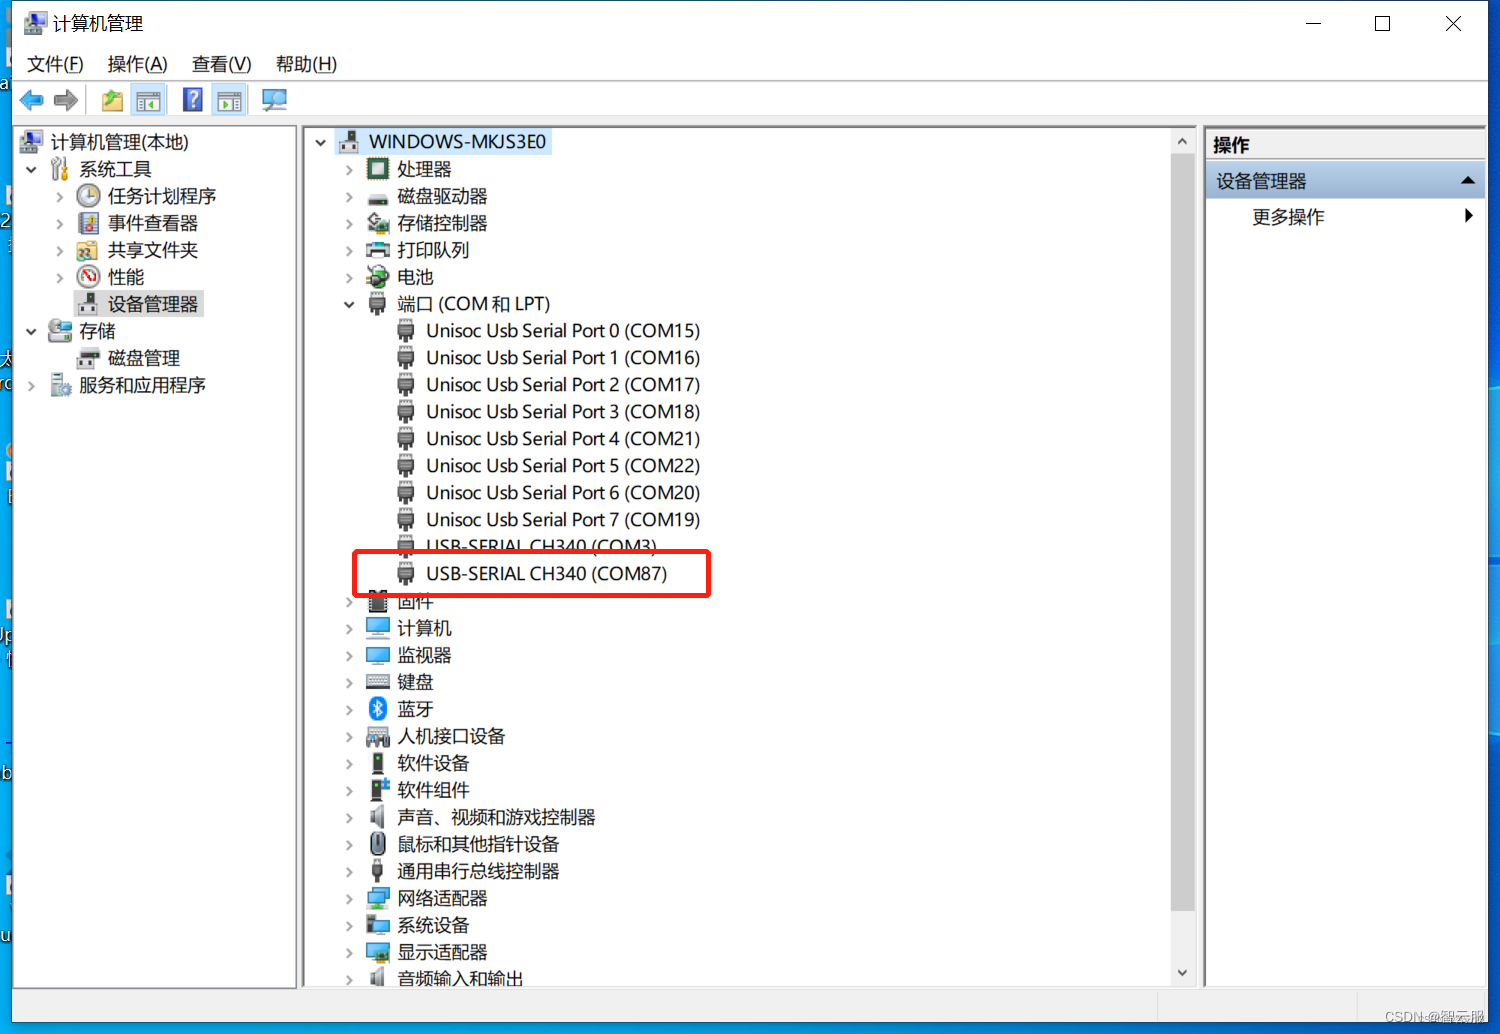
- 调试串口使用485端口,打开设备管理器可以查看调试端口号。
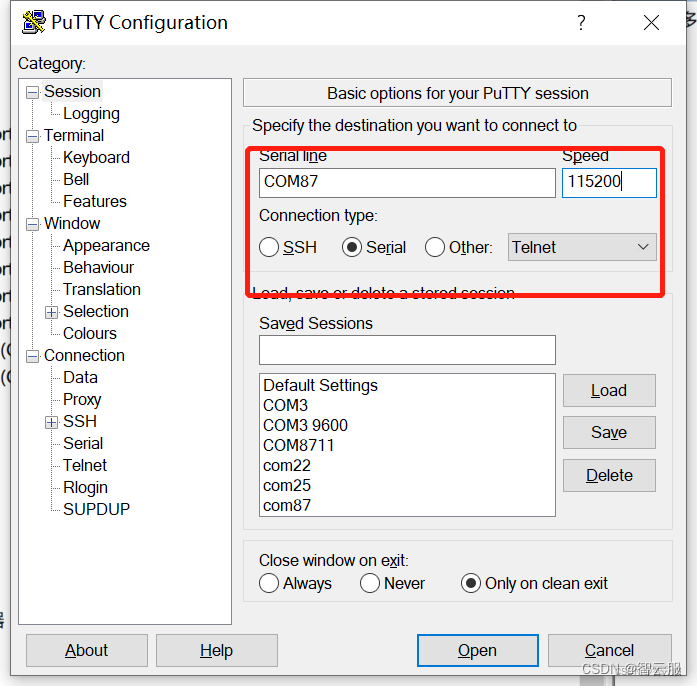
- 串口调试工具使用putty
调试结果
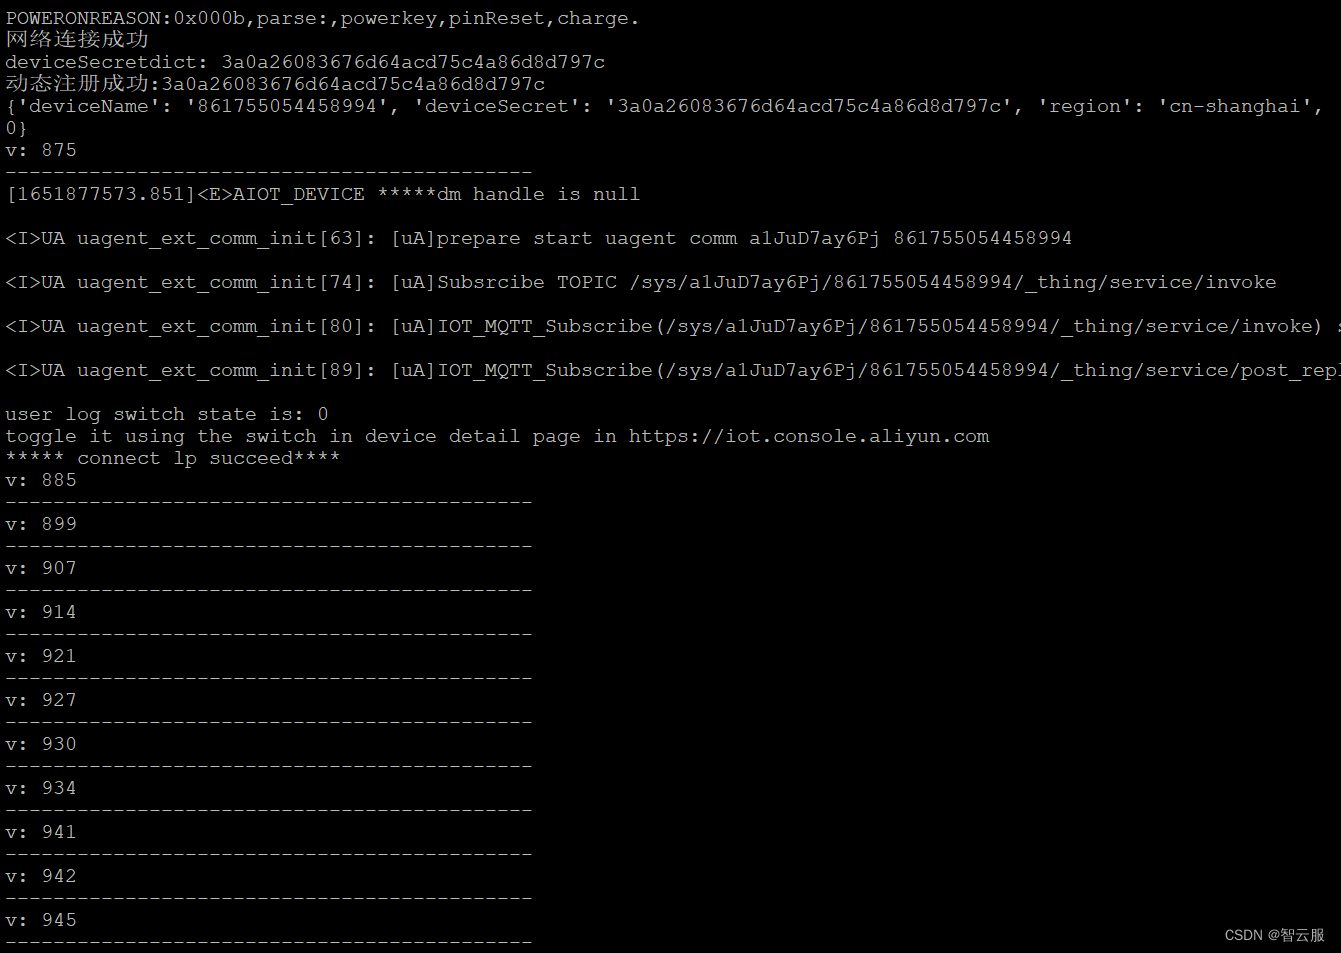
1、串口调试工具log,网络连接成功–动态注册成功–每秒打印MQ2气体传感器电压
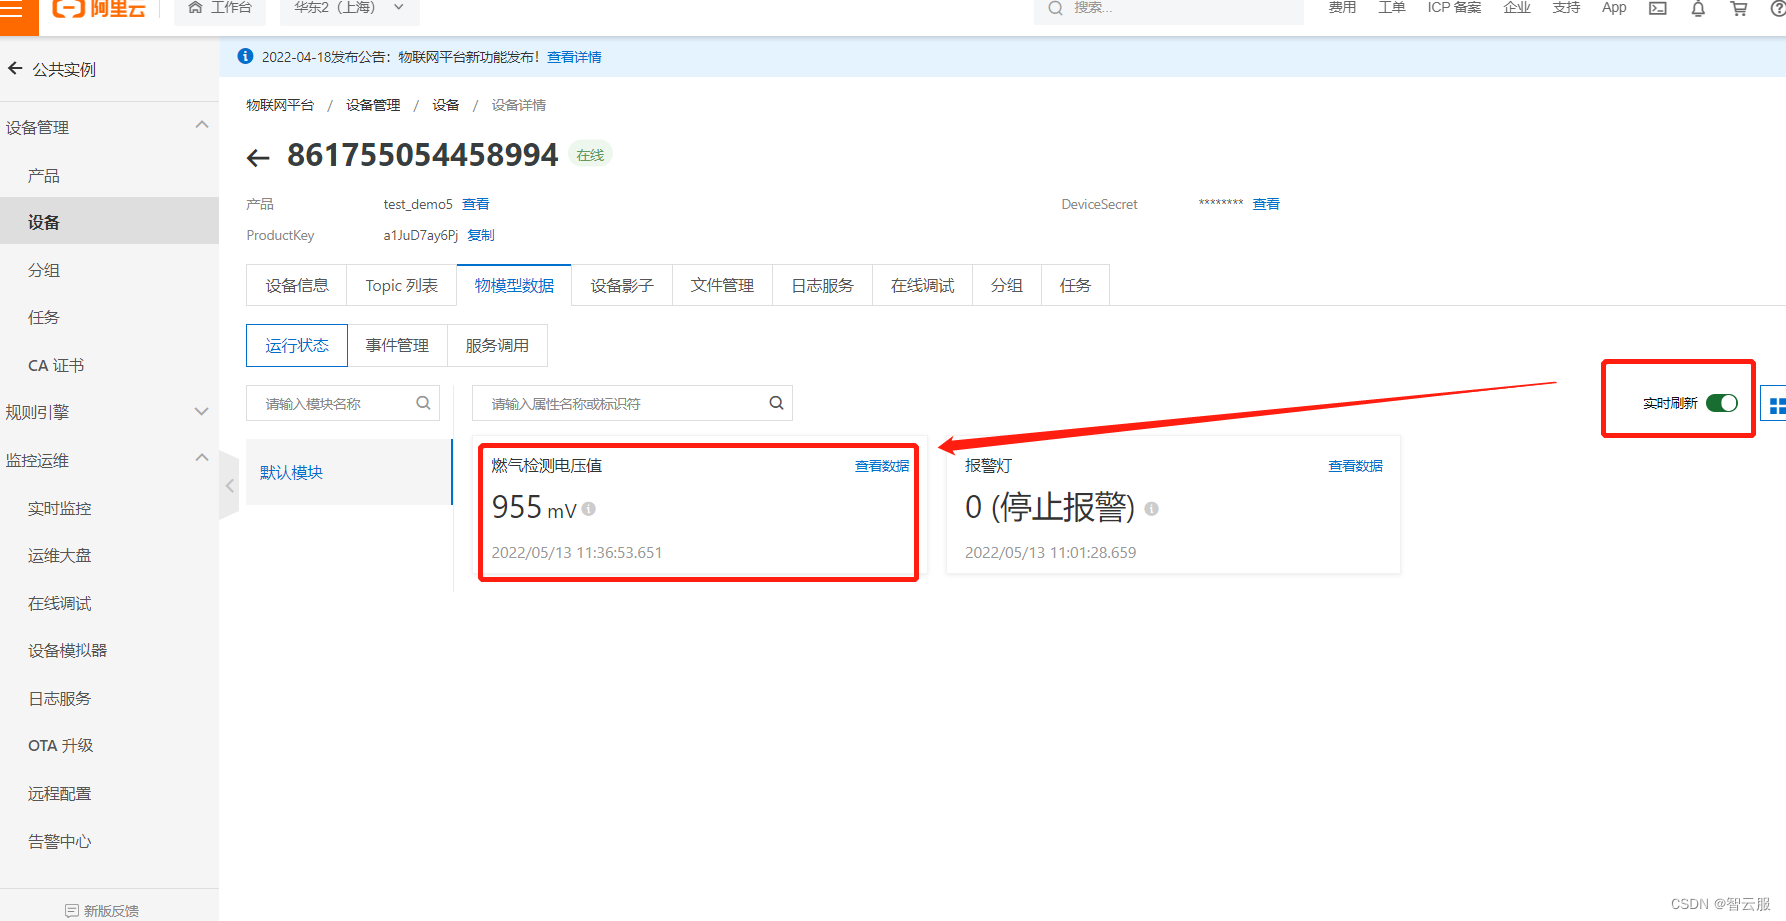
2、云端有数据传入,打开实时刷新,显示数据会自动更新。
3、物联网应用开发
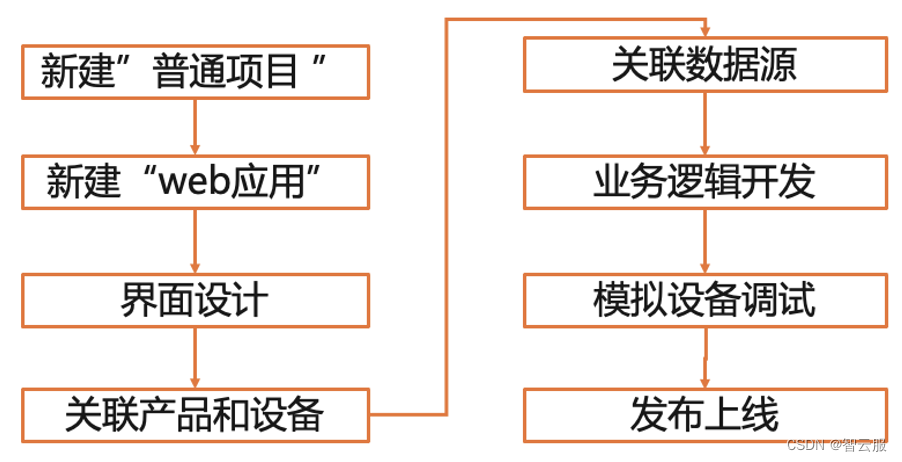
以下是物联网应用开发流程,接下来按以下流程介绍移动端应用的开发。
3.1新建‘普通项目’
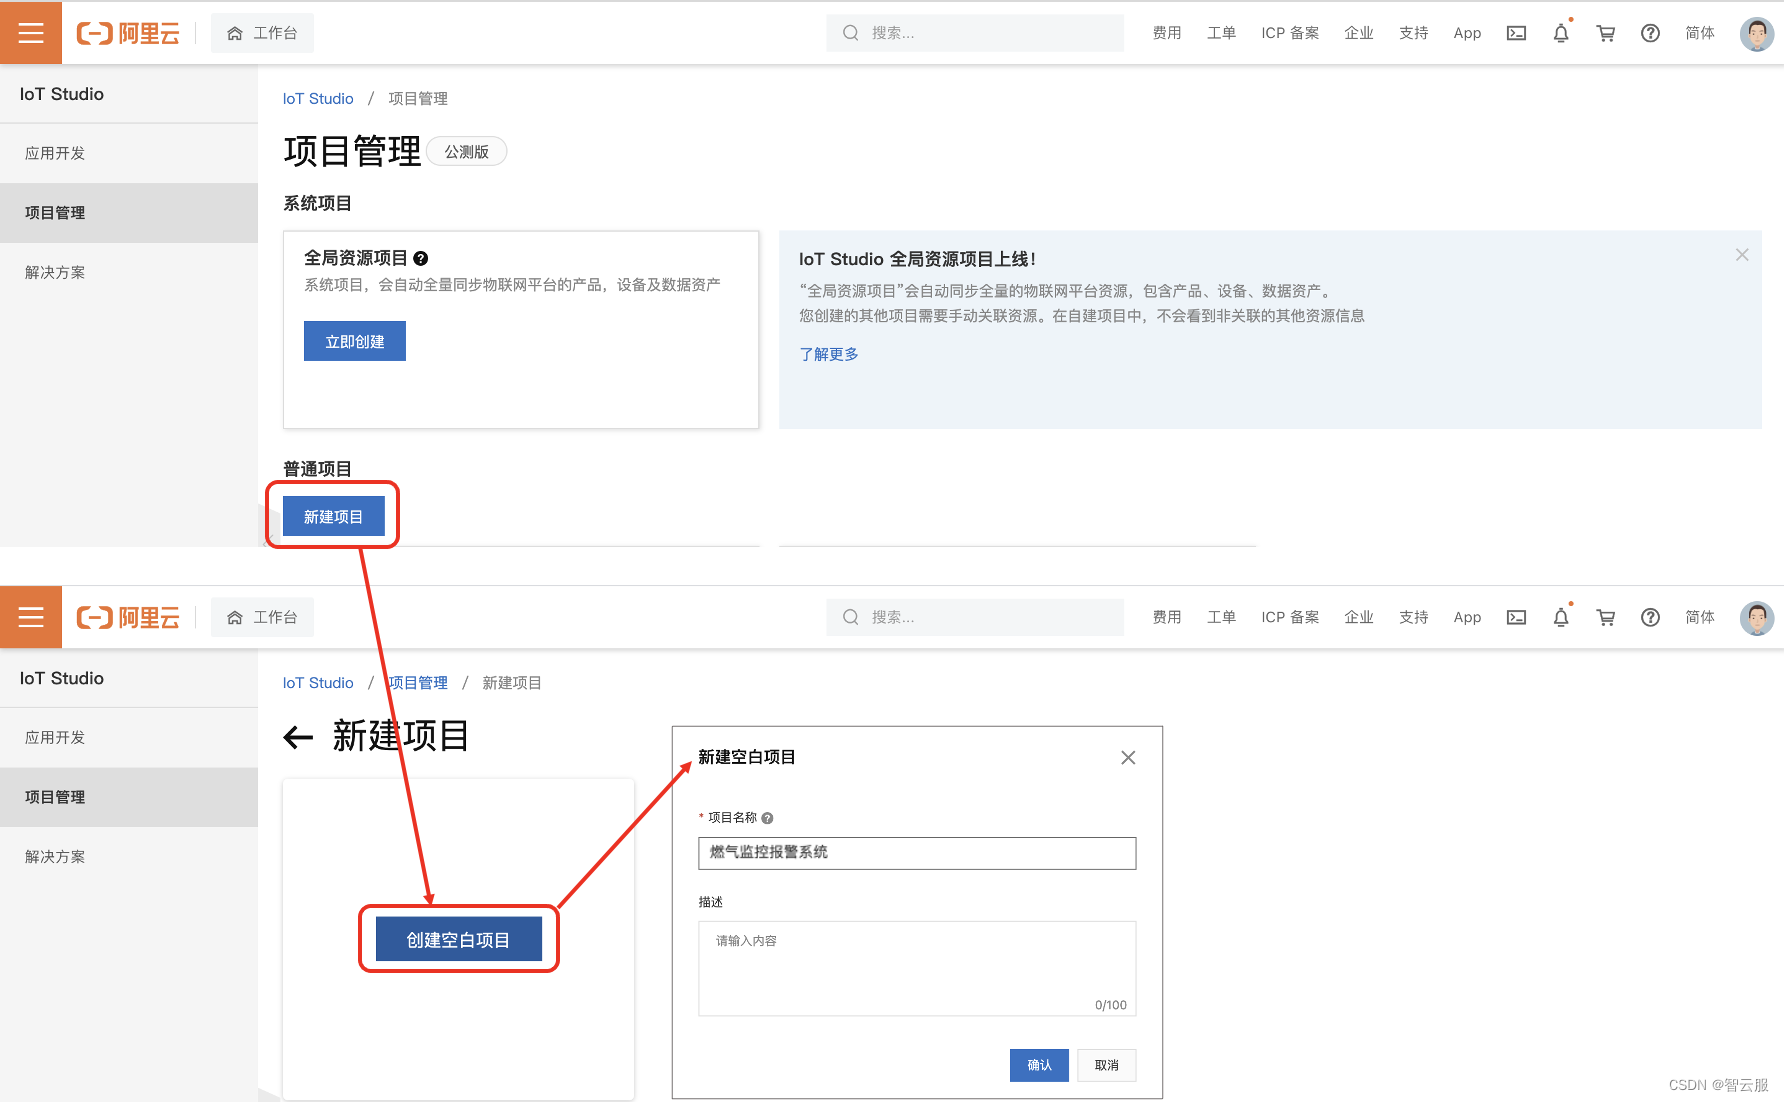
- 使用阿里云IoTStudio创建项目。
- 在项目管理新建空白项目
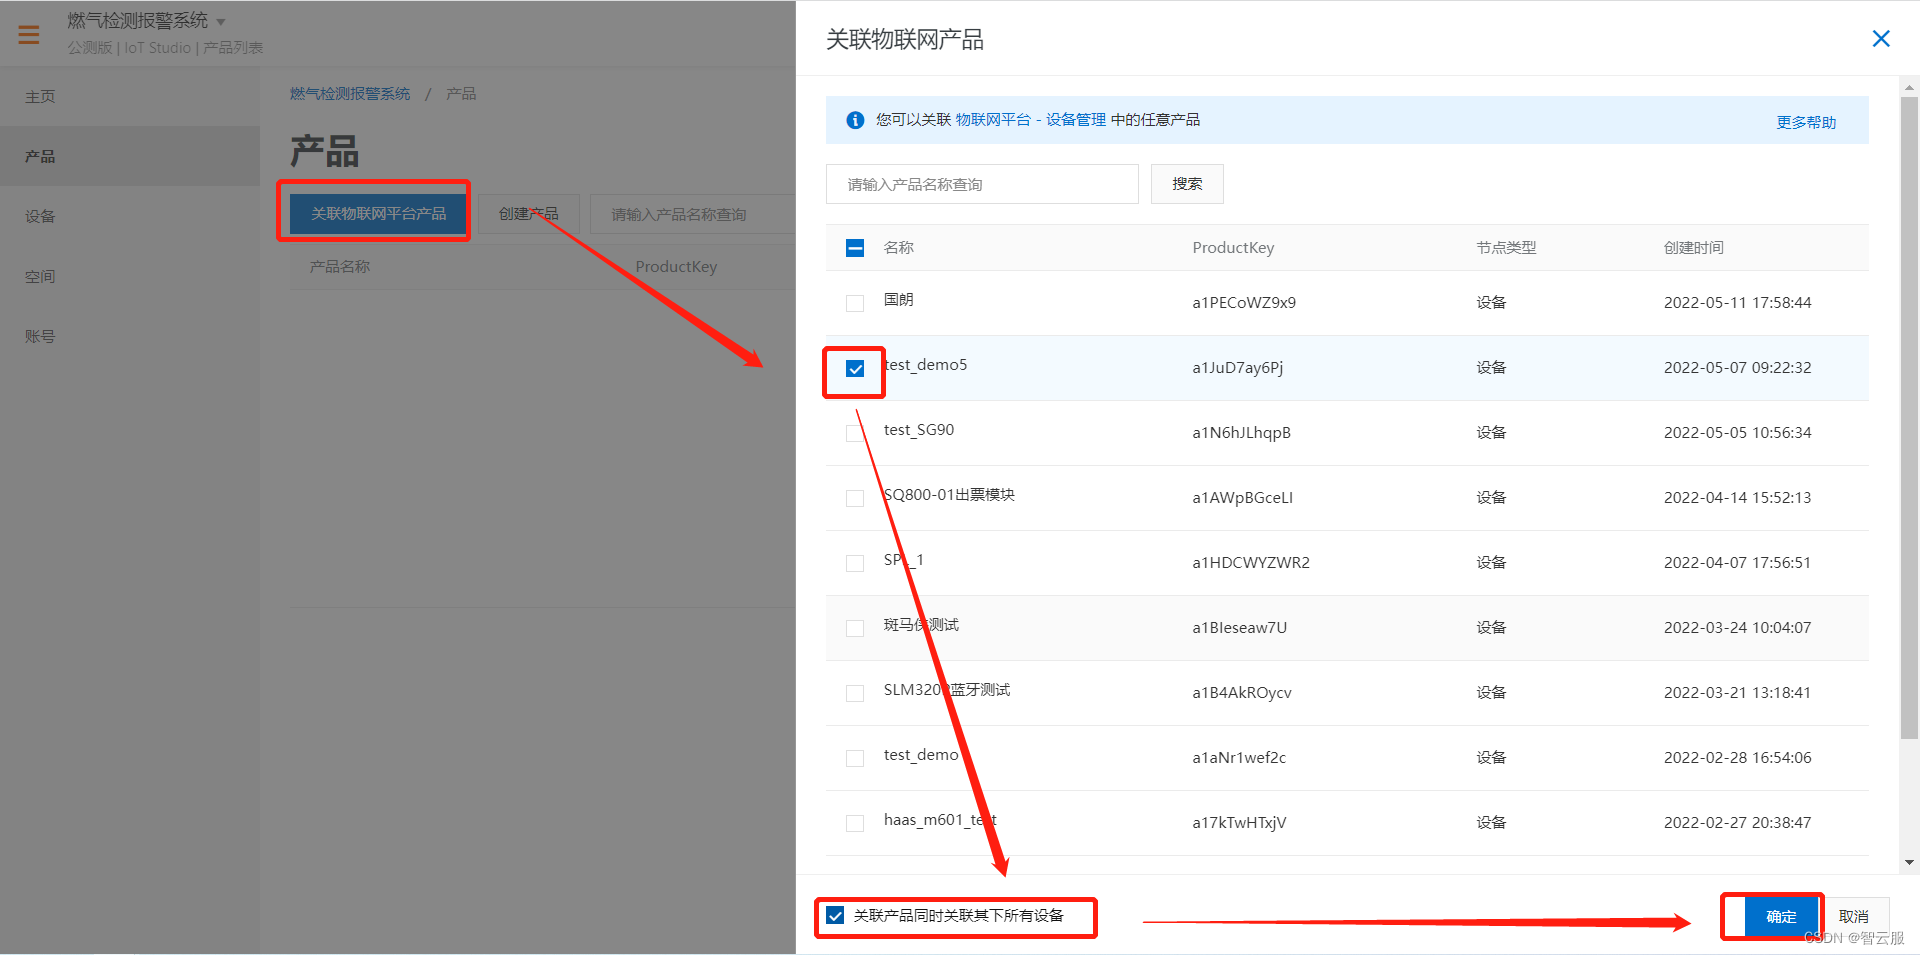
3.2关联产品和设备

3.3新建‘移动应用’
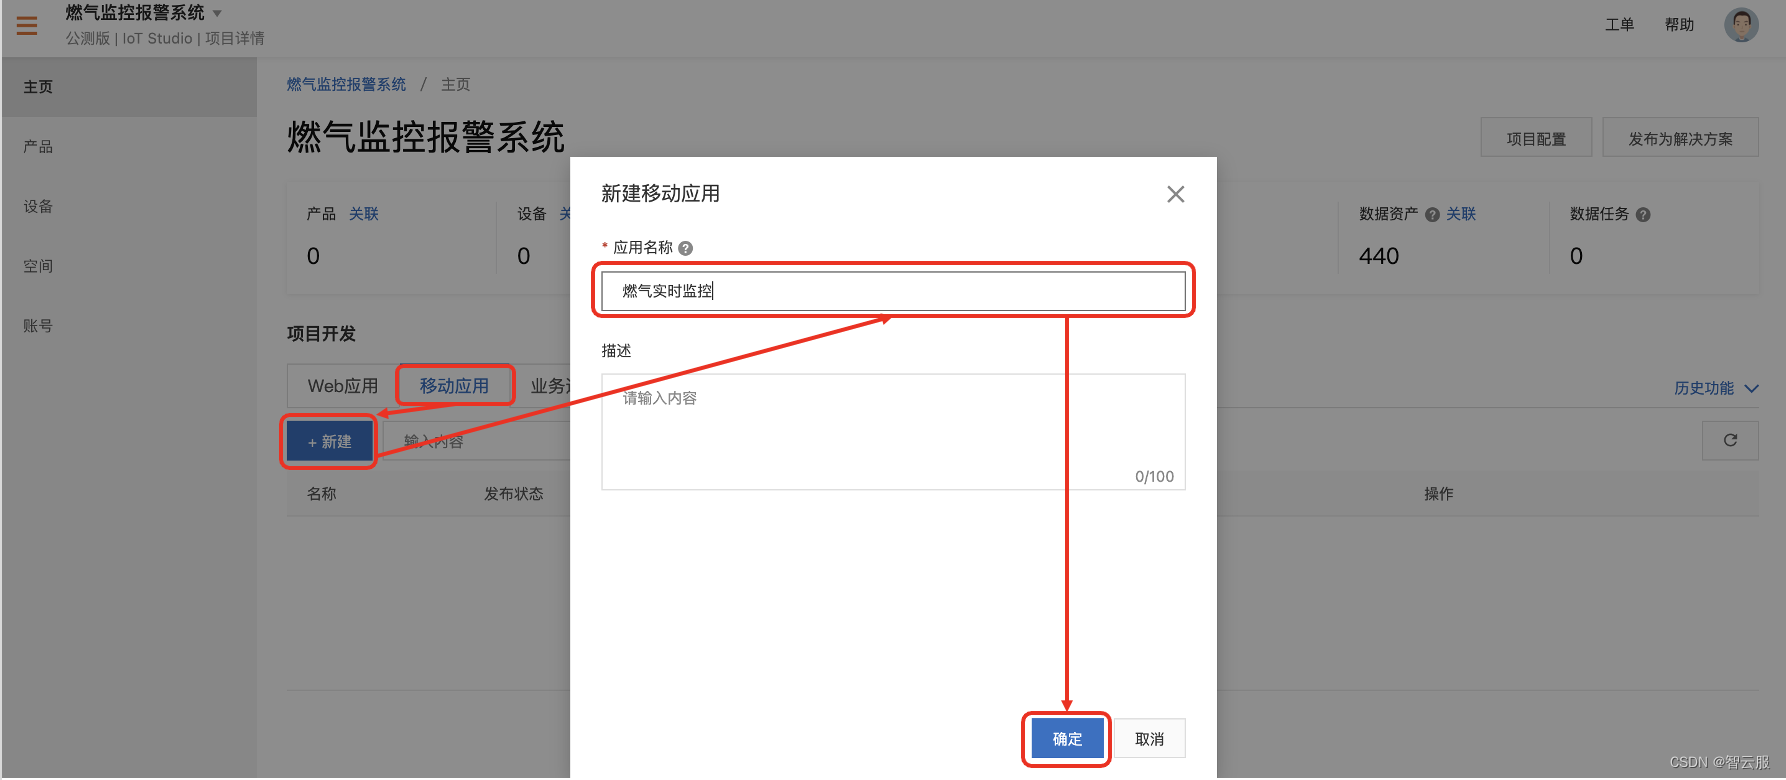
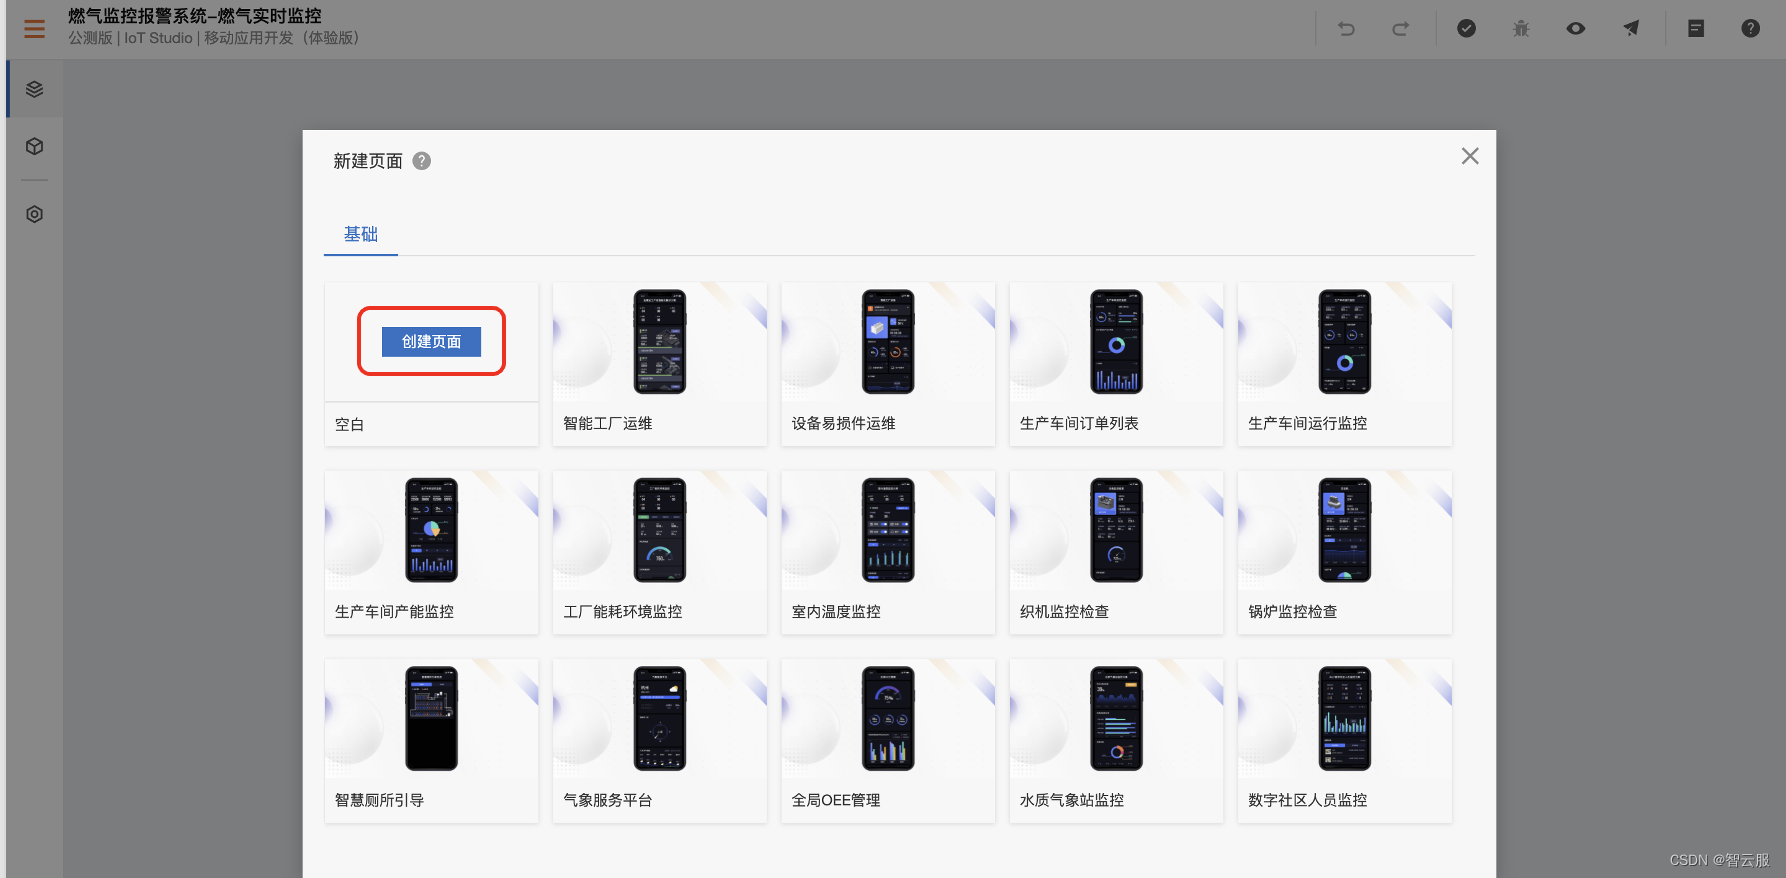
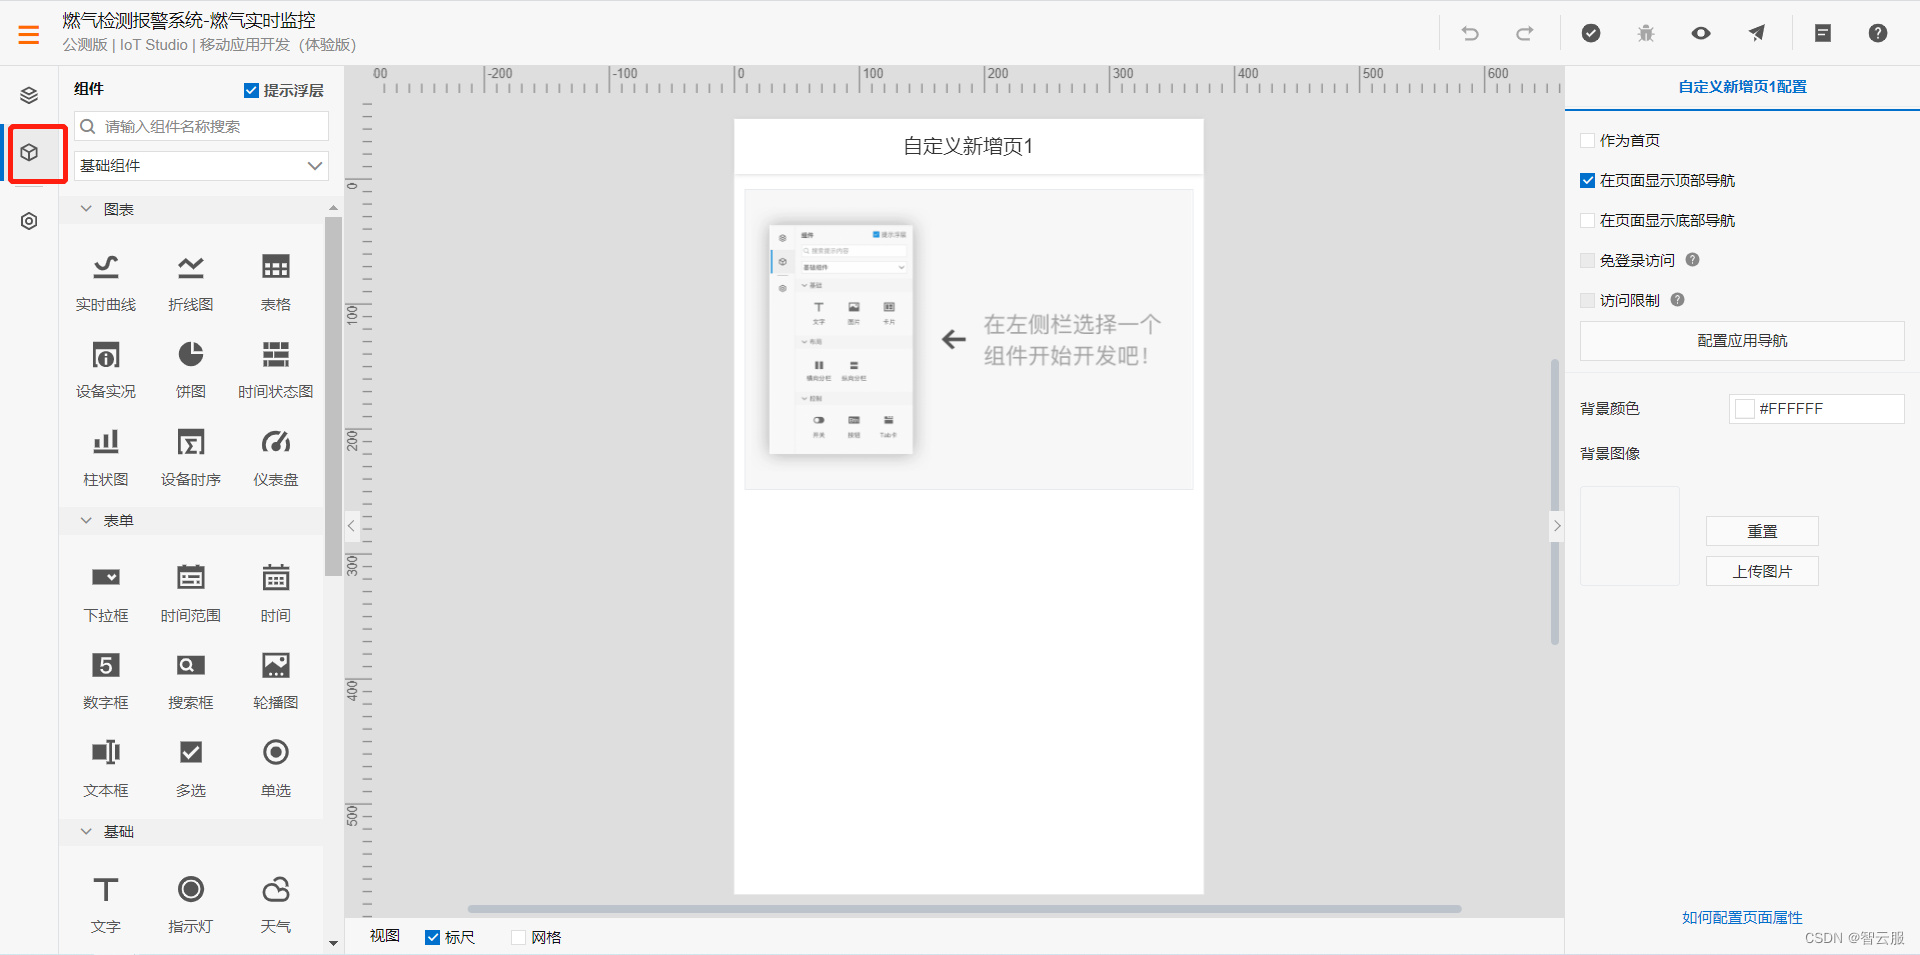
点击上图红框中的‘组件’,就可以看到可用的组件列表。各组件的使用说明请参考组件说明
3.4页面设计
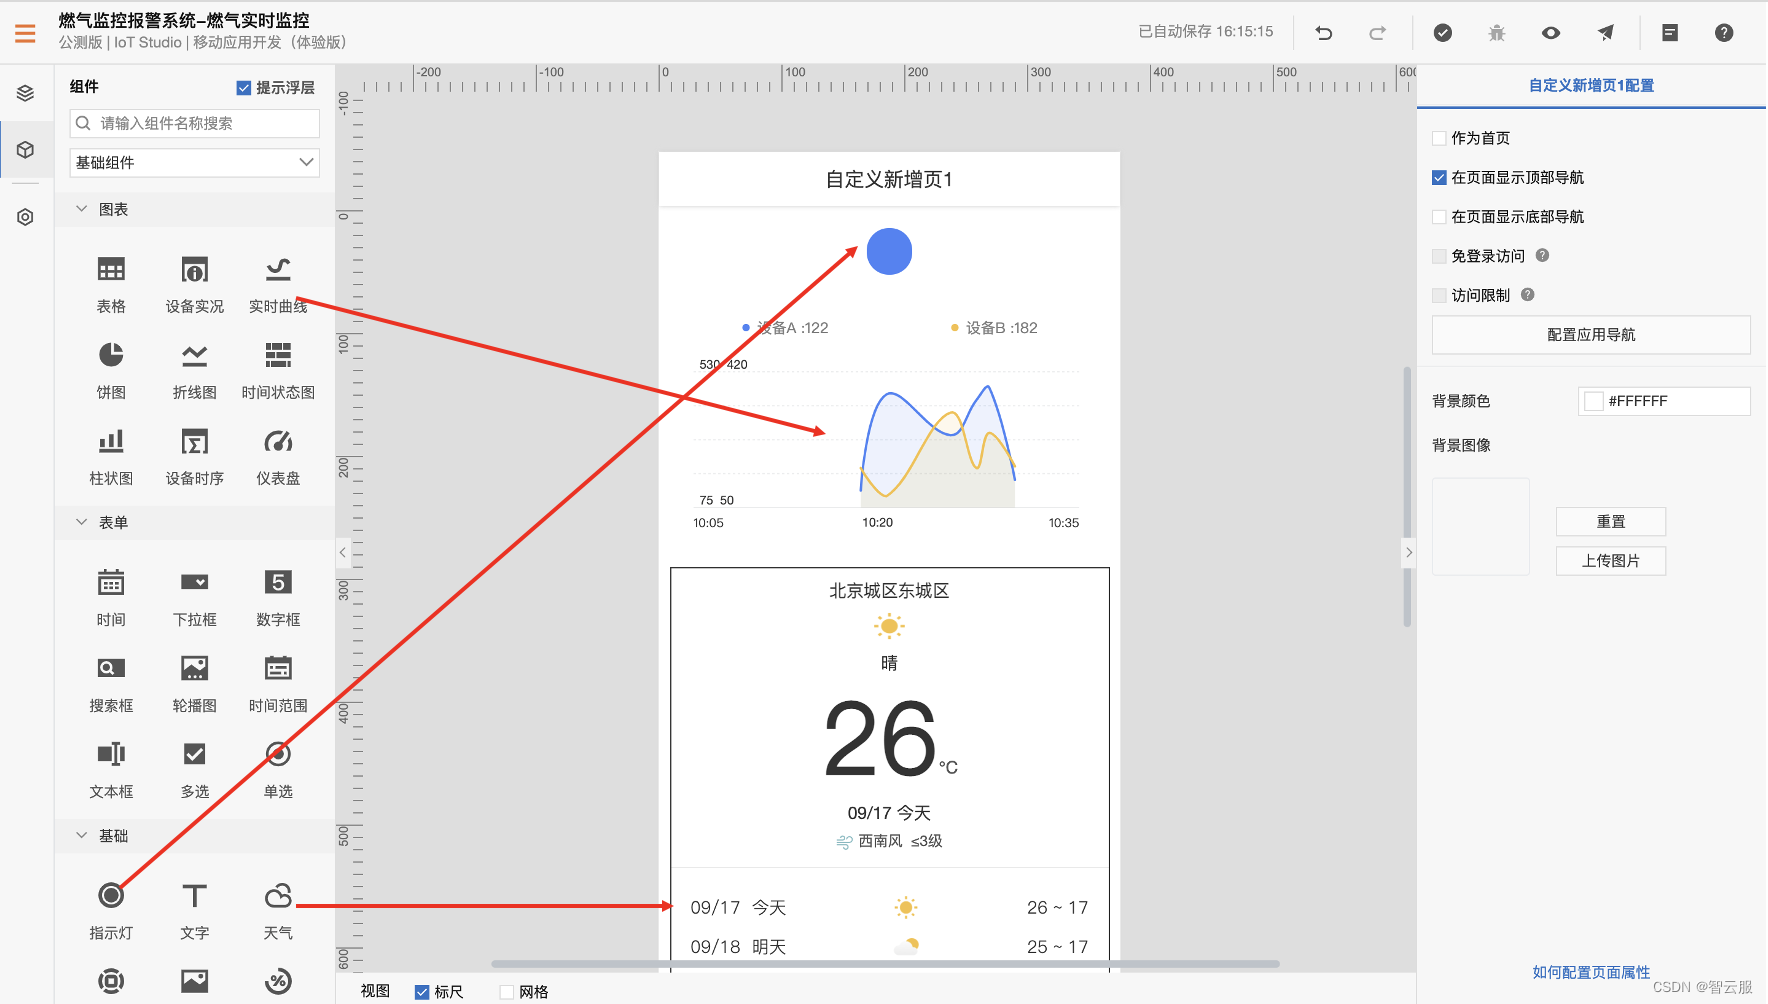
案例使用三个组件:
- 实时曲线 显示传感器实时数据
- 指示灯 显示报警状态
- 天气 用于显示目的地天气
将三个组件拖到中间画布区
3.5关联数据源
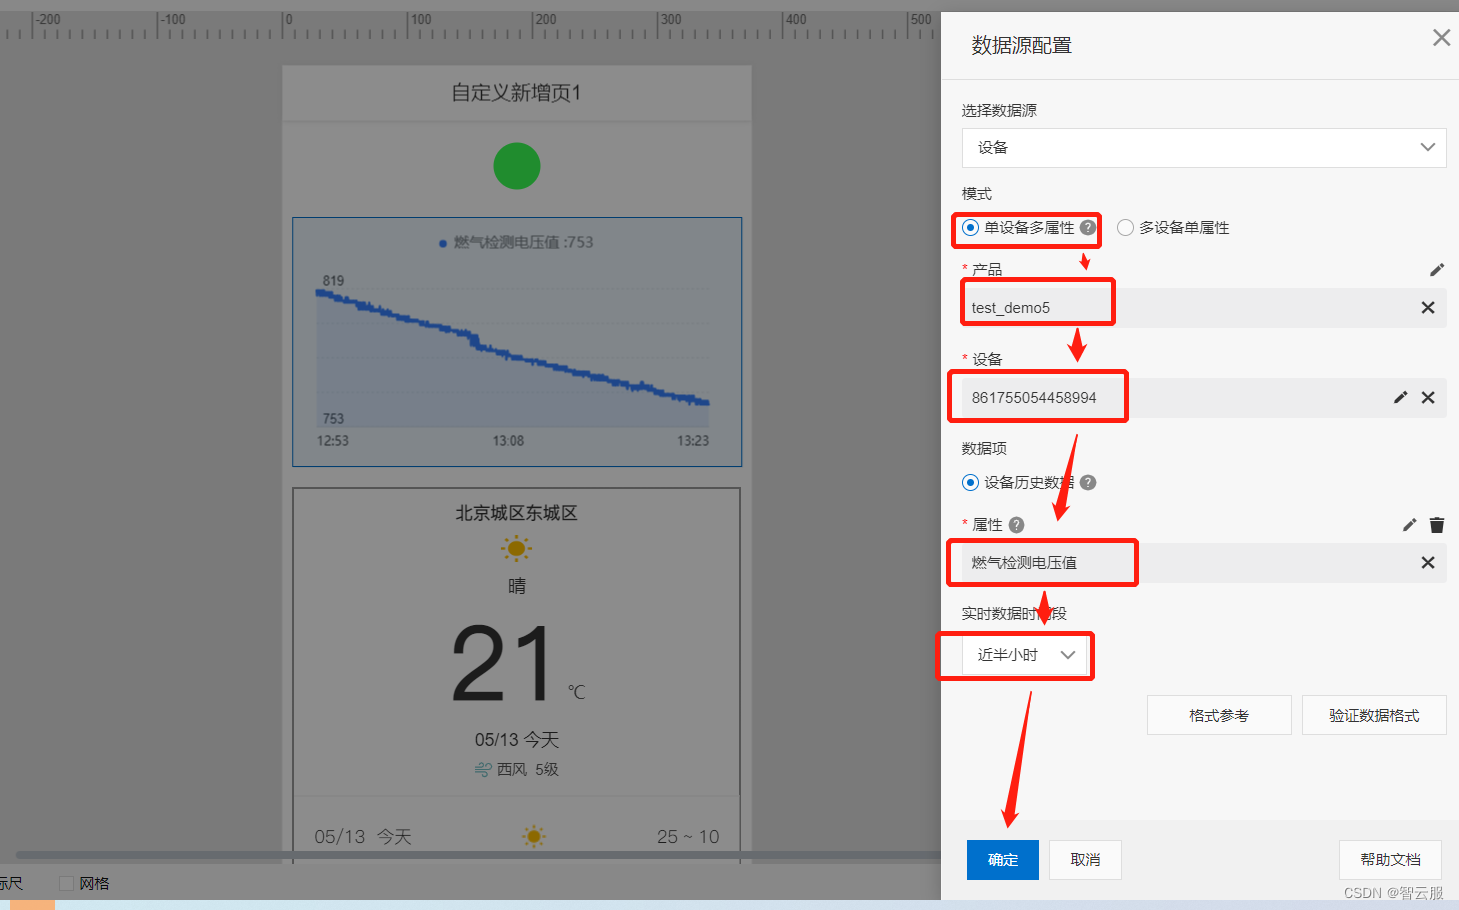
关联数据源分为如下三个步骤
关联产品
关联设备
关联属性
每个组件单独设置
1、‘指示灯’组件设置
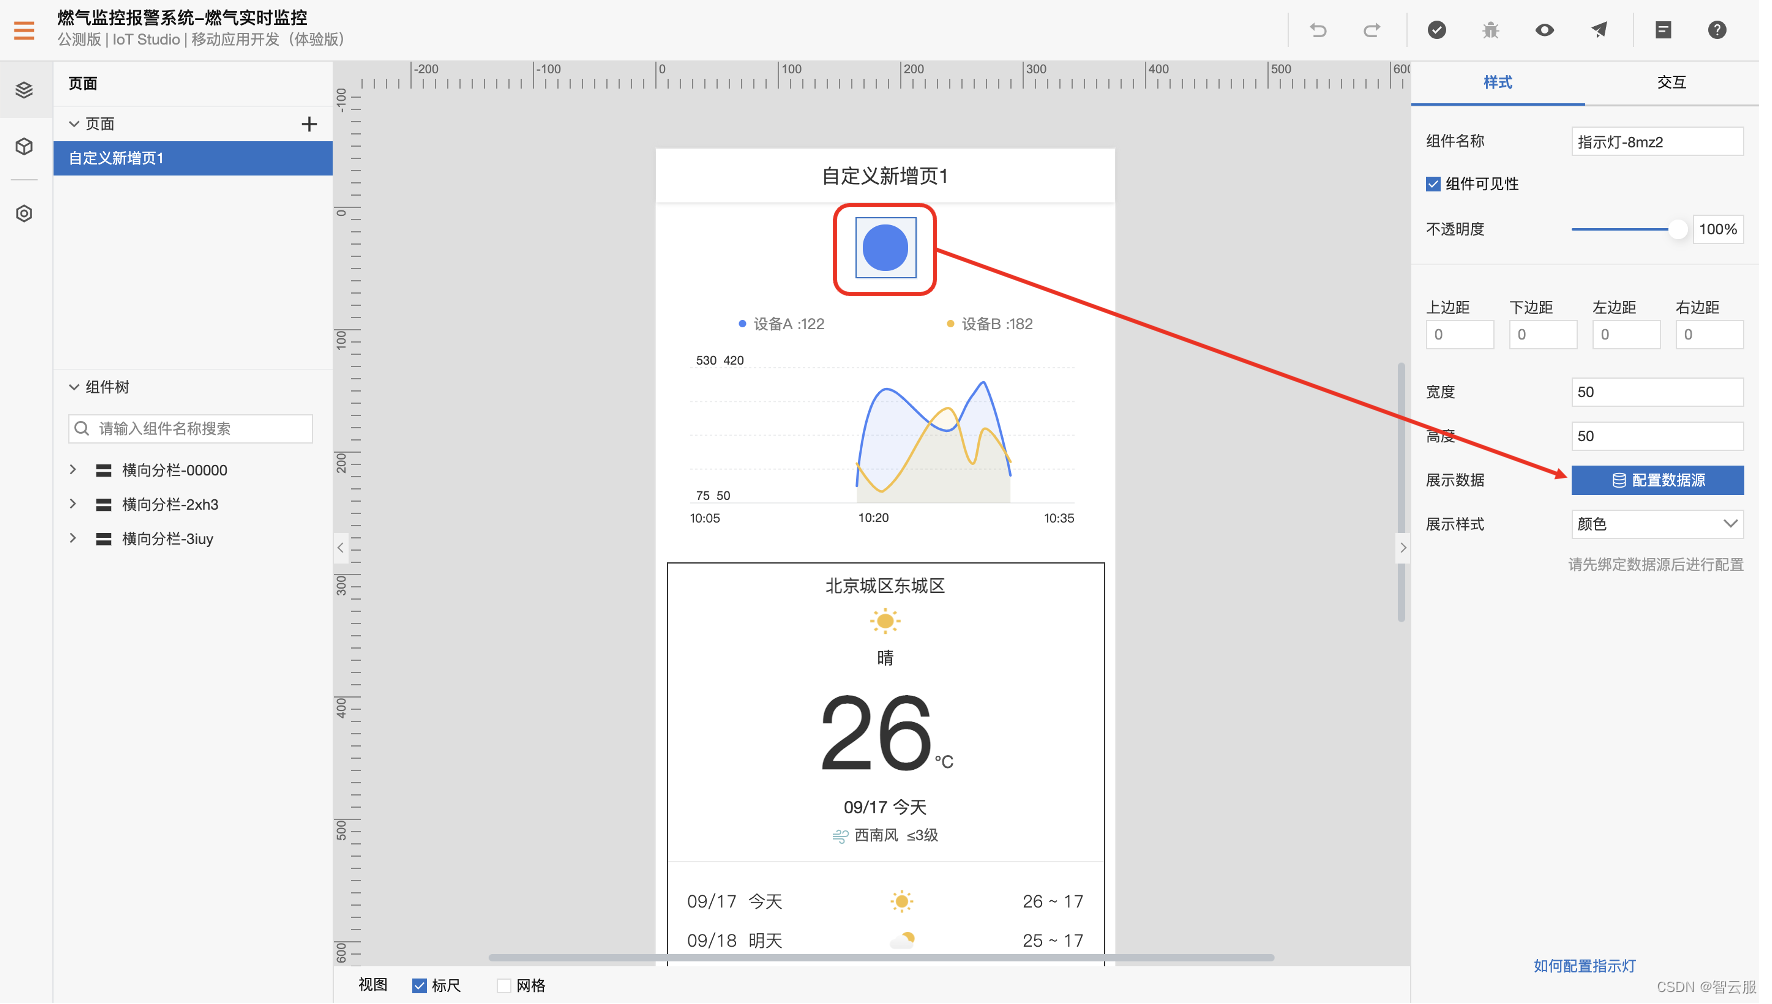
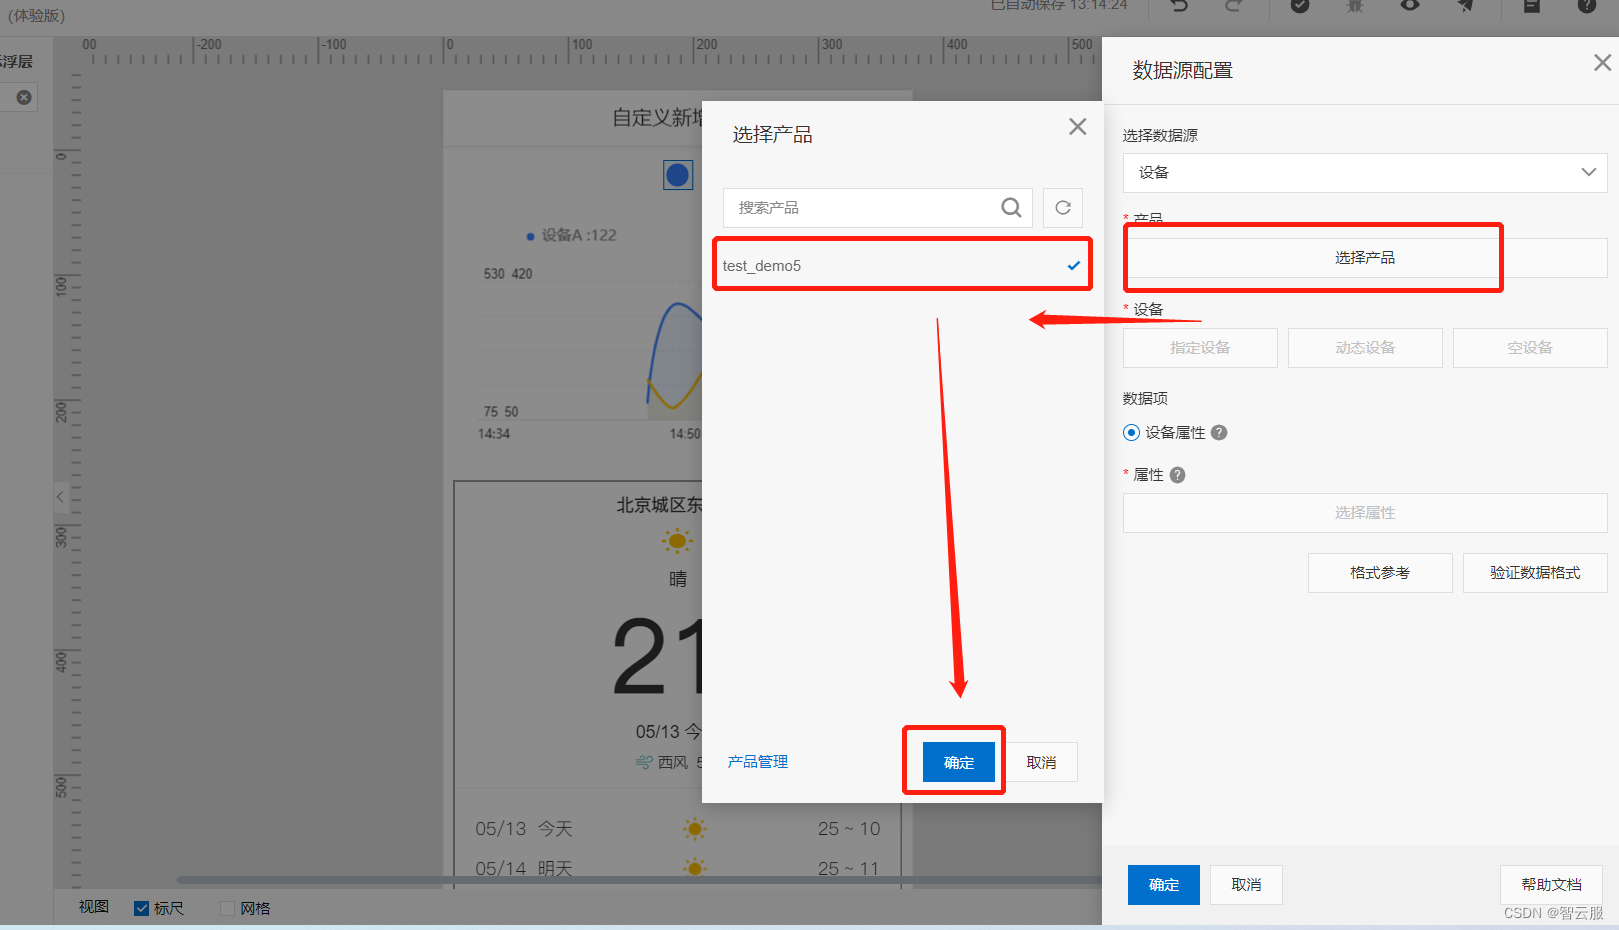
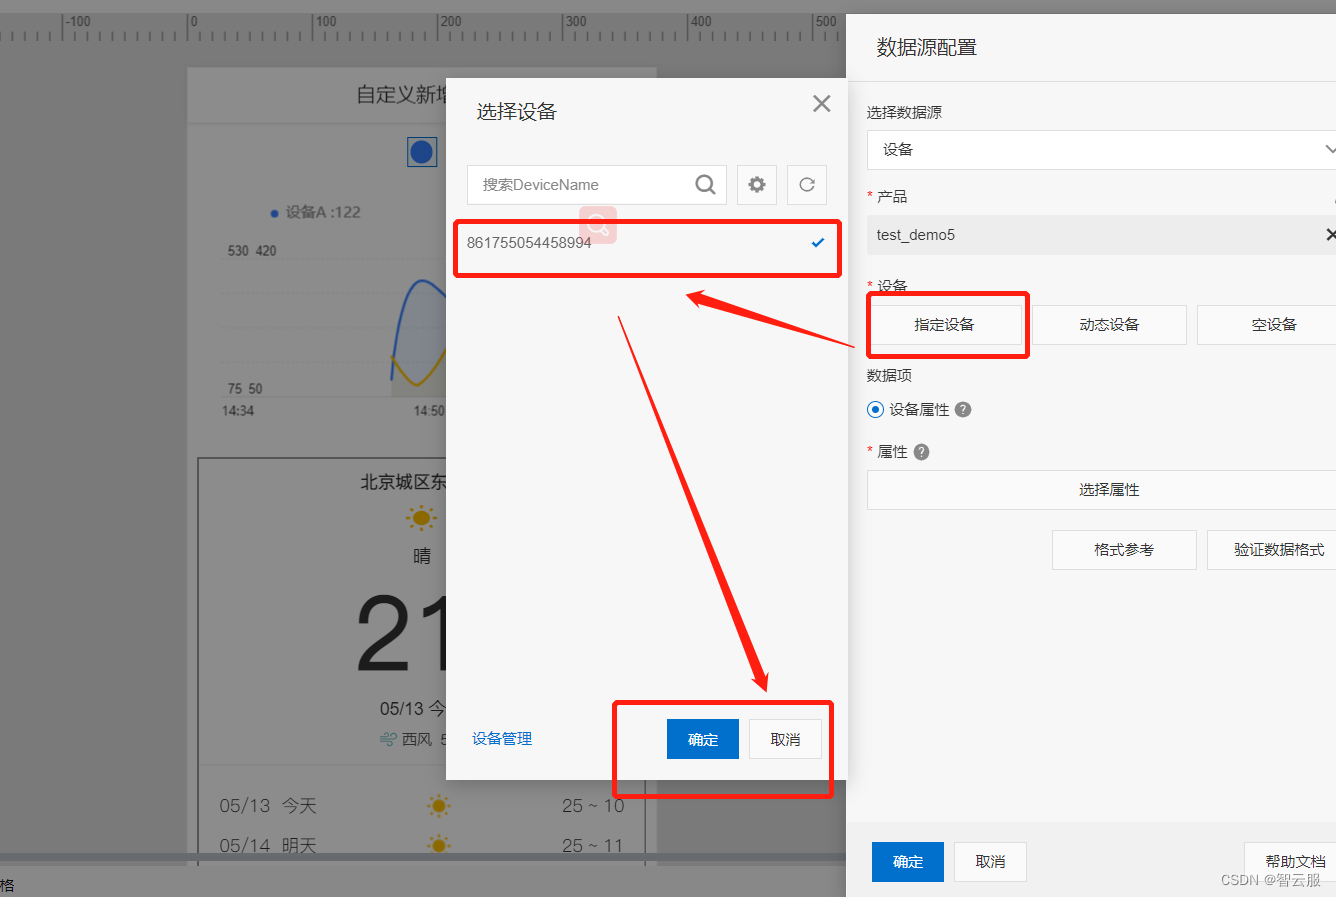
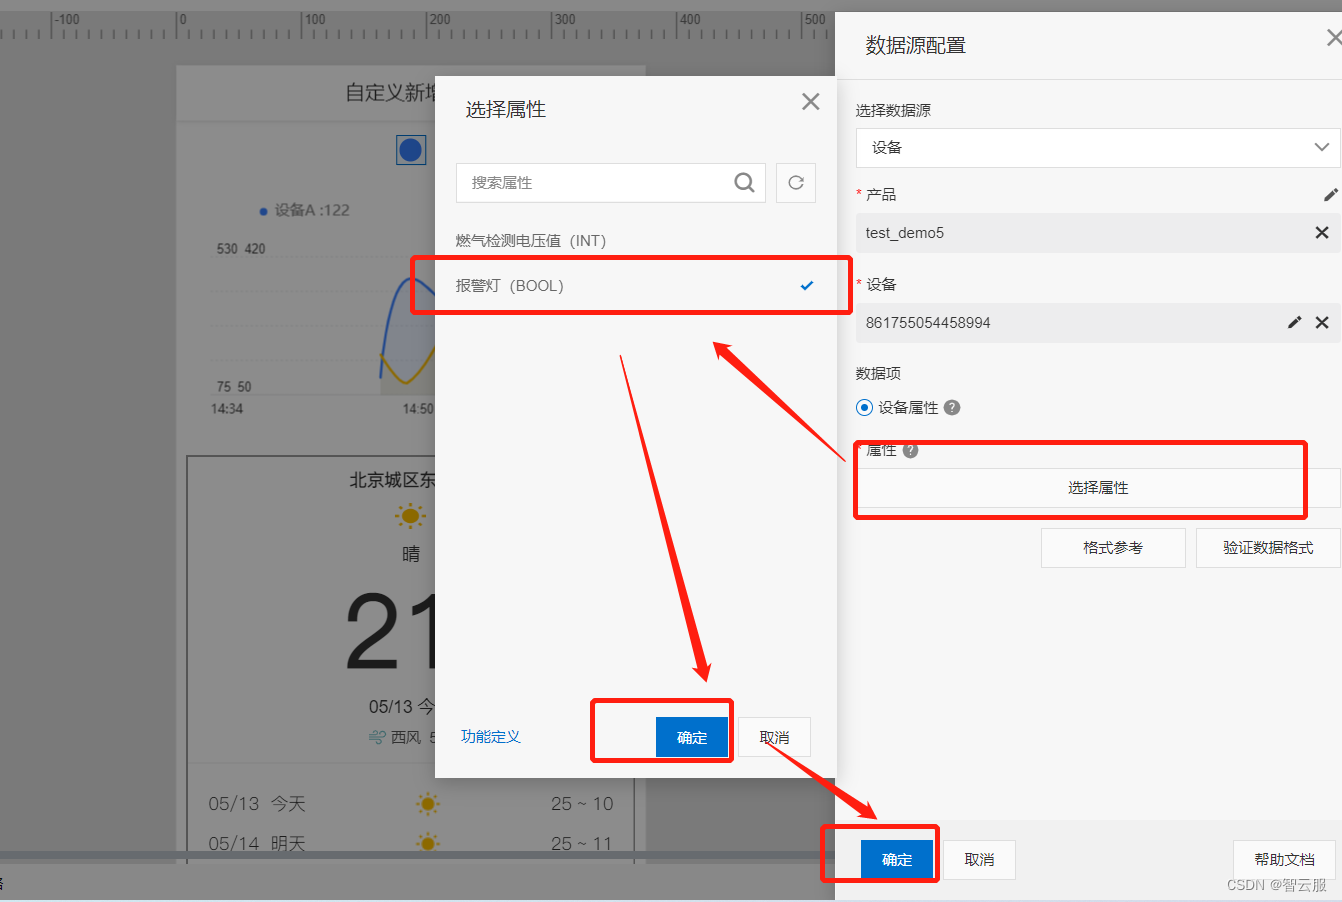
设置好了之后,设置报警
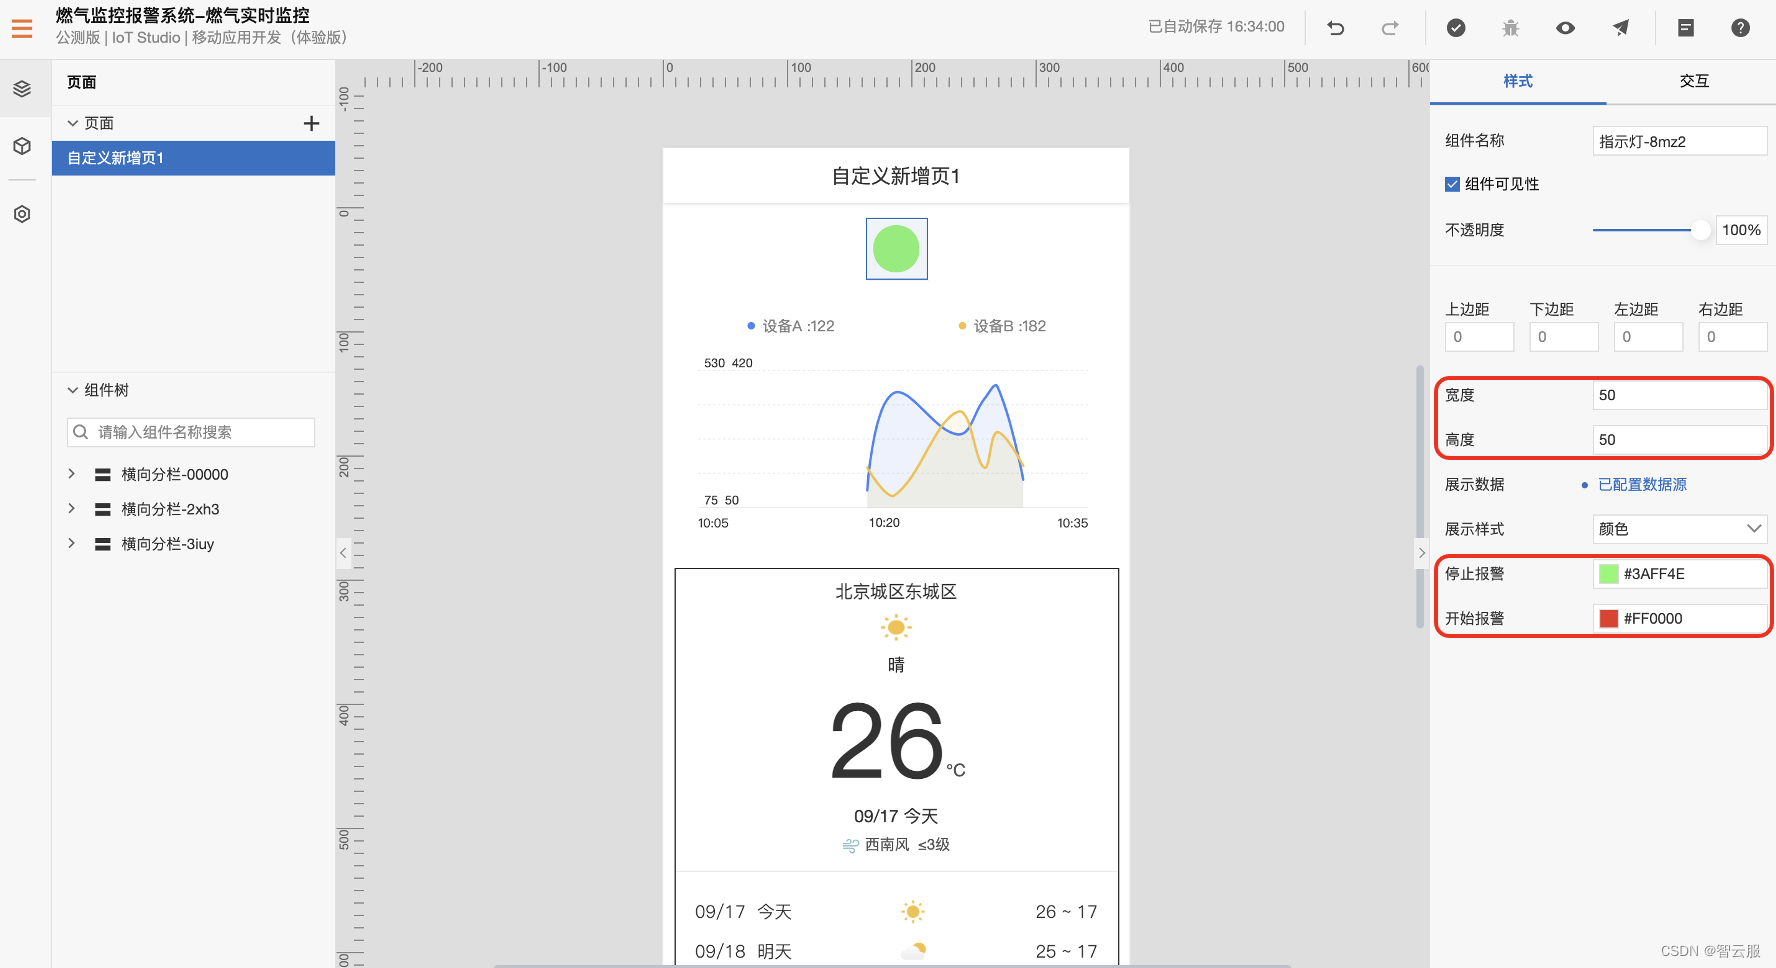
2、同样的方法设置‘实时曲线’。
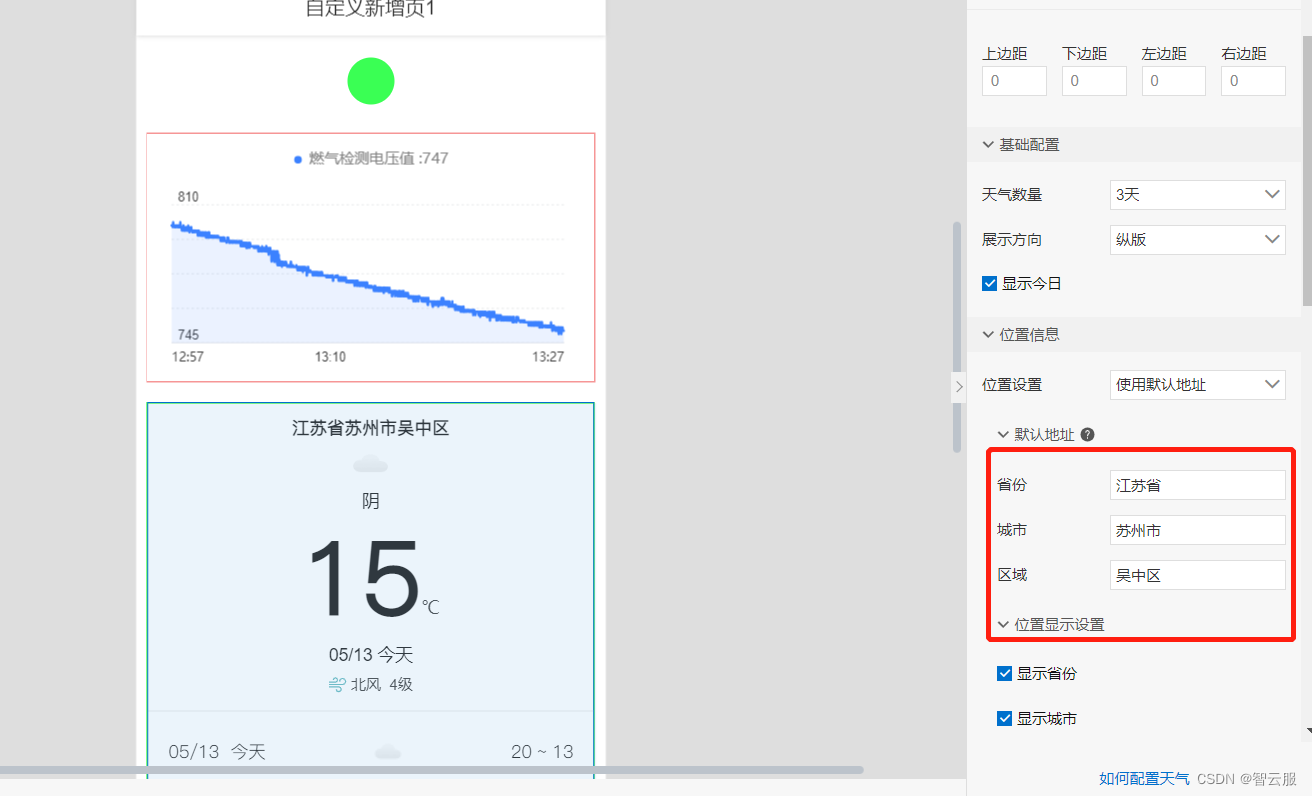
3、设置‘天气’组件,选择需要的地点。
3.6业务逻辑开发
业务逻辑的主要目的是为了方便用户设定物联网设备端的行为逻辑,常规的物联网系统都是在设备端固话行为逻辑,出厂后如果需要修改设备行为,则需要进行OTA升级。
新建一条燃气超阈值就报警的规则。
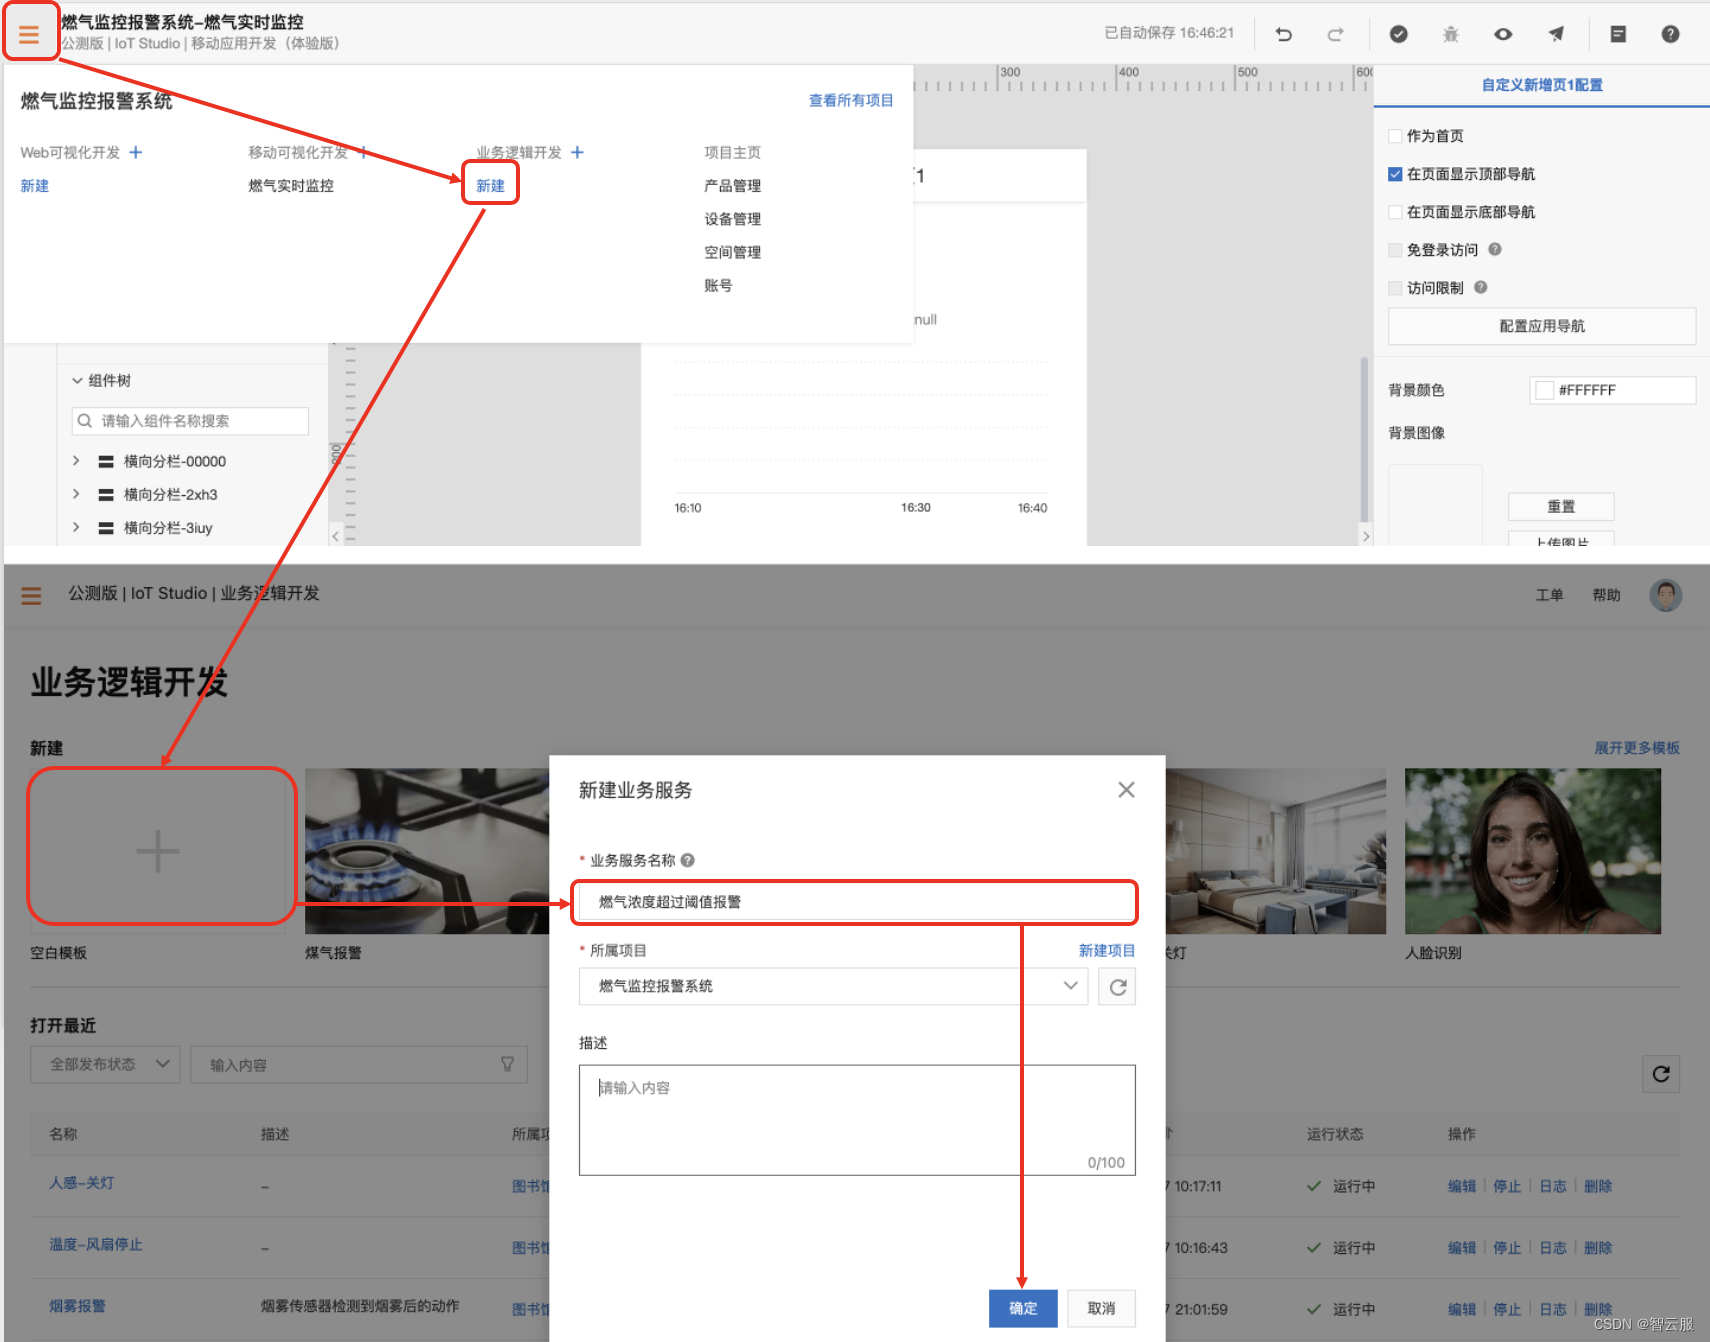
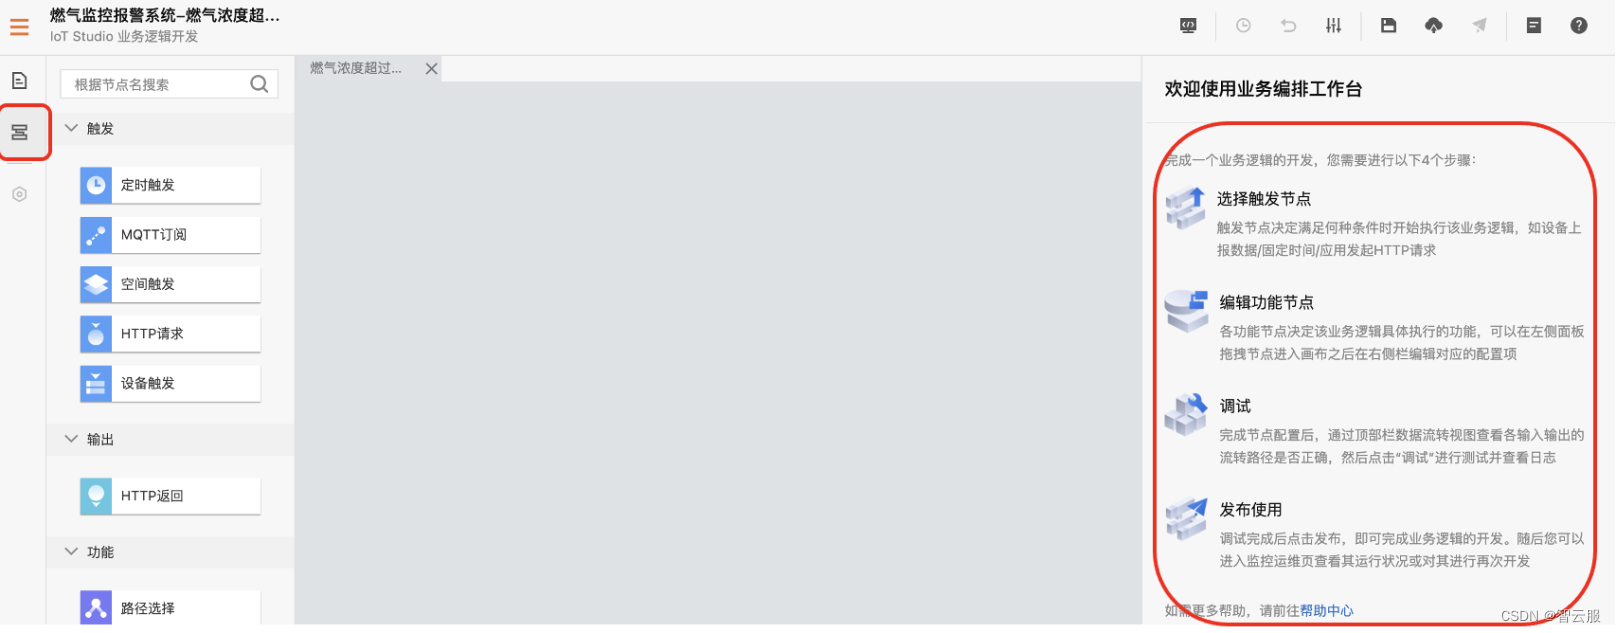
系统自动进入到业务逻辑页面,点击左侧‘节点’,右侧是业务逻辑介绍。
1、选择目标节点
此逻辑需要判断设备上传的燃气电压值,当电压值超过阈值就打开报警,否则关闭报警。需要四个节点:
- 设备触发节点
- 条件判断节点
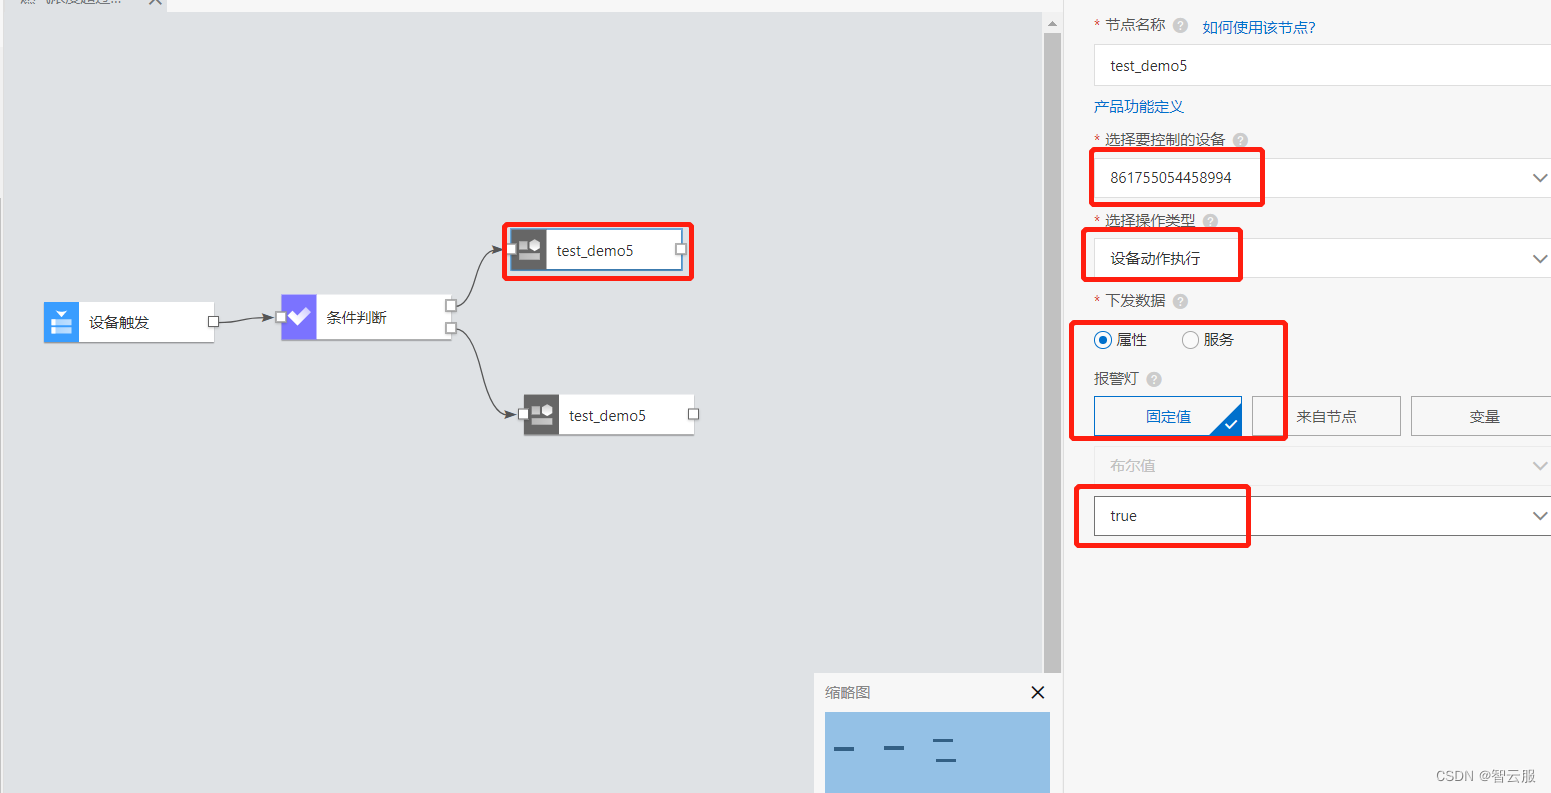
- 开启报警灯节点
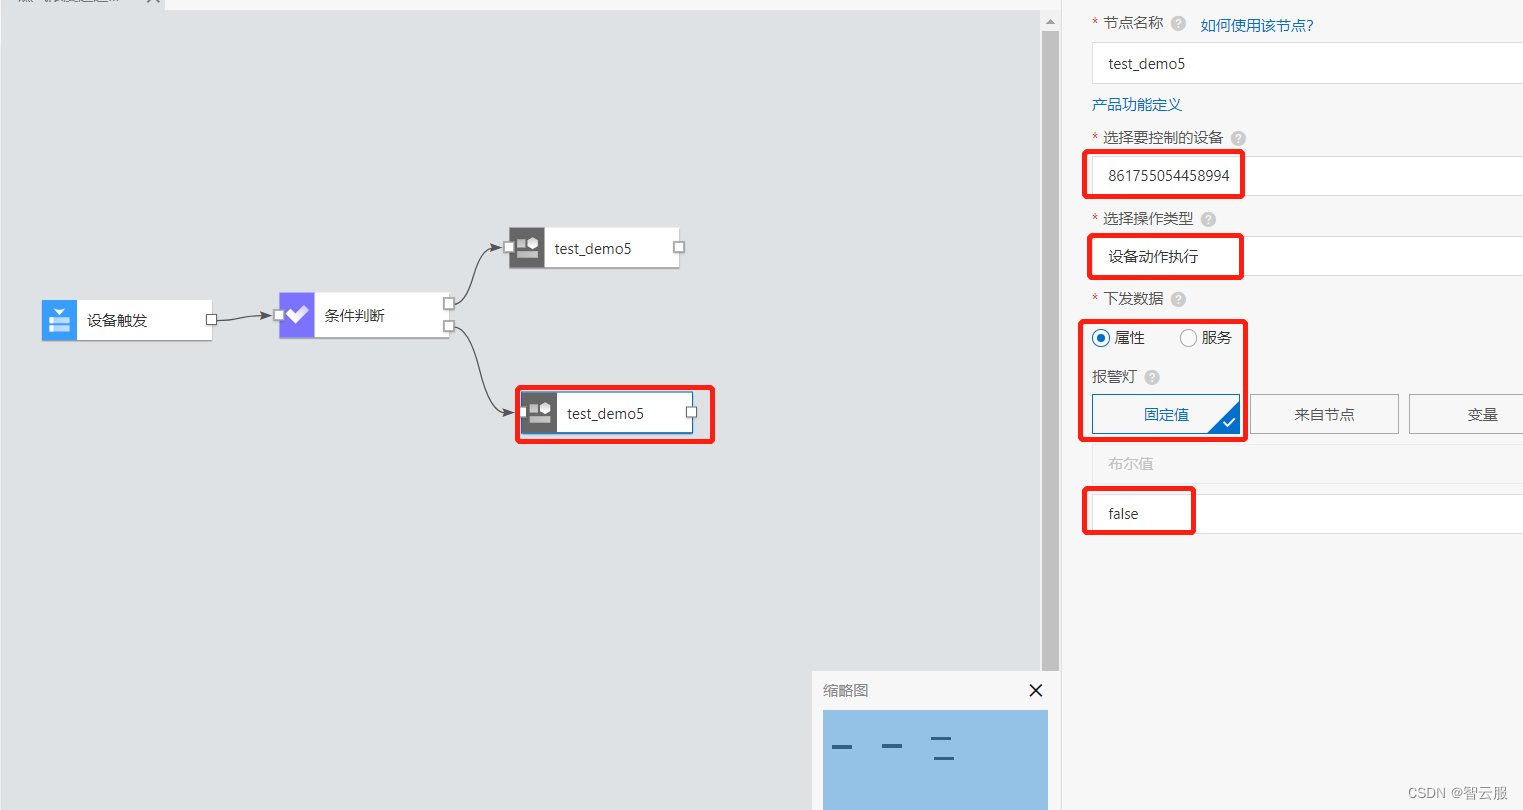
- 关闭报警灯节点
分别从左侧拖出需要的节点。
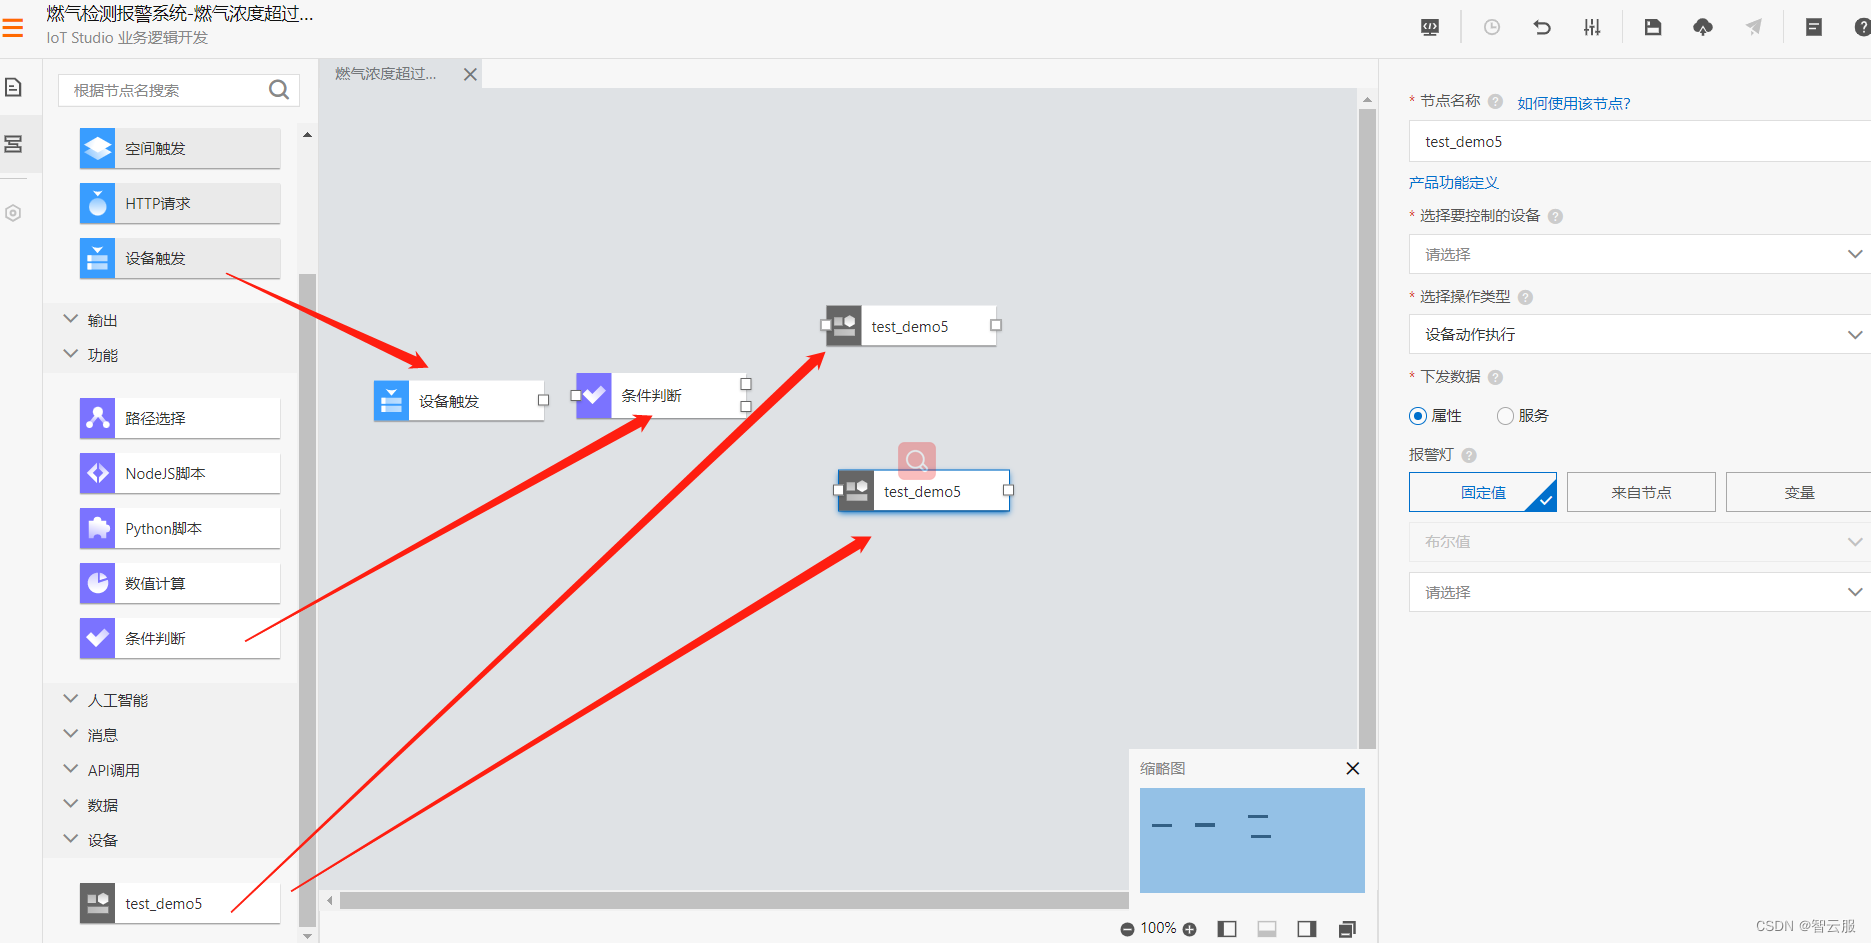
2、建立节点间的关联关系,拖动鼠标将节点连接

3、业务逻辑编辑
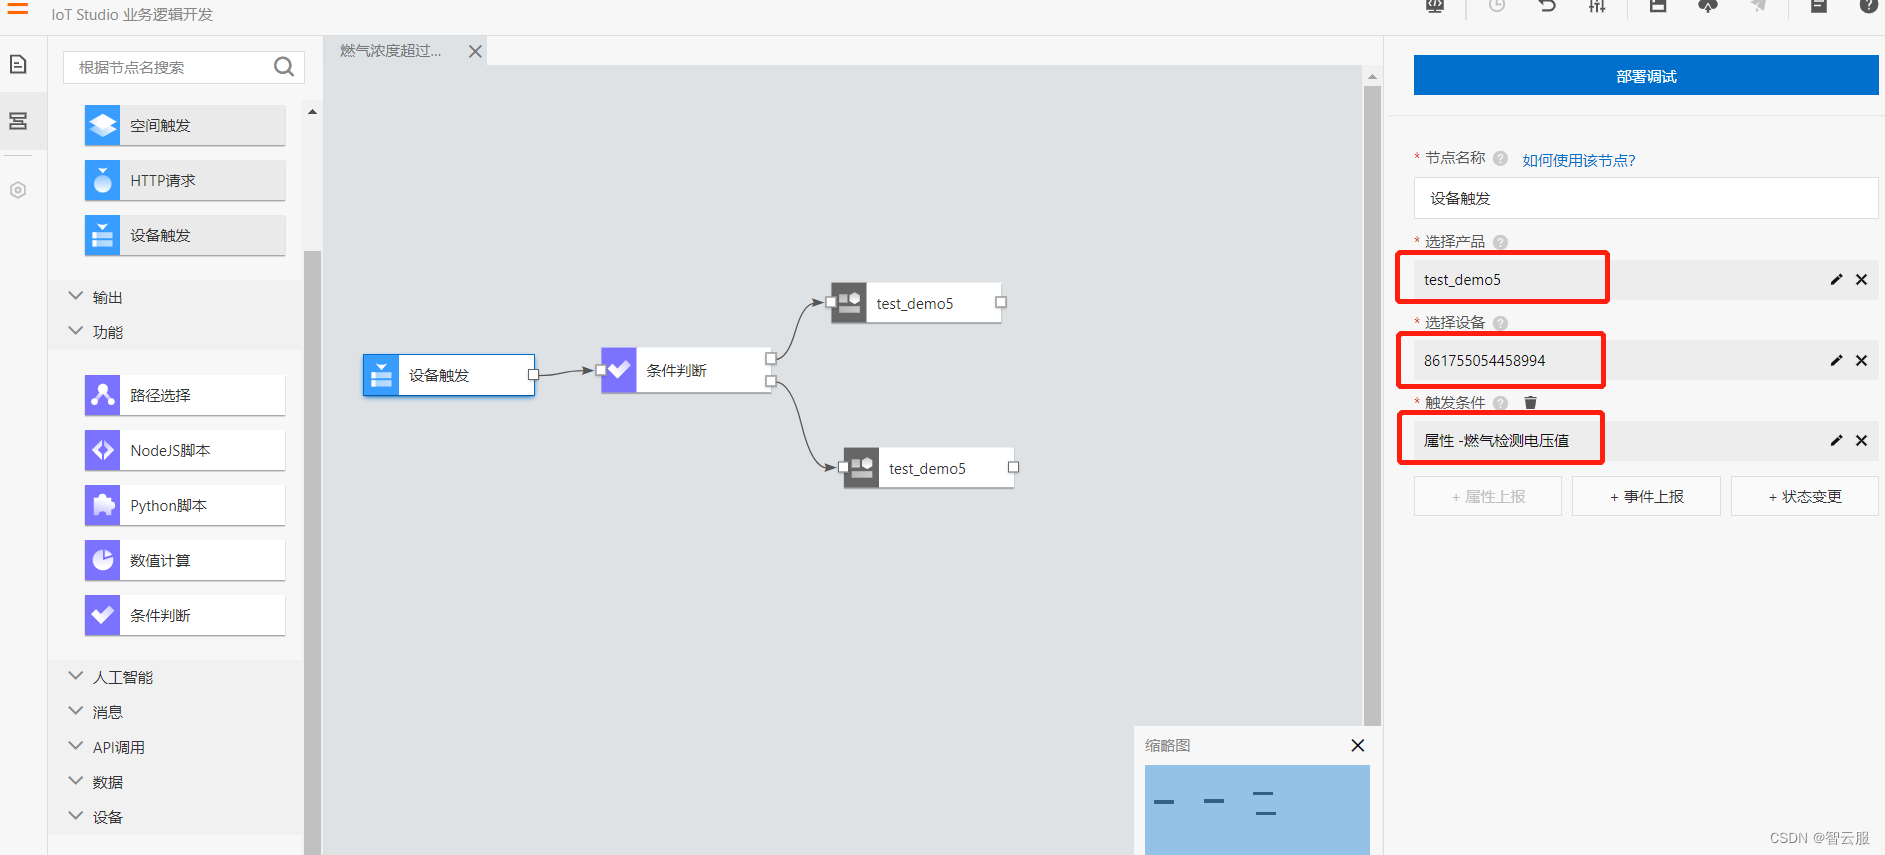
- 设备触发节点
- 条件判断节点
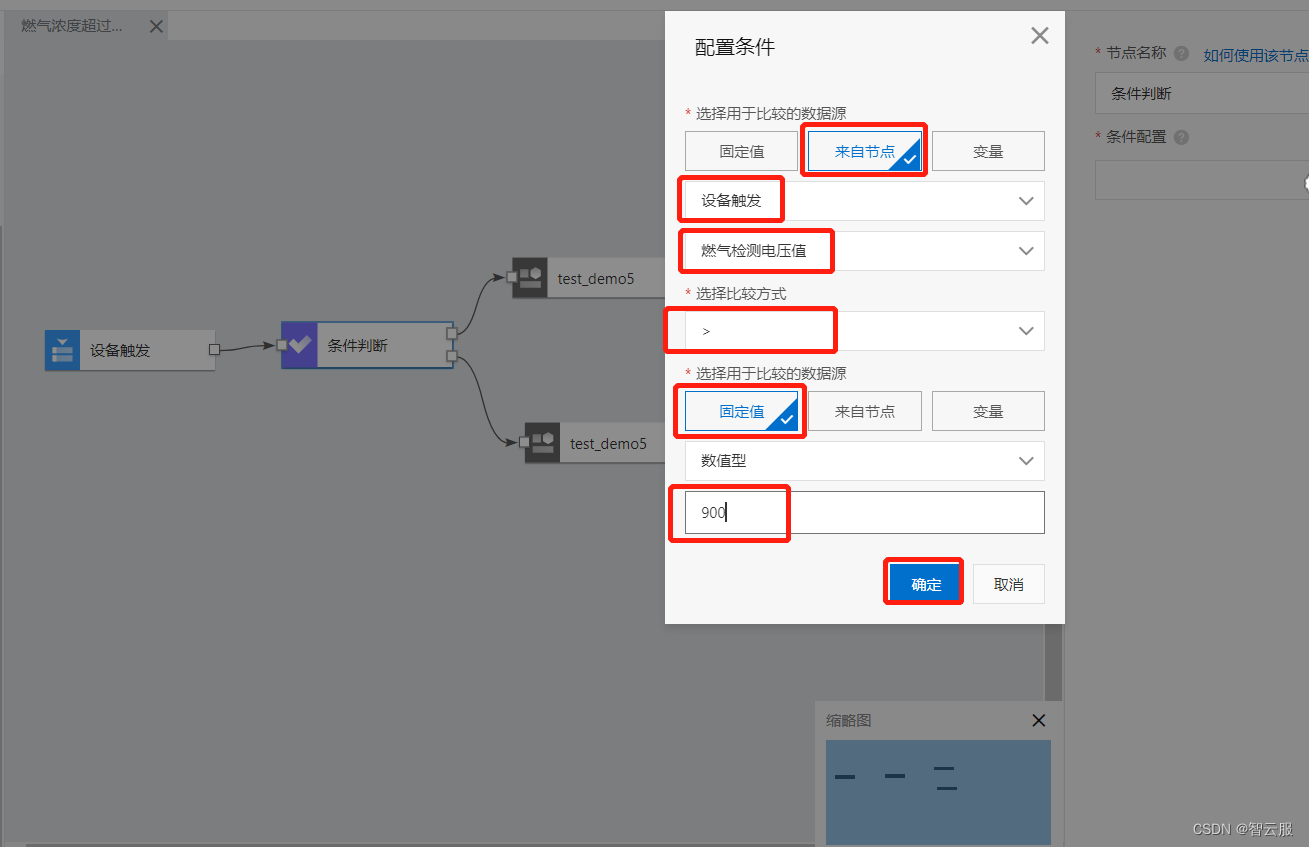
设备节点行为设定
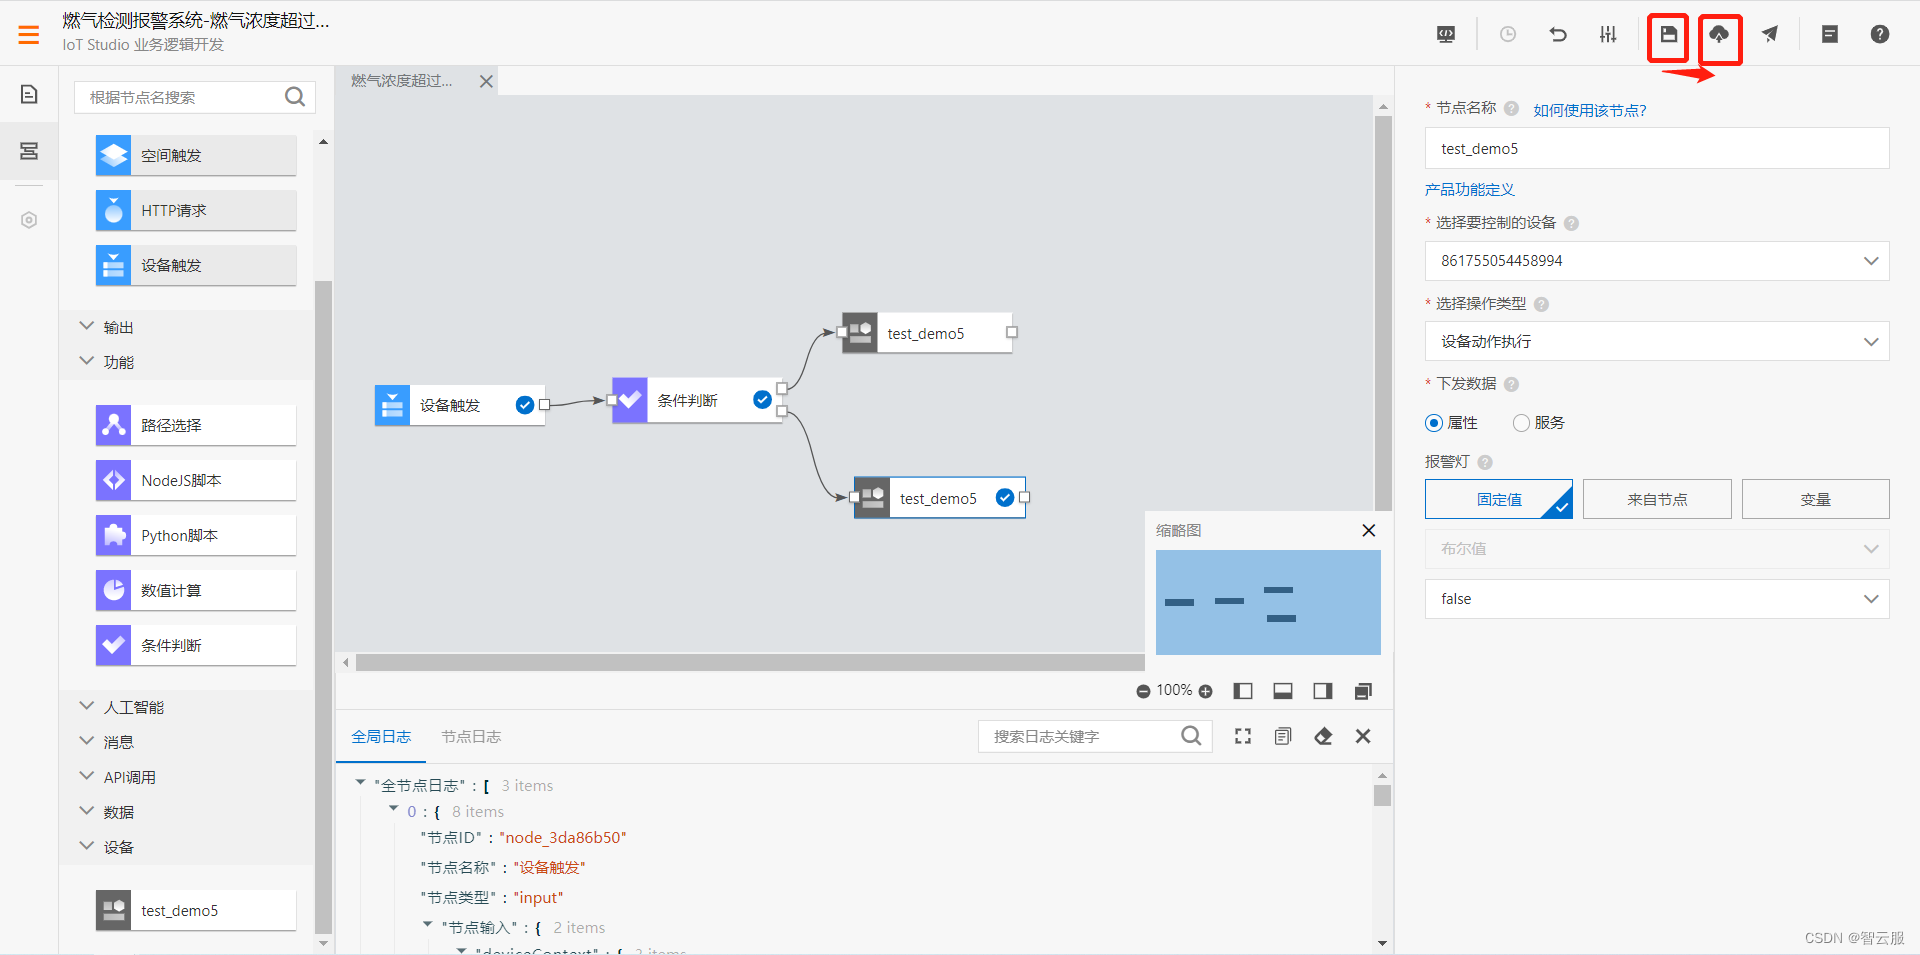
业务逻辑保存和部署
3.7预览和发布上线
业务逻辑设定完毕之后,可以在“燃气监控报警系统”页面‘’保存‘’并点击‘预览’进行预览。
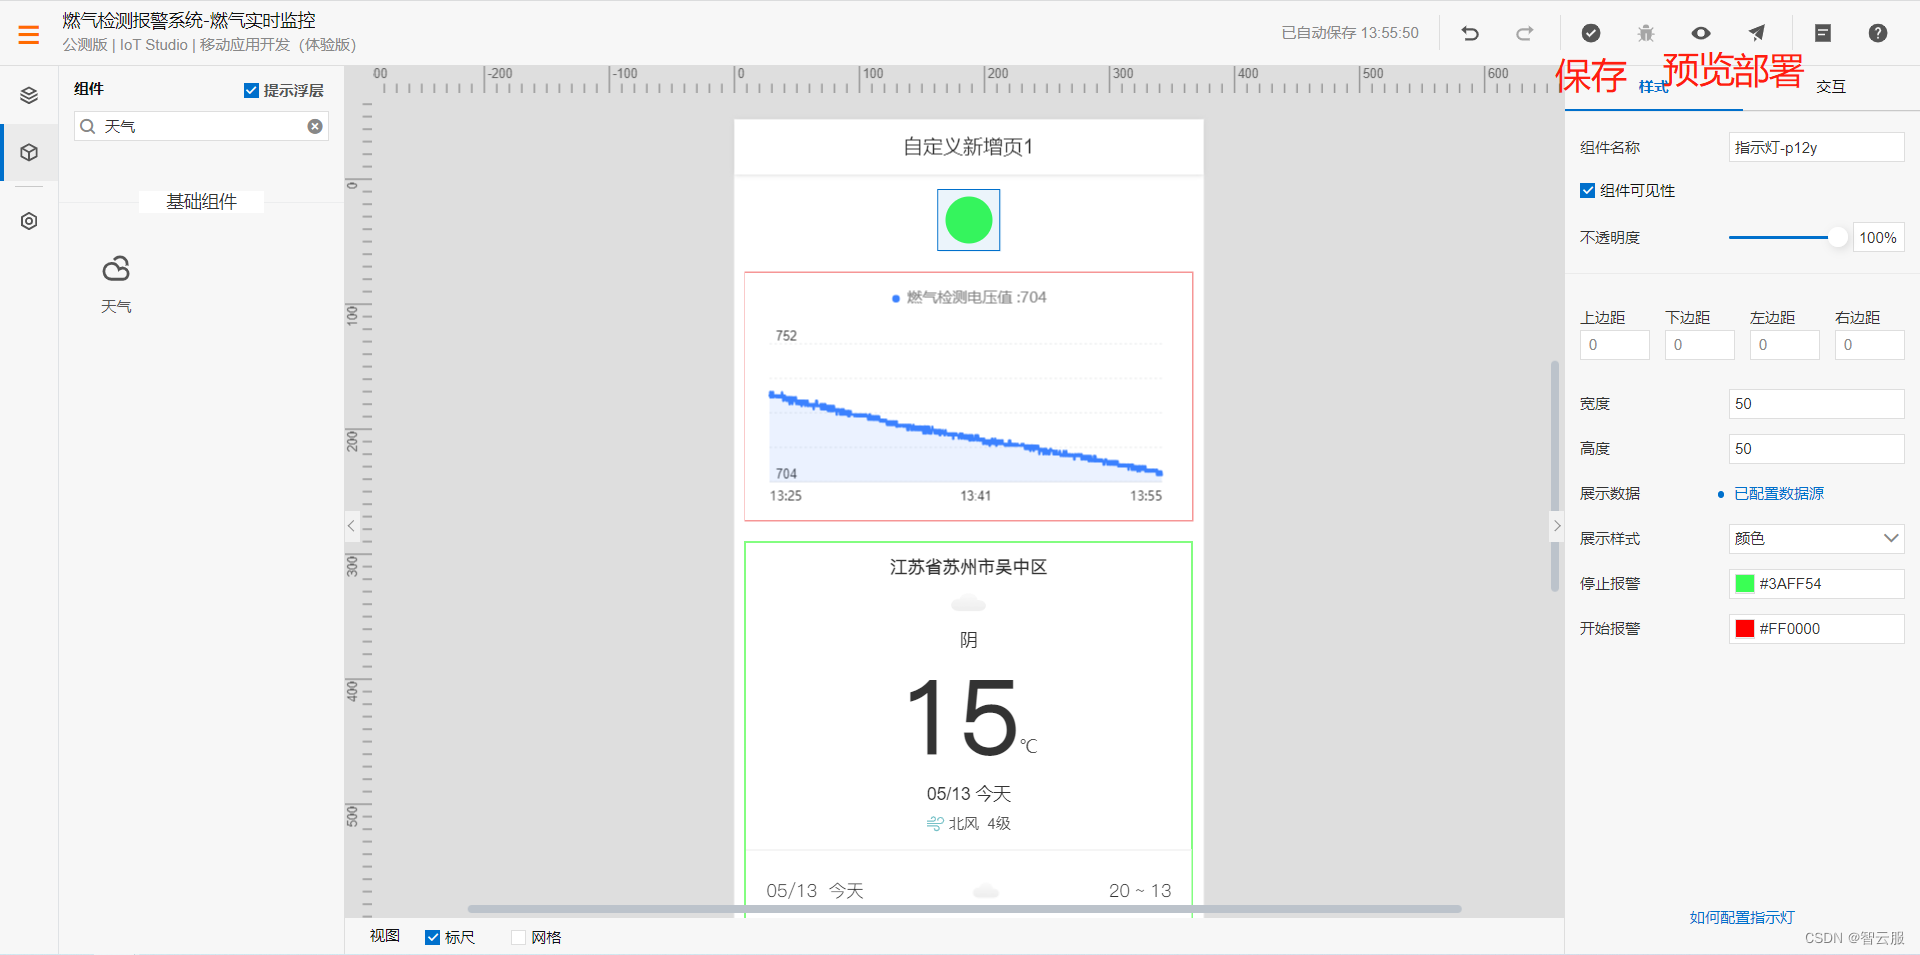
手机扫描二维码,可以在手机看查看数据。
