STM32 超声波测距模块 学习记录
文章日志
1.写于2022/08/15
文章目录
1.超声波模块工作原理
2.实验需要什么
3.代码实操
1.超声波模块工作原理
–先来看看超声波模块的实物图

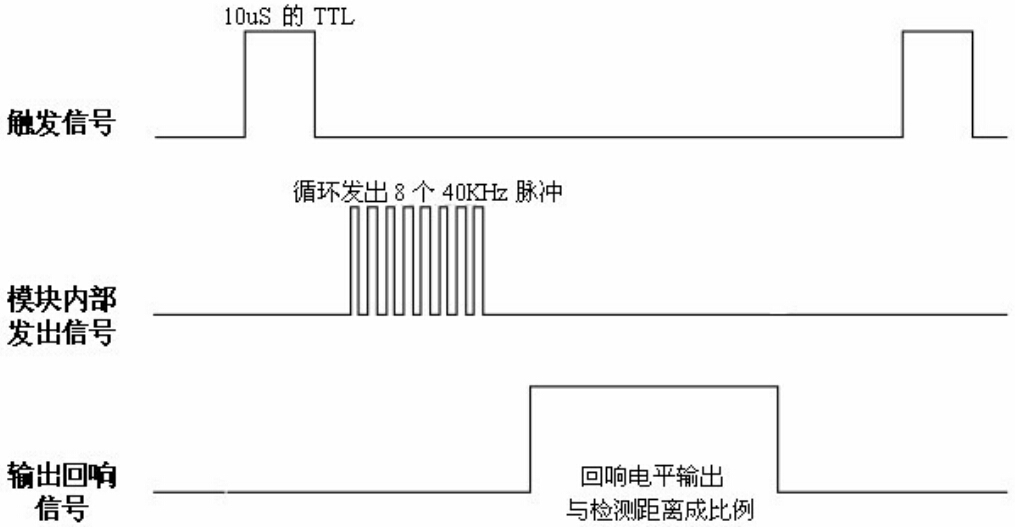
trig 给10us以上的高电平,触发超声波发送
echo 在超声波发送和接收返回期间,输出高电平

我这个超声波模块实际测试感觉精度没那么好,在超近距离下(大搞5mm以下吧),计算出来的距离完全不准
我看网上还有那种5个引脚的超声波模块,原理应该都是差不多的
还有背后电路比我这个更复杂的,如

–工作原理介绍(我不生产知识,只是知识的搬运工,笑哭.jpg)
–时序图
–距离计算公式
这个我看不懂啊,就看懂 距离 = 高电平时间*声速(340m/s)/2
注意单位换算
2.实验需要什么
了解了超声波模块的工作原理,就可以开始实验代码的编写了。
实验前需要的东东:
1.超声波工作原理
2.实物-超声波模块
3.一个stm32板子
4.有关定时器的知识,如定时器输入捕获(汗颜,我必须照着原来的范例改,因为都忘了…不会造轮子,而且用轮子都不利索)
3.代码实操
同样是别人的代码…实测可以
cs.c
//超声波驱动和测量
#include "cs.h"
#include "stm32f10x.h"
#include "delay.h"
#include "usart.h"
//用定时器中断捕捉回响信号

u8 exchange_Alti_num[8];//压力数据

float length=0;

/*记录定时器溢出次数*/
u8 overcount=0;

/*设置中断优先级*/
void NVIC_Config(void)
{
NVIC_InitTypeDef NVIC_InitStructer;

//NVIC_PriorityGroupConfig(NVIC_PriorityGroup_2);

NVIC_InitStructer.NVIC_IRQChannelPreemptionPriority=0;
NVIC_InitStructer.NVIC_IRQChannelSubPriority=0;
NVIC_InitStructer.NVIC_IRQChannel=TIM2_IRQn;
NVIC_InitStructer.NVIC_IRQChannelCmd=ENABLE;

NVIC_Init(&NVIC_InitStructer);
}

/*初始化模块的GPIO以及初始化定时器TIM2*/
void CH_SR04_Init(void)
{
GPIO_InitTypeDef GPIO_InitStructer;
TIM_TimeBaseInitTypeDef TIM_TimeBaseInitStructer;

RCC_APB2PeriphClockCmd( RCC_APB2Periph_GPIOB, ENABLE);
RCC_APB1PeriphClockCmd(RCC_APB1Periph_TIM2, ENABLE);

/*TRIG触发信号*/
GPIO_InitStructer.GPIO_Speed=GPIO_Speed_50MHz;
GPIO_InitStructer.GPIO_Mode=GPIO_Mode_Out_PP;
GPIO_InitStructer.GPIO_Pin=GPIO_Pin_5;
GPIO_Init(GPIOB, &GPIO_InitStructer);

/*ECOH回响信号*/
GPIO_InitStructer.GPIO_Mode=GPIO_Mode_IPD;//GPIO_Mode_IPU GPIO_Mode_IPD //这里好像没啥影响
GPIO_InitStructer.GPIO_Pin=GPIO_Pin_6;
GPIO_Init(GPIOB, & GPIO_InitStructer);

/*定时器TIM2初始化*/
TIM_DeInit(TIM2);
TIM_TimeBaseInitStructer.TIM_Period=999;//定时周期为1000
TIM_TimeBaseInitStructer.TIM_Prescaler=71; //分频系数72
TIM_TimeBaseInitStructer.TIM_ClockDivision=TIM_CKD_DIV1;//不分频
TIM_TimeBaseInitStructer.TIM_CounterMode=TIM_CounterMode_Up;
TIM_TimeBaseInit(TIM2,&TIM_TimeBaseInitStructer);

TIM_ITConfig(TIM2,TIM_IT_Update,ENABLE);//开启更新中断
NVIC_Config();
TIM_Cmd(TIM2,DISABLE);//关闭定时器使能

}


float Senor_Using(void)
{
u16 tim=0;

PBout(5)=1;  //拉高信号,作为触发信号
delay_us(15);  //高电平信号超过10us
PBout(5)=0;
/*等待回响信号*/
while(GPIO_ReadInputDataBit(GPIOB,GPIO_Pin_6)==RESET);
TIM_Cmd(TIM2,ENABLE);//回响信号到来,开启定时器计数


while(GPIO_ReadInputDataBit(GPIOB,GPIO_Pin_6)==SET);//回响信号消失
TIM_Cmd(TIM2,DISABLE);//关闭定时器

tim=TIM_GetCounter(TIM2);//获取计TIM2数寄存器中的计数值,一边计算回响信号时间

//length=(float)(tim+overcount*1000)/58.0;//通过回响信号计算距离

//根据 定时器分频系数(71+1) 定时器重装载值(999+1) 定时器时钟频率(72mhz) 定时器溢出时间 单位us  72*1000 / 72mhz  即1000us  也就是1ms
//定时器溢出时间1ms  每次定时器加1时间为 (tim+1)* (72/72mhz) 即 (tim+1) us
//总时间 overcount*1000 + (tim+1) us   超声波往返时间  /2 为单程时间  再* 340m/s 单位都换算成s 最终结果是 m
//单程时间 单位 mm
length = (float)(tim + 1 + overcount*1000)/2 *0.001 *0.001 * 340 * 100 * 10;//通过回响信号计算距离 单位mm


TIM2->CNT=0;  //将TIM2计数寄存器的计数值清零
overcount=0;  //中断溢出次数清零
//delay_ms(100);

printf("超声波测距为: %f mm \r\n",length);
return length;//距离作为函数返回值
}


//解决重复定义冲突,暂时注释掉
void TIM2_IRQHandler(void) //中断,当回响信号很长是,计数值溢出后重复计数,用中断来保存溢出次数
{
if(TIM_GetITStatus(TIM2,TIM_IT_Update)!=RESET)
  {
TIM_ClearITPendingBit(TIM2,TIM_IT_Update);//清除中断标志
overcount++;

  }
}

//***************数据转换*******************
void Exchange_Number(void)
{
    u32 ex_Pressure;    //串口读数转换值


  Senor_Using();

    ex_Pressure=(long)(length);

    exchange_Alti_num[0]=ex_Pressure/100+'0';
    exchange_Alti_num[1]=ex_Pressure/10%10+'0';
    exchange_Alti_num[2]=ex_Pressure%10+'0';
    exchange_Alti_num[3]='.';
    exchange_Alti_num[4]=ex_Pressure*10%10+'0';
    exchange_Alti_num[5]=ex_Pressure*100%10+'0';
    exchange_Alti_num[6]='0';
    exchange_Alti_num[7]='0';
//    printf(" \r\nAlti: \r\n");
//    //Usart_Send(exchange_Alti_num,8);
//    printf("exchange_Alti_num[0] is %d \r\n",exchange_Alti_num[0]);
//    printf("exchange_Alti_num[1] is %d \r\n",exchange_Alti_num[1]);
//    printf("exchange_Alti_num[2] is %d \r\n",exchange_Alti_num[2]);
//    printf("exchange_Alti_num[3] is %d \r\n",exchange_Alti_num[3]);
//    printf("exchange_Alti_num[4] is %d \r\n",exchange_Alti_num[4]);
//    printf("exchange_Alti_num[5] is %d \r\n",exchange_Alti_num[5]);
//    printf("exchange_Alti_num[6] is %d \r\n",exchange_Alti_num[6]);
//    printf("exchange_Alti_num[7] is %d \r\n",exchange_Alti_num[7]);
//ps:我居然一直用printf,用下循环会死啊
//    printf("cm\n");


}
cs.h这个就不贴了,照着cs.c写下函数声明就行
main.c
#include "stm32f10x.h"
#include "cs.h"
#include "sys.h"
#include "delay.h"
#include "usart.h"

 int main(void)
 {
     delay_init();           //延时函数初始化
     NVIC_PriorityGroupConfig(NVIC_PriorityGroup_2);
     uart_init(9600);    //串口初始化为115200
   CH_SR04_Init();
     Senor_Using();


    while(1)
    {
  Exchange_Number();
        delay_ms(500);
    }

}
相关链接:
https://www.codenong.com/cs79784972/


