8086内存地址变换过程
80x86在从逻辑地址到物理地址变换过程中使用了分段和分页二种机制。
第一阶段使用分段机制将程序的逻辑地址变换成可寻址内存空间的线性地址。
第二阶段用分页机制把线性地址转换成物理地址。
所以可以表示为,这个函数的嵌套关系不能改变。
二级页表的第一级为页目录 ,第二级为页表。
所有的努力最终都指向了进程空间切换。
CS:IP
指令是有长度的,一条指令是由多个字节构成的。指令的执行过程如下:
-
CPU从CS:IP所指向的内存单元读取指令,存放到指令缓冲器中
-
IP = IP + 1,从而指向下一条指令
-
执行指令缓存器中的内容。回到第一步
需要注意的是,汇编语言没有提供直接修改CS/IP寄存器的指令。换言之,禁止通过MOV指令对CS/IP进行赋值。但是它是通过JMP跳转指令,来实现对CS/IP寄存器内容的修改。
IDT
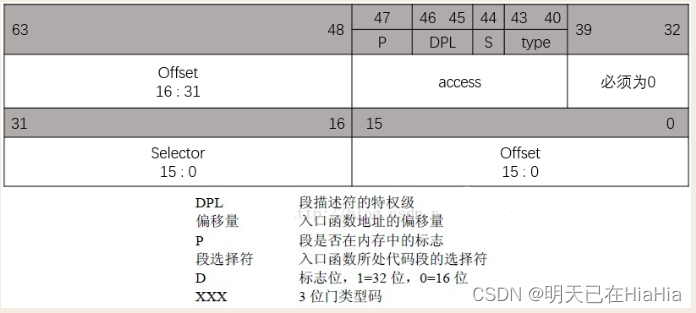
在实模式下,内存最开始的1K字节存储中断向量表。每个表项都有4个字节,前两个字节表示中断服务程序的段基址,后两个字节表示偏移量。

在保护模式下,中断向量表中的表项由8个字节组成,中断向量表也改称中断描述符表(Interrupt Descriptor Table);其中的每个表项称为一个门描述符。

同时,在保护模式下,中断描述符表也不需要在地址为0的地方开始,可以常驻于内存的任何地方。
为查询IDT的起始地址,在CPU中专门设置了一个IDTR——中断描述符表寄存器。
内核在启用中断机制之前,必须把IDT表的起始地址载入IDTR寄存器,并初始化表中的每一个表项。
IDT被初始化两次。第一次是在BIOS程序中,此时CPU还运行在实模式下,IDT被初始化并由bootloader程序使用。
一旦操作系统启动,IDT会被搬运到RAM的受保护区域并被第二次初始化。
各个寄存器的关系为
IDTR(中断寄存器:时间片中断)->TR(任务寄存器)->GDTR(全局段寄存器)->LDTR(局部段寄存器)->CR3(内存分页)
时间片中断一旦开启,操作系统就尘埃落定,各就各位。
时间中断IRQ0
时钟中断 是指每隔一段相同的时间,都会发出一个中断信号(称为一个tick), CPU接受到中断信号后触发内核中相应的中断处理程序。
当 时钟中断 发生时会调用 timer_interrupt() 函数来处理中断,timer_interrupt() 函数源码如下
static void timer_interrupt(int irq, void *dev_id, struct pt_regs *regs)
{
int count;
write_lock(&xtime_lock);
...
do_timer_interrupt(irq, NULL, regs);
write_unlock(&xtime_lock);
}
static inline void do_timer_interrupt(int irq, void *dev_id, struct pt_regs *regs)
{
...
do_timer(regs);
...
if ((time_status & STA_UNSYNC) == 0 &&
xtime.tv_sec > last_rtc_update + 660 &&
xtime.tv_usec >= 500000 - ((unsigned) tick) / 2 &&xtime.tv_usec <= 500000 + ((unsigned) tick) / 2) {
if (set_rtc_mmss(xtime.tv_sec) == 0)
last_rtc_update = xtime.tv_sec;
else
last_rtc_update = xtime.tv_sec - 600;
}
...
}
cli()与sti()
as of 2.5.28, five popular macros have been removed on SMP, and
are being phased out on UP:

 cli(), sti(), save_flags(flags), save_flags_cli(flags), restore_flags(flags)

until now it was possible to protect driver code against interrupt
handlers via a cli(), but from now on other, more lightweight methods
have to be used for synchronization, such as spinlocks or semaphores.
在Linux 2.5.28版本之后,cli()和sti()两个之前版本中常用的关中断和开中断命令将被移除。
取而代之的是自旋锁和信号量等更加轻量级的同步机制。
drivers that want to disable local interrupts (interrupts on the
current CPU), can use the following five macros:

  local_irq_disable(), local_irq_enable(), local_save_flags(flags),
  local_irq_save(flags), local_irq_restore(flags)

but beware, their meaning and semantics are much simpler, far from
that of the old cli(), sti(), save_flags(flags) and restore_flags(flags)
SMP meaning:

    local_irq_disable()       => turn local IRQs off

    local_irq_enable()        => turn local IRQs on

    local_save_flags(flags)   => save the current IRQ state into flags. The
                                 state can be on or off. (on some
                                 architectures there's even more bits in it.)

    local_irq_save(flags)     => save the current IRQ state into flags and
                                 disable interrupts.

    local_irq_restore(flags)  => restore the IRQ state from flags.

(local_irq_save can save both irqs on and irqs off state, and
local_irq_restore can restore into both irqs on and irqs off state.)
这些函数在src/Linux/init/main.c中的start_kernel()函数中调用。
asmlinkage __visible void __init __no_sanitize_address start_kernel(void)
{
	char *command_line;
	char *after_dashes;

	set_task_stack_end_magic(&init_task);
	smp_setup_processor_id();
	debug_objects_early_init();

	cgroup_init_early();

	local_irq_disable();
	early_boot_irqs_disabled = true;
    ...
    ...
	early_boot_irqs_disabled = false;
	local_irq_enable();
}
多扇区代码加载
由于只有第一扇区是通过硬件中断复制进内存,最后两个字节为0x55aa。其他之后的各个扇区均无此要求。因此可以将第一扇区用于加载后续扇区。后面所有的功能在之后进行设计。
以下是最简代码。
; ==========================================
; pmtest1.asm
; 编译方法:nasm pmtest.asm -o pmtest.bin
; ==========================================
;--------------------------------------------------------------------------------------
;--------------------------------------------------------------------------------------
org	07c00h
	jmp	LABEL_BEGIN
;--------------------------------------------------------------------------------------
;--------------------------------------------------------------------------------------
[SECTION .s16]
[BITS	16]
LABEL_BEGIN:

        xor ax,ax      ; 为 DS 置 0 准备
        mov ds,ax
        mov ah, 0x02
        ;al=1 load sec2
        ;al=2 load sec2-3
        ;al=3 load sec2-4
        mov al, 2
        mov ch, 0
        mov cl, 2
        mov dh, 0
        mov bx, sect2
        mov es, bx
        xor bx, bx
        int 0x13
        jmp sect2:0
data:
        sect2 equ 0x0500
times   506-($-$$) db 0
dw      0xaa55
;--------------------------------------------------------------------------------------
;--------------------------------------------------------------------------------------
;sect2:
	mov ax, cs
	mov ds, ax    ; 设置 CS=DS. CS=0x0500, 因此 DS=0x500
                      ; 如果变量已经在代码中设置,则要求
                      ; 正确地引用其内存地址
	mov ax, 0xB800
	mov es, ax
	mov byte [es:(80 * 10 + 0) * 2], 'A'
	mov byte [es:(80 * 11 + 0) * 2], 'B'
	mov byte [es:(80 * 12 + 0) * 2], 'C'
	mov byte [es:(80 * 13 + 0) * 2], 'D'
	mov byte [es:(80 * 14 + 0) * 2], 'E'
	mov byte [es:(80 * 15 + 0) * 2], 'F'
二进制文件如下:
as@as-virtual-machine:~/osdir/chapter3F$ hexdump -Cv boot
00000000  e9 01 00 00 31 c0 8e d8  b4 02 b0 02 b5 00 b1 02  |....1...........|
00000010  b6 00 bb 00 05 8e c3 31  db cd 13 ea 00 00 00 05  |.......1........|
00000020  00 00 00 00 00 00 00 00  00 00 00 00 00 00 00 00  |................|
00000030  00 00 00 00 00 00 00 00  00 00 00 00 00 00 00 00  |................|
00000040  00 00 00 00 00 00 00 00  00 00 00 00 00 00 00 00  |................|
00000050  00 00 00 00 00 00 00 00  00 00 00 00 00 00 00 00  |................|
00000060  00 00 00 00 00 00 00 00  00 00 00 00 00 00 00 00  |................|
00000070  00 00 00 00 00 00 00 00  00 00 00 00 00 00 00 00  |................|
00000080  00 00 00 00 00 00 00 00  00 00 00 00 00 00 00 00  |................|
00000090  00 00 00 00 00 00 00 00  00 00 00 00 00 00 00 00  |................|
000000a0  00 00 00 00 00 00 00 00  00 00 00 00 00 00 00 00  |................|
000000b0  00 00 00 00 00 00 00 00  00 00 00 00 00 00 00 00  |................|
000000c0  00 00 00 00 00 00 00 00  00 00 00 00 00 00 00 00  |................|
000000d0  00 00 00 00 00 00 00 00  00 00 00 00 00 00 00 00  |................|
000000e0  00 00 00 00 00 00 00 00  00 00 00 00 00 00 00 00  |................|
000000f0  00 00 00 00 00 00 00 00  00 00 00 00 00 00 00 00  |................|
00000100  00 00 00 00 00 00 00 00  00 00 00 00 00 00 00 00  |................|
00000110  00 00 00 00 00 00 00 00  00 00 00 00 00 00 00 00  |................|
00000120  00 00 00 00 00 00 00 00  00 00 00 00 00 00 00 00  |................|
00000130  00 00 00 00 00 00 00 00  00 00 00 00 00 00 00 00  |................|
00000140  00 00 00 00 00 00 00 00  00 00 00 00 00 00 00 00  |................|
00000150  00 00 00 00 00 00 00 00  00 00 00 00 00 00 00 00  |................|
00000160  00 00 00 00 00 00 00 00  00 00 00 00 00 00 00 00  |................|
00000170  00 00 00 00 00 00 00 00  00 00 00 00 00 00 00 00  |................|
00000180  00 00 00 00 00 00 00 00  00 00 00 00 00 00 00 00  |................|
00000190  00 00 00 00 00 00 00 00  00 00 00 00 00 00 00 00  |................|
000001a0  00 00 00 00 00 00 00 00  00 00 00 00 00 00 00 00  |................|
000001b0  00 00 00 00 00 00 00 00  00 00 00 00 00 00 00 00  |................|
000001c0  00 00 00 00 00 00 00 00  00 00 00 00 00 00 00 00  |................|
000001d0  00 00 00 00 00 00 00 00  00 00 00 00 00 00 00 00  |................|
000001e0  00 00 00 00 00 00 00 00  00 00 00 00 00 00 00 00  |................|
000001f0  00 00 00 00 00 00 00 00  00 00 00 00 00 00 55 aa  |..............U.|
00000200  8c c8 8e d8 b8 00 b8 8e  c0 26 c6 06 40 06 41 26  |.........&..@.A&|
00000210  c6 06 e0 06 42 26 c6 06  80 07 43 26 c6 06 20 08  |....B&....C&.. .|
00000220  44 26 c6 06 c0 08 45 26  c6 06 60 09 46           |D&....E&..`.F|
0000022d
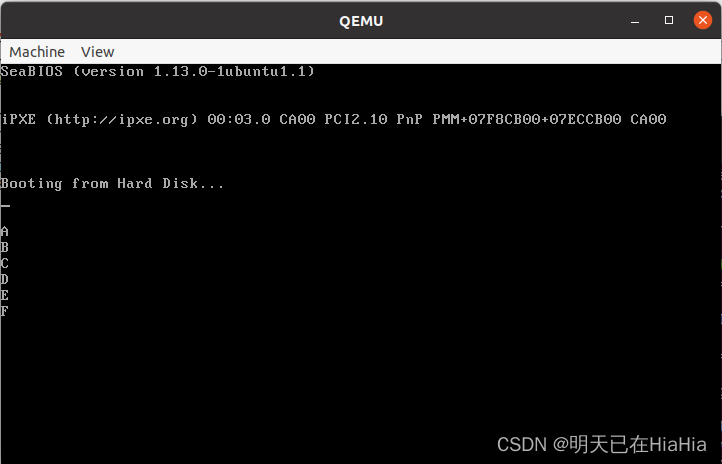
运行效果如下

怠速
操作系统一旦实现怠速,则意味着系统与用户的交互接口已准备完毕。
页表
页表是进程内存与物理实际存储之间的桥梁。
在开启分页机制后,CPU拿到这个地址,会根据CR3寄存器中存储的页目录表地址来进行寻址,最终得到的物理地址才是CPU真正去访问的地址。
无论是几级页表,标准页的尺寸都是 4KB,所以 4GB 线性地址空间最多有 1M 个标准页。
一级页表是将这 1M 个标准页放置到一张页表中,二级页表是将这 1M 个标准页平均放置 1K 个页表中,每个页表中包含有 1K 个页表项。
页表项是 4 字节大小,页表包含 1K 个页表项,故页表大小为4KB,这恰恰是一个标准页的大小。
打开分页之后,每一个进程只管用平坦连续地址空间,并在进程当地的页表中记录MMU反馈的实际上用到的是哪几个物理页中即可。
如:
加载的进程1实际使用的页为第235,238页,则其进程当地页表中记录的就是{235,238}
加载的进程2实际使用的页为第29页,则其进程当地页表中记录的就是{29};
VPN(虚拟地址)总是连续的,是根据进程需要形成的平坦连续空间;
PPN(物理地址)总是不连续的,是MMU根据请求,将实际物理地址分页后查找到的实际可用的页面的编号返回给进程,进行记录。用于切换现场的保存、换出及重加载。
