STM32中断方式实现串口通信(标准库)
文章目录
- 主要任务:
1)当stm32接收到字符“s”时,停止持续发送“hello windows!”; 当接收到字符“t”时,持续发送“hello windows!”;
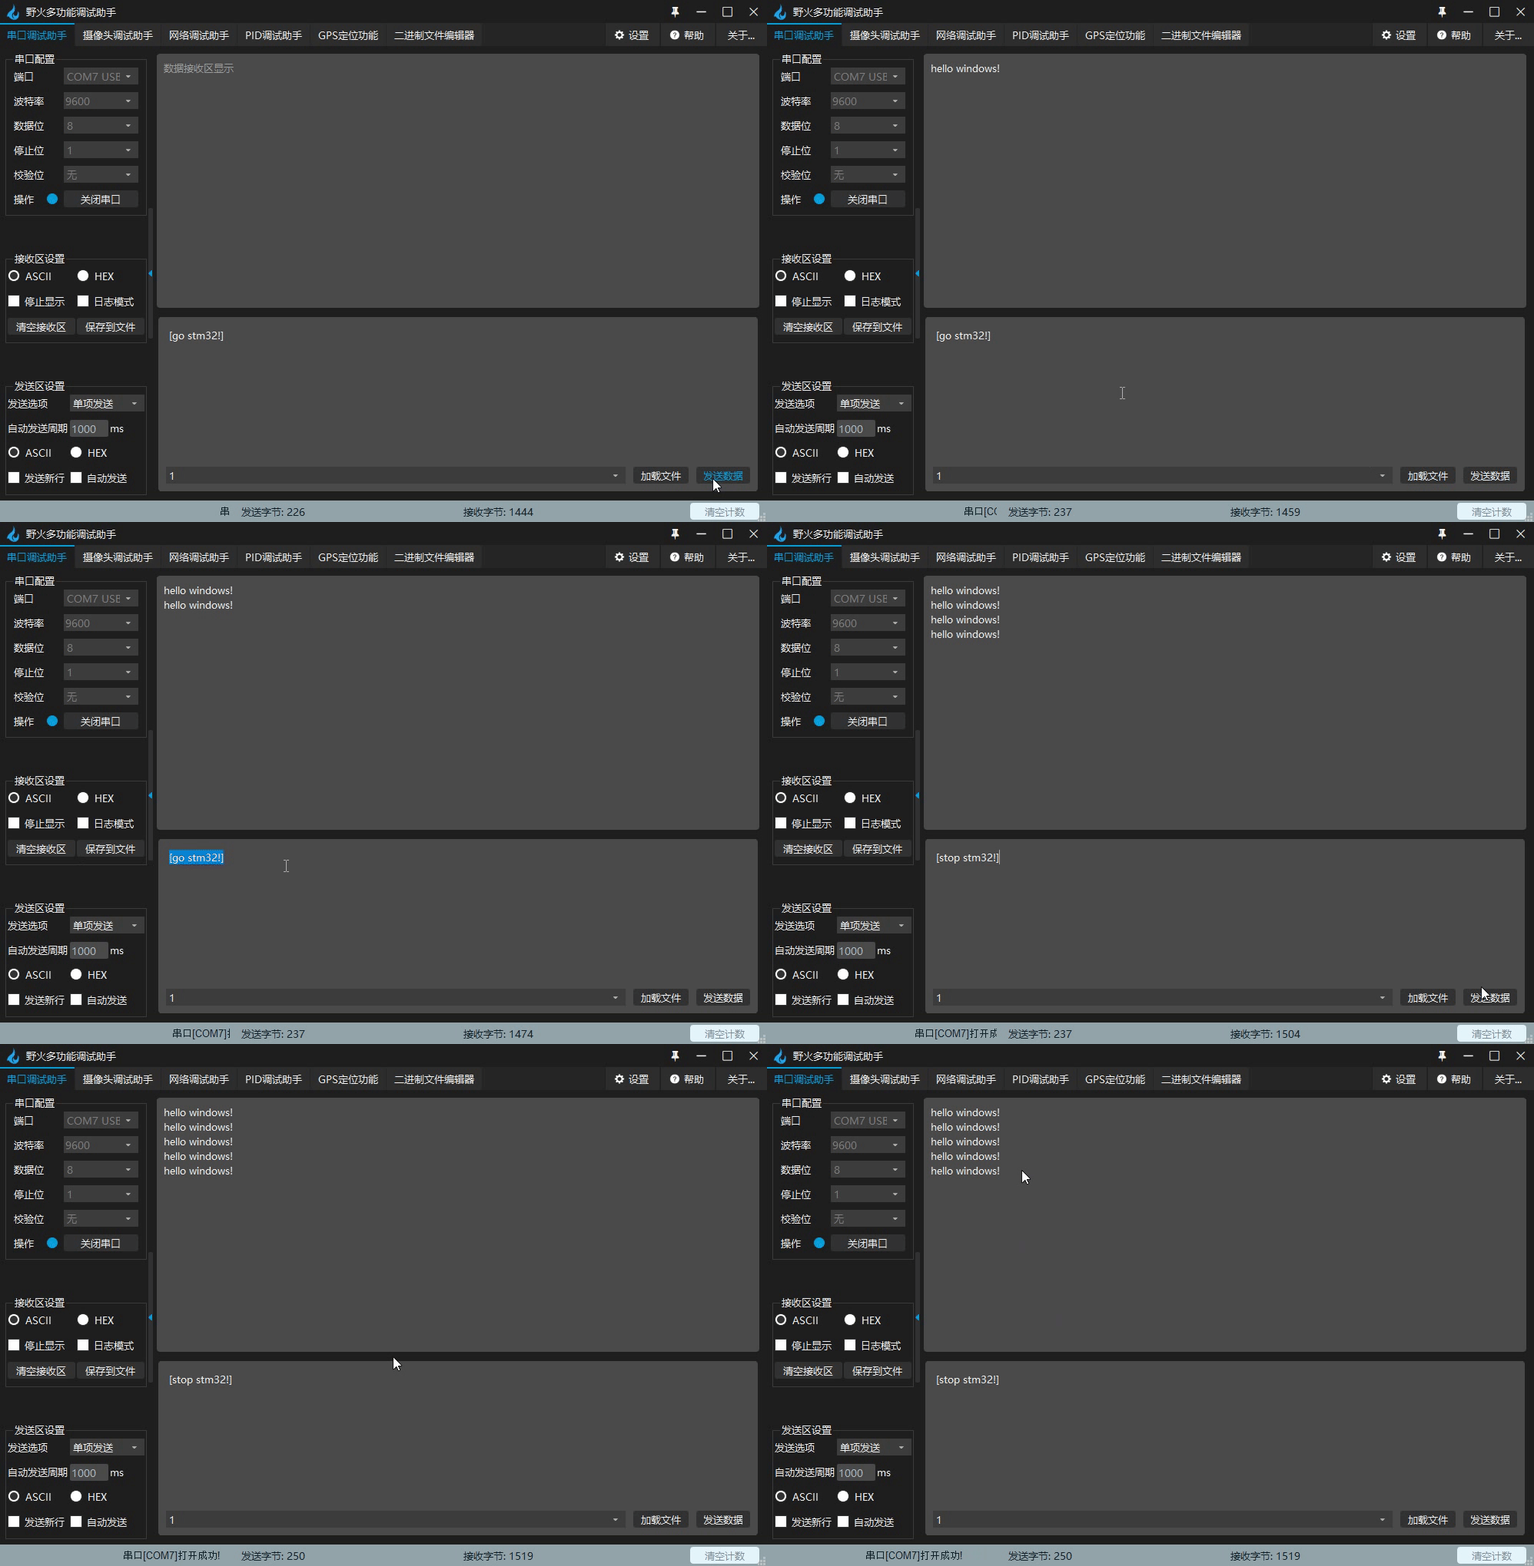
2)当stm32接收到字符“stop stm32!”时,停止持续发送“hello windows!”; 当接收到字符“go stm32!”时,持续发送“hello windows!”
实验工具:
(1)软件
标准库
KEIL5:[安装教程](https://blog.csdn.net/zhoushuaiyxlmwan/article/details/127190907?
spm=1001.2014.3001.5502)mcuisp(或者FlyMcu): mcuisp百度网盘链接提取码:h2xc
野火多功能调试助手:https://pan.baidu.com/s/14zEjYNlU-2CjgoR1sI5dSg 提取码:rau0
(2)硬件
- STM32F103C8T6的最小核心板
- 杜邦线
- USB转TTL模块
一.串口通信原理以及中断原理
一.问题分析
1.涉及外设
1.串口通信:USART,GPIO
2.中断:GPIO,AFIO,EXTI,NVIC
2.状态机实现
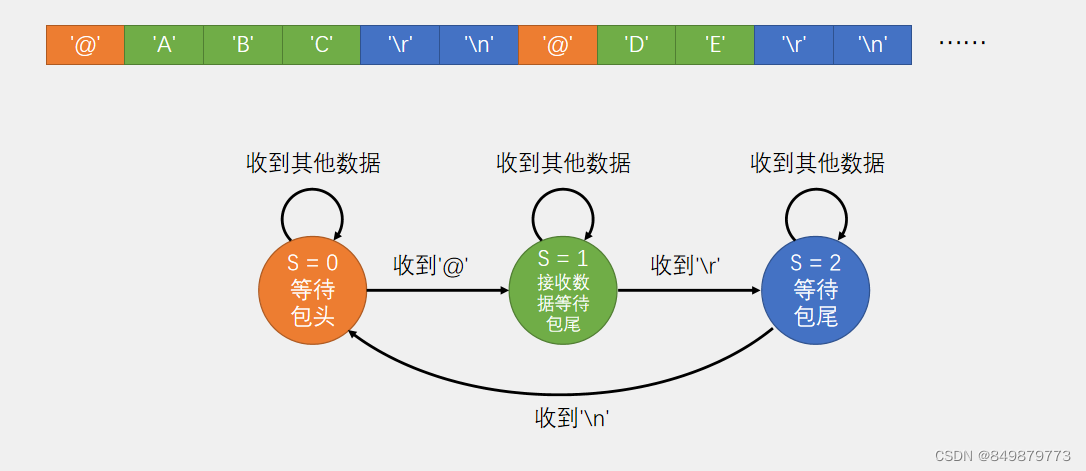
图上的意思是:
设置一个状态标志位S,默认为0,等待包头的出现(这里的包头自己设置一个字符 )。
当检测到接收的一个字符和我们规定的包头字符相符合,就把标志位S置1,并且开始接收后面来的数据,直到读取到某一个字符和我们规定的第一位结束位相符合,则把标志位S置2,并且不再接收数据,只等待字符与第二个结束位相符合,把状态位S置0.
这里是双重结束标志置位,我们也可以设置一个结束标志位,这样就只需要S的值在0或1之间转换,原理不变
二.创建MDK(keil5)项目
1.项目结构
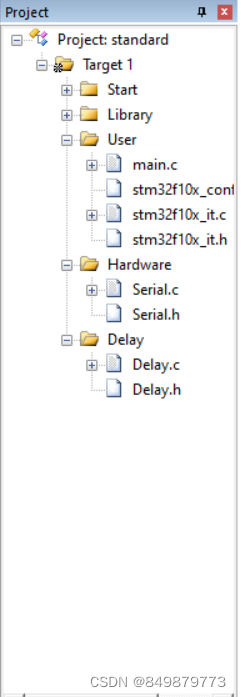
①.USER
存放main.c文件以及标准库的配置文件
②.Hardware
存放串口触发中断,以及利用串口通信的一些函数
③.Delay
存放供我们调用的延时函数,在后面用单片机循环发送消息时会用到
④.其他
都是其他对应的标准库的文件
2.基本设置
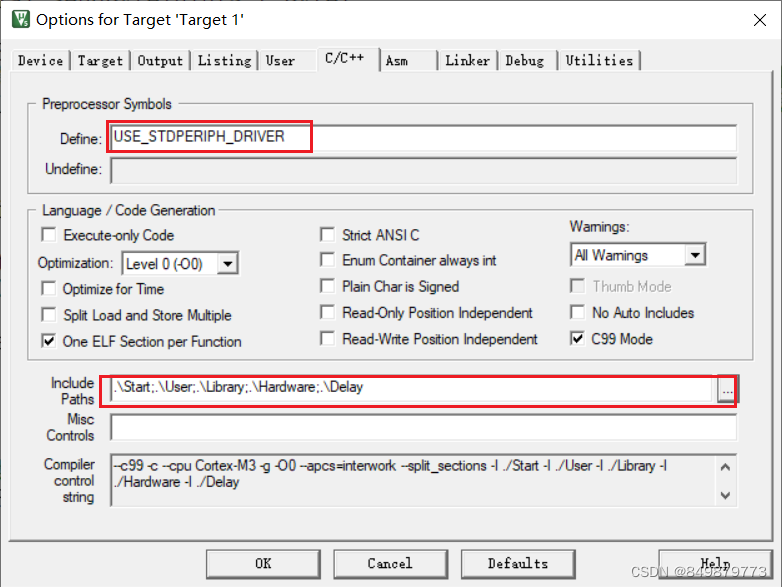
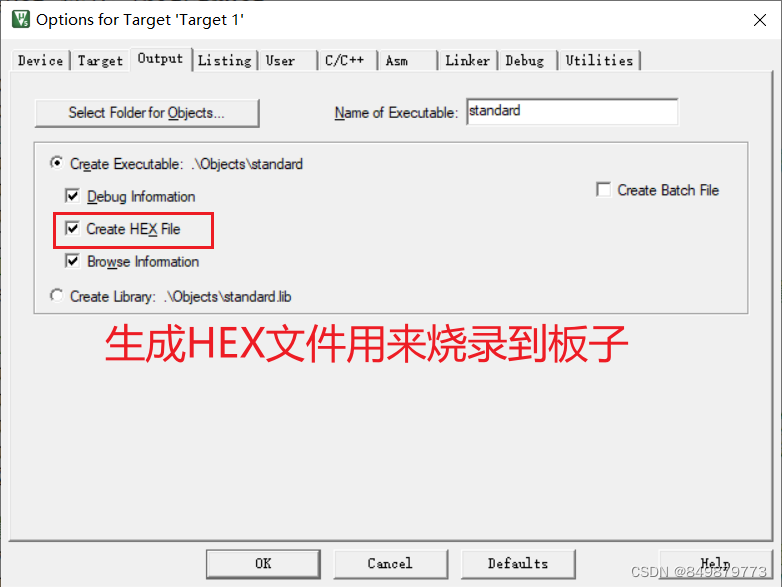
三.具体实现
1.配置RCC,把涉及到的外设的时钟全部打开
	RCC_APB2PeriphClockCmd(RCC_APB2Periph_USART1,ENABLE);//打开串口的时钟
	RCC_APB2PeriphClockCmd(RCC_APB2Periph_GPIOA,ENABLE);//打开PA9和PA10的时钟
2.初始化GPIO口
	GPIO_InitTypeDef GPIO_InitStruct;
	//PA9引脚(对应串口发送功能)
	GPIO_InitStruct.GPIO_Mode = GPIO_Mode_AF_PP;   //TX引脚是USART外设控制的输出脚,所以要复用推挽输出
	GPIO_InitStruct.GPIO_Pin = GPIO_Pin_9;
	GPIO_InitStruct.GPIO_Speed = GPIO_Speed_50MHz;
	GPIO_Init(GPIOA, &GPIO_InitStruct);
	//PA10引脚(对应串口接收功能)
	GPIO_InitStruct.GPIO_Mode = GPIO_Mode_IN_FLOATING;
	GPIO_InitStruct.GPIO_Pin = GPIO_Pin_10;
	GPIO_InitStruct.GPIO_Speed = GPIO_Speed_50MHz;
	GPIO_Init(GPIOA, &GPIO_InitStruct);
3.初始化UART
	USART_InitTypeDef USART_InitStruct;
	USART_InitStruct.USART_BaudRate = 9600;//设置波特率
	USART_InitStruct.USART_HardwareFlowControl =USART_HardwareFlowControl_None;  //硬件流控制
	USART_InitStruct.USART_Mode = USART_Mode_Tx | USART_Mode_Rx;//只需要发送则只需要TX,若需要接收则或上RX
	USART_InitStruct.USART_Parity = USART_Parity_No;//无校验位
	USART_InitStruct.USART_StopBits = USART_StopBits_1;//1位停止位
	USART_InitStruct.USART_WordLength = USART_WordLength_8b;//选择8位字长
	USART_Init(USART1,&USART_InitStruct);
4.开启中断
USART_ITConfig(USART1,USART_IT_RXNE,ENABLE);//开启串口对应中断
5.配置NVIC优先级和分组
	NVIC_InitTypeDef NVIC_InitStructure;
	NVIC_PriorityGroupConfig(NVIC_PriorityGroup_2);
	NVIC_InitStructure.NVIC_IRQChannel = USART1_IRQn;
	NVIC_InitStructure.NVIC_IRQChannelCmd = ENABLE;
	NVIC_InitStructure.NVIC_IRQChannelPreemptionPriority = 1;
	NVIC_InitStructure.NVIC_IRQChannelSubPriority = 1;
	NVIC_Init(&NVIC_InitStructure);
6.开启USART外设
USART_Cmd(USART1,ENABLE);//开启USART外设
7.中断函数
根据标准库的封装,USART的中断函数名为
void USART1_IRQHandler(),这里由于还有其他函数的调用,直接给出Serial.c文件的完整代码。
#include "stm32f10x.h"                  // Device header
#include "stdio.h"
#include <stdio.h>
#include <string.h>

uint8_t Serial_RxFlag;//定义一个接收标志位
char Serial_RxPacket[100];//定义一个全局的char数组,范围可以给大一点,在头文件里会把这个数组extern出去方便再主函数直接用

void Serial_Init(void)
{
	GPIO_InitTypeDef GPIO_InitStruct;
	USART_InitTypeDef USART_InitStruct;
	NVIC_InitTypeDef NVIC_InitStructure;

	//第一步开启时钟
	RCC_APB2PeriphClockCmd(RCC_APB2Periph_USART1,ENABLE);
	RCC_APB2PeriphClockCmd(RCC_APB2Periph_GPIOA,ENABLE);//打开PA9和PA10的时钟

	//第二部初始化引脚

		//PA9引脚
	GPIO_InitStruct.GPIO_Mode = GPIO_Mode_AF_PP;   //TX引脚是USART外设控制的输出脚,所以要复用推挽输出
	GPIO_InitStruct.GPIO_Pin = GPIO_Pin_9;
	GPIO_InitStruct.GPIO_Speed = GPIO_Speed_50MHz;
	GPIO_Init(GPIOA, &GPIO_InitStruct);
		//PA10引脚
	GPIO_InitStruct.GPIO_Mode = GPIO_Mode_IN_FLOATING;
	GPIO_InitStruct.GPIO_Pin = GPIO_Pin_10;
	GPIO_InitStruct.GPIO_Speed = GPIO_Speed_50MHz;
	GPIO_Init(GPIOA, &GPIO_InitStruct);

	//第三步初始化USART

	USART_InitStruct.USART_BaudRate = 9600;//设置波特率
	USART_InitStruct.USART_HardwareFlowControl =USART_HardwareFlowControl_None;  //硬件流控制
	USART_InitStruct.USART_Mode = USART_Mode_Tx | USART_Mode_Rx;//只需要发送则只需要TX,若需要接收则或上RX
	USART_InitStruct.USART_Parity = USART_Parity_No;//无校验位
	USART_InitStruct.USART_StopBits = USART_StopBits_1;//1位停止位
	USART_InitStruct.USART_WordLength = USART_WordLength_8b;
	USART_Init(USART1,&USART_InitStruct);

	//第四步开启中断
	USART_ITConfig(USART1,USART_IT_RXNE,ENABLE);
	NVIC_PriorityGroupConfig(NVIC_PriorityGroup_2);
	NVIC_InitStructure.NVIC_IRQChannel = USART1_IRQn;
	NVIC_InitStructure.NVIC_IRQChannelCmd = ENABLE;
	NVIC_InitStructure.NVIC_IRQChannelPreemptionPriority = 1;
	NVIC_InitStructure.NVIC_IRQChannelSubPriority = 1;
	NVIC_Init(&NVIC_InitStructure);


	USART_Cmd(USART1,ENABLE);//开启USART外设
}


uint8_t Serial_GetRxFlag(void) //用来返回一个是否接收完一个字符串的标志
{
	if(Serial_RxFlag == 1)
	{
		Serial_RxFlag = 0;
		return 1;
	}
	return 0;
}


void Serial_SendByte(uint8_t Byte)
{
	USART_SendData(USART1,Byte);//调用这个库函数byte变量写入到TDR
	//需要等待一下,等待TDR数据移到移位寄存器了我们才能进行下一步的输出
	while(USART_GetFlagStatus(USART1,USART_FLAG_TXE)==RESET);
	//TXE发送数据寄存器空标志位,这个标志位会自动清零,不需要我们手动清除

}

void Serial_SendString(char *String) // 一个字符串发送函数
{
	uint8_t i;
	for(i=0;String[i]!=0;i++)
	{
		Serial_SendByte(String[i]);
	}

}

//中断函数
void USART1_IRQHandler()
{
	static u8 pRxpacket = 0;// 定义一个Rxpacket数组下标
	static u8 Rxstate = 0; //定义标志位

	if(USART_GetITStatus(USART1,USART_IT_RXNE)==SET)
	{
		u8 RxData = USART_ReceiveData(USART1);

		if(Rxstate==0)
		{
			if(RxData=='[')//起始标志符为'['
			{
				memset(Serial_RxPacket,'\0',sizeof(Serial_RxPacket));//清空这个数组
				pRxpacket = 0;//用来给数组赋值的数组下标必须在标志位Rxstate变之前就置0
				Rxstate=1;
			}
		}
		else if(Rxstate==1)
		{
			if(RxData==']')//结束标志符为']'
			{
				Rxstate=0;
				Serial_RxFlag=1;//RxFlag置1证明已经取完一整个字符串,可以在主函数里读取这个字符串
			}
			else
			{
				Serial_RxPacket[pRxpacket] = RxData;
				pRxpacket++;
			}
		}
		USART_ClearITPendingBit(USART1,USART_IT_RXNE);
	}
}
- 这里有几个值得注意的点:
- 1.在初始化外设的时候,只要涉及到调用标准库里的宏定义生成一个结构体变量的时候,必须写在最前面,否则编译的时候会报错。例如
GPIO_InitTypeDef GPIO_InitStruct; - 2.用来给数组赋值的数组下标
pRxstate必须在标志位Rxstate变之前就置0,否则在运行的时候下标不能及时归零。 - 3.起始标识符和结束标识符可以随意设置
8.主函数执行以及判断和响应
#include "stm32f10x.h"                  // Device header
#include <stdio.h>
#include "Serial.h"
#include "Delay.h"
#include <string.h>

int main(void)
{
	Serial_Init();
	while(1)
	{
		if(Serial_GetRxFlag()==1)//如果接受标志位置1,也即成功读取了一个字符串
		{
			if(strcmp(Serial_RxPacket,"go stm32!")==0)//这里的字符串可以随意设置,
			{
				while(1)
				{
					Serial_SendString("hello windows!\n");
					Delay_ms(800);

					if(strcmp(Serial_RxPacket,"stop stm32!")==0)
					{
						break;
					}
				}

			}
		}

	}
}
- 这里有也几个值得注意的点:
- 1.用来比较字符串的函数
strcmp()使用的时候必须包含头文件#include<stdio.h> - 2.这里能直接调用
Serial_RxPacket[]字符数组是因为在Serial.h头文件里把它extern出来了,而main函数又导入了Serial.h头文件,所以可以直接使用
9.头文件及工具文件
- Delay.c
#include "stm32f10x.h"

/**
  * @brief  微秒级延时
  * @param  xus 延时时长,范围:0~233015
  * @retval 无
  */
void Delay_us(uint32_t xus)
{
	SysTick->LOAD = 72 * xus;				//设置定时器重装值
	SysTick->VAL = 0x00;					//清空当前计数值
	SysTick->CTRL = 0x00000005;				//设置时钟源为HCLK,启动定时器
	while(!(SysTick->CTRL & 0x00010000));	//等待计数到0
	SysTick->CTRL = 0x00000004;				//关闭定时器
}

/**
  * @brief  毫秒级延时
  * @param  xms 延时时长,范围:0~4294967295
  * @retval 无
  */
void Delay_ms(uint32_t xms)
{
	while(xms--)
	{
		Delay_us(1000);
	}
}

/**
  * @brief  秒级延时
  * @param  xs 延时时长,范围:0~4294967295
  * @retval 无
  */
void Delay_s(uint32_t xs)
{
	while(xs--)
	{
		Delay_ms(1000);
	}
}
- Delay.h
#ifndef __DELAY_H
#define __DELAY_H

void Delay_us(uint32_t us);
void Delay_ms(uint32_t ms);
void Delay_s(uint32_t s);

#endif
- Serial.h
#ifndef _Serial_H
#define _Serial_H
extern char Serial_RxPacket[];
void Serial_Init(void);
void Serial_SendByte(uint8_t Byte);
void Serial_SendString(char *String);
uint8_t Serial_GetRxFlag(void);
#include <stdio.h>
#endif
四.线路连接
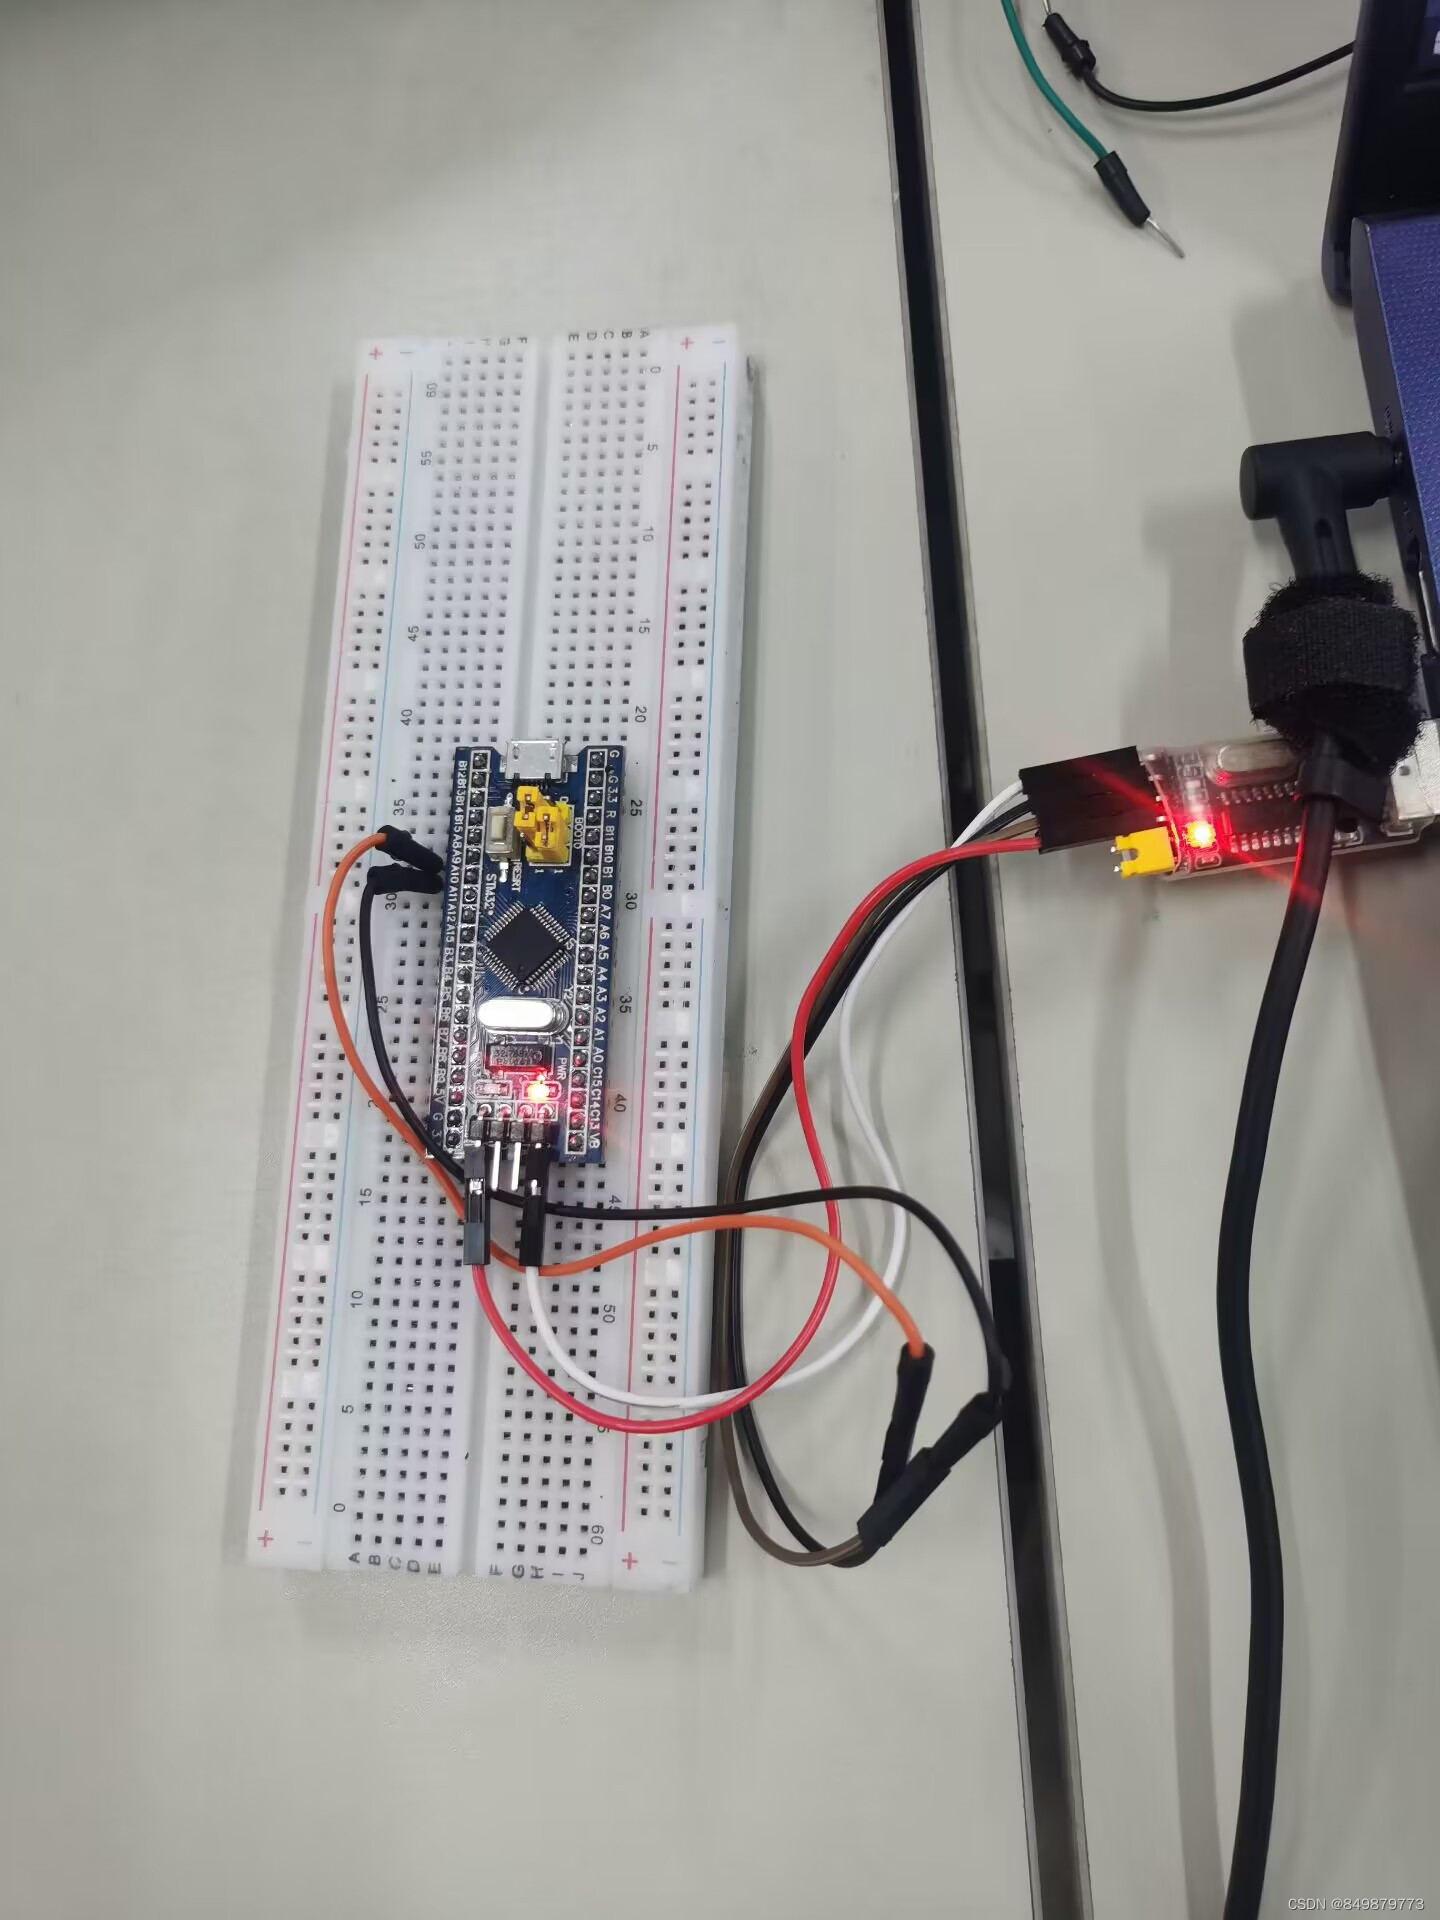
这里接线比较简单,只用把PA9(串口发送)与RXD连接,PA10(串口接收端)与TXD连接就好
五.实验结果
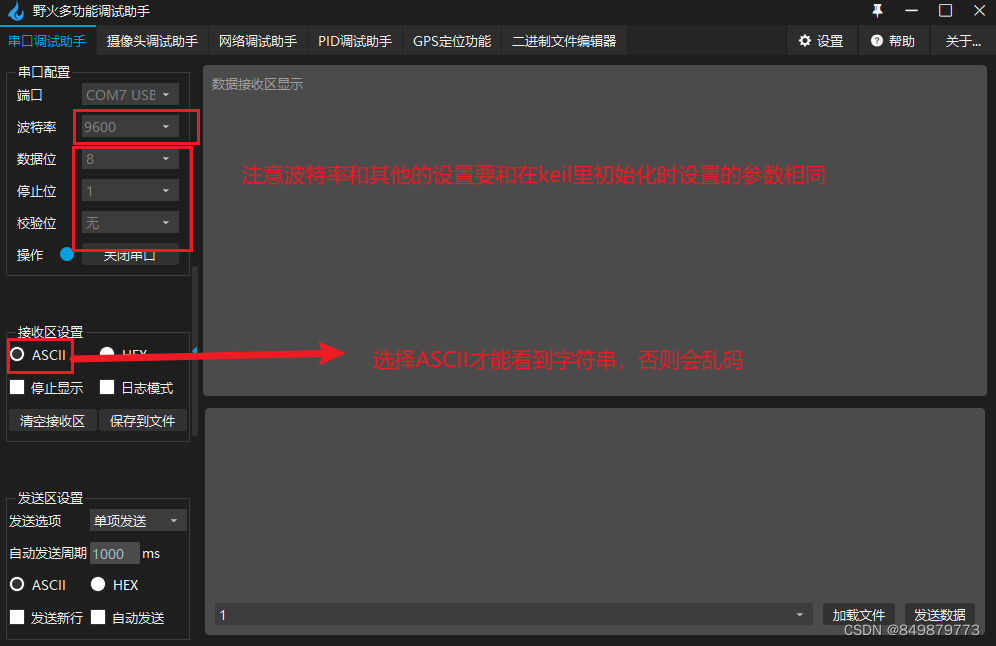
生成的Hex文件,在FlyMcu进行烧录后,打开串口助手
六.总结
多次试着使用标准库来完成项目后对外设的理解更深刻了,不过由于C语言的知识掌握不够号,导致在完成的过程中遇到了很多问题,这可能也是标准库比起HAL库比较麻烦的一点。标准库需要我们更熟练的掌握c语言的知识,而且如果不熟练的话会花费很多时间。