1 配置环境
setting.json·是设置语言环境,launch.json是设置执行环境来执行代码,tasks.json是用来设置指令编译代码
1.1 setting.json
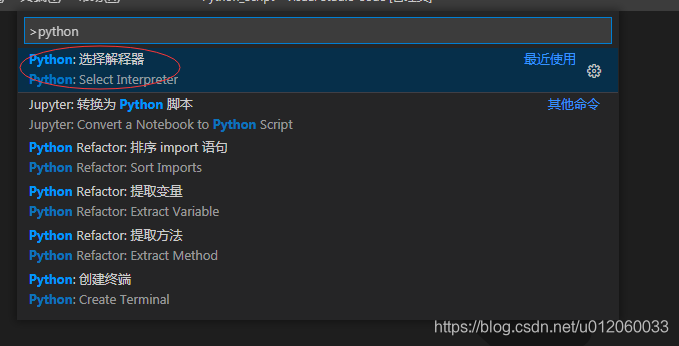
配置python解释器,在vscode界面内按下ctrl+shift+p键,输入python,选择python解释器(python属于解释语言,不需要编译成二进制中间语言,它是依赖解释器,解释一行运行一行)

然后选择python解释器路径,点击确定后,就会在当前选中的文件夹内生成一个.vscode文件夹且内有一个setting.json文件

这只是生成一个setting.json模板,可以按照自己需求添加,如下
{
    "python.pythonPath": "D:\\Anaconda3\\envs\\python3",
    "workbench.colorTheme": "Monokai",
    "window.zoomLevel": 0,
    "explorer.confirmDelete": false,
    "editor.accessibilitySupport": "off",
    "editor.formatOnPaste": true,
    "editor.formatOnSave": false,
    "editor.formatOnType": false,
    "editor.showFoldingControls": "mouseover",
    // 控制编辑器是否显示缩进参考线。
    "editor.renderIndentGuides": true,
    "editor.multiCursorModifier": "ctrlCmd",
    # 将原来的cmd.exe 替换为bash.exe  因为更喜欢bash.exe的操作
    "terminal.integrated.shell.windows": "C:\\Program Files\\Git\\bin\\bash.exe",
    "terminal.integrated.rendererType": "dom",
    "workbench.activityBar.visible": true,
    "python.jediEnabled": false
}
1.2 launch.json
在vscode页面点击运行和调试窗口,点击创建launch.json

就会自动创建一个launch.json文件
{
    "version": "0.2.0",
    "configurations": [
        {
            "name": "Python: 当前文件",
            "type": "python",
            "request": "launch",
            "program": "${file}",
            "console": "integratedTerminal"
        }
    ]
}
此时也是在.vscode文件夹下生成的

或者再次模板上添加
{
    // Use IntelliSense to learn about possible attributes.
    // Hover to view descriptions of existing attributes.
    // For more information, visit: https://go.microsoft.com/fwlink/?linkid=830387
    "version": "0.2.0",
    "configurations": [
        {
            "name": "Python",
            "type": "python",
            "request": "launch",
            "stopOnEntry": false,
            "program": "${file}",
            "cwd": "${workspaceRoot}",
            "env": {},
            "envFile": "${workspaceRoot}/.env",
            "debugOptions": [
                "WaitOnAbnormalExit",
                "WaitOnNormalExit",
                "RedirectOutput"
            ]
        }
    ]
}
1.3 task.json(可能不需要配置)
在vscode面板内选中 终端—>配置任务...->选择 使用模板创建 tasks.json 文件

选择Other

tasks.json文件生成完毕

2 print打印中文乱码
由于使用的python 3+版本,默认编译是utf8,在dos窗口里面可以打印中文,但是在vscode中就不能打印
2.1 方法一
以 windows 系统为例,添加系统变量,此法可以一劳永逸
PYTHONIOENCODING=UTF8

2.2 方法二
修改task.json配置
调出vscode控制命令面板,选择配置任务,点击进去

在task.json中添加如下信息:
"options": {
 "env":{
 "PYTHONIOENCODING": "UTF-8"
 }
}
在每个需要中文的 python 文件增加信息
import io
import sys
#改变标准输出的默认编码
sys.stdout=io.TextIOWrapper(sys.stdout.buffer,encoding='utf8')