开始前的忠告
本教程是配置Vscode的C/C++编译环境,使其能够在Vscode上debug(不得不说Vscode对C++进行debug的界面真的很香)
如果你之前电脑里面没有安装过Vscode,那么恭喜你,只要你跟着我一步步做,不要超前某些步骤,基本上立刻就能配置完成,如果你之前装过,那也没事,就是要改个launch.json文件麻烦了点hhh
那我们就开始叭!
安装mingw并修改环境变量
mingw
首先,这玩意乍一看跟C++半毛钱关系都没有,让我们来看看介绍:(来源mingw维基百科)
MinGW(Minimalist GNU for Windows),又称mingw32,是将GCC编译器和GNU Binutils移植到Win32平台下的产物,包括一系列头文件(Win32API)、库和可执行文件。(因此配置了mingw才能在vscode上进行正常的debug)
好了我知道你可能看不懂hhh,没关系哈,我们装就完事了;
mingw即点即下地址

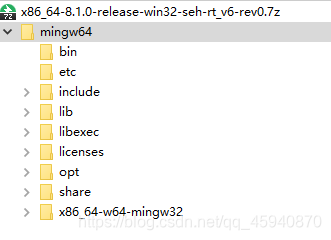
然后我们打开看看下载了什么:

只要是这样子的目录格式,就没啥问题啦,然后我们把压缩包解压,把解压后的整个文件放到C盘的目录下;这里请不要自作主张修改目录,在C盘配起来会方便很多,如果你选择了别的目录,那后面肯定要修改launch.json了

修改环境变量
现在我们右键桌面上的我的电脑,选择属性,然后划到最下面,打开高级系统设置;

打开之后,我们选择环境变量,要进入它进行修改;

然后选择系统变量的Path,选中它,然后点编辑

在里面新建,把我们刚刚放置的mingw目录输入进去即可

之后,每一个页面都点确定,不要直接关掉,防止电脑发神经不保存;
这样操作之后,我们使用win + r,输入cmd打开终端命令窗口;

然后我们输入
gcc -v
能够出现版本号,即证明我们安装成功!

至此我们的mingw就配置完成了,接下来进入重头戏Vscode的配置(其实这个更简单一些hhh)
配置Vscode
这次我们直接到Vscode的官网上下载它的安装包:Vscode官网

然后安装(建议全部勾上,可以省去很多不必要的麻烦)

然后我们打开Vscode,它会提示你要不要安装中文包,可以根据自己的需求而定,我这里不推荐大家安装,多练习阅读英文的能力是非常有必要的;
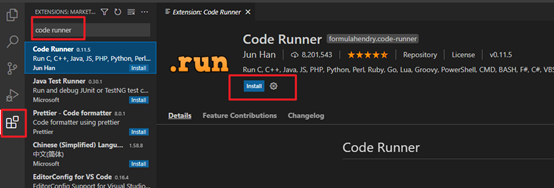
然后我们想要运行C/C++程序,我们首先需要到插件商店中安装Code Runner

然后对coderunner进行配置,我们选择左下角那个齿轮图案,选择settings

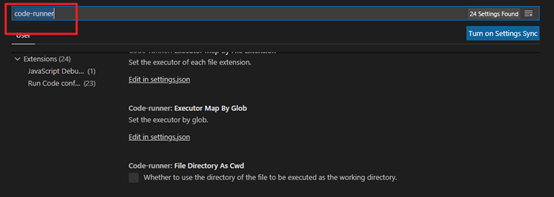
然后搜索code-runner

然后给一下的几个配置打个勾,具体的功效吧,如果你有兴趣可以百度百度,虽然我觉得直接看也能够看懂(但是你不勾上那就基本上是运行不了的hhh)


我相信你都能找到的吧hhh,然后我们在安装C/C++插件,这个一看就很重要对吧hhh

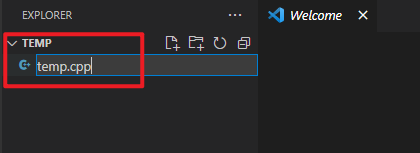
安装完成之后,我们就可以开始尝试运行程序了,这里以.cpp文件为例,随便选择一个文件夹打开,然后新建temp.cpp文件来进行测试;

然后我们打上非常经典的Hello World!进行输出;

然后单击右上角的运行按钮(这里只要你按照上面的插件配置了,就会出现的,如果没有请重启一下)

可以看到我们输出了Hello World!
然后我们再测试一下debug功能,给cout语句打上断点

然后,我们选择Run中的Start Debugging开始,然后会让你选择编译路径,全部点第一个即可;就会跳出在debug的界面,就证明你成功了;


如果这里你成功了,那下面的特殊情况就不需要看啦!祝贺你!
针对特殊情况
这里的特殊情况就是,你可能之前就安装了vscode或者,你没有按照步骤一步步来(嗨呀),也没事,它就会跳出来让你修改launch.json文件,那就改呗

主要就是修改这两个地方,第一个改成一样的即可,第二个按照的你的路径改;(这里给出修改完的,你可以直接复制一整个)
{
    // Use IntelliSense to learn about possible attributes.
    // Hover to view descriptions of existing attributes.
    // For more information, visit: https://go.microsoft.com/fwlink/?linkid=830387
    "version": "0.2.0",
    "configurations": [
        {
            "name": "g++.exe - 生成和调试活动文件",
            "type": "cppdbg",
            "request": "launch",
            "program": "${fileDirname}\\${fileBasenameNoExtension}.exe",
            "args": [],
            "stopAtEntry": false,
            "cwd": "${workspaceFolder}",
            "environment": [],
            "externalConsole": false,
            "MIMode": "gdb",
            "miDebuggerPath": "C:\\mingw\\bin\\gdb.exe",
            "setupCommands": [
                {
                    "description": "为 gdb 启用整齐打印",
                    "text": "-enable-pretty-printing",
                    "ignoreFailures": true
                }
            ],
            "preLaunchTask": "C/C++: g++.exe 生成活动文件"
        }
    ]
}
其他的地方,如果你有兴趣了解可以去百度百度hhh,相信修改完,应该没啥问题,如果还有别的bug,可以提出来,或者直接重装hhh(解决一切的方法)