使用jupyter运行C#,F#主要有以下几个过程:
1.安装 .netcore。
2. 安装python3(默认自带)
3. 安装jupyter
4. 安装dotnet工具
一、安装.netcore
使用Ubuntu安装.netcore过程如下:
1.打开终端并运行以下命令
wget https://packages.microsoft.com/config/ubuntu/21.04/packages-microsoft-prod.deb -O packages-microsoft-prod.deb
sudo dpkg -i packages-microsoft-prod.deb
rm packages-microsoft-prod.deb
- 安装SDK
sudo apt-get update;
sudo apt-get install -y apt-transport-https && \
sudo apt-get update && \
sudo apt-get install -y dotnet-sdk-5.0
3.等待安装完成后输入dotnet --info可以查看是够安装成功。
安装过程中如出现错误可参考官方教程:https://docs.microsoft.com/zh-cn/dotnet/core/install/linux-ubuntu
二、python 及jupyter的安装
1.python一般自带为python3 不在讲述。
2. 安装jupyter:直接使用 pip3 install jupyter 在安装完成后,终端运行jupyter notebook 如果可以正常运行则表示安装成功,若报错jupyter command not found, 解决办法为添加~/.local/bin到环境变量中:vim ~/.bashrc 在文件末尾加上:
PATH=~/.local/bin:$PATH
export PATH
3.配置好后运行source ~/.bashrc激活让环境变量生效。
4.运行jupyter notebook 可以正常运行则代表安装成功。
三 dotnet工具安装及jupyter 下C#、F#内核的安装。
-
在安装好jupyter 后,在终端运行
jupyter kernespec list可以看到如下图
可以看到现在只有python3 的内核,所以现在jupyter只能运行python代码。 -
终端运行:
dotnet tool install -g Microsoft.dotnet-interactive安装dotnet interactive 命令,如果显示要求重启,请重启电脑。安装成功如下:

-
终端运行:
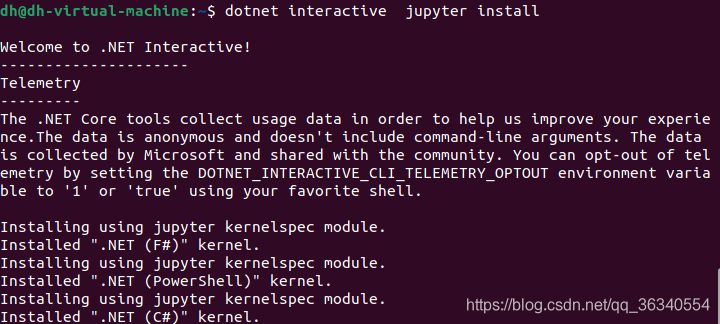
dotnet interactive jupyter install如下图

4.再次运行jupyter kernespec list 可以看到已经有C#和F#的内核,安装成功:

四、jupyter 运行C#代码
1.启动jupyter
mkdir myapp
cd myapp
jupyter notebook
2.在服务器打开jupyter,点击新建可以看到已经可以运行C#,F# 、.Net、Python内核的代码。 