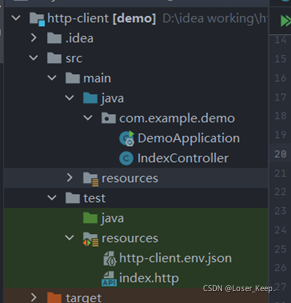
idea 中的:HTTP Client,这款工具挺好用的,主要优点:
1、若想测试一个接口,只需要几行代码
2、运行特别容易
3、可以切换各种环境的请求地址
创建一个 springboot 项目

核心实现
IndexController
package com.example.demo;

import org.springframework.web.bind.annotation.*;
import org.springframework.web.multipart.MultipartFile;

import javax.servlet.http.HttpServletRequest;
import java.util.HashMap;
import java.util.List;
import java.util.Map;

/**
 * @author ktz 2021/8/26
 */
@RestController
public class IndexController {
    /**
     * get请求
     */
    @RequestMapping("/get")
    public String get() {
        return "[get]";
    }

    /**
     * post请求,模拟表单提交
     */
    @PostMapping("/post")
    public Map<String, String[]> post(HttpServletRequest request) {
        return request.getParameterMap();
    }

    /**
     * post请求json数据
     */
    @PostMapping("/body")
    public List<Integer> body(@RequestBody List<Integer> list) {
        System.out.println("[body]");
        return list;
    }


    /**
     * post请求json数据
     */
    @PostMapping("/body2")
    public String body(@RequestBody User user) {
        System.out.println("[body2]");
        System.out.println(user);
        return "[success-body2]";
    }

    /**
     * put请求
     */
    @PutMapping("/put")
    public String put() {
        return "[send put]";
    }

    /**
     * 模拟多文件上传,并带上表单数据
     * 这个请求可以想象为页面中的一个表单提交,表单有 4 个元素:2 个 File 元素,用来选择需要上传的 2 个文件。2 个输入框,分别用来输入 userName 和 age。
     */
    @PostMapping("/upload")
    public Map<String, Object> upload(@RequestParam("file1") MultipartFile file1,
                                      @RequestParam("file2") MultipartFile file2,
                                      User user,
                                      HttpServletRequest request) {
        Map<String, Object> result = new HashMap<>(1);
        result.put("file1.size", file1.getSize());
        result.put("file1.name", file1.getName());//file1
        result.put("file1.originalFilename", file1.getOriginalFilename());//pic_1.jpeg

        result.put("file2.size", file2.getSize());
        result.put("file2.name", file2.getName());//file2
        result.put("file2.originalFilename", file2.getOriginalFilename());//pic_2.jpeg
        result.put("user", user);
        result.put("params", request.getParameterMap());//userName、age
        return result;
    }

    static class User {
        private String userName;
        private int age;

        public String getUserName() {
            return userName;
        }

        public void setUserName(String userName) {
            this.userName = userName;
        }

        public int getAge() {
            return age;
        }

        public void setAge(int age) {
            this.age = age;
        }

        @Override
        public String toString() {
            return "User{" +
                    "userName='" + userName + '\'' +
                    ", age=" + age +
                    '}';
        }
    }
}
http-client.env.json
{
  "dev": {
    "url": "http://localhost:8080"
  },
  "test": {
    "url": "http://localhost:9090"
  }
}
index.http
### get 请求
GET http://localhost:8080/get

### post
### 提交表单数据,将表单内的数据转换为键值对,会封装到一个map中,比如 test=xxx&name=sss
POST http://localhost:8080/post
Content-Type: application/x-www-form-urlencoded

name=张三&age=23

### post
### 提交表单数据,将表单内的数据序列化为json字符串,会封装到@RequestBody标注的参数上,比如 {"test": "xxx"}
POST http://localhost:8080/body
Content-Type: application/json

[3,10,40]

### post
### 提交表单数据,将表单内的数据序列化为json字符串,会封装到@RequestBody标注的参数上,比如 {"test": "xxx"}
POST http://localhost:8080/body2
Content-Type: application/json

{
  "userName": "ktz",
  "age": 22
}

### put请求 服务实际使用端口为8080,因此dev环境测试成功
#PUT http://localhost:8080/put
PUT {{url}}/put


### 多文件上传文件
### boundary 表示参数和参数值定义范围的起始边界线,对应的默认值是 WebAppBoundary,也可以自定义,比如:WebAppBoundary123
### 如果有多个请求参数,各个参数需要使用--WebAppBoundary来作为它们的边界分隔符(前后都需要)
### 对应postman中的操作,选择一个文件,如何定位其位置呢?需要使用”<“这个符号
### 另外需要注意换行问题
POST http://localhost:8080/upload
Content-Type: multipart/form-data; boundary=WebAppBoundary

--WebAppBoundary
Content-Disposition: form-data; name="file1"; filename="x2.jpg"

< C:\Users\LOSER\Pictures\Saved Pictures\x2.jpg
--WebAppBoundary--

--WebAppBoundary
Content-Disposition: form-data; name="file2"; filename="x3.jpg"

< C:\Users\LOSER\Pictures\Saved Pictures\x3.jpg
--WebAppBoundary--

--WebAppBoundary--
Content-Disposition: form-data;name=userName

dg
--WebAppBoundary--

--WebAppBoundary--
Content-Disposition: form-data;name=age

23
--WebAppBoundary—
测试接口

?HTTP client 的使用
创建 http 后缀的文件,文件必须以 http 为后缀,这种文件会自动被 HTTP Client 插件识别,效果如下:

测试效果
 ??
??