EE308 LAB2
LAB2 Progress Logging
| The Link Your Class | MU-EE308 |
|---|---|
| The Link of Requirement of This Assignment | LAB 2 Individual work |
| The Aim of This Assignment | lab 2 |
| MU STU ID and FZU STU ID | <19015339_831902126> |
My Github Link:
Github
My Code Style:
My Code Style
Ⅰ. Use Git to conduct version control
1. Create Github Repository
2. Clone your Repo to local
First we enter a working directory and create your local directory to store all your local repositories.

You may notice that all the commands are liken Linux commands, exactly! I strongly recommend you to revise Linux commands before using Git.
Secondly, using SSH to clone the remote repository to local. I assume that you have already set up your SSH on Github.
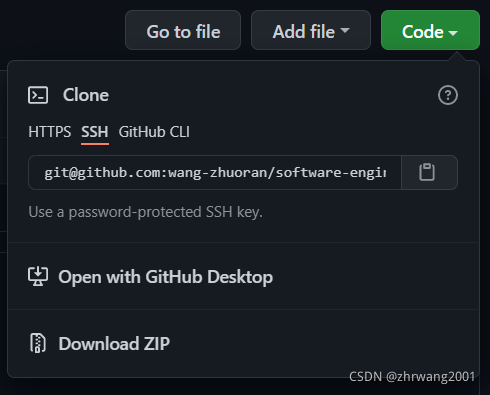

Great!
3. Make your first commit!
First enter the local repo:

You can see that the name of repo is set as origin automatically.
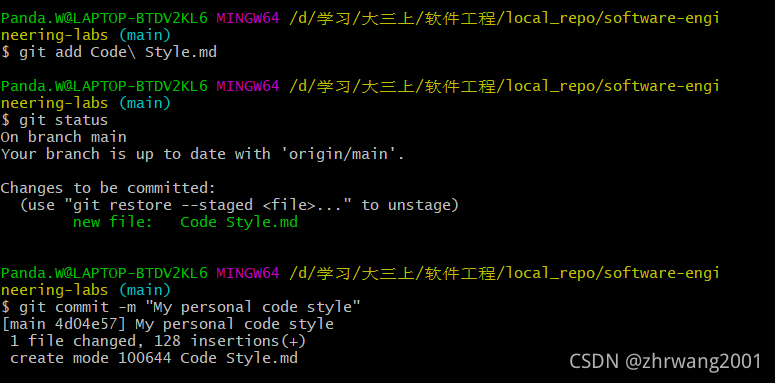
Select the file you want to upload to local repository and commit it to the local repository. Here, I use the command:
git add file_name
and
git commit -m "some commit info"
Of course, you can check the status using the command:
git status
Here is my commit process:
4. Push local to remote
Use the command:
git push -u origin main
to push the local change to remote.

Now, check out the Github remote repo, you can see the change have already been made.
Ⅱ. PSP Form
| Personal Software Process Stages | Estimated Time/minutes | Completed Time/minutes |
|---|---|---|
| Planning | - | - |
| Estimate | 15 | 15 |
| Development | - | - |
| Analysis | 120 | 180 |
| Design Spec | 40 | 45 |
| Design Review 20 | 30 | |
| Coding Standard | 30 | 20 |
| Design | 50 | 80 |
| Coding | 1200 | 1400 |
| Code Review Planning | 60 | 45 |
| Test | 90 | 120 |
| Reporting | - | - |
| Test Report | 60 | 45 |
| Size Measurement | 10 | 10 |
| Postmortem&Process Improvement | 120 | 90 |
| total | 1815 | 2080 |
Ⅲ. Description of problem-solving ideas
The first two tasks is easy: Use a setto store all the keywords. First preprose all the code and extract all the keywords and }, {. Then just traverse them and we can obtain the result.
The last two task is a little bit tricky: The if-elseand if-else if-elsecan nested. The main idea is here:
1. Extract the keywords if and else and consider else-if as one keyword
2. At the same time, also extract the "level" of each of them like this:
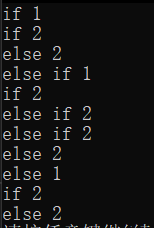
3. Then, we can process the if-else and if-else if-else with all the levels
4. Traverse the same level at a time.
Ⅳ. Design and implementation process & Code Description

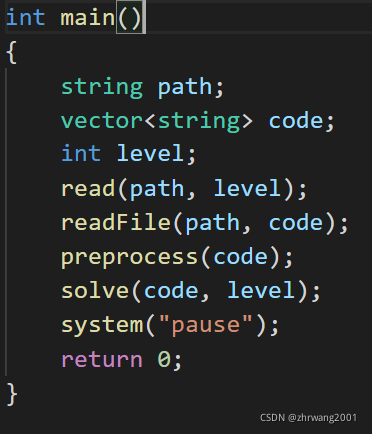
The functions in the mainlevel is:
Preprocess
The pathstore the path of our test file and I create a vectorcalled codeto store all the codes in the test file. And the int levelwas used to store the solution level.
Then the read()and readFile()functions are used to read the user input, i.e. path and level, and read in all the content in the test file.
In order to be more convenient, the function preprocess()is used to delet every non-letter(except they are {or}) character.


Count keywords
After these process, we can count the keywords now! Just traverse all the codeand count them.
const set<string> keywords = {"auto", "break", "case", "char", "const",
							  "continue", "default", "do", "double", "else",
							  "enum", "extern", "float", "for", "goto", "if",
							  "int", "long", "register", "return", "short",
							  "signed", "sizeof", "static", "struct", "switch",
							  "typedef", "union", "unsigned", "void",
							  "volatile", "while"};
/*
Return the total num of keywords in a code file
the path directed to.
*/
int countKeywords(vector<string> &code)
{
	int total_num = 0;
	for (int i = 0; i < code.size(); i++)
	{
		if (keywords.find(code[i]) != keywords.end())
		{
			total_num++;
		}
	}
	return total_num;
}
And the result is seemingly perfect:

Count switchand case
The idea of this part is same as the last one. Just traverse it and count switchand case.
The function here is countSwitchAndCase()
The result is here:

Count if-else
At this part, the relationship of functions is:
solve() -> countIfElse() -> extractKeyLevel() -> extractIfElse()
In the solve()funtion, call the countIfElse()funtion, in this one, call extractKeyLevel(), which is used to extract the ifand elseand else ifkeywords and its “level”, this function needs the value returned by function extractIfElse(), which returned the vector of only the ifand elseand else ifkeywords and {}.
After getting all the return value of extractKeyLevel() extractIfElse()function, the countIfElse()
could work:

Define a pair, which store the keyword in its first slot, and the “level” in the second slot.

The idea is here:
Traverse the vector, when it encounters if, meaning that the count process should start.
Create the second pointer, used to track the end of if-else.
When the second pointer encounters else if, meaning that this must not be an if-else.
When it encounters an else, and have the same level at the same time, meaning that it can be counted as an if-else.
So here is the result:

Count if-else if-else
The idea is liken the last one.

And the result is:

Ⅴ. Unit test screenshots and description
A unit test is a way of testing a unit - the smallest piece of code that can be logically isolated in a system. Here is my unit test:

Ⅵ. Performance Testing
use clock()function to test performance of my code.
	#include "stdlib.h"
	#include "time.h"
	clock_t start, finish;
	double duration;
	start = clock();
	/*My code here*/
	finish = clock();
	duration = (double)(finish - start) / CLOCKS_PER_SEC;
	printf("%f seconds\n", duration);
On my machine, the result is 0.003s, which is really good.
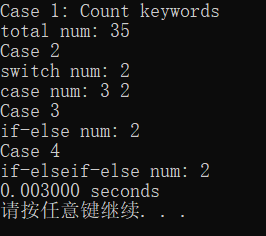
And the Time complexityis also no more than
O
(
n
2
)
O(n^2)
O(n2), which is also acceptable.
Ⅶ. Summary
In this lab, I was so struggling with the writing code part.
My commit record:

What did I learn:
- Revise every thing of C++
- How to use Git
- Planning before coding is so important
- Performance Testing
- Unit Testing
See you next lab!
