一、git的常用操作
1.安装 sudo apt install git
2.查看Git的版本 git version
3.git分类
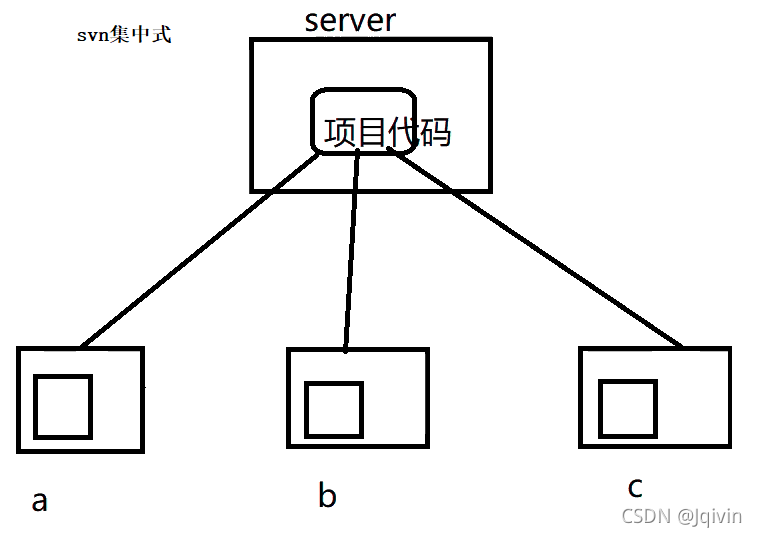
- 集中式 如svn

集中式git中,过度依赖服务器,a,b,c中只存在最新的版本,如果服务器出现故障,以前的版本就找不到了。 - 分布式git

每个主机都存在历史版本。
二、git的基本概念
2.1git分区(四个工作区)
git本地有三个工作区:工作区(working directory)、暂存区(stage/index)、仓库(repository)。再加上远程服务器上的git仓库(remote directory)就成为了四个区域。


- 工作区(worlspace):平常放代码的地方。
- Index/stage:暂存区,临时存放的改动,事实上它就是一个文件,保存即将要存放的代码。
- Repository:仓库区,是本地的一个仓库,存放最终提交的项目版本。这里面有你提交到所有版本的数据。其中HEAD指向最新仓库的版本。
- Remote: git远程服务器的仓库,托管代码的服务器,就如github,gitee之类的。
2.2工作流程
1.在工作目录中添加,修改文件
- 将需要进行版本管理的文件放入暂存区
- 将暂存区的文件提交到git仓库
2.3文件的四种状态
使用 git status查看状态
- Untracked: 未跟踪:此文件在文件夹中,即在工作区。 但并没有加入到git库, 不参与版本控制. 通过
git add filename状态变为Staged.
创建一个文件hello.cpp.- Unmodify: 文件已经入库, 未修改。 即版本库中的文件快照内容与文件夹中完全一致. 这种类型的文件有两种去处, 如果它被修改, 而变为Modified. 如果使用git rm filename移出版本库, 则成为Untracked文件。- Modified: 文件已修改, 仅仅是修改, 并没有进行其他的操作. 这个文件也有两个去处, 通过git add filename可进入暂存staged状态, 使用git checkout则丢弃修改过,返回到unmodify状态, 这个git checkout即从库中取出文件, 覆盖当前修改. - Staged: 暂存状态. 执行
git commit -m '描述'则将修改同步到库中, 这时库中的文件和本地文件又变为一致,文件为Unmodify状态. 执行git reset HEAD filename取消暂存,文件状态为Modified.


三、git命令
创建本地仓库
1.创建一个目录
2.初始化仓库
使用git init使其成为一个可以通过git管理的仓库
第一次使用需要设置用户名和邮箱
stu@stu-virtual-machine:~/myproject$ git config --global user.email "you@126.com"
stu@stu-virtual-machine:~/myproject$ git config --global user.name "youname"
3.git add filename
将文件添加到暂存区
4. git commit -m ‘版本描述信息’
提交版本到仓库
5.git status 查看仓库状态
6.git log 查看提交的历史记录
只记录当前版本及之前的版本的记录
修改hello.cpp,添加打印功能

7.git reflog 查看对仓库的操作日志
记录对仓库的操作的记录 每次的操作都会记录

8.git reset --hard HEAD^ 回退版本

9. git reset --hard 版本号 回退到对应的版本号

10.git diff 比较差异
git diff 比较与当前版本
git diff HEAD^ 比较与上一个版本
git diff 版本号 比较与版本号对应的版本


11.git checkout filename 放弃对工作区代码的修改
可以和git diff 在一起使用,我们可以看到修改的代码,如果不想修改,就使用这个命令。就是将仓库中的最新版本覆盖工作区。

12.git reset HEAD filename 从暂存区中撤销

13.git rm filename 删除一个文件
此时提交到缓存区,需要commit之后才能在版本库中删除。


四、分支
默认为master分支,可以建立不同的分支开发不同的版本。也可以合并分支。

1. 查看分支:git branch
2.创建分支:git branch 分支名
3.切换分支:git checkout 分支名

4.创建并切换分支:git checkout -b 分支名

5.删除分支:git branch -d 分支名
不能删除当前所在的分支,要切换到其他分支之后才能进行删除

6.合并某个分支到当前分支:git merge 分支名
如果同时在两个分支都修改了内容,会产生冲突。要人工进行修改。


从上面的图可以看出,我们只能在master中看到合并后的版本,在topic中看不到。


注意:


7.以图表的方式显示log: git log --graph
8.保护现场:git stash
9.列出所有保存现场的信息:git stash list
10.取出某次的现场信息:git stash pop “stash@{1}”
默认是最近的一次,如果有多个现场,可以加上编号“stash@{1}”来指定获取某一个。不同的分支的现场,要回到对应的分支再获取,否则会自动合并到当前分区的工作区。
当工作区有代码修改的时候是不能切换分支的要先保存现场,再进行切换。


五、远程仓库操作

操作一
添加公钥
打开gitee -> 【设置】-> 【ssh公钥】

如何获取公钥?
首先,在终端输入 ssh-keygen -t rsa -C "xxxx@qq.com".
jqw@jqw-virtual-machine:~$ ssh-keygen -t rsa -C "2771856863@qq.com"
Generating public/private rsa key pair.
Enter file in which to save the key (/home/jqw/.ssh/id_rsa):
Created directory '/home/jqw/.ssh'.
Enter passphrase (empty for no passphrase):
Enter same passphrase again:
Your identification has been saved in /home/jqw/.ssh/id_rsa
Your public key has been saved in /home/jqw/.ssh/id_rsa.pub
The key fingerprint is:
SHA256:GHmf5EjJ2z/FEjokqyxLeFCrveTjq2gLi4/FQmzapno 2771856863@qq.com
The key's randomart image is:
+---[RSA 3072]----+
|                 |
|       o .       |
|    . o * o .    |
|.  . . = @ o o   |
| +. . . S B . o  |
|+o = . .   o o   |
|+ B * o     o    |
|oXE=.+       .   |
|X++o*o           |
+----[SHA256]-----+
进入/home/jqw/.ssh目录,查看 id_rsa.pub文件中的内容就是公钥。
jqw@jqw-virtual-machine:~/.ssh$ cat id_rsa.pub
在gitee中添加公钥之后,服务器就把公钥保存了。

测试连通是否成功
命令:ssh -T git@gitee.com or ssh -T git@github.com
jqw@jqw-virtual-machine:~/.ssh$ ssh -T git@gitee.com
Hi Jqivin! You've successfully authenticated, but GITEE.COM does not provide shell access.

jqw@jqw-virtual-machine:~/.ssh$ ssh -T git@github.com
Hi Jqivin! You've successfully authenticated, but GitHub does not provide shell access.