天猫精灵开放平台实验―基于模板创建开发屏显页面技能
一、前提准备
使用本地 VSCode 快速开发一个技能屏显界面,并通过控制台的操作连接猫精设备进行真机测试。
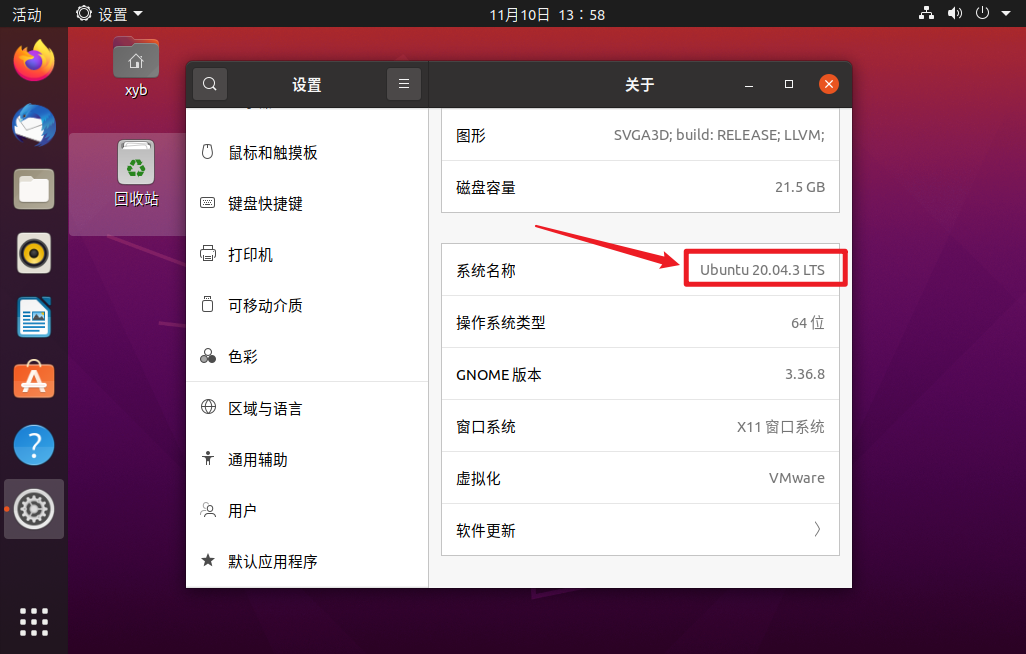
- 1、本实验目前支持CentOS、Ubuntu、MacOS上支持。本实验采用Ubuntu 20.4系统。
- 2、在Ubuntu系统上安装VSCode开发软件。# 系列文章目录
二、登录天猫精灵开放平台
1、登录天猫精灵开放平台 ,登陆后点击控制台,选择技能应用平台并点击进入。
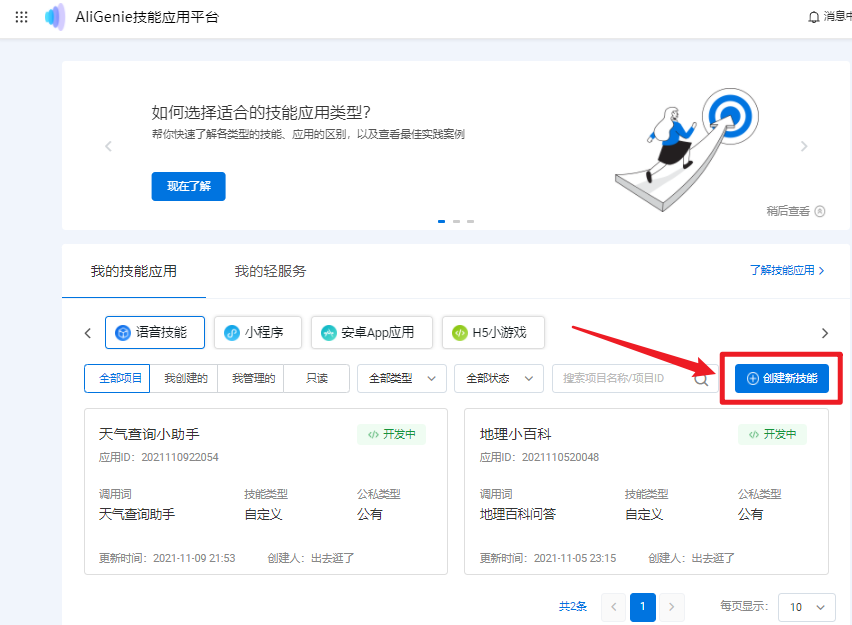
(一)创建新技能
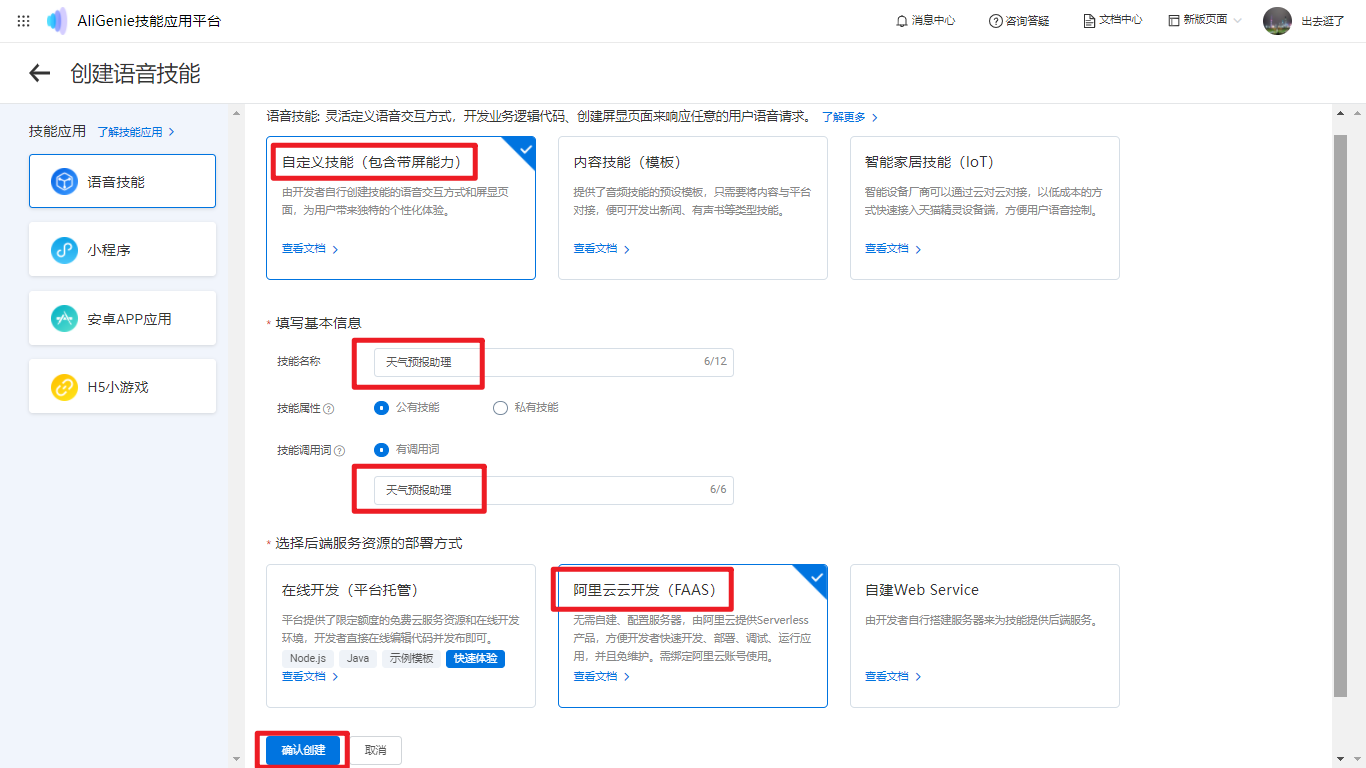
1、创建语音技能
2、填写基本信息
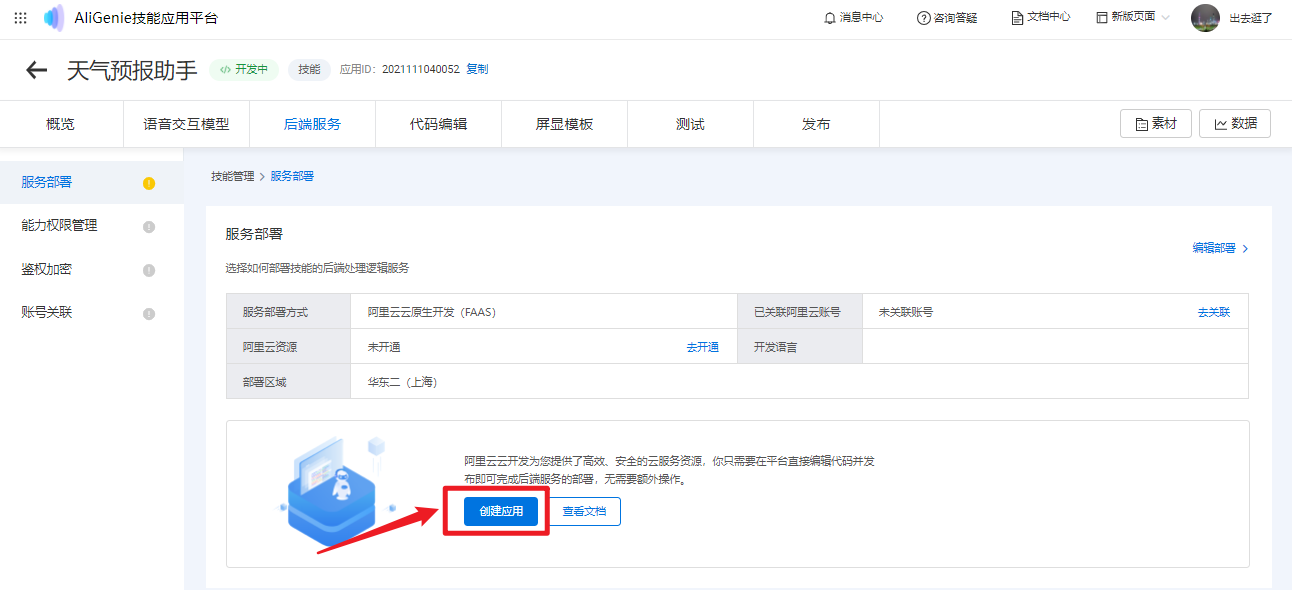
(二)创建后端服务
1、创建后端服务
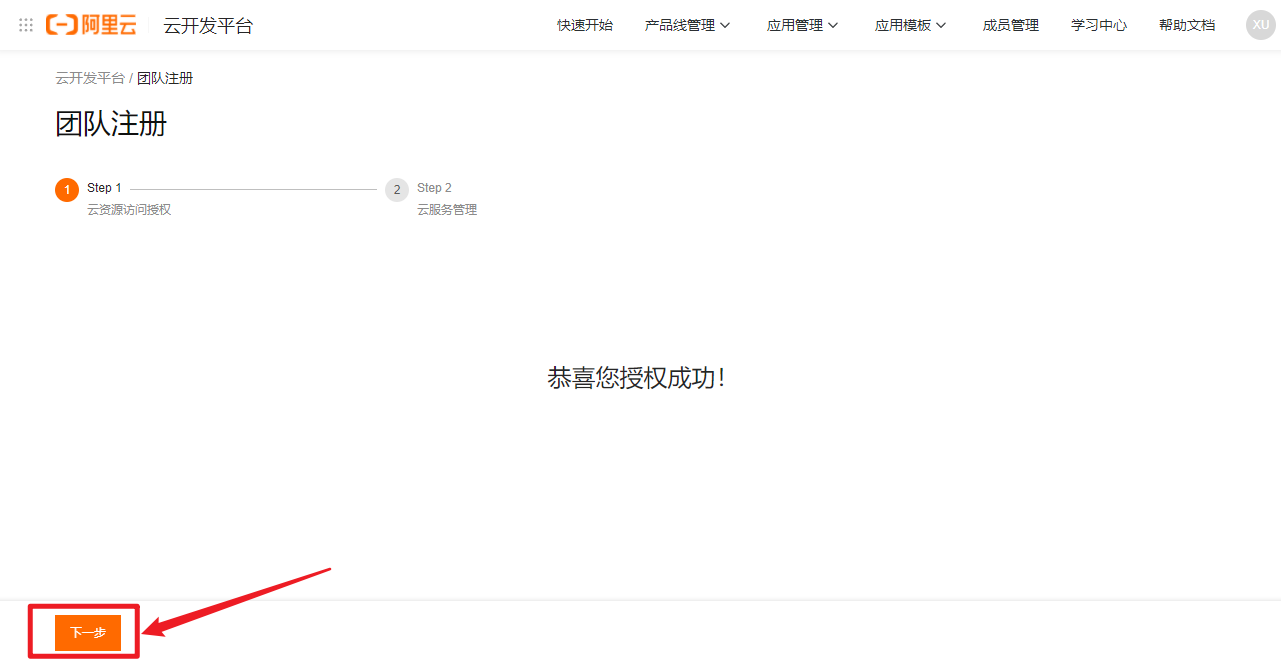
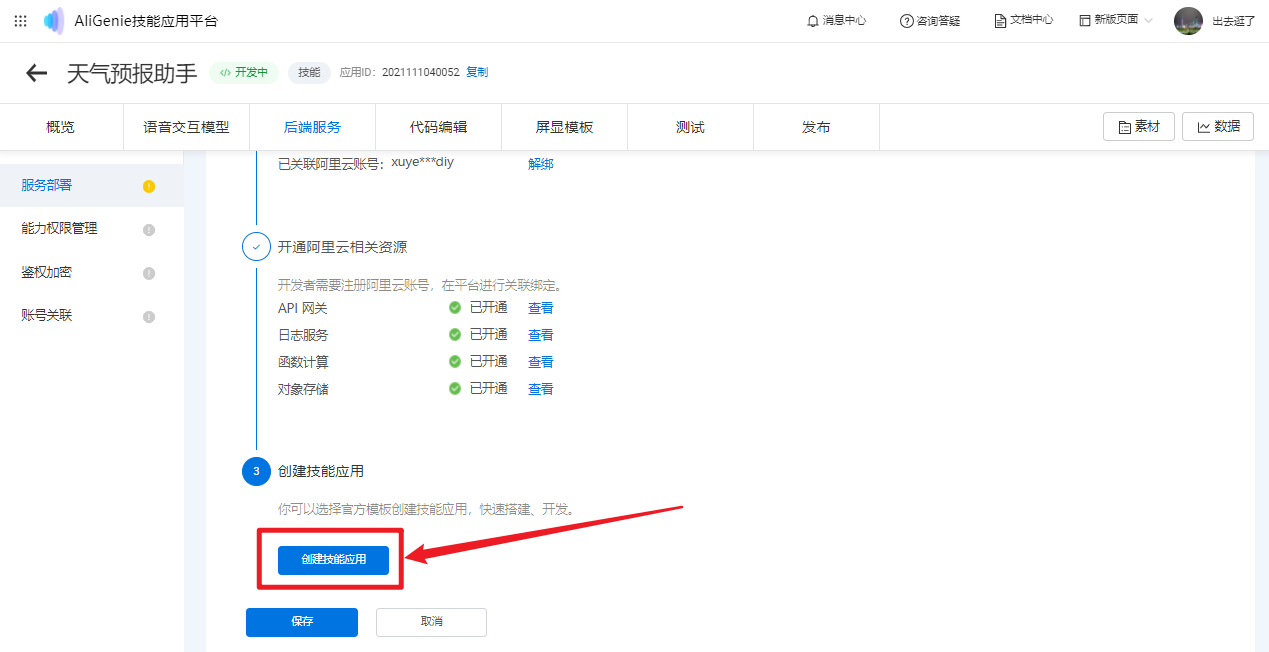
2、关联阿里云账号
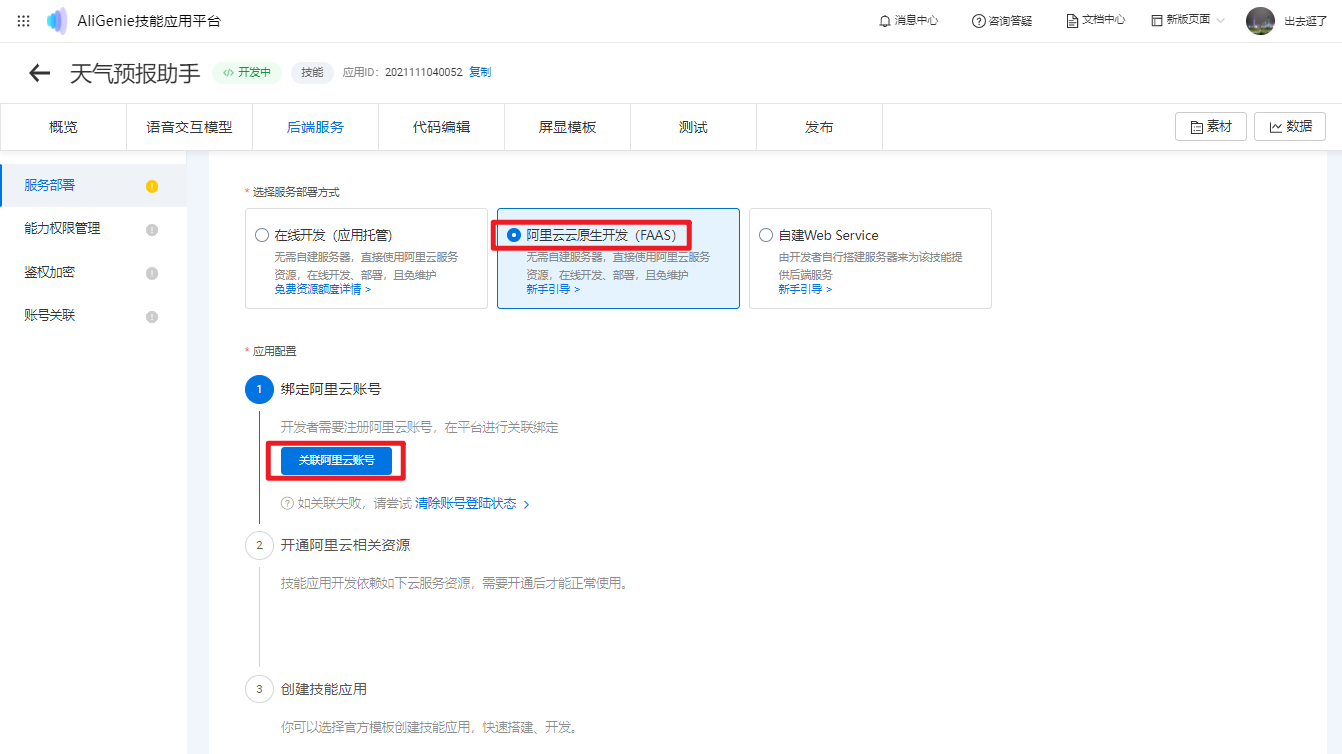
登录阿里云账号

完成授权,点击下一步。
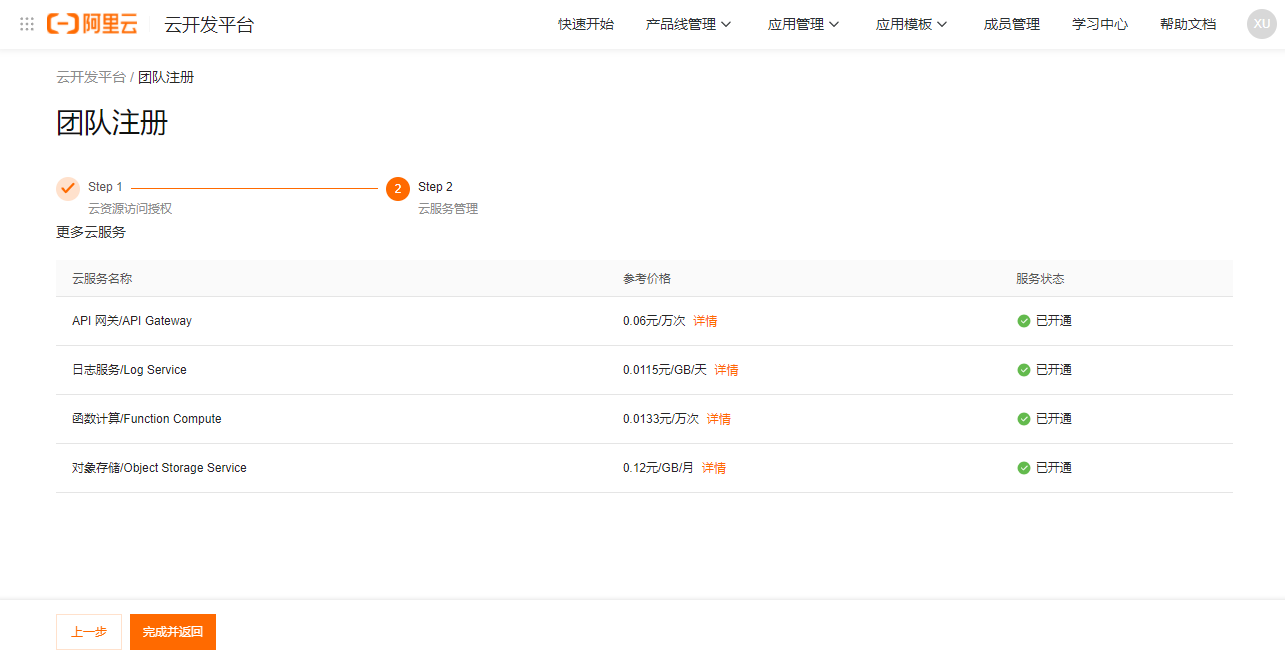
开通相关服务。
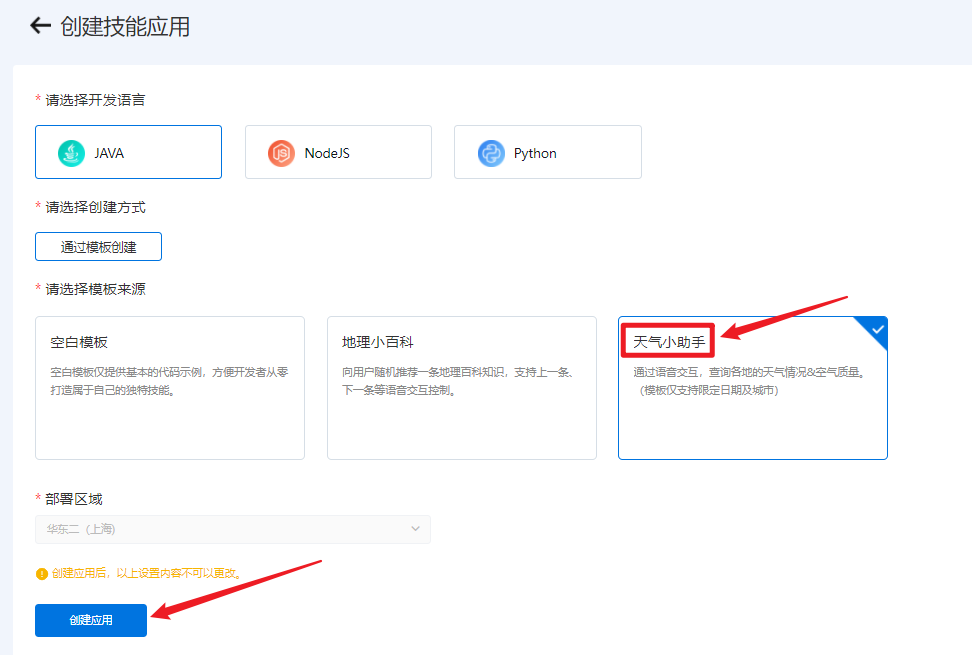
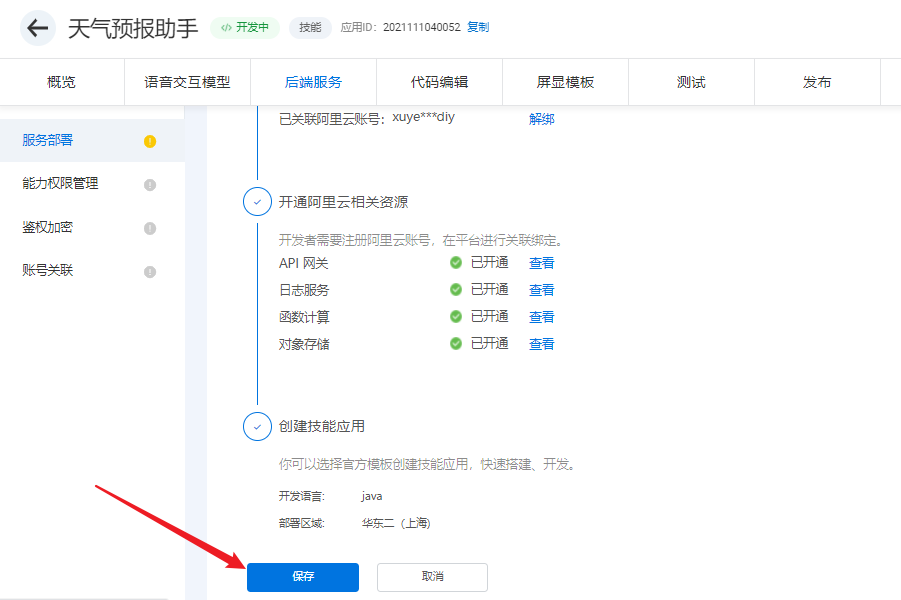
3、创建技能应用
创建应用
保存创建的服务
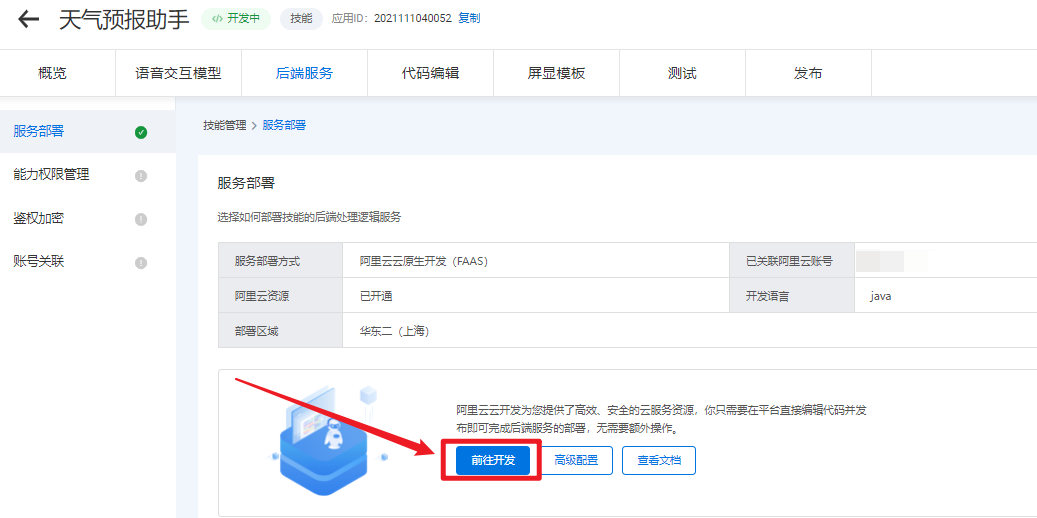
点击“前往开发”。
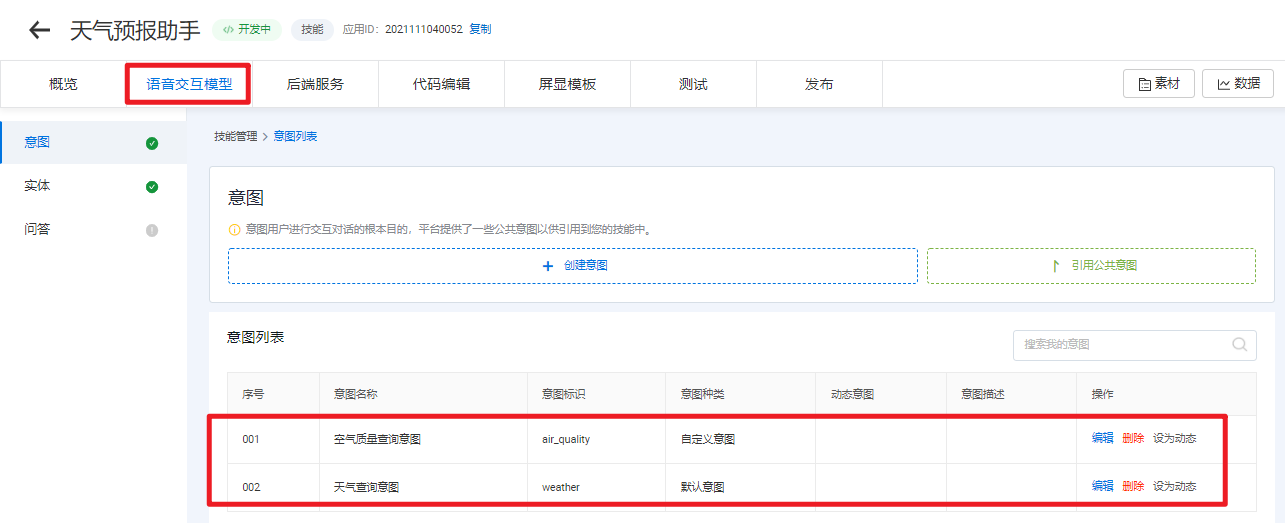
查看语音交互模型已经自动完成创建
4、调试代码
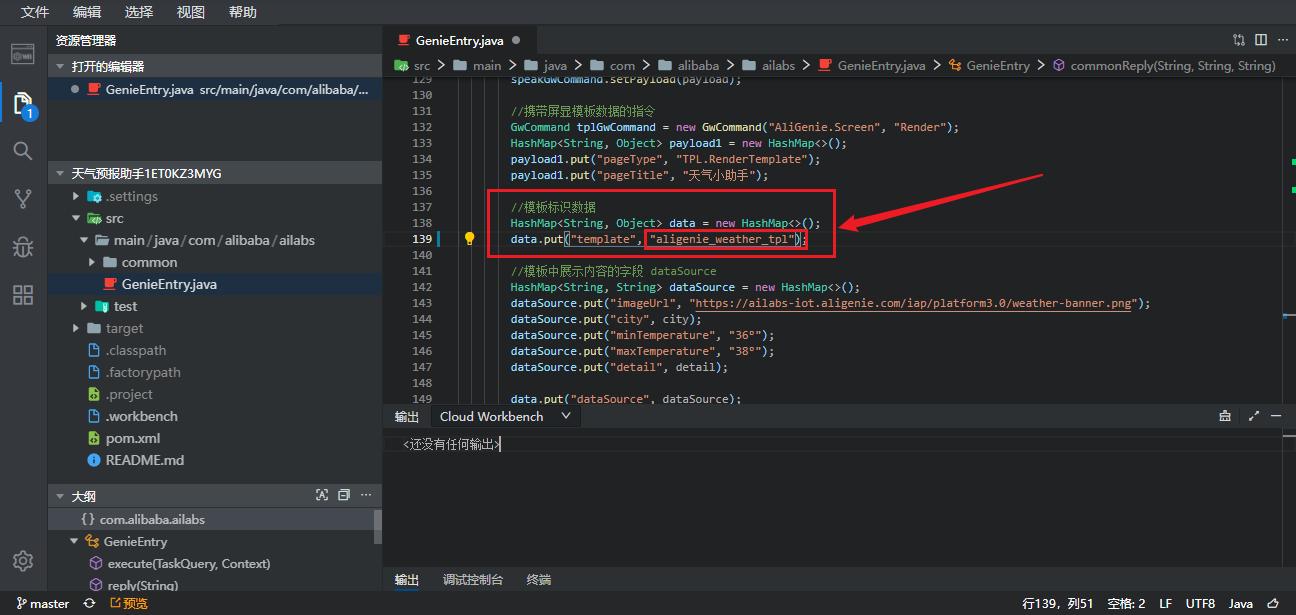
示例代码如下
package com.alibaba.ailabs;

import java.util.HashMap;
import java.util.List;
import java.util.Map;
import java.util.stream.Collectors;

import com.alibaba.ailabs.common.AbstractEntry;
import com.alibaba.da.coin.ide.spi.meta.AskedInfoMsg;
import com.alibaba.da.coin.ide.spi.meta.ExecuteCode;
import com.alibaba.da.coin.ide.spi.meta.GwCommand;
import com.alibaba.da.coin.ide.spi.meta.ResultType;
import com.alibaba.da.coin.ide.spi.standard.ResultModel;
import com.alibaba.da.coin.ide.spi.standard.TaskQuery;
import com.alibaba.da.coin.ide.spi.standard.TaskResult;
import com.alibaba.fastjson.JSON;

import com.aliyun.fc.runtime.Context;
import com.google.common.collect.Lists;

/**
 * @Description 天猫精灵技能函数入口,FC handler:com.alibaba.ailabs.GenieEntry::handleRequest
 * @Version 1.0
 **/
public class GenieEntry extends AbstractEntry {
    @Override
    public ResultModel<TaskResult> execute(TaskQuery taskQuery, Context context) {
        context.getLogger().info("taskQuery: " + JSON.toJSONString(taskQuery));

        //String screenStatus = taskQuery.getRequestData().get("screenStatus");
        String screenStatus = "online";

        // 从请求中获取意图参数以及参数值
        Map<String, String> paramMap = taskQuery.getSlotEntities().stream().collect(
            Collectors.toMap(slotItem -> slotItem.getIntentParameterName(), slotItem -> slotItem.getOriginalValue()));
        String reply;

        String city = paramMap.get("city");
        String date = paramMap.get("date");

        //处理名称为 weather 的意图
        if ("weather".equals(taskQuery.getIntentName())) {

            //weather 意图中 date 参数勾选了必选,请求数据中一定会携带 date 参数,只需要判断 city 参数有没有。
            if (city == null) {
                reply = "您要查询哪个城市的天气?";
                return askReply(reply, "city", taskQuery.getIntentId());
            }

            //TODO 根据参数获取天气信息,这里使用假数据替代
            reply = city + date + "天气 晴。";
            if ("online".equals(screenStatus)) {
                return weatherTplReply(reply, city);
            } else {
                return reply(reply);
            }

            //处理名称为 air_quality 的意图
        } else if ("air_quality".equals(taskQuery.getIntentName())) {
            //air_quality 意图中 date 参数勾选了必选,请求数据中一定会携带 date 参数,只需要判断 city 参数有没有。
            if (city == null) {
                reply = "您要查询哪个城市的空气质量?";
                return askReply(reply, "city", taskQuery.getIntentId());
            }

            //TODO 根据参数获取空气质量信息,这里使用假数据替代
            reply = city + date + "空气质量46 优。";
            if ("online".equals(screenStatus)) {
                return airTplReply(reply, city);
            } else {
                return reply(reply);
            }
        }
        reply = "请检查意图名称是否正确,或者新增的意图没有在代码里添加对应的处理分支。";
        return reply(reply);
    }

    /**
     * 结束对话的回复,回复后音箱闭麦
     */
    private ResultModel<TaskResult> reply(String reply) {
        ResultModel<TaskResult> res = new ResultModel<>();
        TaskResult taskResult = new TaskResult();
        taskResult.setReply(reply);
        taskResult.setExecuteCode(ExecuteCode.SUCCESS);
        taskResult.setResultType(ResultType.RESULT);
        res.setReturnCode("0");
        res.setReturnValue(taskResult);
        return res;
    }

    /**
     * 指定追问参数,音箱自动开麦,用户的回答优先匹配追问的参数
     */
    private ResultModel<TaskResult> askReply(String reply, String parameterName, Long intentId) {
        ResultModel<TaskResult> res = new ResultModel<>();
        TaskResult taskResult = new TaskResult();
        taskResult.setReply(reply);
        taskResult.setExecuteCode(ExecuteCode.SUCCESS);
        taskResult.setResultType(ResultType.ASK_INF);
        AskedInfoMsg askedInfoMsg = new AskedInfoMsg(parameterName, intentId);
        taskResult.setAskedInfos(Lists.newArrayList(askedInfoMsg));
        res.setReturnCode("0");
        res.setReturnValue(taskResult);
        return res;
    }

    /**
     * 天气查询意图的TPL回复
     */
    private ResultModel<TaskResult> weatherTplReply(String reply, String city) {
        return commonReply(reply, city, reply);
    }

    /**
     * 空气质量查询意图的TPL回复
     */
    private ResultModel<TaskResult> airTplReply(String reply, String city) {
        return commonReply(reply, city, reply);
    }

    private ResultModel<TaskResult> commonReply(String reply, String city, String detail) {
        //屏显模板数据需要使用gwCommands字段携带,会导致reply失效。回复内容通过speak指令返回
        GwCommand speakGwCommand = new GwCommand("AliGenie.Speaker", "Speak");

        HashMap<String, Object> payload = new HashMap<>();
        payload.put("type", "text");
        payload.put("text", reply);
        speakGwCommand.setPayload(payload);

        //携带屏显模板数据的指令
        GwCommand tplGwCommand = new GwCommand("AliGenie.Screen", "Render");
        HashMap<String, Object> payload1 = new HashMap<>();
        payload1.put("pageType", "TPL.RenderTemplate");
        payload1.put("pageTitle", "天气小助手");

        //模板标识数据
        HashMap<String, Object> data = new HashMap<>();
        data.put("template", "aligenie_weather_tpl");

        //模板中展示内容的字段 dataSource
        HashMap<String, String> dataSource = new HashMap<>();
        dataSource.put("imageUrl", "https://ailabs-iot.aligenie.com/iap/platform3.0/weather-banner.png");
        dataSource.put("city", city);
        dataSource.put("minTemperature", "36°");
        dataSource.put("maxTemperature", "38°");
        dataSource.put("detail", detail);

        data.put("dataSource", dataSource);
        payload1.put("data", data);

        tplGwCommand.setPayload(payload1);

        return tplReply(Lists.newArrayList(speakGwCommand, tplGwCommand));
    }

    /**
     * 携带TPL数据的结束对话回复,回复后音箱闭麦
     */
    private ResultModel<TaskResult> tplReply(List<GwCommand> gwCommands) {
        ResultModel<TaskResult> res = new ResultModel<>();
        TaskResult taskResult = new TaskResult();
        taskResult.setExecuteCode(ExecuteCode.SUCCESS);
        taskResult.setResultType(ResultType.RESULT);
        taskResult.setGwCommands(gwCommands);
        res.setReturnCode("0");
        res.setReturnValue(taskResult);
        return res;
    }
}
5、推送代码至远程分支
为防止您的代码丢失,请务必提交并推送代码到远程分支
[admin@f99f9e13-a8b9-4189-bada-d24034966e0e-77d8d5765d-h8vtm /home/admin/workspace/codeup.aliyun.com/618249ae404574409feabd87/workbench/repo_2021-11-10_2021111001491236]
$git status
On branch master
Your branch is up to date with 'origin/master'.

Changes not staged for commit:
  (use "git add <file>..." to update what will be committed)
  (use "git checkout -- <file>..." to discard changes in working directory)

        modified:   src/main/java/com/alibaba/ailabs/GenieEntry.java

no changes added to commit (use "git add" and/or "git commit -a")

[admin@f99f9e13-a8b9-4189-bada-d24034966e0e-77d8d5765d-h8vtm /home/admin/workspace/codeup.aliyun.com/618249ae404574409feabd87/workbench/repo_2021-11-10_2021111001491236]
$git add src

[admin@f99f9e13-a8b9-4189-bada-d24034966e0e-77d8d5765d-h8vtm /home/admin/workspace/codeup.aliyun.com/618249ae404574409feabd87/workbench/repo_2021-11-10_2021111001491236]
$git commit -m "weather_tpl"
[master 4bf99d6] weather_tpl
 1 file changed, 1 insertion(+), 1 deletion(-)

[admin@f99f9e13-a8b9-4189-bada-d24034966e0e-77d8d5765d-h8vtm /home/admin/workspace/codeup.aliyun.com/618249ae404574409feabd87/workbench/repo_2021-11-10_2021111001491236]
$git push
Counting objects: 9, done.
Delta compression using up to 5 threads.
Compressing objects: 100% (5/5), done.
Writing objects: 100% (9/9), 632 bytes | 42.00 KiB/s, done.
Total 9 (delta 2), reused 0 (delta 0)
To https://codeup.aliyun.com/618249ae404574409feabd87/workbench/repo_2021-11-10_2021111001491236.git
   4235ca4..4bf99d6  master -> master

[admin@f99f9e13-a8b9-4189-bada-d24034966e0e-77d8d5765d-h8vtm /home/admin/workspace/codeup.aliyun.com/618249ae404574409feabd87/workbench/repo_2021-11-10_2021111001491236]
$
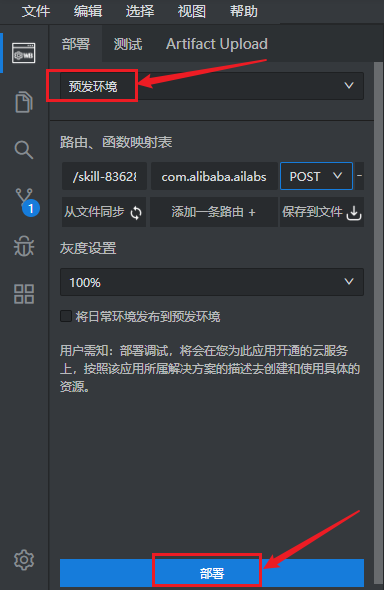
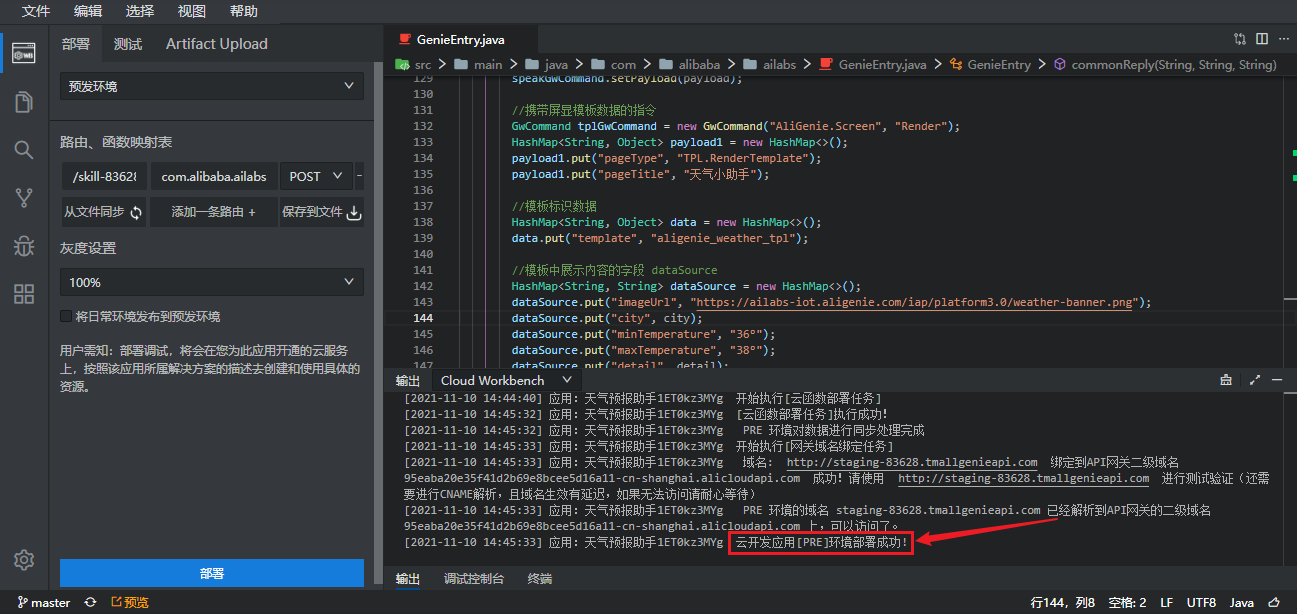
6、部署代码

(三)创建屏显模板
1、新建屏显模板
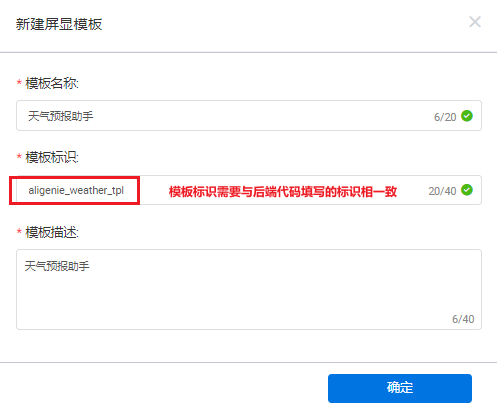
2、填写模板名称、标识、描述

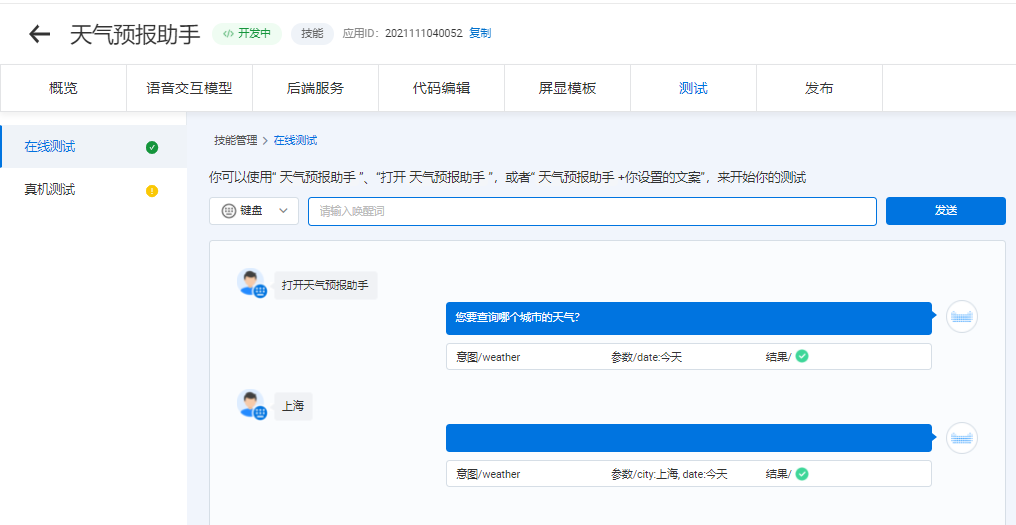
(四)在线测试
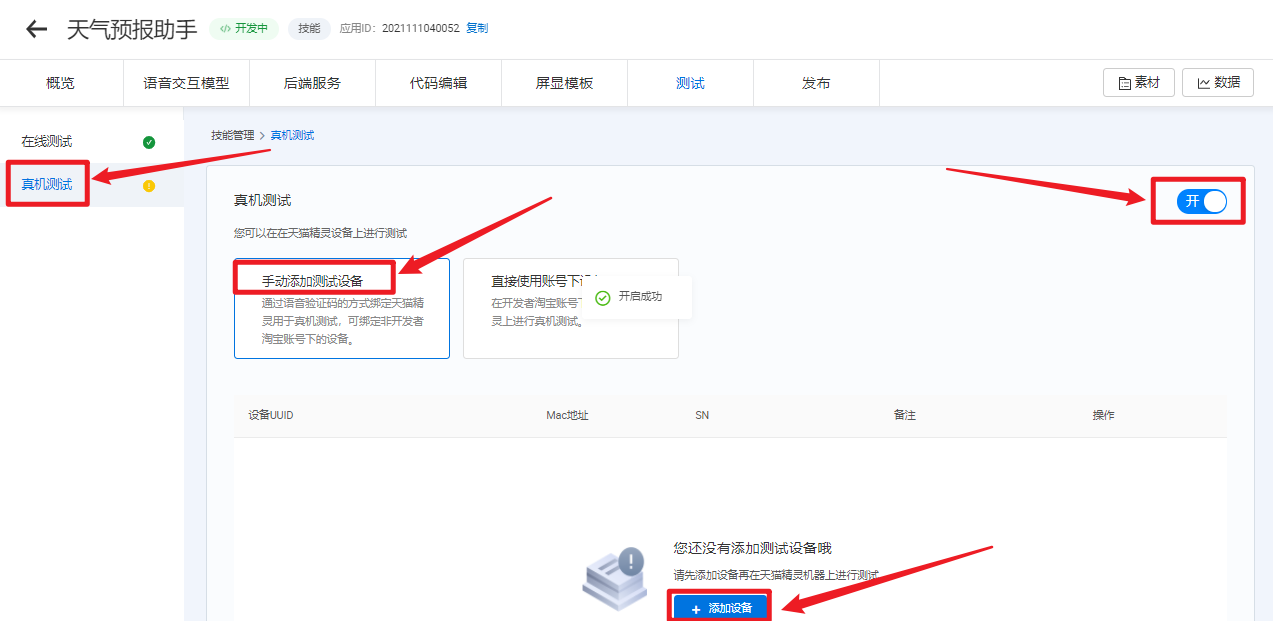
(五)真机测试
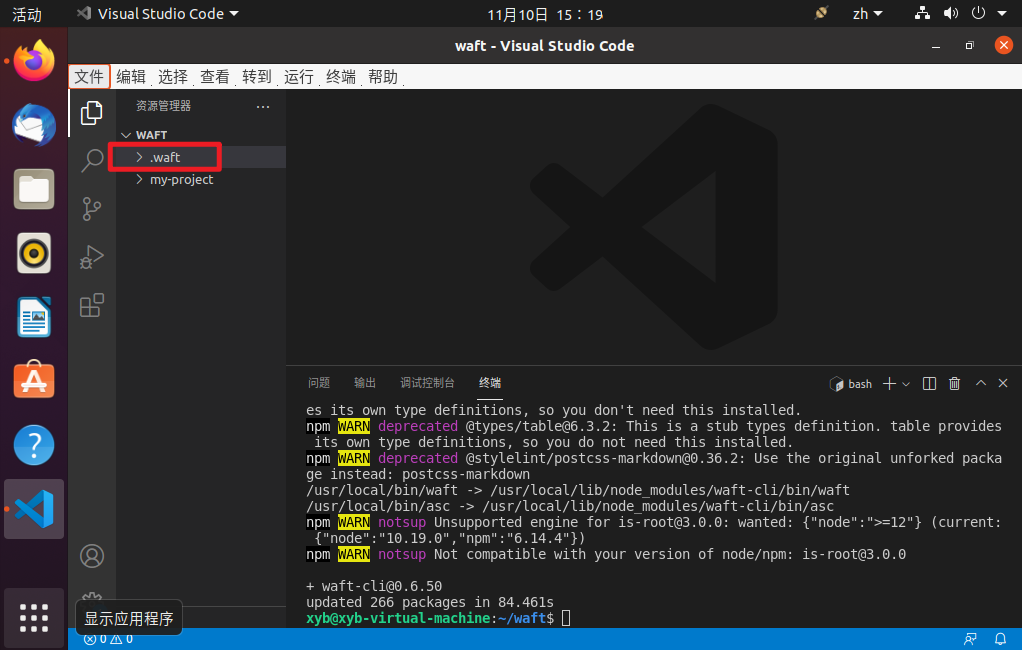
1、安装waft-cli 工具
在Ubuntu系统上使用VSCode软件安装waft-cli 工具
PS: 权限问题使用sudo执行即可
npm i waft-cli -g
xyb@xyb-virtual-machine:~/waft$ sudo npm i waft-cli -g
[sudo] xyb 的密码:
npm WARN deprecated uuid@3.4.0: Please upgrade  to version 7 or higher.  Older versions may use Math.random() in certain circumstances, which is known to be problematic.  See https://v8.dev/blog/math-random for details.
npm WARN deprecated @types/ora@3.2.0: This is a stub types definition. ora provides its own type definitions, so you do not need this installed.
npm WARN deprecated request@2.88.2: request has been deprecated, see https://github.com/request/request/issues/3142
npm WARN deprecated har-validator@5.1.5: this library is no longer supported
npm WARN deprecated loadsh@0.0.4: This is a typosquat on the popular Lodash package. This is not maintained nor is the original Lodash package.
npm WARN deprecated @types/colors@1.2.1: This is a stub types definition. colors provides its own type definitions, so you don't need this installed.
npm WARN deprecated @types/table@6.3.2: This is a stub types definition. table provides its own type definitions, so you do not need this installed.
npm WARN deprecated @stylelint/postcss-markdown@0.36.2: Use the original unforked package instead: postcss-markdown
/usr/local/bin/waft -> /usr/local/lib/node_modules/waft-cli/bin/waft
/usr/local/bin/asc -> /usr/local/lib/node_modules/waft-cli/bin/asc

> core-js-pure@3.19.1 postinstall /usr/local/lib/node_modules/waft-cli/node_modules/core-js-pure
> node -e "try{require('./postinstall')}catch(e){}"

Thank you for using core-js ( https://github.com/zloirock/core-js ) for polyfilling JavaScript standard library!

The project needs your help! Please consider supporting of core-js:
> https://opencollective.com/core-js
> https://patreon.com/zloirock
> https://paypal.me/zloirock
> bitcoin: bc1qlea7544qtsmj2rayg0lthvza9fau63ux0fstcz

Also, the author of core-js ( https://github.com/zloirock ) is looking for a good job -)

npm WARN notsup Unsupported engine for is-root@3.0.0: wanted: {"node":">=12"} (current: {"node":"10.19.0","npm":"6.14.4"})
npm WARN notsup Not compatible with your version of node/npm: is-root@3.0.0

+ waft-cli@0.6.50
added 963 packages from 553 contributors in 202.846s
xyb@xyb-virtual-machine:~/waft$
2、创建项目
通过waft脚手架初始化项目,会引导您进行项目命名等,您将得到一个新project
sudo waft init

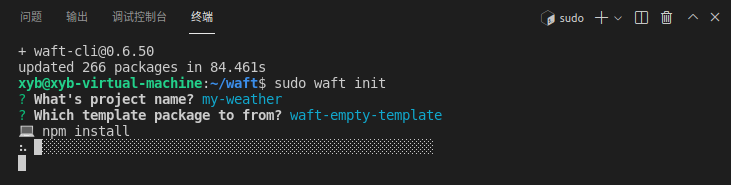
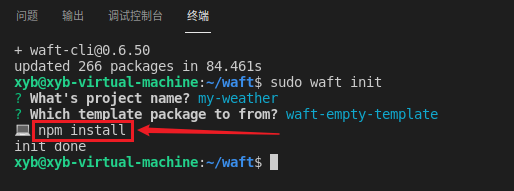
xyb@xyb-virtual-machine:~/waft$ sudo waft init
? What's project name? my-demo
? Which template package to from? waft-empty-template
💻 npm install
init done
xyb@xyb-virtual-machine:~/waft$
3、启动调试服务
xyb@xyb-virtual-machine:~/waft$ cd my-weather/
xyb@xyb-virtual-machine:~/waft/my-weather$ sudo npm run start
> my-weather@0.6.0 start /home/xyb/waft/my-weather
> waft start
🖥 waft工作台已启动
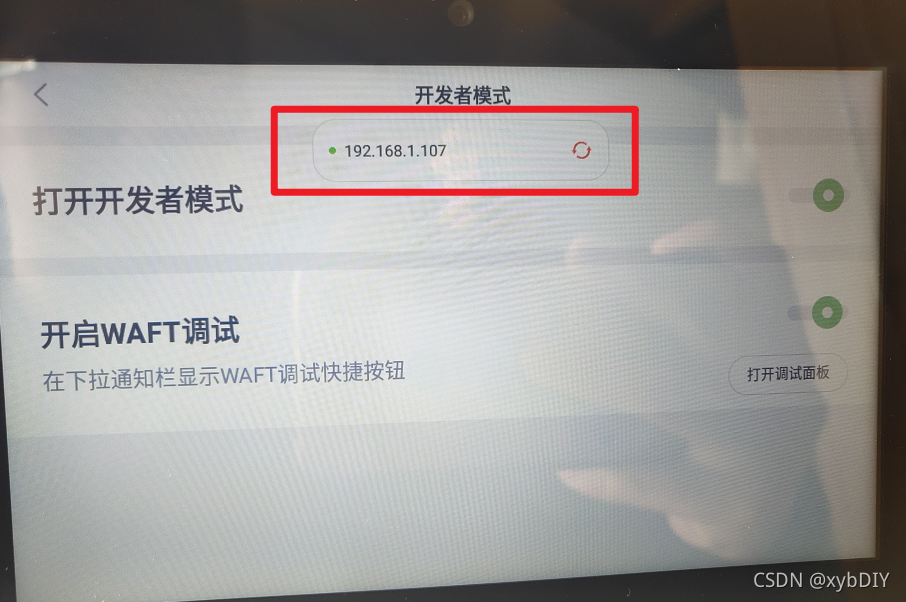
http://127.0.0.1:8080/ui
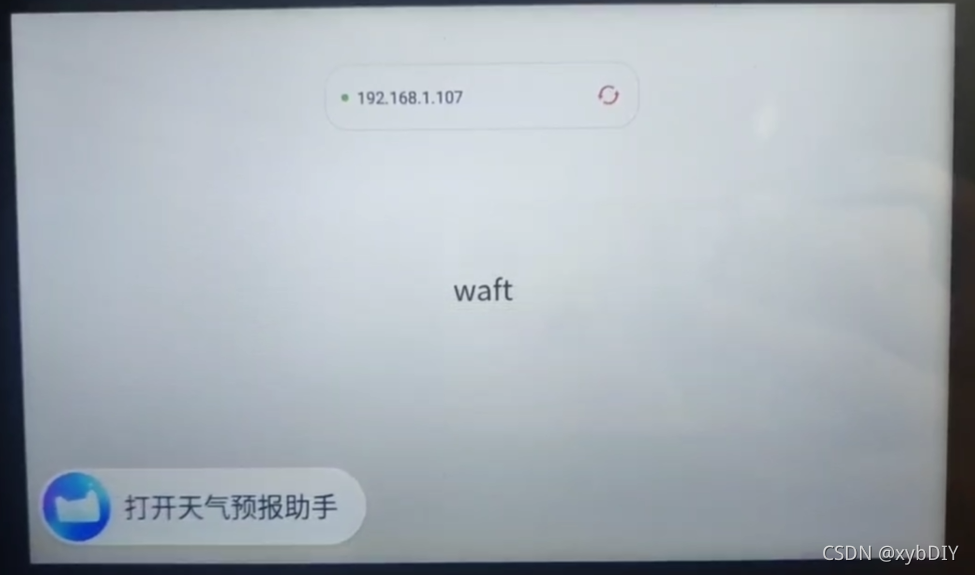
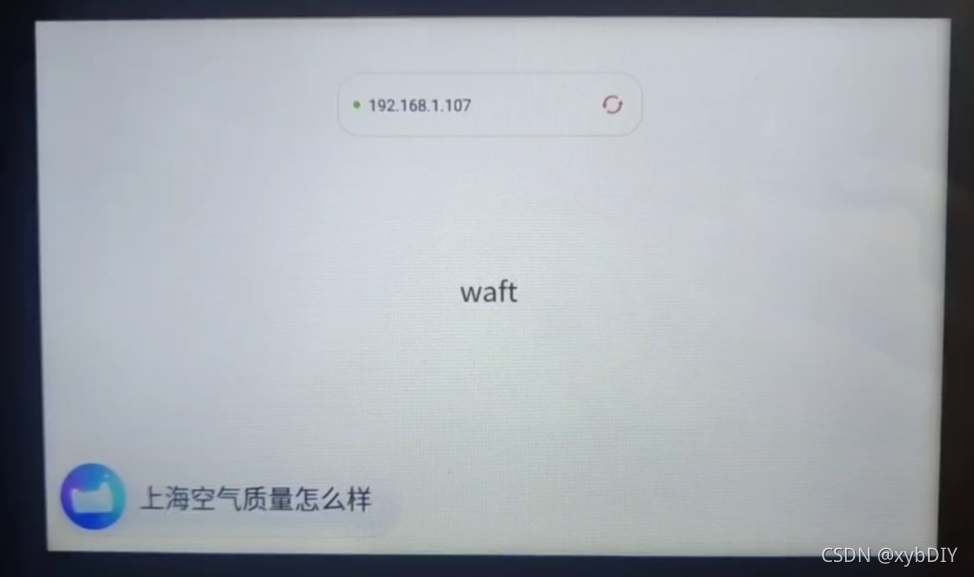
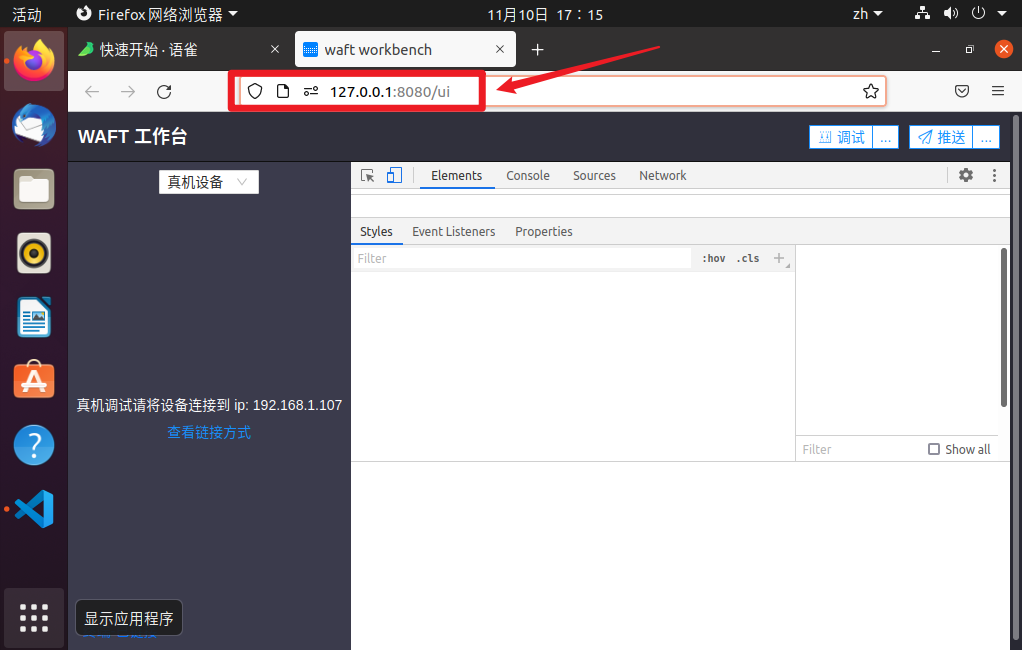
真机调试可连接到本机ip: 192.168.1.107
🌐 web预览服务已启动
http://127.0.0.1:8080/web/preview.html?action=preview&path=pages/index/index
😊 start success
Welcome to waft development.
Type .help for more information.
waft:0.6.16
waft-cli:0.6.50
waft> /bin/sh: 1: open: not found
waft>
waft> Device connection received 1
[Devtools Server] New Device connected 1
waft> [Workbench] connected 1
waft> [Inspector] panel connected
waft工作台
4、打开天猫精灵开发者模式
注意事项:测试环境天猫精灵所连接的网络需跟本地端在同一局域网内。
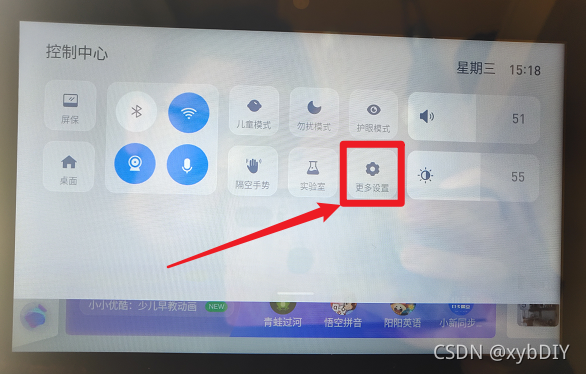
(1)在天猫精灵上,点击“更多设置”。
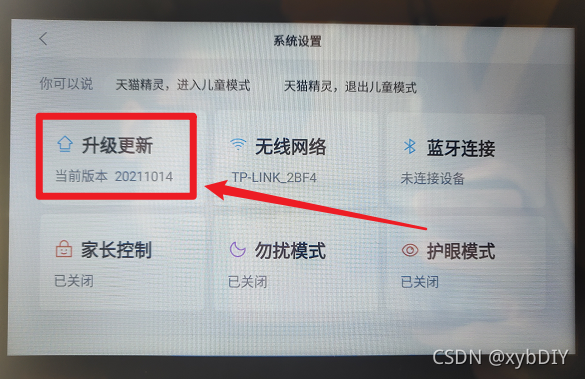
(2)点击“升级更新”。
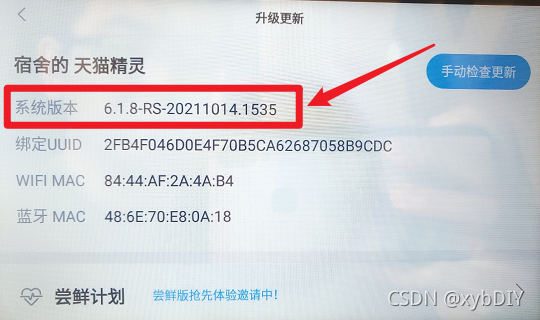
(3)连续点击“系统版本”五下,打开“开发者模式”。
(4)开启WAFT调试
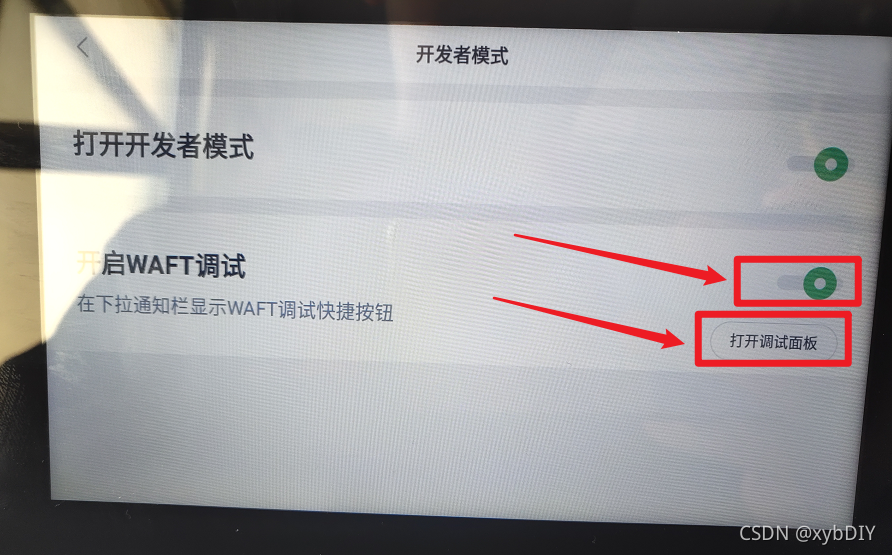
(5)打开调试面板,输入本地端的IP地址

REPL命令行模式
启动后自动开启REPL模式,可以通过.help查询支持哪些命令列表
4、打包
waft> .build
waft>
? start build app
I/O Read   :    22.015 ms  n=796
I/O Write  :    98.799 ms  n=3
Parse      :   510.609 ms  n=250
Initialize :    51.435 ms  n=1
Compile    :  1159.436 ms  n=1
Emit       :  2273.466 ms  n=2
Validate   :   294.048 ms  n=1
Optimize   :     1.126 ms  n=1
Transform  :          n/a  n=0
? build app done
? compiler success output files to ./build/
waft>
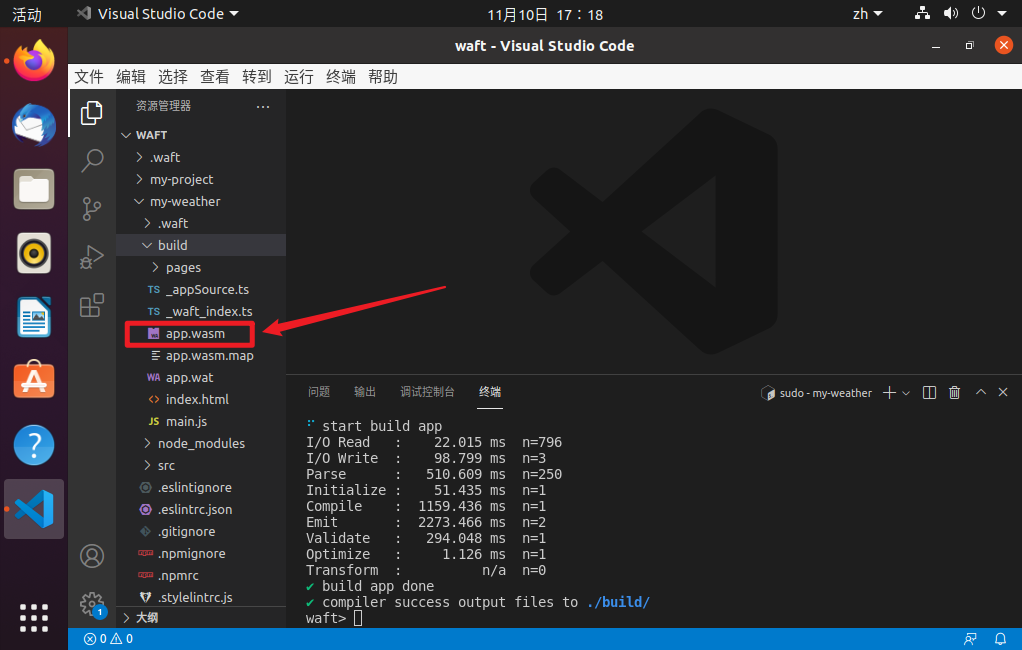
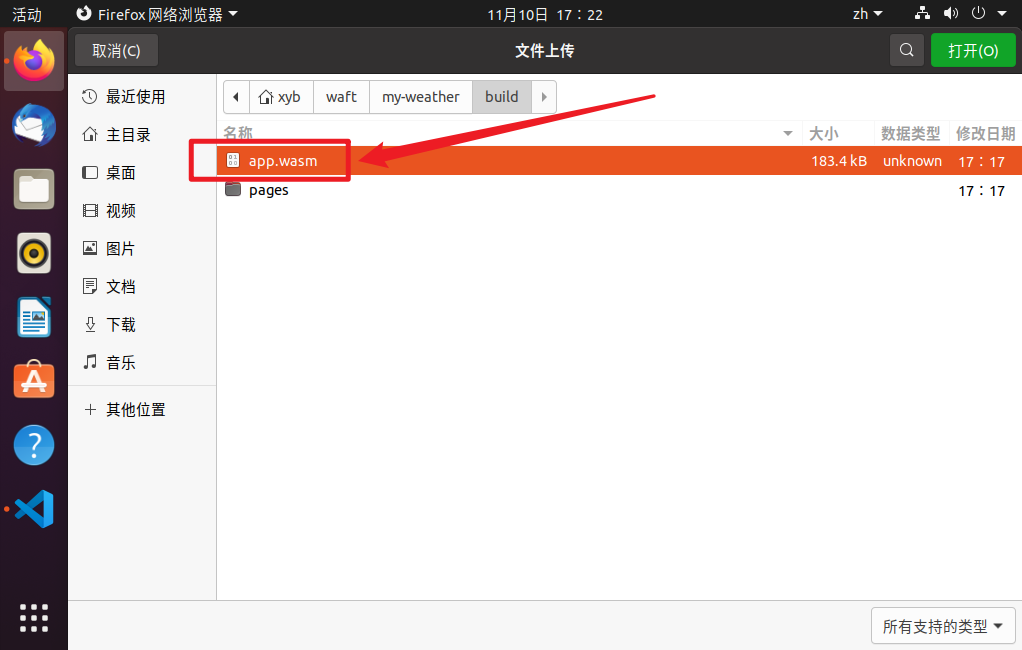
5、上传app.wasm

6、推送
waft> .push
push end md5:8ea41e2c19ca3ee39268a504561c123f file:/home/xyb/waft/my-weather/build/app.wasm
waft>
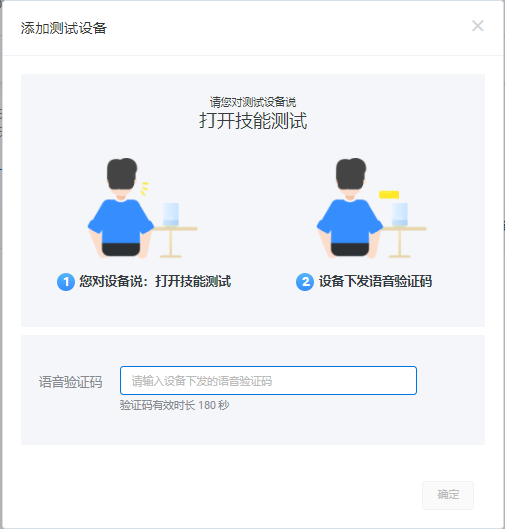
7、添加测试设备
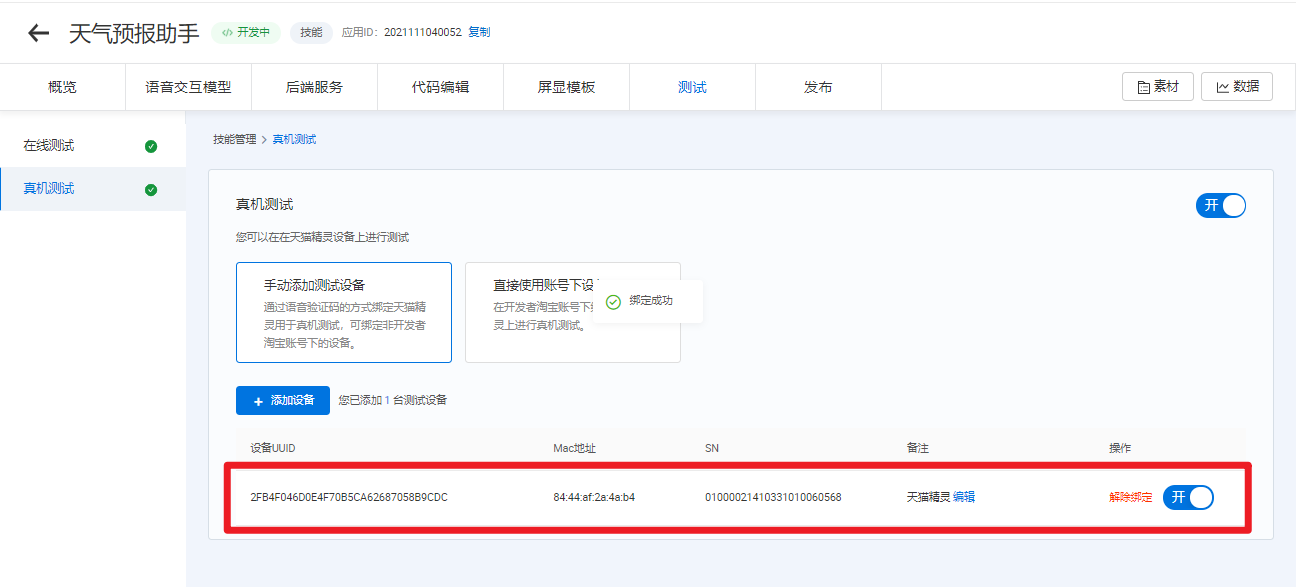
8、测试