Windows 系统
方法一 命令行添加
可以先查看 pip 帮助说明:
pip --help
Usage:
  pip <command> [options]

Commands:
  install                     Install packages.
  download                    Download packages.
  uninstall                   Uninstall packages.
  freeze                      Output installed packages in requirements format.
  list                        List installed packages.
  show                        Show information about installed packages.
  check                       Verify installed packages have compatible dependencies.
  config                      Manage local and global configuration.
  search                      Search PyPI for packages.
  hash                        Compute hashes of package archives.
  debug                       Show information useful for debugging.
  help                        Show help for commands.
General Options:
  -h, --help                  Show help.
  --isolated                  Run pip in an isolated mode, ignoring environment variables and user configuration.
  -v, --verbose               Give more output. Option is additive, and can be used up to 3 times.
  -V, --version               Show version and exit.
  -q, --quiet                 Give less output. Option is additive, and can be used up to 3 times (corresponding to
                              WARNING, ERROR, and CRITICAL logging levels).
  --log <path>                Path to a verbose appending log.
  --proxy <proxy>             Specify a proxy in the form [user:passwd@]proxy.server:port.
  --retries <retries>         Maximum number of retries each connection should attempt (default 5 times).
  --timeout <sec>             Set the socket timeout (default 15 seconds).
  --exists-action <action>    Default action when a path already exists: (s)witch, (i)gnore, (w)ipe, (b)ackup,
                              (a)bort.
  --trusted-host <hostname>   Mark this host as trusted, even though it does not have valid or any HTTPS.
  --cert <path>               Path to alternate CA bundle.
  --client-cert <path>        Path to SSL client certificate, a single file containing the private key and the
                              certificate in PEM format.
  --cache-dir <dir>           Store the cache data in <dir>.
  --no-cache-dir              Disable the cache.
  --disable-pip-version-check
                              Don't periodically check PyPI to determine whether a new version of pip is available for
                              download. Implied with --no-index.
  --no-color                  Suppress colored output
config 命令选项可以更改 pip 配置,输入如下命令即可更换 pip 源:
pip config set global.index-url https://pypi.tuna.tsinghua.edu.cn/simple

Writing to C:\Users\xxxx\AppData\Roaming\pip\pip.ini
运行命令后结果提示生成配置文件 C:\Users\xxxx\AppData\Roaming\pip\pip.ini
方法二 编辑配置文件
win + r,在运行程序框中输入 %APPDATA%:
在打开目录下新建 pip 文件夹,打开后在新建配置文件 pip.ini
pip.ini 配置内容如下:
[global]

timeout = 6000

index-url = https://pypi.tuna.tsinghua.edu.cn/simple

trusted-host = pypi.tuna.tsinghua.edu.cn
测试镜像源
安装常用的 http 请求库 requests,命令显示请求的镜像源为 https://pypi.tuna.tsinghua.edu.cn/
pip install requests
Looking in indexes: https://pypi.tuna.tsinghua.edu.cn/simple
Collecting requests
  Downloading https://pypi.tuna.tsinghua.edu.cn/packages/92/96/144f70b972a9c0eabbd4391ef93ccd49d0f2747f4f6a2a2738e99e5adc65/requests-2.26.0-py2.py3-none-any.whl (62kB)
     |████████████████████████████████| 71kB 255kB/s
Collecting charset-normalizer~=2.0.0; python_version >= "3" (from requests)
  Downloading https://pypi.tuna.tsinghua.edu.cn/packages/c8/27/141554fc0f42c05dd318fbb0be0e3e018da686544a3ff452762e49ccac58/charset_normalizer-2.0.8-py3-none-any.whl
Collecting idna<4,>=2.5; python_version >= "3" (from requests)
  Downloading https://pypi.tuna.tsinghua.edu.cn/packages/04/a2/d918dcd22354d8958fe113e1a3630137e0fc8b44859ade3063982eacd2a4/idna-3.3-py3-none-any.whl (61kB)
     |████████████████████████████████| 61kB 135kB/s
Collecting certifi>=2017.4.17 (from requests)
  Downloading https://pypi.tuna.tsinghua.edu.cn/packages/37/45/946c02767aabb873146011e665728b680884cd8fe70dde973c640e45b775/certifi-2021.10.8-py2.py3-none-any.whl (149kB)
     |████████████████████████████████| 153kB 819kB/s
Collecting urllib3<1.27,>=1.21.1 (from requests)
  Downloading https://pypi.tuna.tsinghua.edu.cn/packages/af/f4/524415c0744552cce7d8bf3669af78e8a069514405ea4fcbd0cc44733744/urllib3-1.26.7-py2.py3-none-any.whl (138kB)
     |████████████████████████████████| 143kB 1.1MB/s
Installing collected packages: charset-normalizer, idna, certifi, urllib3, requests
Successfully installed certifi-2021.10.8 charset-normalizer-2.0.8 idna-3.3 requests-2.26.0 urllib3-1.26.7
Linux 系统
编辑配置文件
我在 Ubuntu 中查看 pip 帮助信息中没有 config 选项,所以只好修改配置文件了,内容与 Windows 中的配置文件一致。
如果没有就新建如下目录和文件:
~/.pip/pip.conf
测试镜像源
填好配置内容后即可测试镜像源,命令显示请求的镜像源为 https://pypi.tuna.tsinghua.edu.cn/:
xxxx@xxx:~/.pip$ pip install requests
Collecting requests
  Downloading https://pypi.tuna.tsinghua.edu.cn/packages/92/96/144f70b972a9c0eabbd4391ef93ccd49d0f2747f4f6a2a2738e99e5adc65/requests-2.26.0-py2.py3-none-any.whl (62kB)
    100% |████████████████████████████████| 71kB 186kB/s
Collecting idna<3,>=2.5; python_version < "3" (from requests)
  Downloading https://pypi.tuna.tsinghua.edu.cn/packages/a2/38/928ddce2273eaa564f6f50de919327bf3a00f091b5baba8dfa9460f3a8a8/idna-2.10-py2.py3-none-any.whl (58kB)
    100% |████████████████████████████████| 61kB 22.4MB/s
Collecting certifi>=2017.4.17 (from requests)
  Downloading https://pypi.tuna.tsinghua.edu.cn/packages/37/45/946c02767aabb873146011e665728b680884cd8fe70dde973c640e45b775/certifi-2021.10.8-py2.py3-none-any.whl (149kB)
    100% |████████████████████████████████| 153kB 399kB/s
Collecting urllib3<1.27,>=1.21.1 (from requests)
  Downloading https://pypi.tuna.tsinghua.edu.cn/packages/af/f4/524415c0744552cce7d8bf3669af78e8a069514405ea4fcbd0cc44733744/urllib3-1.26.7-py2.py3-none-any.whl (138kB)
    100% |████████████████████████████████| 143kB 286kB/s
Collecting chardet<5,>=3.0.2; python_version < "3" (from requests)
  Downloading https://pypi.tuna.tsinghua.edu.cn/packages/19/c7/fa589626997dd07bd87d9269342ccb74b1720384a4d739a1872bd84fbe68/chardet-4.0.0-py2.py3-none-any.whl (178kB)
    100% |████████████████████████████████| 184kB 136kB/s
Installing collected packages: idna, certifi, urllib3, chardet, requests
Successfully installed certifi-2021.10.8 chardet-4.0.0 idna-2.10 requests-2.26.0 urllib3-1.26.7
pycharm
修改 pycharm 设置
打开 pycharm 设置

找到项目配置 Python Interpreter,点击红框中的 + 。

按图中步骤添加以来镜像源后保存

测试镜像源
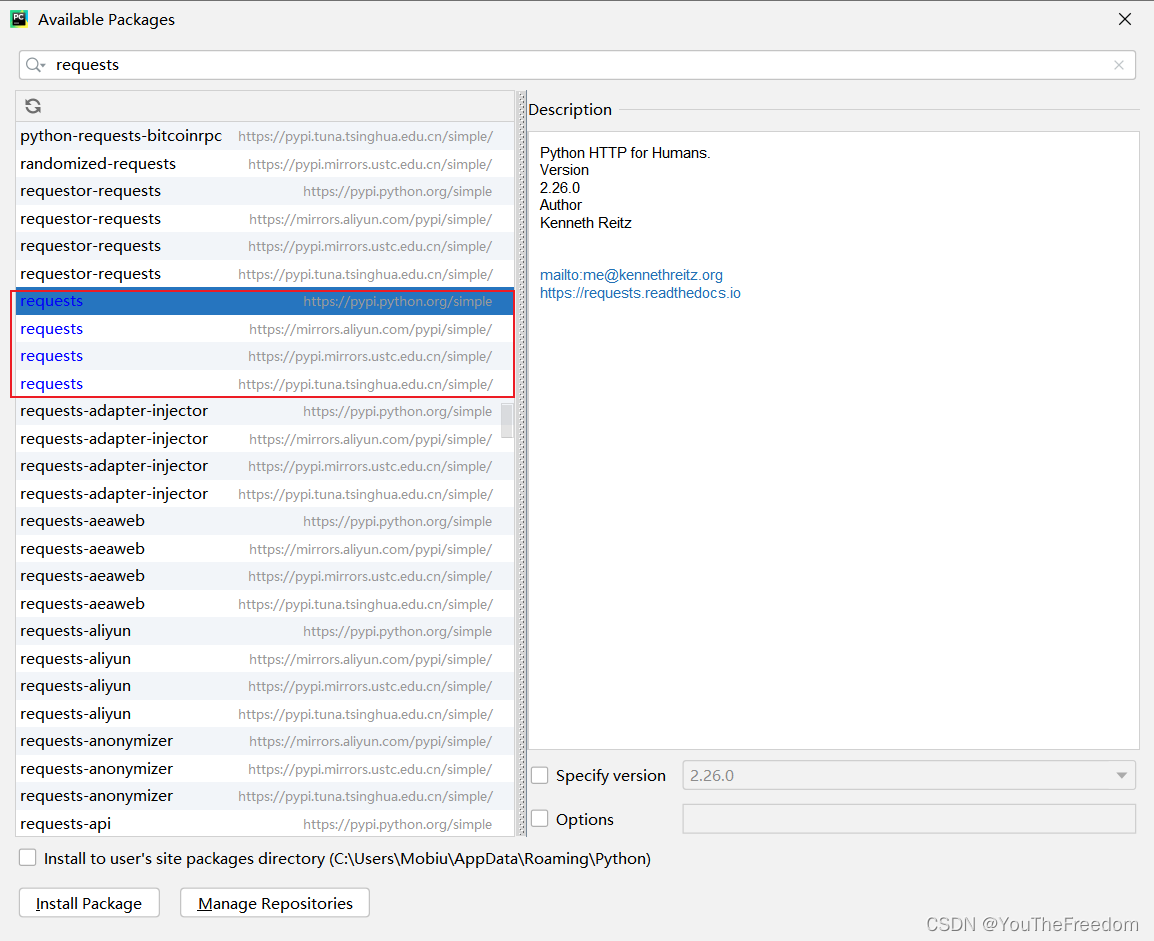
关闭重启 pycharm,按之前的步骤打开如下界面,发现依赖库除了官方源,还有自己刚才加上的镜像源:
