NodeJS Debug & VSCode Debugger
一、Debugging
1、Debug 调试器
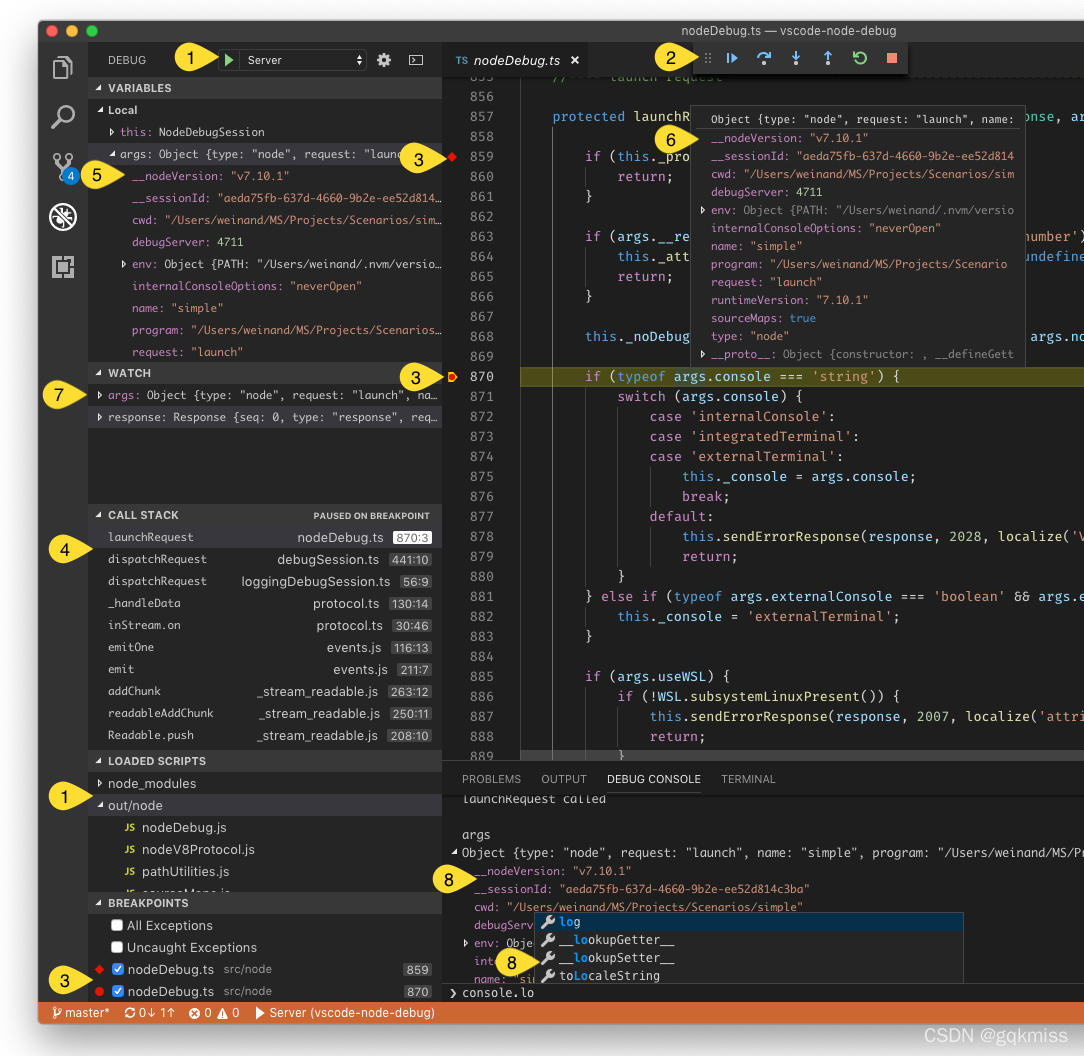
- 调试器配置管理;
- 调试器启动、停止、步进操作;
- 源代码、函数、条件、断点和日志点;
- 堆栈跟踪,多线程和多进程支持;
- 在视图和
hover中浏览复杂的数据结构; - 变量值显示在
hover和源代码中; watch表达式管理- 自动完成的交互式评估的调试控制台。
2、开始调试
1. 创建一个 testvscodedebug 目录,在其中创建 index.js 文件
const a = '1';
const b = '2';
debugger;
for(let i = 0; i < 10; i++) {
    console.log(i);
}

const arr = [1,2,3,4,5];

const isTrue = arr.some(item => {
    console.log(item);
    return item > 4;
});

console.log(isTrue);
2. 点击调试按钮
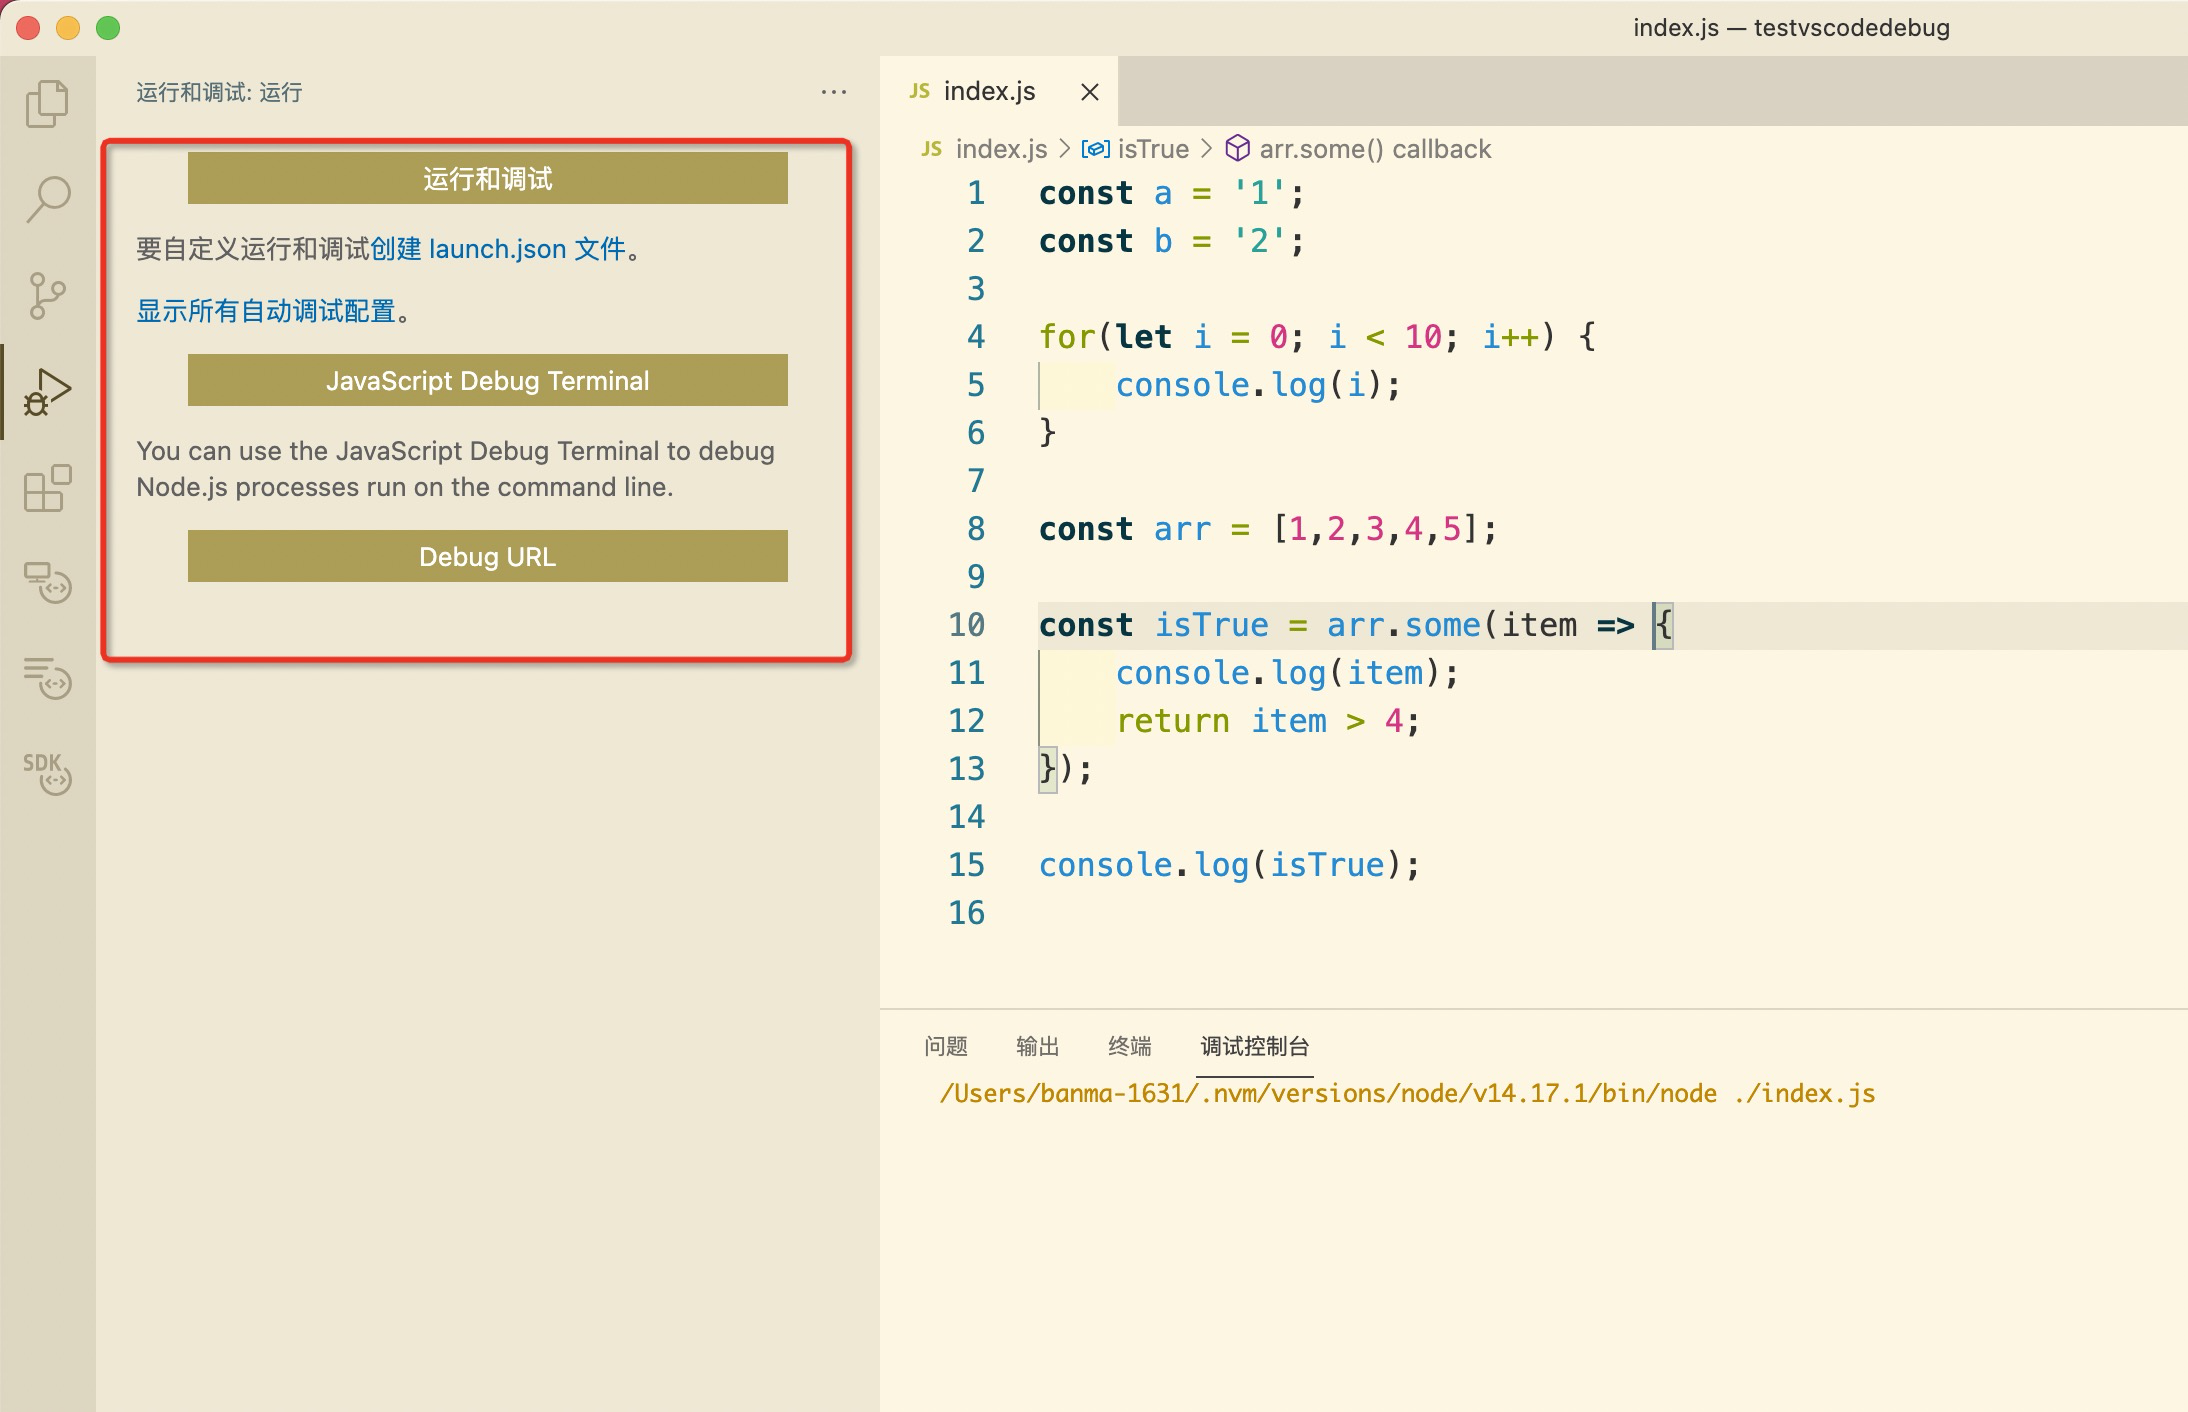
需要创建 launch.json 文件
3. 点击【创建 launch.json】按钮,选择 NodeJS
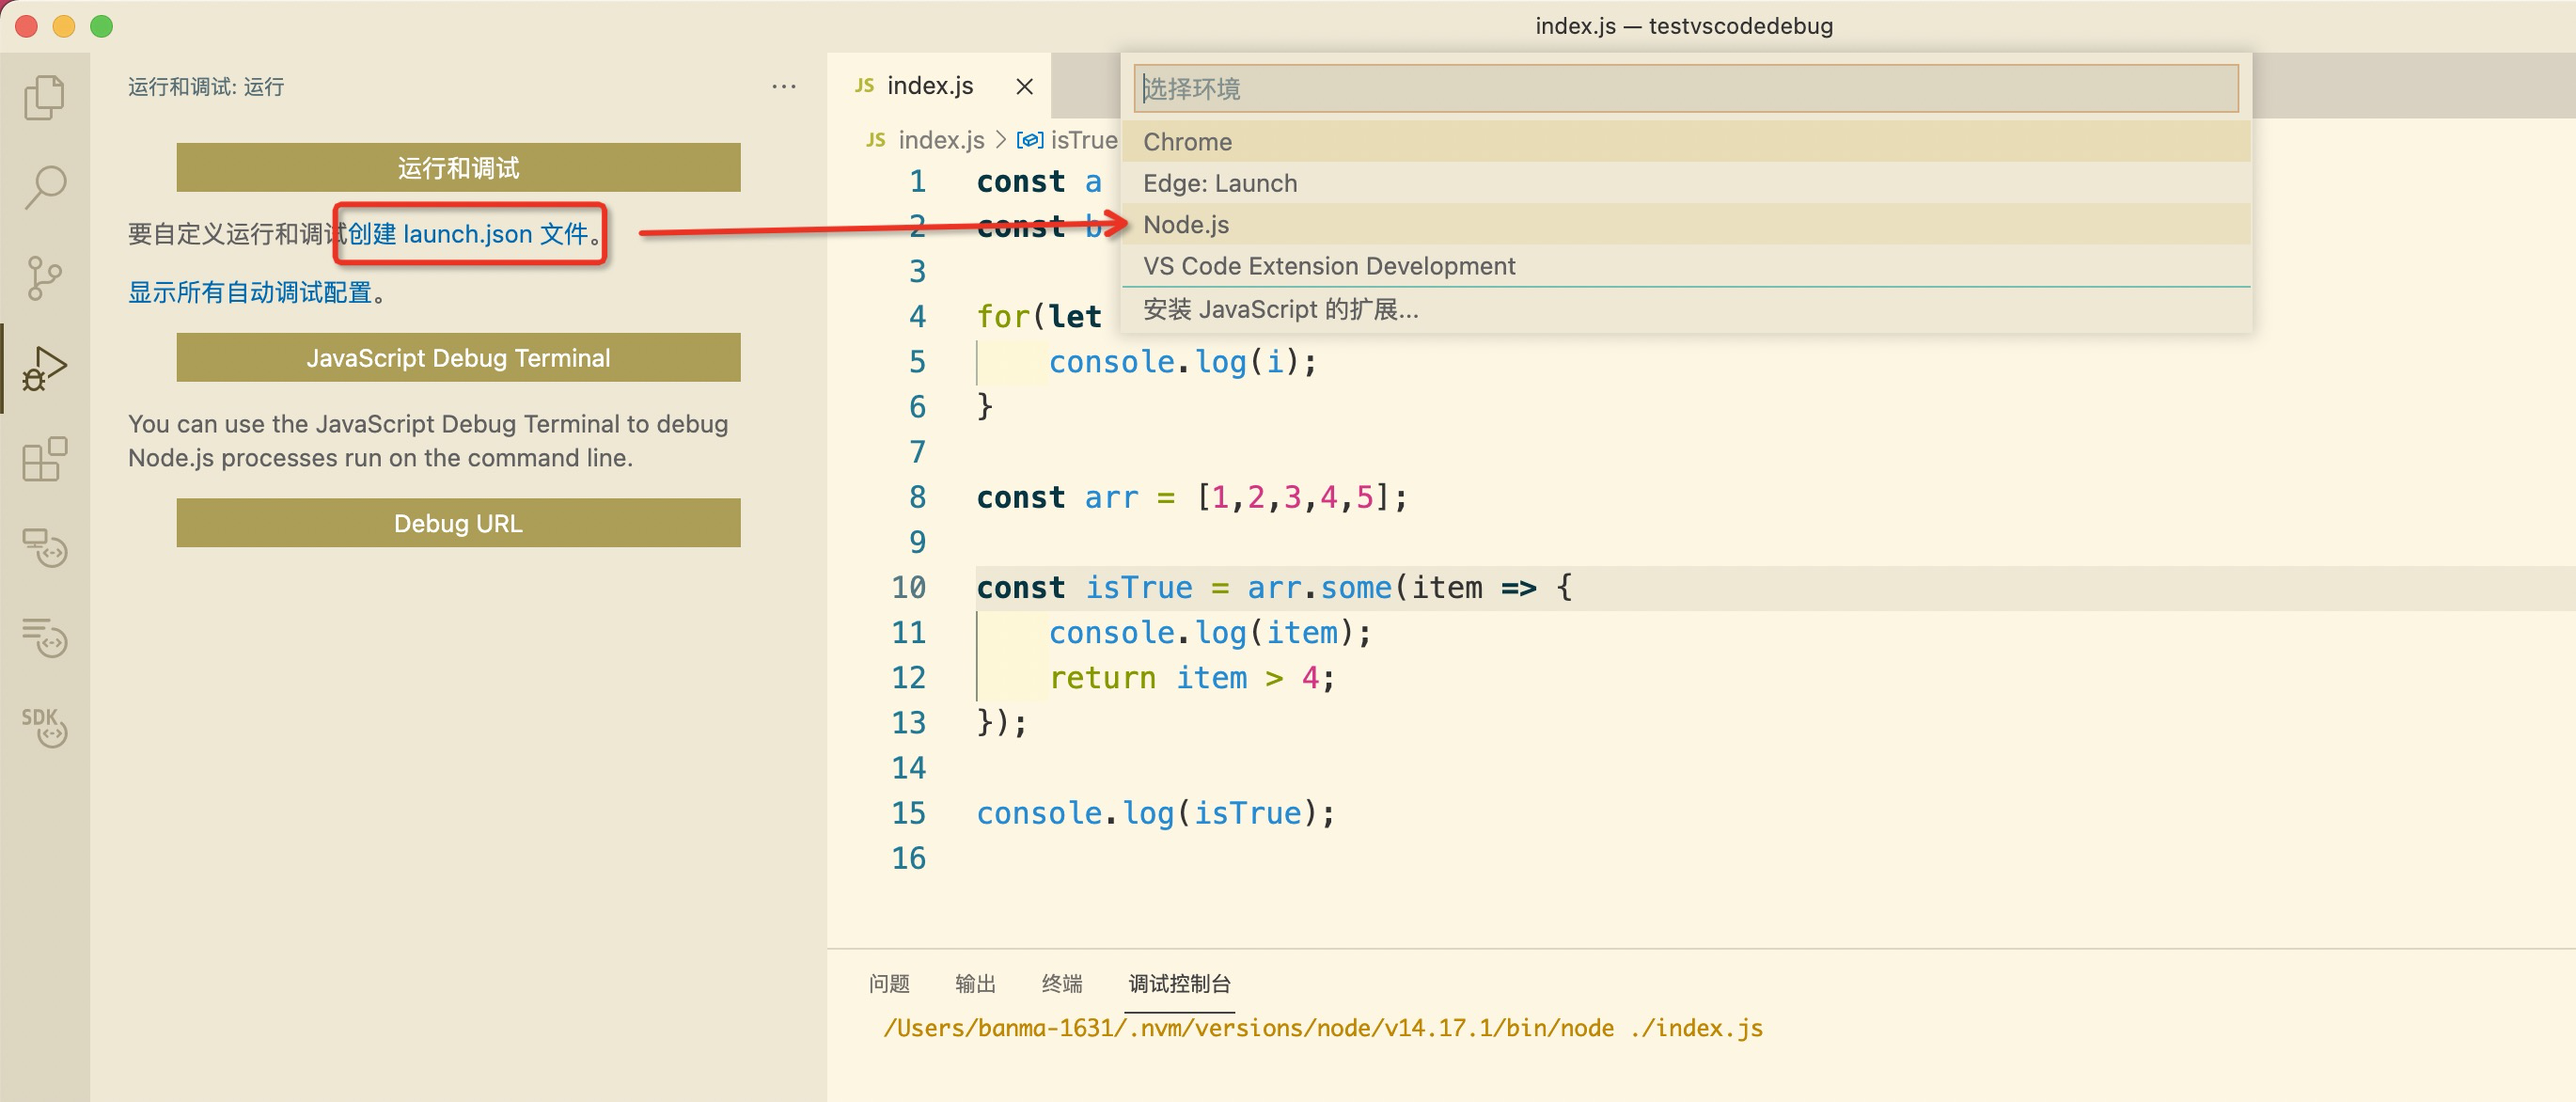
会发现在文件夹中多了一个 .vscode 的文件夹,里面有一个 launch.json 文件
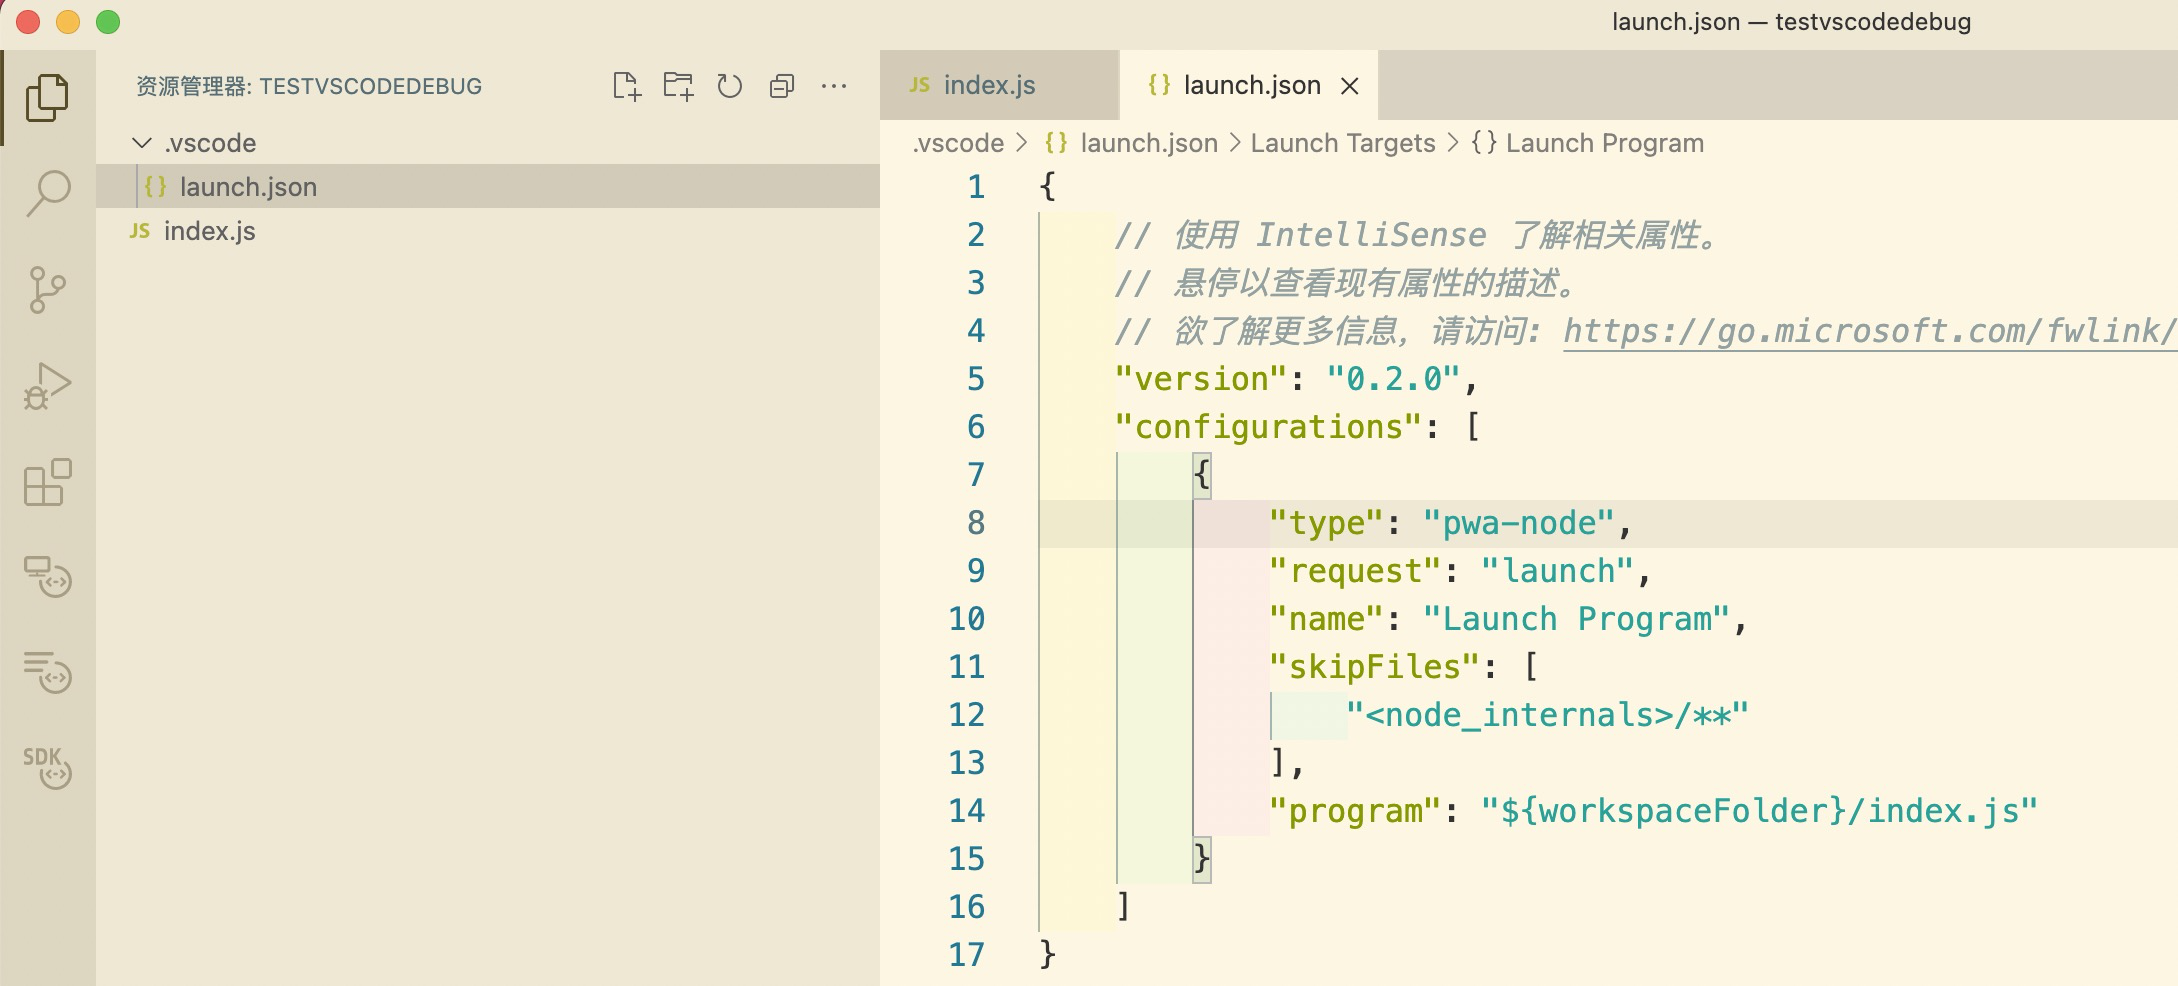
4. 重新点击调试
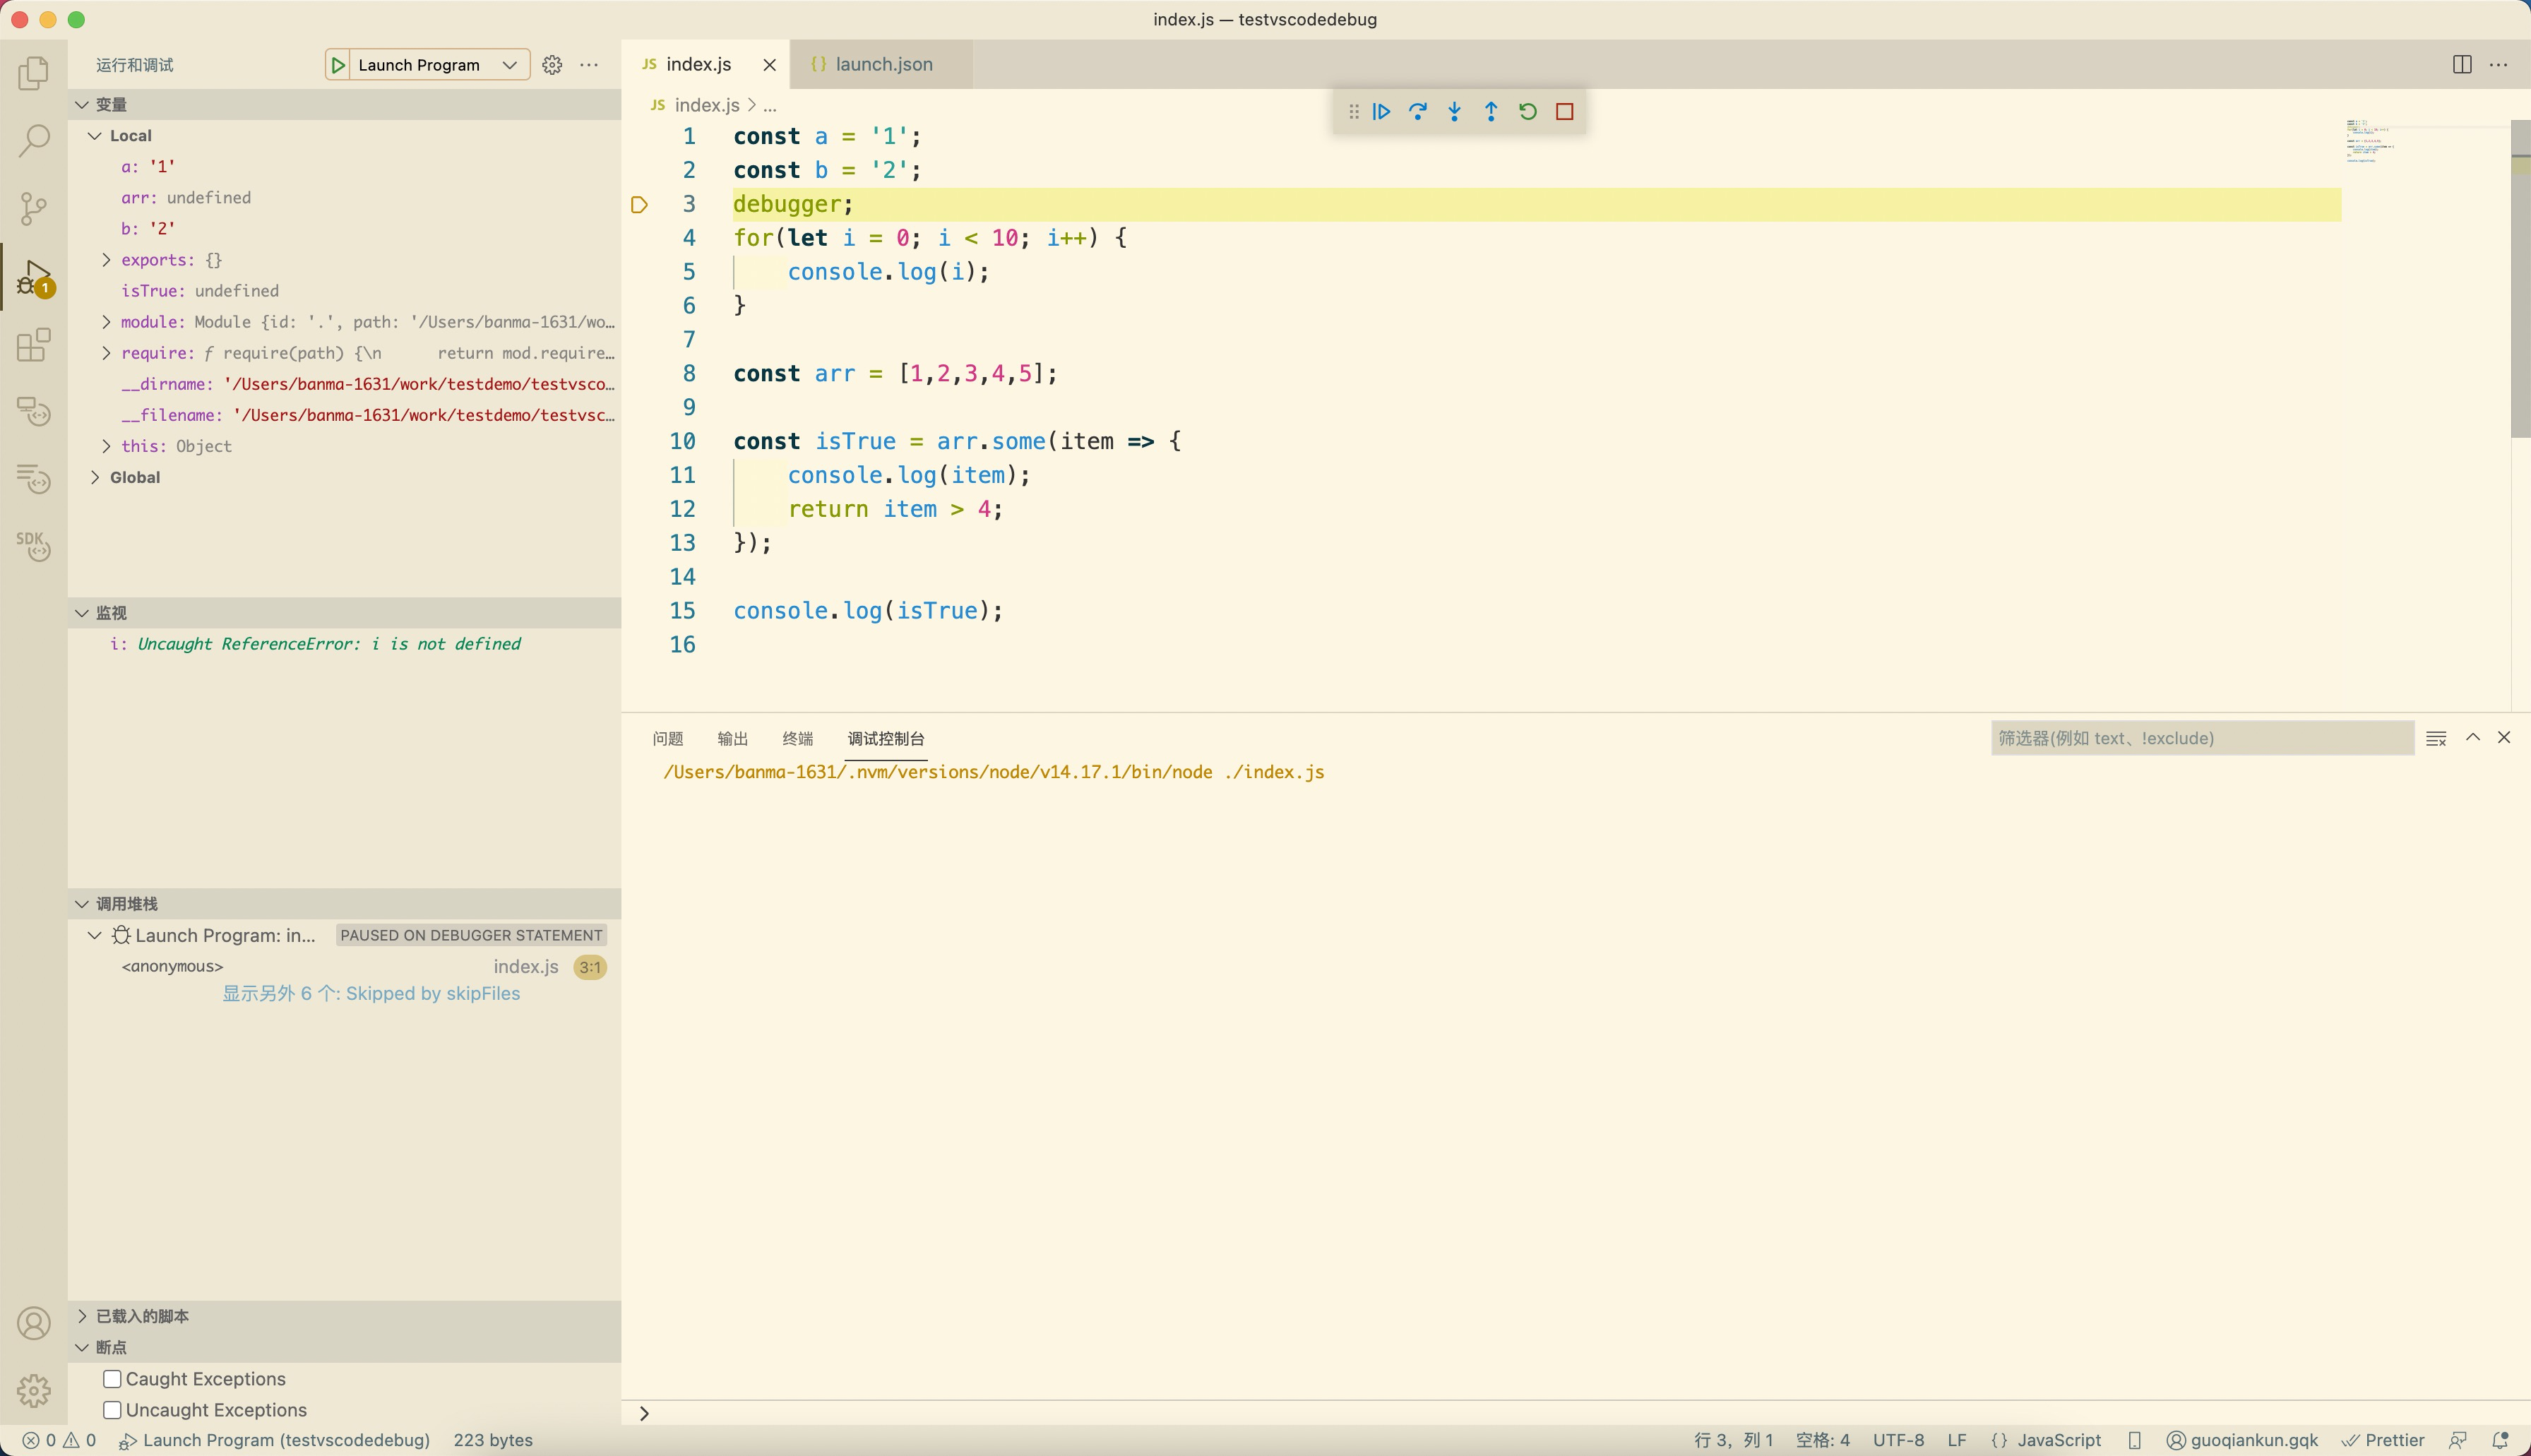
即可开始调试
5. 调试工具栏
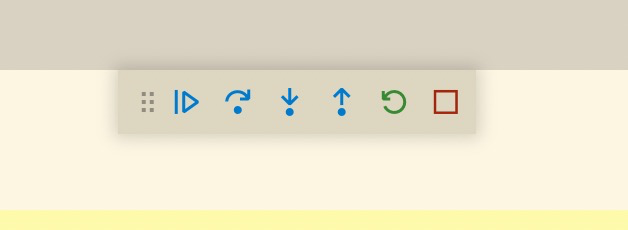
● 继续/暂停 F5
● 跳过 F10
● 步入 F11
● 走出去 ?F11
● 重启 ??F5
● 停止 ?F5
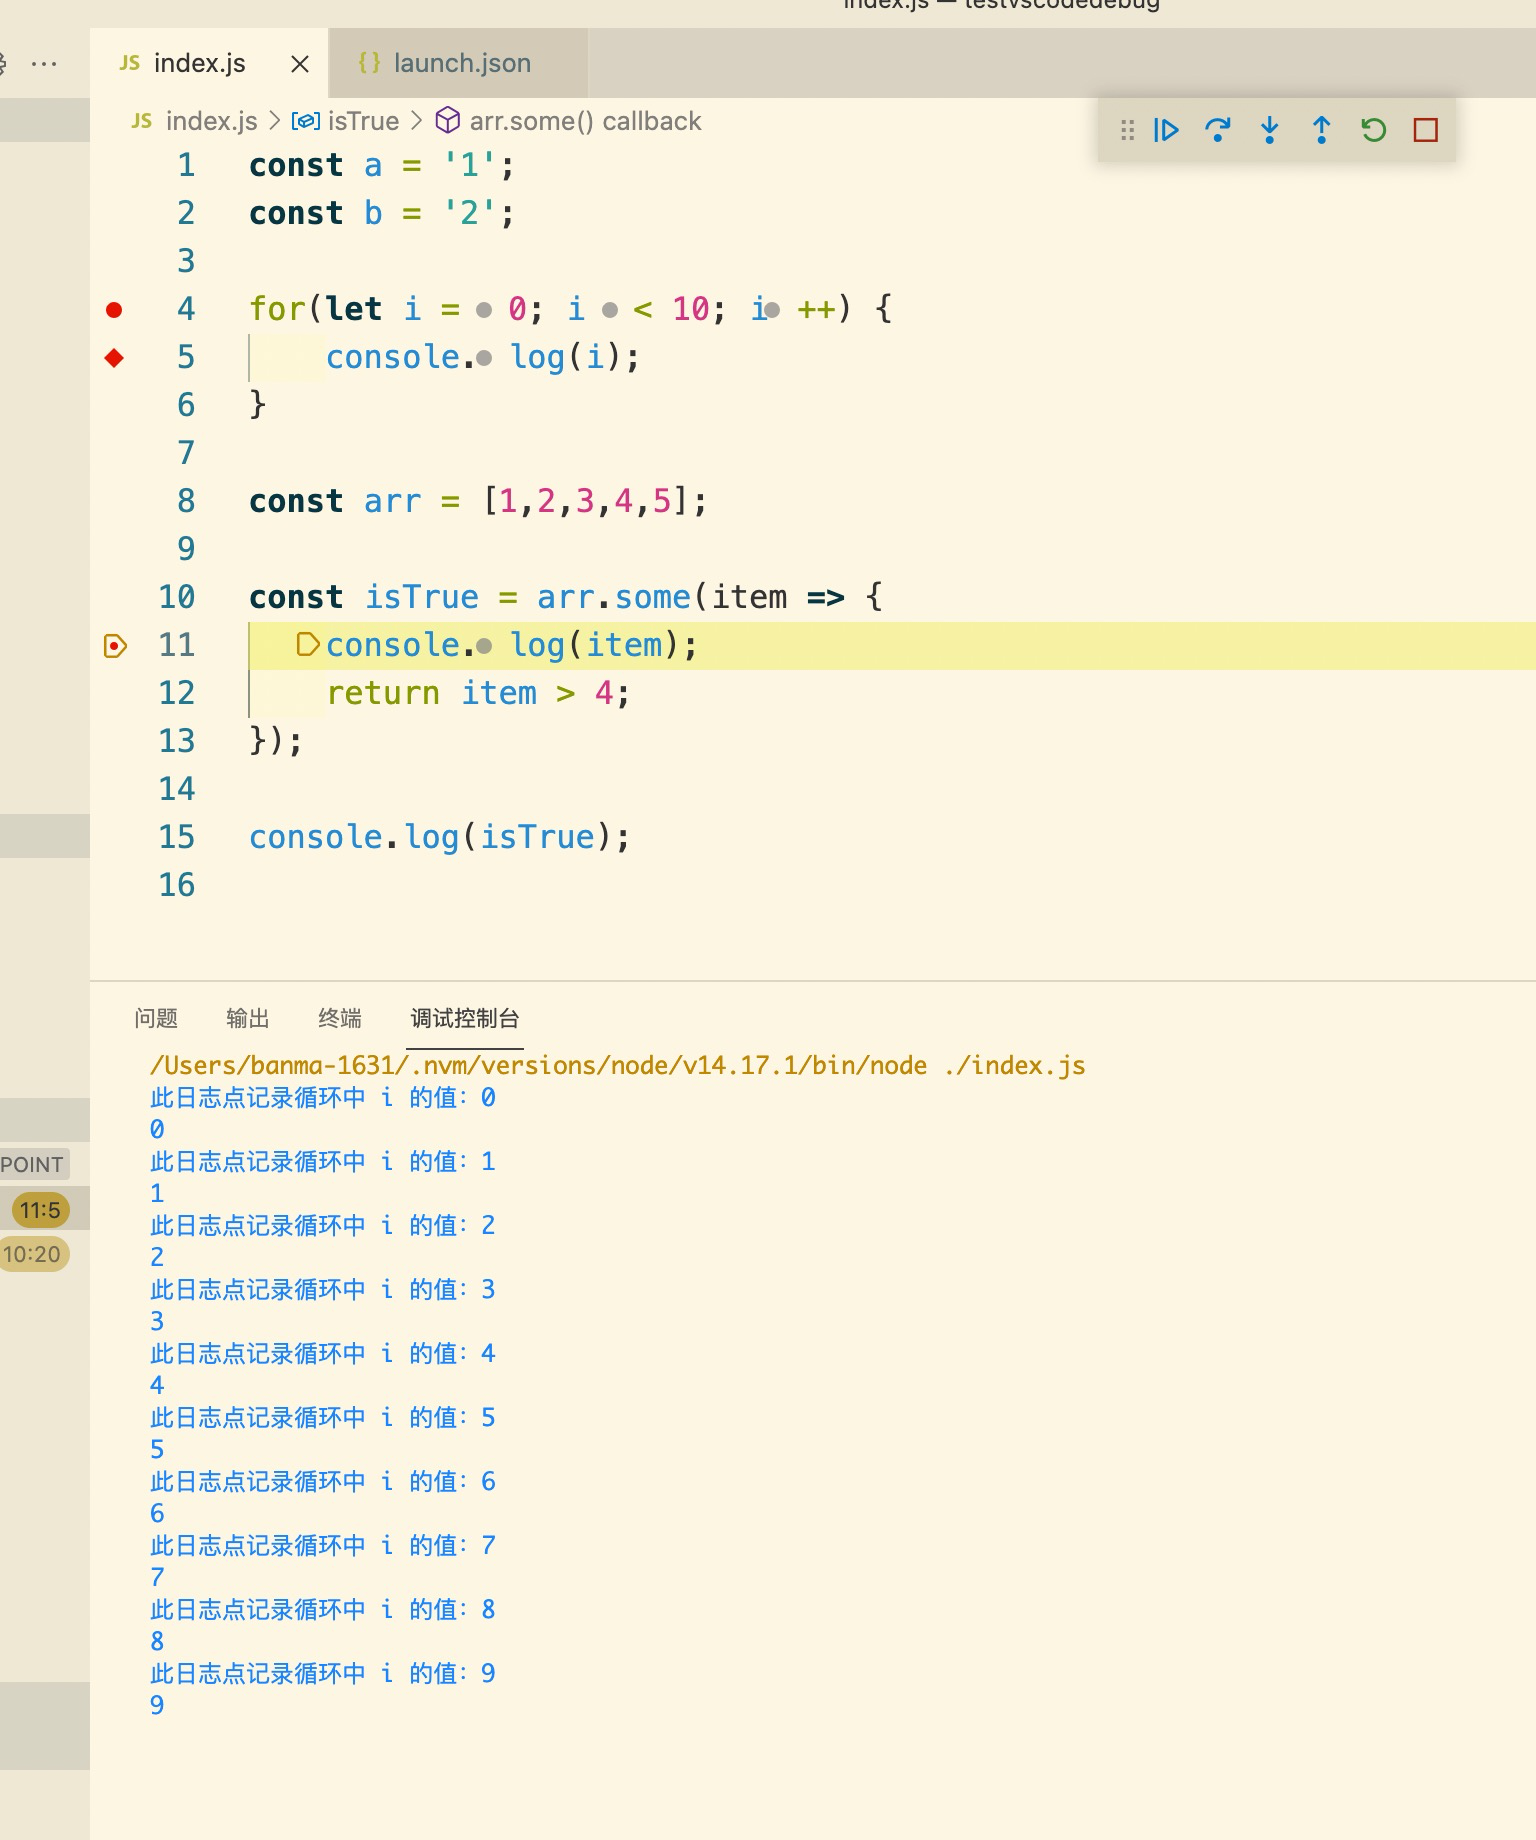
6. 红点调试
不用在代码里面添加 debugger,在代码侧添加红点,在进行调试。
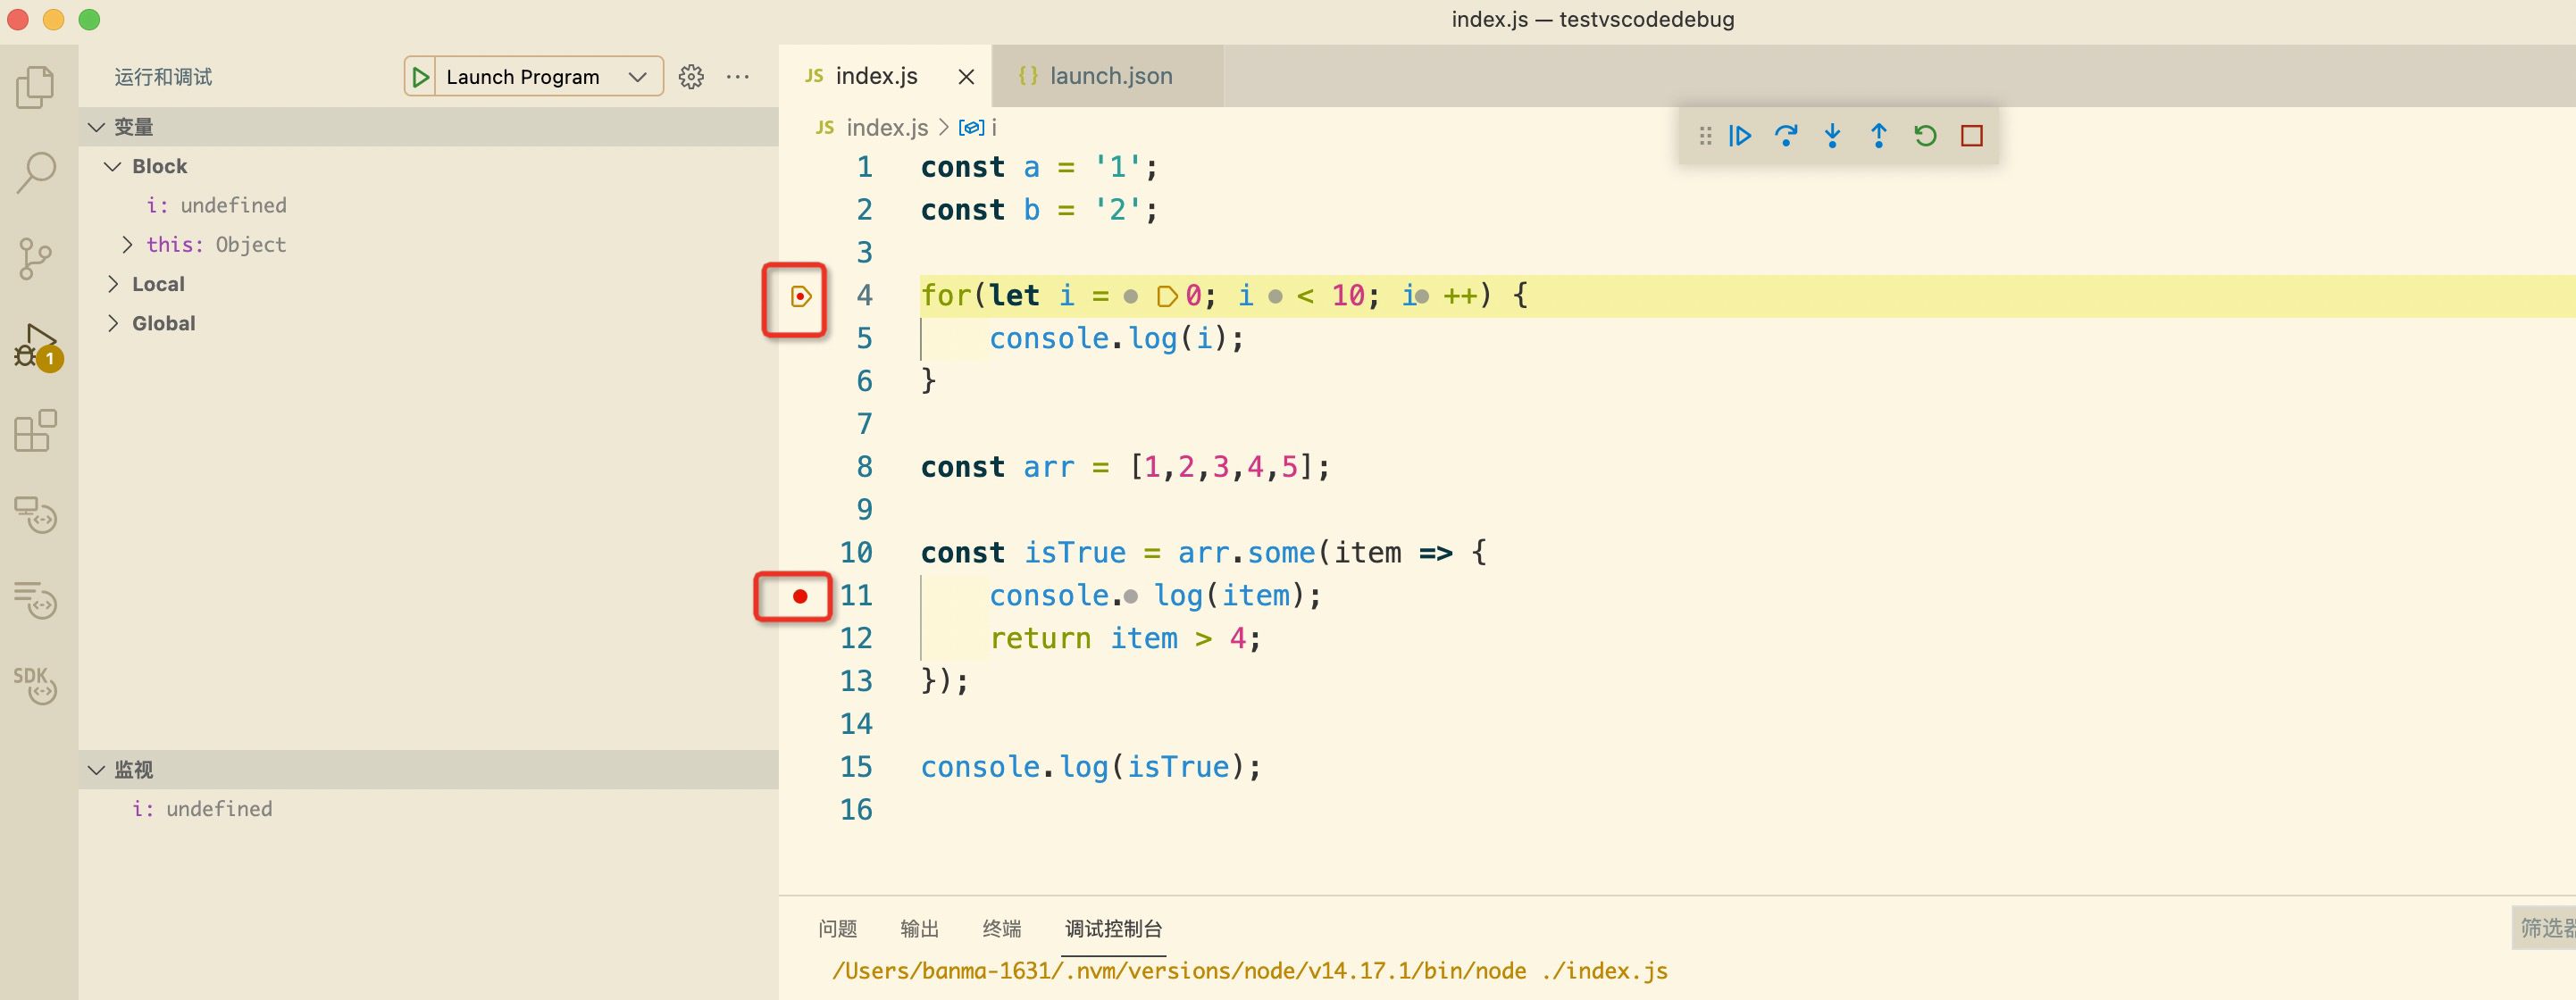
7. 日志点
在每一行小红点位置上右键点击,选择添加日志点

如:此日志点记录循环中 i 的值:{i}
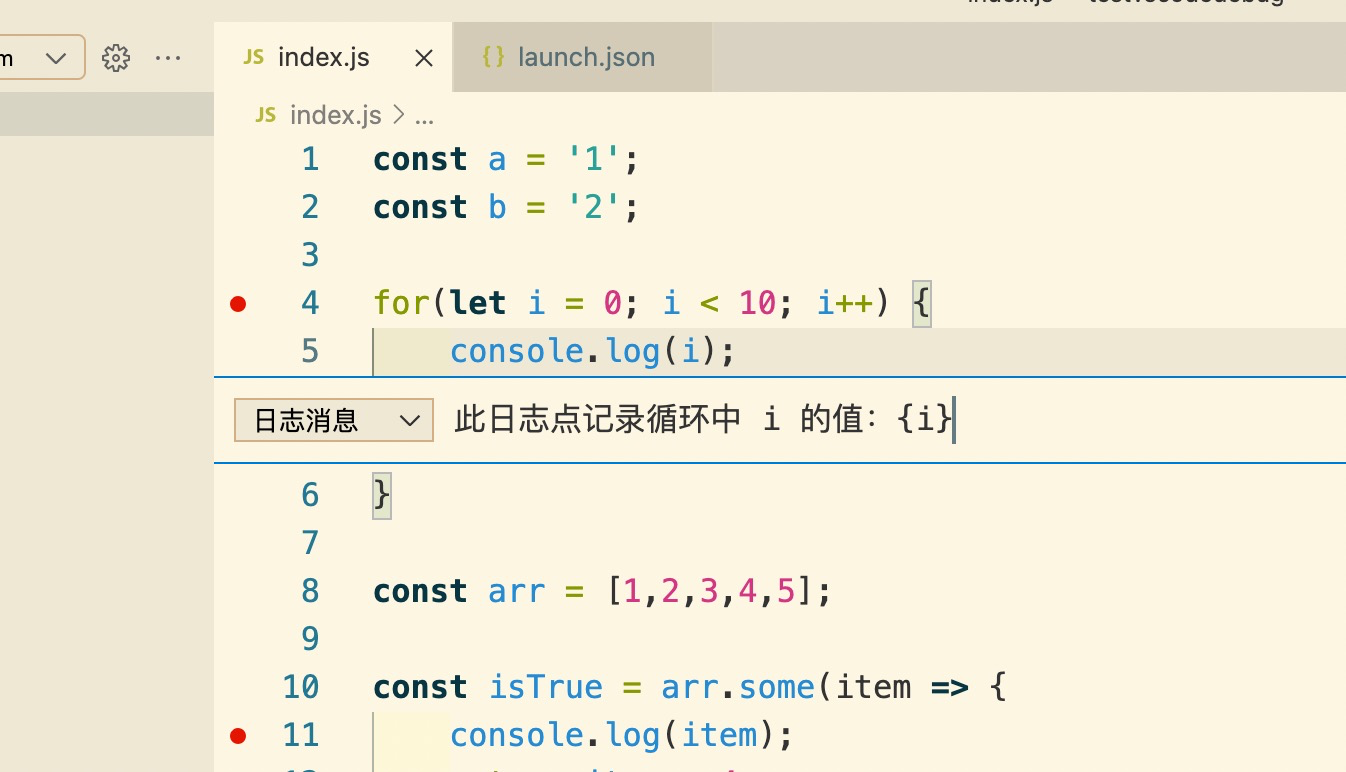
执行时可以看到会有日志打印出来。
3、Launch.json 属性
1. 静态配置
{
    // 使用 IntelliSense 了解相关属性。
    // 悬停以查看现有属性的描述。
    // 欲了解更多信息,请访问: https://go.microsoft.com/fwlink/?linkid=830387
    "version": "0.2.0",
    "configurations": [

    ]
}
2. configurations 配置
interface common {
  // 环境类型,比如 node
  type: string
  // debug方式
  request: 'launch' | 'attach'
  // debugger 名称 展示在调试器管理中的名称
  name: string
  // 遵循协议
  protocol: 'auto' | 'inspector' | 'legacy'
  // debug port
  port: number
  // 调试端口的 TCP/IP 地址
  address: string
  // 通过将此设置为 true 来启用源映射
  sourceMaps: boolean
  // glob 模式数组,用于定位生成的 JavaScript 文件
  outFiles: array
  // 终止时重新启动会话
  restart: boolean
  autoAttachChildProcesses: boolean
  // 当重新启动会话时,在这个毫秒数之后放弃
  timeout: number
  // 当程序启动时立即中断
  stopOnEntry: boolean
  // VS Code的根目录
  localRoot: string
  // 节点的根目录
  remoteRoot: string
  // 尝试自动跳过没有映射到源文件的代码
  smartStep: boolean
  // 自动跳过这些 glob 模式覆盖的文件
  skipFiles: array
  // 是否启用诊断输出
  trace: boolean
  presentation: {
    // 是否隐藏,true 为隐藏不可见 默认 false
  	hidden: boolean,
    // 排序 数字越小越在前
    order: number,
    // 组,组名一样一个组
    group: string
  }
}
interface launch {
  // 要调试的 Node.js 程序的绝对路径
  program: string
  // 传递给程序调试的参数
  args: array
  // 在这个目录中启动程序进行调试
  cwd: '${workspaceFolder}'
  // 要使用的运行时可执行文件的绝对路径。默认是 node
  runtimeExecutable: 'node' | 'npm' | string
  // 传递给 runtime 可执行文件的可选参数
  runtimeArgs: string
  // 选择 Node.js 的特定版本
  runtimeVersion: string
  // 该属性期望环境变量作为字符串类型键/值对的列表
  env: {}
  // 包含环境变量定义的文件的可选路径
  envFile: '${workspaceFolder}/.env'
  // 启动程序的控制台
  console: 'internalConsole' | 'integratedTerminal' | 'externalTerminal'
  outputCapture: string
}
interface attach {
  // 使用该processId属性时,调试端口是根据 Node.js 版本(和使用的协议)自动确定的,不能显式配置。所以不要指定 port 属性。
  processId: string
}
3. 特定于平台的属性
Launch.json 支持不同的操作系统不同的属性值
args 在 windows 上传值,stopOnEntry 在 MacOS 上传值
{
  "version": "0.2.0",
  "configurations": [
    {
      "type": "node",
      "request": "launch",
      "name": "Launch Program",
      "program": "${workspaceFolder}/node_modules/gulp/bin/gulpfile.js",
      "args": ["myFolder/path/app.js"],
      "windows": {
        "args": ["myFolder\\path\\app.js"]
      },
      "stopOnEntry": true,
      "osx": {
        "stopOnEntry": false
      }
    }
  ]
}
Windows-windowsLinux-linuxMacOS-osx
4. Launch vs Attach
launch 是指把 debug sessions 附加到接下来直接启动的 node 调试程序(即跟随 –inspect-brk=port),注意 debug port 得和 –inspect-brk=port 对应;
attach 是指把 debug sessions 附加到指定的正在运行的处于 debug 模式的 node 程序的对应端口上,如果是非 debug 模式的 node 程序,则需要提供 processId。
5. Source Maps
VS Code 默认会开启 source maps。如果编译后的文件不在同级目录,则需要设置 outFiles attribute 告知 debug adpater 源文件在哪。
6. 变量替换
VSCode 常用的路径和其他一些值可以作为变量使用。
{
  "type": "node",
  "request": "launch",
  "name": "Launch Program",
  "program": "${workspaceFolder}/app.js",
  "cwd": "${workspaceFolder}",
  "args": ["${env:USERNAME}"]
}
4、变量
1. 变量列表
${workspaceFolder}- 在VS Code中打开的文件夹的路径;${workspaceFolderBasename}- 在VS Code中打开的文件夹的名称,不带斜杠(/);${file}- 当前打开的文件;${fileWorkspaceFolder}- 当前打开的文件的工作区文件夹;${relativeFile}- 相对于workspaceFolder当前打开的文件;${relativeFileDirname}- 当前打开的文件的目录名;${fileBasename}- 当前打开的文件的basename;${fileBasenameNoExtension}- 当前打开的文件的basename,没有文件扩展名;${fileDirname}- 当前打开的文件的dirname;${fileExtname}- 当前打开文件的扩展名;${cwd}- 任务运行程序在启动时的当前工作目录;${lineNumber}- 选中的文件当前选定的行号;${selectedText}- 选中的文件中当前选定的文本;${execPath}-VS Code可执行文件的运行路径;${env:Name}- 环境变量;${config:Name}- 配置变量;${command:commandID}-command变量;${defaultBuildTask}- 默认构建任务的名称;${pathSeparator}- 用于分隔文件路径中的组件的字符;${input:variableID}-input输入变量。
2. 示例
假设您有以下需求:
- 位于在
/home/your-username/your-project/folder/file.ext编辑器中打开的文件; - 该目录
/home/your-username/your-project作为根工作区打开。
因此,您将拥有每个变量的以下值:
${workspaceFolder}-/home/your-username/your-project${workspaceFolderBasename}-your-project${file}-/home/your-username/your-project/folder/file.ext${fileWorkspaceFolder}-/home/your-username/your-project${relativeFile}-folder/file.ext${relativeFileDirname}-folder${fileBasename}-file.ext${fileBasenameNoExtension}-file${fileDirname}-/home/your-username/your-project/folder${fileExtname}-.ext${lineNumber}- 光标的行号${selectedText}- 在代码编辑器中选择的文本${execPath}-Code.exe的位置${pathSeparator}-在macOS或linux上为/,在Windows上位\
3. 每个工作区文件夹范围内的变量
通过将根文件夹的名称附加到变量(用冒号分隔),可以访问工作区的同级根文件夹。如果没有根文件夹名称,该变量的范围将与使用它的文件夹相同。
例如,在具有文件夹 Server 和的多根工作区中 Client, ${workspaceFolder:Client} 指的是 Client 根的路径。
4. 环境变量
您还可以通过 ${env:Name} 语法(例如,${env:USERNAME} )引用环境变量。
{
  "type": "node",
  "request": "launch",
  "name": "Launch Program",
  "program": "${workspaceFolder}/app.js",
  "cwd": "${workspaceFolder}",
  "args": ["${env:USERNAME}"]
}
5. Config 变量
${config:Name}
${config:editor.fontSize}
6. Command 变量
${command:commandID}
{
  "configurations": [
    {
      "type": "node",
      "request": "attach",
      "name": "Attach by Process ID",
      "processId": "${command:extension.pickNodeProcess}"
    }
  ]
}
7. Input 变量
${input:variableID}
{
  "version": "2.0.0",
  "tasks": [
    {
      "label": "task name",
      "command": "${input:variableID}"
      // ...
    }
  ],
  "inputs": [
    {
      "id": "variableID",
      "type": "type of input variable"
      // type specific configuration attributes
    }
  ]
}
目前 VS Code 支持三种类型的输入变量:
promptString:显示一个输入框以从用户那里获取字符串。pickString:显示快速选择下拉菜单,让用户从多个选项中进行选择。command:运行任意命令。
PromptString:description:显示在快速输入中,为输入提供上下文。default:如果用户不输入其他内容将使用的默认值。password:设置为true以使用不会显示键入值的密码提示输入。
PickString:description:显示在快速选择中,为输入提供上下文。options:供用户选择的选项数组。default:如果用户不输入其他内容将使用的默认值。它必须是选项值之一。
Command:command:在变量插值上运行的命令。args:传递给命令实现的可选选项包。
{
  "version": "2.0.0",
  "tasks": [
    {
      "label": "ng g",
      "type": "shell",
      "command": "ng",
      "args": ["g", "${input:componentType}", "${input:componentName}"]
    }
  ],
  "inputs": [
    {
      "type": "pickString",
      "id": "componentType",
      "description": "What type of component do you want to create?",
      "options": [
        "component",
        "directive",
        "pipe",
        "service",
        "class",
        "guard",
        "interface",
        "enum",
        "enum"
      ],
      "default": "component"
    },
    {
      "type": "promptString",
      "id": "componentName",
      "description": "Name your component.",
      "default": "my-new-component"
    }
  ]
}
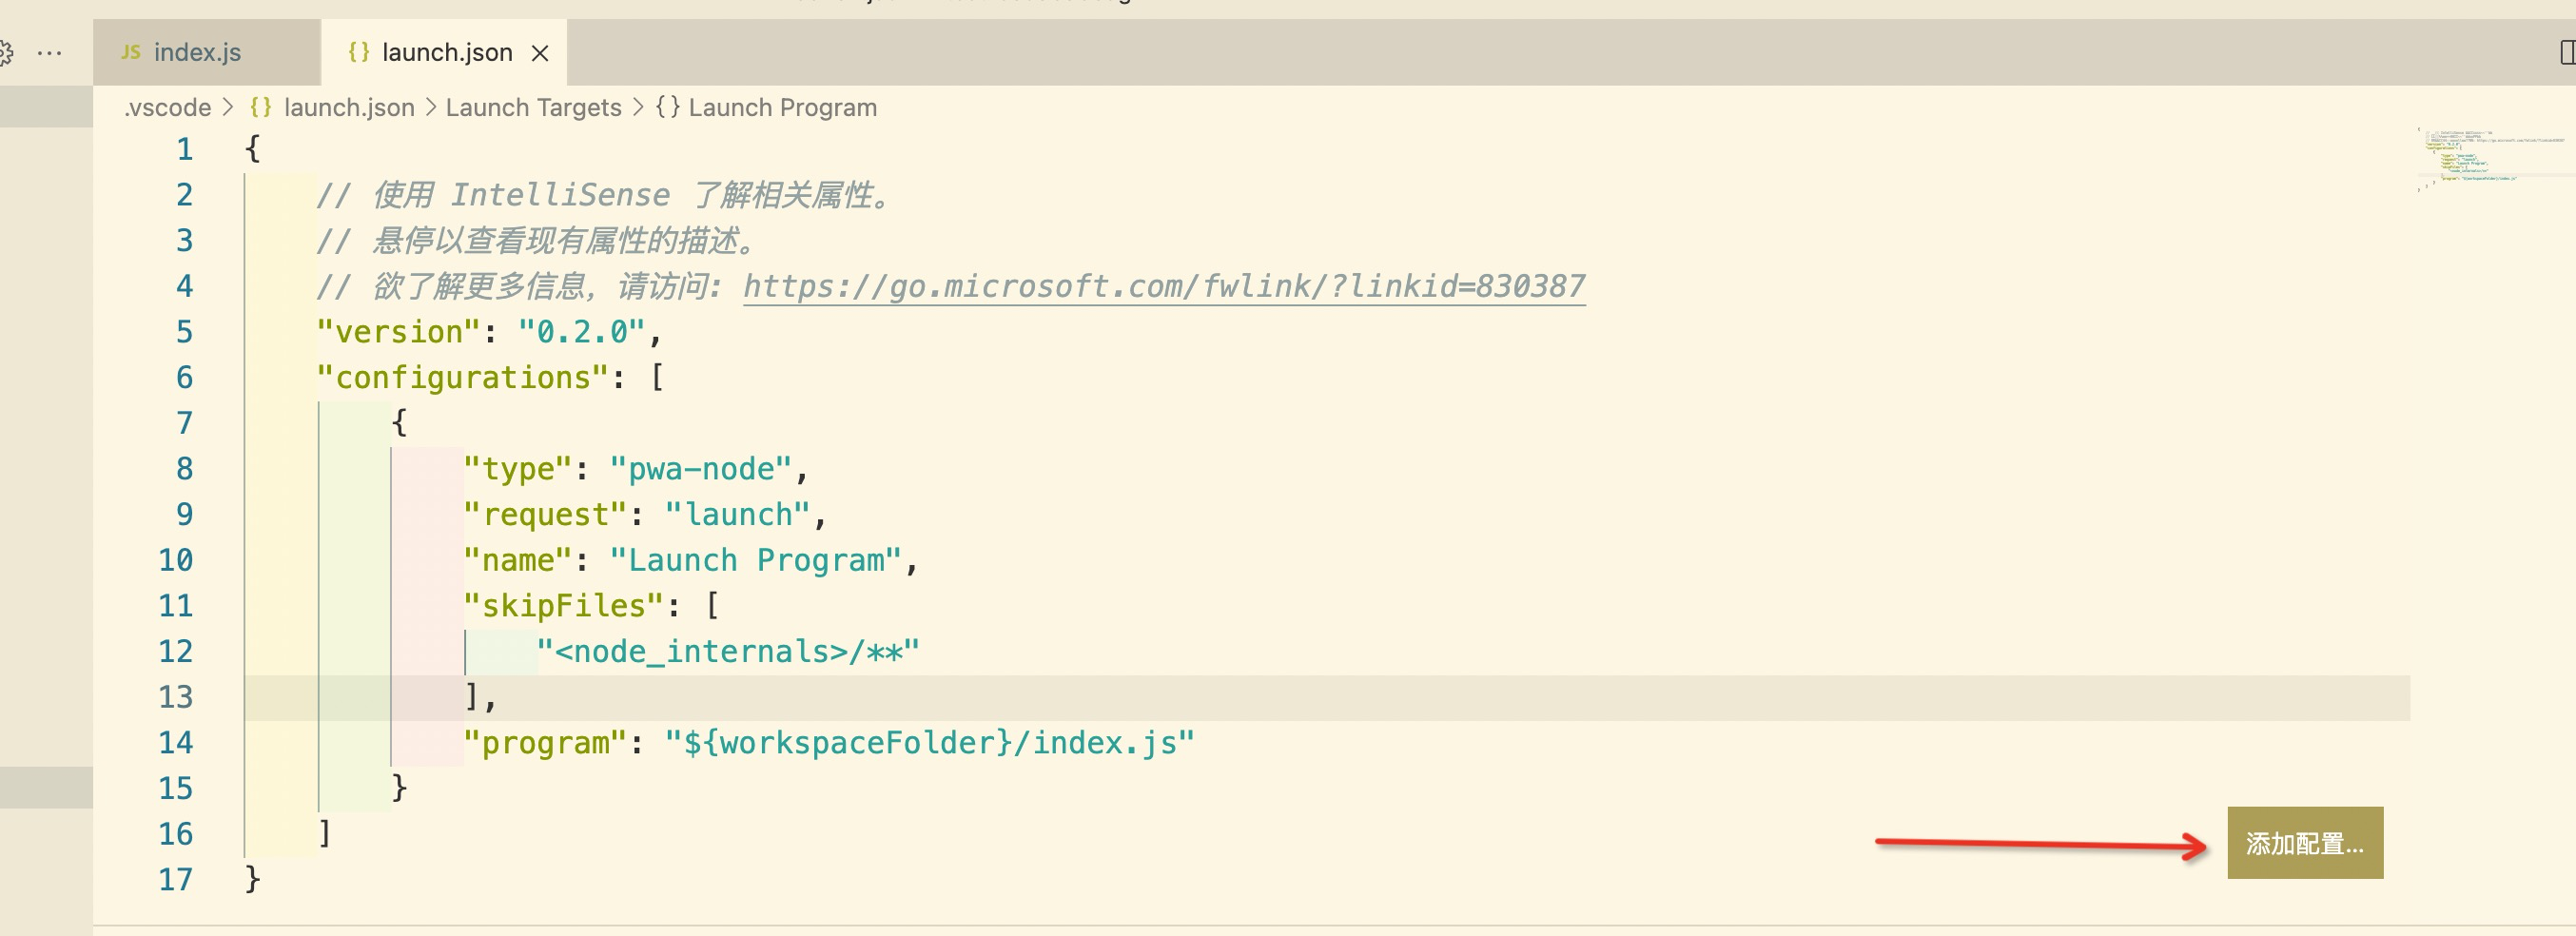
5、复合配置
Compound launch configurations
1. 添加配置
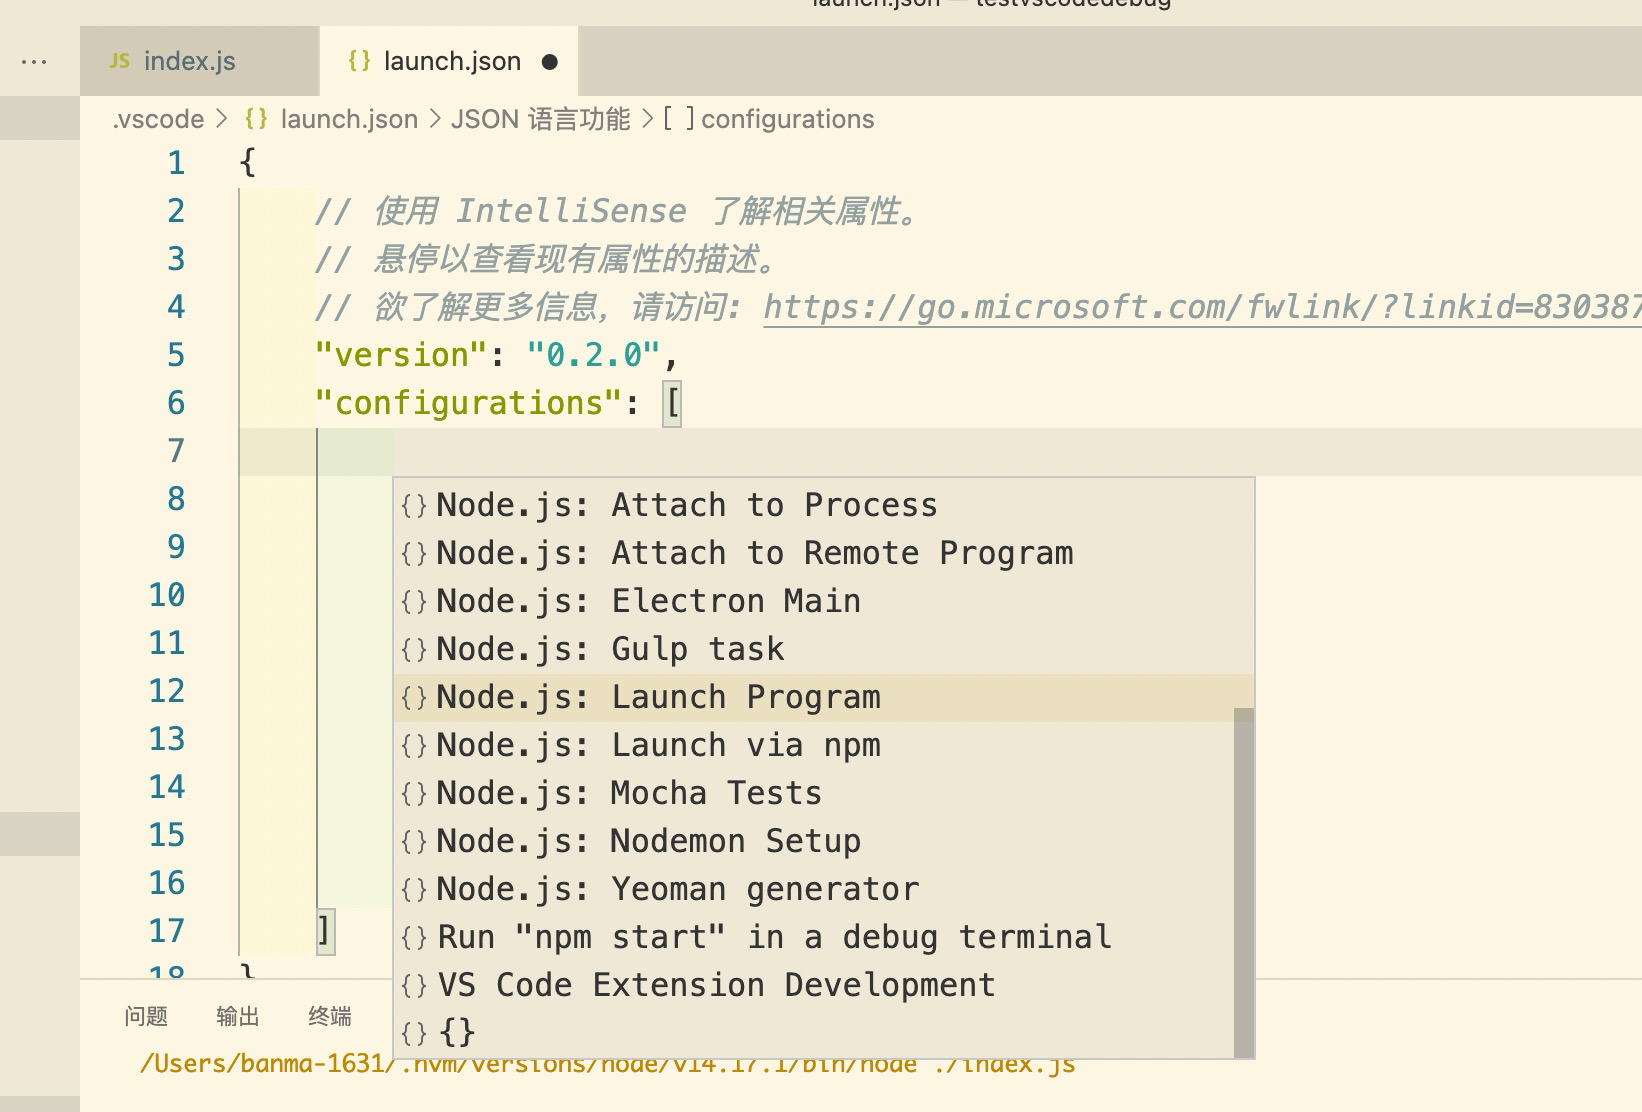
2. 选择对应的配置即可
二、Contributes Breakpoints 调试器断点
扩展列出了将启用设置断点的语言文件类型。
{
  "contributes": {
    "breakpoints": [
      {
        "language": "javascript"
      },
      {
        "language": "javascriptreact"
      }
    ]
  }
}
三、Contributes Debuggers
1. 属性
● type 是用于在启动配置中标识此调试器的唯一 ID,与 launch.json 配置中的 type 一致
● label 是此调试器在 VS code 中的名称。
● program 调试适配器的路径,该适配器针对实际调试器或运行时实现 VS Code 调试协议。
● runtime 如果到调试适配器的路径不是可执行文件,但需要 runtime。
● configurationAttributes 是特定于此调试器的启动配置参数的架构。请注意,JSON 模式构造 $ref 并且 definition 不受支持。
● initialConfigurations 用于填充初始 launch.json 的启动配置。
● configurationSnippets 编辑 launch.json 时可通过 IntelliSense 使用的启动配置。
● variables 引入替换变量并将它们绑定到调试器扩展实现的命令。
● languages 那些调试扩展可以被视为“默认调试器”的语言。
2. 示例
{
  "contributes": {
    "debuggers": [
      {
        "type": "node",
        "label": "Node Debug",
        "program": "./out/node/nodeDebug.js",
        "runtime": "node",
        "languages": ["javascript", "typescript", "javascriptreact", "typescriptreact"],
        "configurationAttributes": {
          "launch": {
            "required": ["program"],
            "properties": {
              "program": {
                "type": "string",
                "description": "The program to debug."
              }
            }
          }
        },

        "initialConfigurations": [
          {
            "type": "node",
            "request": "launch",
            "name": "Launch Program",
            "program": "${workspaceFolder}/app.js"
          }
        ],

        "configurationSnippets": [
          {
            "label": "Node.js: Attach Configuration",
            "description": "A new configuration for attaching to a running node program.",
            "body": {
              "type": "node",
              "request": "attach",
              "name": "${2:Attach to Port}",
              "port": 9229
            }
          }
        ],

        "variables": {
          "PickProcess": "extension.node-debug.pickNodeProcess"
        }
      }
    ]
  }
}
四、VSCode Debug API
1. 变量
1. activeDebugConsole: DebugConsole
当前活动的调试控制台。如果没有激活的调试会话,则不会显示发送到调试控制台的输出。
2. activeDebugSession: DebugSession | undefined
当前活动的调试会话。如果没有激活调试会话,则该值为 undefined。
3. breakpoints: readonly Breakpoint[]
断点列表
2. 事件
1. onDidChangeActiveDebugSession: Event<DebugSession | undefined>
当活动调试会话发生更改时触发的事件,当活动调试会话更改为 undefined 时,也会触发该事件。
2. onDidChangeBreakpoints: Event<BreakpointsChangeEvent>
添加、删除或更改断点集时触发的事件。
3. onDidReceiveDebugSessionCustomEvent: Event<DebugSessionCustomEvent>
当从调试会话接收到自定义 DAP 事件时触发的事件。
4. onDidStartDebugSession: Event<DebugSession>
在启动新的调试会话时触发的事件。
5. onDidTerminateDebugSession: Event<DebugSession>
当调试会话终止时触发的事件。
3. 方法
1. addBreakpoints(breakpoints: readonly Breakpoint[]): void
添加断点
| 参数 | 描述 |
|---|---|
breakpoints: readonly Breakpoint[] | 添加的断点 |
2. asDebugSourceUri(source: DebugProtocolSource, session?: DebugSession): Uri
将通过调试适配器协议(Debug Adapter Protocol)接收的 source 描述符对象转换为可用于加载其内容的 Uri。
| 参数 | 描述 |
|---|---|
source: DebugProtocolSource | 符合调试适配器协议中定义的 Source 类型的对象。 |
session?: DebugSession | 可选的调试会话。 |
| 返回值 | |
Uri | 一个可以用来加载源内容的 uri。 |
3. registerDebugAdapterDescriptorFactory(debugType: string, factory: DebugAdapterDescriptorFactory): Disposable
为特定的调试类型注册一个调试适配器描述符函数。扩展只允许为扩展定义的调试类型注册一个 DebugAdapterDescriptorFactory。否则将抛出一个错误。为调试类型注册多个DebugAdapterDescriptorFactory 会导致错误。
| 参数 | 描述 |
|---|---|
debugType: string | 注册函数的调试类型。 |
factory: DebugAdapterDescriptorFactory | 要注册的函数。 |
| 返回值 | |
Disposable |
4. registerDebugAdapterTrackerFactory(debugType: string, factory: DebugAdapterTrackerFactory): Disposable
为给定的调试类型注册一个调试适配器踪器函数。
| 参数 | 描述 |
|---|---|
debugType: string | 注册函数的调试类型。 |
factory: DebugAdapterTrackerFactory | 要注册的函数。 |
| 返回值 | |
Disposable |
5. registerDebugConfigurationProvider(debugType: string, provider: DebugConfigurationProvider, triggerKind?: DebugConfigurationProviderTriggerKind): Disposable
为特定的调试类型注册一个 debug configuration provider。
| 参数 | 描述 |
|---|---|
debugType: string | 调试类型。 |
provider: DebugConfigurationProvider | 注册的 debug configuration provider |
triggerKind?: DebugConfigurationProviderTriggerKind | |
| 返回值 | |
Disposable |
6. removeBreakpoints(breakpoints: readonly Breakpoint[]): void
删除断点
| 参数 | 描述 |
|---|---|
breakpoints: readonly Breakpoint[] | 删除的断点 |
7. startDebugging(folder: WorkspaceFolder | undefined, nameOrConfiguration: string | DebugConfiguration, parentSessionOrOptions?: DebugSession | DebugSessionOptions): Thenable<boolean>
通过使用命名启动或命名复合配置或直接传递 DebugConfiguration 来开始调试。
| 参数 | 描述 |
|---|---|
folder: WorkspaceFolder | undefined | 工作区文件夹。 |
nameOrConfiguration: string | DebugConfiguration | 调试或复合配置或 DebugConfiguration 对象的名称。 |
parentSessionOrOptions?: DebugSession | DebugSessionOptions | 调试会话的选项。 |
| 返回值 | |
Thenable<boolean> |
8. stopDebugging(session?: DebugSession): Thenable<void>
停止给定的调试会话,如果省略则停止所有的调试会话。
| 参数 | 描述 |
|---|---|
session?: DebugSession | 调试会话 |
| 返回值 | |
Thenable<boolean> |
五、Debugging Architecture 调试架构
1. Debug Adapter
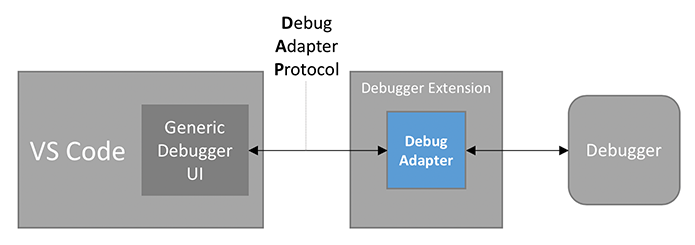
VS Code 实现了一个通用的(语言无关的)调试器 UI,它基于一个抽象的协议。由于调试器通常不实现此协议,因此需要一些中介来“调整”调试器以适应协议。这个中介通常是与调试器通信的独立进程。
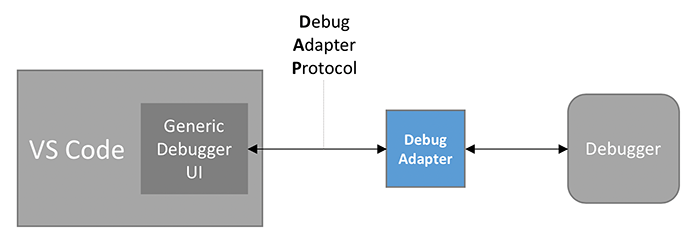
我们称这个中介为调试适配器(简称 DA,Debug Adapter), DA 和 VS Code 之间使用的抽象协议是调试适配器协议(简称 DAP,Debug Adapter Protocol)。由于调试适配器协议是独立于 VS Code 的,它有自己的网站。
由于调试适配器独立于 VS Code,并且可以在其他开发工具中使用,所以它们与 VS Code 基于扩展和贡献点的可扩展性体系结构不匹配。
出于这个原因,VS Code 提供了一个贡献点,debuggers,调试适配器可以在一个特定的调试类型下贡献(例如 Node.js 调试器的 node )。当用户启动该类型的调试会话时,VS Code 会启动已注册的 DA。
因此,在其最基本的形式中,调试器扩展只是调试适配器实现的声明性贡献,而扩展基本上是调试适配器的打包容器,没有任何额外的代码。
2. Demo
vscode-mock-debug
github 地址:https://github.com/Microsoft/vscode-mock-debug
1. clone 下来,yarn 安装 node_modules
2. 打开文件夹中的 package.json 文件
文件中配置了 breakpoints 和 debuggers 两个参数。
结合上面的属性解析我们知道此插件设置了语言类型为 markdown 且 type 值为 mock 的一个 debuggers

3. F5 启动插件或者点击左侧 Debug 按钮
可以看到 launch.json 文件中的配置。

4. 点击左侧 Debug 按钮
可以看到上面 select 框中有一个 Debug readme.md,然后启动,即可看到 markdown 文件进行调试中。


5. 关闭刚刚打开的 vs code 回到 clone 项目,在 breakpoints 和 debuggers 中分别添加新配置。

debuggers 配置 mockJs 只需要按照上面 mock 的配置复制,然后改 type 和 configurationSnippets 中 label 即可。
配置如下:
{
	"type": "mockJs",
	"languages": ["javascript"],
	"label": "Mock Debug Js",
	"program": "./out/debugAdapter.js",
	"runtime": "node",
	"configurationAttributes": {
	  "launch": {
	    "required": [
	      "program"
	    ],
	    "properties": {
	      "program": {
	        "type": "string",
	        "description": "Absolute path to a text file.",
	        "default": "${workspaceFolder}/${command:AskForProgramName}"
	      },
	      "stopOnEntry": {
	        "type": "boolean",
	        "description": "Automatically stop after launch.",
	        "default": true
	      },
	      "trace": {
	        "type": "boolean",
	        "description": "Enable logging of the Debug Adapter Protocol.",
	        "default": true
	      },
	      "compileError": {
	        "type": "string",
	        "description": "Simulates a compile error in 'launch' request.",
	        "enum": [
	          "default",
	          "show",
	          "hide"
	        ],
	        "enumDescriptions": [
	          "default: show fake compile error to user",
	          "show fake compile error to user",
	          "do not show fake compile error to user"
	        ]
	      }
	    }
	  }
	},
	"initialConfigurations": [
	  {
	    "type": "mockJs",
	    "request": "launch",
	    "name": "Ask for file name",
	    "program": "${workspaceFolder}/${command:AskForProgramName}",
	    "stopOnEntry": true
	  }
	],
	"configurationSnippets": [
	  {
	    "label": "Mock Debug Js: Launch",
	    "description": "A new configuration for 'debugging' a user selected js file.",
	    "body": {
	      "type": "mockJs",
	      "request": "launch",
	      "name": "Ask for file name",
	      "program": "^\"\\${workspaceFolder}/\\${command:AskForProgramName}\"",
	      "stopOnEntry": true
	    }
	  }
	],
	"variables": {
	  "AskForProgramName": "extension.mock-debug.getProgramName"
	}
}
6. 配置完成之后在 sampleWorkspace 文件夹中创建 index.js 文件,写入代码。

7. 点击左侧 Debug 按钮,选择 Extension + Server 选项,并启动调试

8. 在新打开的窗口的 launch.json 文件中,点击 Add Configuration... 按钮,选择 Mock Debug Js: Launch

并修改其中配置
{
	"type": "mockJs",
	"request": "launch",
	"name": "Debug js",
	"program": "${workspaceFolder}/index.js",
	"stopOnEntry": true
}
9. 点击 Debug 按钮,选择 Debug js 选项

即可调试 js 文件
