git学习指南
1.安装git
2.安装完成后需要在命令行下设置
git config --global user.name "Your Name"
git config --global user.email "email@example.com"
因为git分布式版本控制系统,所有每个机器都需要自报家门,以方便查看是由谁提交的代码。
注意git config命令的--global参数,用了这个参数,表示你这台机器上所有的Git仓库都会使用这个配置,当然也可以对某个仓库指定不同的用户名和Email地址。
3.创建版本库(repository)
3.1 创建版本库,可以有效管理项目文件
mkdir learngit
cd learngit
3.2 将这个目录变成git可以管理的仓库
git init
更改完成之后当前目录下会生成一个隐藏目录文件.git,此目录是Git来跟踪管理版本库的,没事千万不要手动修改这个目录里面的文件,不然改乱了,就把Git仓库给破坏了。
4.将文件添加到版本库中
4.1 把文件添加到仓库
git add file	#添加单个文件
git add file1 file2	#添加多个文件
git add .	#添加当前目录下的所有文件
4.2 把文件提交到仓库
git commit -m "log_message"
#特别说明:-m 参数后面的log_message是本次提交的说明,可以输入任意值。
5.查看当前仓库的状态
5.1使用git status可以查看当前仓库是否被修改
git status
5.2若被修改就,使用git diff可以查看修改的内容
git diff
6.版本回退
6.1 在日常开发中,如果想知道文件都修改了什么,可以使用以下命令
git log
git log --pretty=oneline #加上参数可以有效避免输出的信息太多
6.2 在git中使用HEAD表示当前版本,上一个版本是HEAD^
上上一个版本是HEAD^^当然可以使用HEAD~100代表第一百个版本
git reset --hard HEAD^
6.3 查看文件内容是不是被还原
cat file
回退之后,最新的那个版本已经无法再使用git log 看到了
若想再次回到之前的版本,需要如下操作:
找到回退前的版本ID
git reset --hard ID
再次查看版本内容是不是又恢复了
使用以下命令可以快速查找相关ID
git reflog
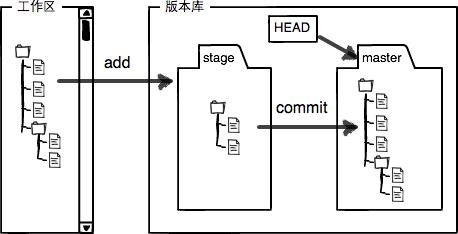
7.工作区和暂存区
- 工作区(working directory):指的是当前工作的仓库目录,比如之前所创建的learngit目录
- 版本库(repository):工作区里面有一个隐藏目录
.git,这个并不算工资区,而是Git的版本库,git的版本库里面存在很多东西,其中最重要的是stage(或者叫index)的暂存区,还有Git为我们自动创建的第一个分支master,以及指向master的一个指针叫HEAD。

- 经常把文件往git版本库中添加的时候,其步骤为:
- 使用git add把文件添加进去,实际上就是把文件添加到暂存区中
- 使用git commit 提交更改,实际上就是将暂存区中的所有内容提交到当前分支
- 因为我们创建Git版本库时,Git自动为我们创建了唯一一个
master分支,所以,现在,git commit就是往master分支上提交更改。
8.撤销修改
命令git checkout -- readme.txt意思就是,把readme.txt文件在工作区的修改全部撤销,这里有两种情况:
- 一种是
readme.txt自修改后还没有被放到暂存区,现在,撤销修改就回到和版本库一模一样的状态; - 一种是
readme.txt已经添加到暂存区后,又作了修改,现在,撤销修改就回到添加到暂存区后的状态。
总之,就是让这个文件回到最近一次git commit或git add时的状态。
git checkout -- file
修改后文件还没有add到暂存区时
#使用git status可以看到可以使用以下命令撤回操作
git checkout -- file

#新版本使用以下命令
git restore <file>
修改后文件已经add到暂存区,但还没有commit时
#使用git status可以看到提示按步骤操作
git reset HEAD file			#使用该命令可以将暂存区的数据撤回到工作区
#新版本使用以下命令
git restore --staged <file>


#再次git status可看到提示使用
git checkout -- file
#新版本使用以下命令
git restore <file>
9.删除文件
如果你不小心将工作区里面的文件删除了,工作区和版本库此时就不一致,使用git status则可以看到有提示
[root@VM-0-16-centos test]# git status
# On branch master
# Changes to be committed:
#   (use "git reset HEAD <file>..." to unstage)
#
#	new file:   file2
#
# Changes not staged for commit:
#   (use "git add/rm <file>..." to update what will be committed)
#   (use "git checkout -- <file>..." to discard changes in working directory)
#
#	deleted:    file2
此时如果真的需要删除
#使用以下命令可以将版本库中的文件也删除,保持工作区于版本库一致
git rm file
删掉之后并且 git commit一下
另外一种是如果需要恢复文件
#只能恢复文件到最新版本,你会丢失最近一次提交后你修改的内容
git checkout -- <file>
10.远程仓库
10.1 创建SSH Key
ssh-keygen -t rsa -C "youremail@example.com"
10.2 将公钥复制到github上
cd .ssh
公钥存在id_rsa.pub中
10.3 关联远程库
git remote add origin git@github.com:Fairy-qun/Python.git
#关联远程库必须给远程库指定一个名字,origin是默认习惯命名
10.4 推送master分支内容到远程库
git push -u origin master(分支可自行更改) #第一次需要使用-u参数,后面就不需要
记一次小错误
#由于推送项目到远程库时出现
To github.com:Fairy-qun/Python.git
 ! [rejected]        master -> master (fetch first)
error: failed to push some refs to 'github.com:Fairy-qun/Python.git'
hint: Updates were rejected because the remote contains work that you do
hint: not have locally. This is usually caused by another repository pushing
hint: to the same ref. You may want to first integrate the remote changes
hint: (e.g., 'git pull ...') before pushing again.
hint: See the 'Note about fast-forwards' in 'git push --help' for details.

#原因
线上线下文件不一致导致

#解决方案
#将线上线下代码进行合并
git pull --rebase origin master

#再进行推送
10.5 拉取远程库的项目
git clone git@github.com:Fairy-qun/Python.git
11.分支管理
11.1 创建与合并分支
创建test分支
#对于老版本
git checkout -b test
#对于新版本
git switch test
切换分支
git branch test
git checkout test

git checkout -b test #表示创建并切换分支,相当于以上两条命令
git switch -c test	#功能同上
查看当前分支列表
git branch #列出当前的所有分支,当前分支前面会标有一个*号
之后就可以正常在此分支上提交
若在此分支上的工作完成之后,就可以切换回master分支
回到master分支后可以知道在其他分支上所做的操作都没有,仅仅时提交在了其他分支上,如果需要的话,将其合并到master分支上
合并分支
git merge test #merge命令用于合并指定分支到当前分支上
合并完成后再查看就能够在其他分支最新提交状态一样
删除分支
git branch -d test #合并完成后,就可以放心删除分支了
11.2 分支管理策略
通常合并分支时,Git会默认用Fast forward模式,但是在这种模式下,删除分支后,会丢掉分支的信息。
解决方案:
使用--no-ff方式的git merge来强制解除Fast forward模式,这样在merge时,就会生成一个新的commit,就可以从分支的历史信息上看出分支的信息
实操:
git switch -c test	#创建并却换分支

#在此分支上对已经修改的文件进行提交
git add file
git commit -m "log_message"

git switch master #切换回master分支

#准备合并分支,并使用--no-ff参数禁用Fast-forward模式
git merge --no-ff -m "merge with no-ff" test	#因为本次合并需要有一个commit,所有增加-m参数将commit描述写进去

#合并后使用git log查看分支历史
git log
11.3 Bug分支
在需要修改bug时,可以先将正在某个分支上的工作隐藏起来,待bug恢复后,在恢复分支上的信息继续工作
#将工作信息隐藏起来
git stash

#之后就修改bug

#查看工作信息
git stash list

#恢复工作信息(两种方式)
1. git stash apply		#此方式时恢复后stash内容不删除,如果需要删除,使用git stash drop
2. git stash pop	#此方式是恢复的同时也把stash内容删除

再使用git stash list就没有任何的stash内容了

#如果有多个stash,恢复时使用git stash list查看后使用以下命令
git stash apply stash@{0}
在master分支上修复了bug后,我们要想一想,dev分支是早期从master分支分出来的,所以,这个bug其实在当前dev分支上也存在。
解决方案:
为了方便操作,Git专门提供了一个cherry-pick命令,让我们能复制一个特定的提交到当前分支:
git cherry-pick <commit id>
开发一个新feature,最好新建一个分支;
如果要丢弃一个没有被合并过的分支,可以通过git branch -D <name>强行删除。
git branch -D <name>
12.标签管理
12.1 创建标签
在git中打标签非常简单,首先,切换到需要打标签的分支上:
git branch #查看分支列表

git checkout master #切换分支
然后,使用以下命令就可以打标签:
git tag v1.0(任意值)		#打标签

git tag		#查看当所有标签
默认标签是打在最新提交的commit上的。有时候,如果忘了打标签,比如,现在已经是周五了,但应该在周一打的标签没有打,怎么办?
方法是找到历史提交的commit id,然后打上就可以了:
git log --pretty=oneline --abbrev-commit	#查找历史commit

git tag v0.9 commitID		#打上标签

再使用git tag查看
如果需要查看某个标签的信息
git show tag-v0.9
还可以创建带有说明的标签,用-a指定标签名,-m指定说明文字:
git tag -a v0.1 -m "log_message" commitID
使用git show v0.1可以看到说明文字
12.2 标签操作
如果标签打错了,也可以删除:
$ git tag -d v0.1
Deleted tag 'v0.1' (was f15b0dd)
因为创建的标签都只存储在本地,不会自动推送到远程。所以,打错的标签可以在本地安全删除。
如果要推送某个标签到远程,使用命令git push origin <tagname>:
$ git push origin v1.0
Total 0 (delta 0), reused 0 (delta 0)
To github.com:michaelliao/learngit.git
 * [new tag]         v1.0 -> v1.0
或者,一次性推送全部尚未推送到远程的本地标签:
$ git push origin --tags
Total 0 (delta 0), reused 0 (delta 0)
To github.com:michaelliao/learngit.git
 * [new tag]         v0.9 -> v0.9
如果标签已经推送到远程,要删除远程标签就麻烦一点,先从本地删除:
$ git tag -d v0.9
Deleted tag 'v0.9' (was f52c633)
然后,从远程删除。删除命令也是push,但是格式如下:
$ git push origin :refs/tags/v0.9
To github.com:michaelliao/learngit.git
 - [deleted]         v0.9
要看看是否真的从远程库删除了标签,可以登陆GitHub查看。
13.gitee简单使用
简易的命令行入门教程:
13.1 Git 全局设置:
git config --global user.name "Qun"
git config --global user.email "1837322086@qq.com"
13.2 创建 git 仓库:
mkdir python
cd python
git init
touch README.md
git add README.md
git commit -m "first commit"
git remote add origin git@gitee.com:lixiaomai/python.git
git push -u origin "master"
13.3 已有仓库?
cd existing_git_repo
git remote add origin git@gitee.com:lixiaomai/python.git
git push -u origin "master"
的命令行入门教程:
13.1 Git 全局设置:
git config --global user.name "user"
git config --global user.email "example@qq.com"
13.2 创建 git 仓库:
mkdir python
cd python
git init
touch README.md
git add README.md
git commit -m "first commit"
git remote add origin git@gitee.com:lixiaomai/python.git
git push -u origin "master"
13.3 已有仓库?
cd existing_git_repo
git remote add origin git@gitee.com:lixiaomai/python.git
git push -u origin "master"