C/S模式多人聊天室
? 在IDEA下创建ChatRoom项目,在该项目下创建ChatClient和ChatServer两个Moudule,分别是聊天室的客户端和服务器端。
1. 登录界面和客户端界面创建
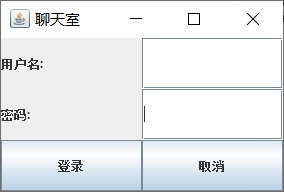
创建登陆界面
效果展示:

创建Login.java
import javax.swing.*;
import java.awt.*;
import java.awt.event.ActionEvent;
import java.awt.event.ActionListener;

/**
 * @Description 登录页面
 * @Author Alex
 * @Date 2022-03-24 19:22
 */
public class Login extends JFrame {

    private JLabel unameJLabel;

    private JLabel pwdJLabel;

    private JTextField unameJTextFiled;

    private JTextField pwdJTextFiled;

    private JButton loginJButton;

    private JButton cancelJButton;

    public Login(){
        super("聊天室");

        this.unameJLabel = new JLabel("用户名:");
        this.pwdJLabel = new JLabel("密码:");
        this.unameJTextFiled = new JTextField();
        this.pwdJTextFiled = new JTextField();
        this.loginJButton = new JButton("登录");
        this.cancelJButton = new JButton("取消");


        this.setSize(300,200);
        //采用网格布局 3X2
        this.setLayout(new GridLayout(3,2));
        this.add(unameJLabel);
        this.add(unameJTextFiled);
        this.add(pwdJLabel);
        this.add(pwdJTextFiled);
        this.add(loginJButton);
        this.add(cancelJButton);
        //设置居中显示
        this.setLocationRelativeTo(null);
        this.setVisible(true);

    }

}
创建ClientMain主函数启动
public class ClientMain {

    public static void main(String[] args) {
        new Login();
    }
}
给登录按钮绑定监听事件
/**
     * 监听单击事件
     */
    class MyEvent implements ActionListener{

        @Override
        public void actionPerformed(ActionEvent e) {
            //1.获得用户名
            String loginuname = unameJTextFiled.getText();

            //2.创建Socket连接服务器端
            try {
                Socket socket = new Socket("127.0.0.1",9999);

                //3. 跳转到聊天页面
                new Client(socket,loginuname);

                //4.关闭当前登录窗口
                dispose();

            } catch (UnknownHostException ex) {
                JOptionPane.showMessageDialog(null,"找不到服务器");
                ex.printStackTrace();
            } catch (IOException ex) {
                ex.printStackTrace();
            }
        }
    }
 		//给按钮绑定监听事件
        this.loginJButton.addActionListener(new MyEvent());
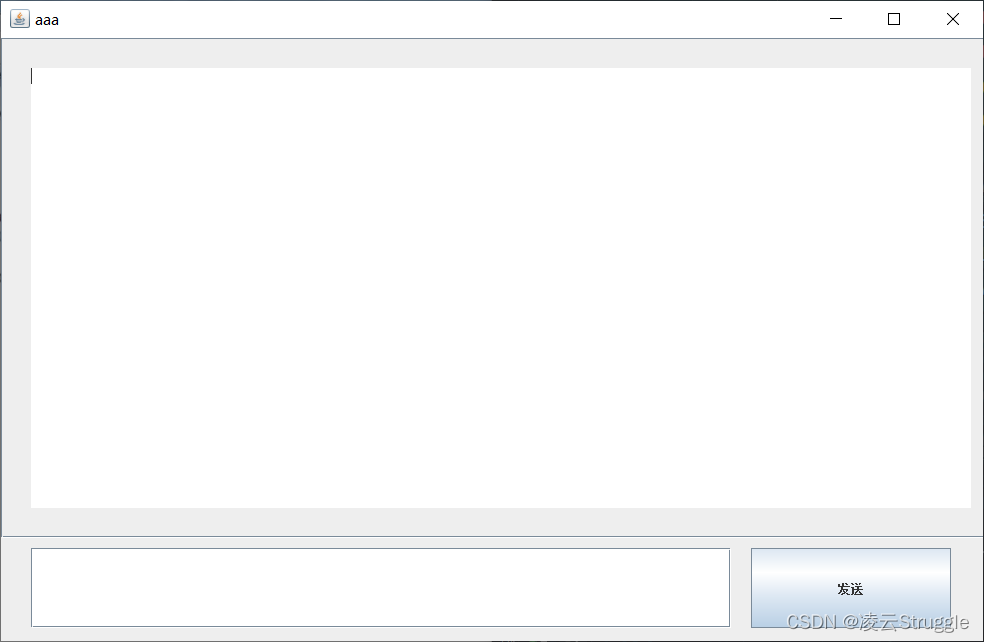
点击登录后,由登录界面跳转到客户端界面
创建客户端界面

Client.java
import javax.swing.*;
import java.net.Socket;

/**
 * @Description 客户端
 * @Author Alex
 * @Date 2022-03-24 20:48
 */
public class Client extends JFrame{

    //滚动面板,用来放消息列表
    private JScrollPane topPanel;
    //发送消息的面板
    private JPanel bottomPanel;
    //存放消息列表 不可编辑
    private JTextArea msgList;
    //写消息的文本框
    private JTextField msgText;
    //发送按钮
    private JButton sendButton;

    private Socket socket;
    private String uname;

    public Client(Socket socket,String uname){

        super(uname);
        this.socket = socket;
        this.uname = uname;

        this.topPanel = new JScrollPane();
        this.bottomPanel = new JPanel();
        this.msgList = new JTextArea();
        this.msgText = new JTextField();
        this.sendButton = new JButton("发送");

        //设置属性(绝对布局)
        this.topPanel.setLayout(null);
        this.bottomPanel.setLayout(null);

        this.topPanel.setBounds(0,0,1000,500);
        this.msgList.setBounds(30,30,940,440);
        this.bottomPanel.setBounds(0,500,1000,100);
        this.msgText.setBounds(30,510,700,80);
        this.sendButton.setBounds(750,510,200,80);

        //添加组件到窗口中
        this.topPanel.add(msgList);
        this.bottomPanel.add(msgText);
        this.bottomPanel.add(sendButton);
        this.add(topPanel);
        this.add(bottomPanel);

        //设置窗口属性
        this.setSize(1000,650);
        this.setLocationRelativeTo(null);
        this.setVisible(true);
    }
}
2. 服务器端接收消息和群发消息
- 服务器端接收到客户端发来的所有socket,并转发给所有客户端,需要使用多线程,一边接收,一边群发消息
- 输入输出流的封装!!!
Server.java
import java.io.*;
import java.net.ServerSocket;
import java.net.Socket;
import java.util.ArrayList;
import java.util.List;

/**
 * @Description TODO
 * @Author Alex
 * @Date 2022-03-24 21:22
 */
public class Server {

    //存放所有连接上服务器的客户端
    private List<Socket> clientSockets = new ArrayList<Socket>();

    public Server(){
        //1. 创建服务器socket
        try {
            ServerSocket serverSocket = new ServerSocket(9999);
            while (true){
                //2.接收客户端的socket
                Socket socket = serverSocket.accept();
                //3.存入集合中
                this.clientSockets.add(socket);

                //4.开一个线程处理客户端发来的消息
                ReceiveThread thread = new ReceiveThread(socket);
                thread.start();
            }

        } catch (IOException e) {
            e.printStackTrace();
        }
    }

    //创建一个线程 接收客户端的socket
    class ReceiveThread extends Thread{

        private Socket currentSocket;

        public ReceiveThread(Socket socket){
            this.currentSocket = socket;
        }

        @Override
        public void run() {

            try {
                //获得当前客户端中拿到的消息
                InputStream is = this.currentSocket.getInputStream();
                //群发给所有的线程对象
                //获得输入流 封装成缓冲流
                BufferedReader bufferedReader = new BufferedReader(new InputStreamReader(is));

                String msg = null;
                while ((msg = bufferedReader.readLine()) != null){
                    //群发给所有的客户端
                    for (Socket socket:clientSockets){
                        PrintWriter pw = new PrintWriter(new OutputStreamWriter(socket.getOutputStream()));
                        pw.println(msg);
                        //发送到客户端
                        pw.flush();

                        //不要关闭输出流 如果关闭当前的socket输出流 意味着 socket关闭
                    }
                }
            } catch (IOException e) {
                e.printStackTrace();
            }

        }
    }
}
3. 客户端发送和接收消息
在客户端中开启一个接收线程接收来自服务器的消息,并监听发送按钮,向服务器端发送消息
class MyEvent implements ActionListener{

        @Override
        public void actionPerformed(ActionEvent e) {
            //1.获得文本框的消息内容
            String msg = msgText.getText();
            //格式化日期
            SimpleDateFormat simpleDateFormat = new SimpleDateFormat("yyyy-MM-dd");
            String time = simpleDateFormat.format(new Date());
            msg = time + uname +"说:"+msg;
            //2.发送到服务器端
            try {
                PrintWriter pw = new PrintWriter(new OutputStreamWriter(socket.getOutputStream()));

                pw.println(msg);
                pw.flush();
                //不能关socket中的输出流
            } catch (IOException ex) {
                ex.printStackTrace();
            }
        }
    }

    //创建接收服务器端返回的消息的线程
    class ReceiveThread extends Thread{
        @Override
        public void run() {
            BufferedReader bufferedReader;
            try {
                //从服务器端读消息
                bufferedReader = new BufferedReader(new InputStreamReader(socket.getInputStream()));
                String msg = null;
                while ((msg = bufferedReader.readLine()) != null){
                    msgList.append(msg+"\n");
                }
            } catch (IOException e) {
                e.printStackTrace();
            }
        }
    }
开启接收线程和给发送按钮绑定监听事件:
		//开启一个线程 接收服务器端发回的消息
        ReceiveThread receiveThread = new ReceiveThread();
        receiveThread.start();

        //对发送按钮绑定监听器
        this.sendButton.addActionListener(new MyEvent());
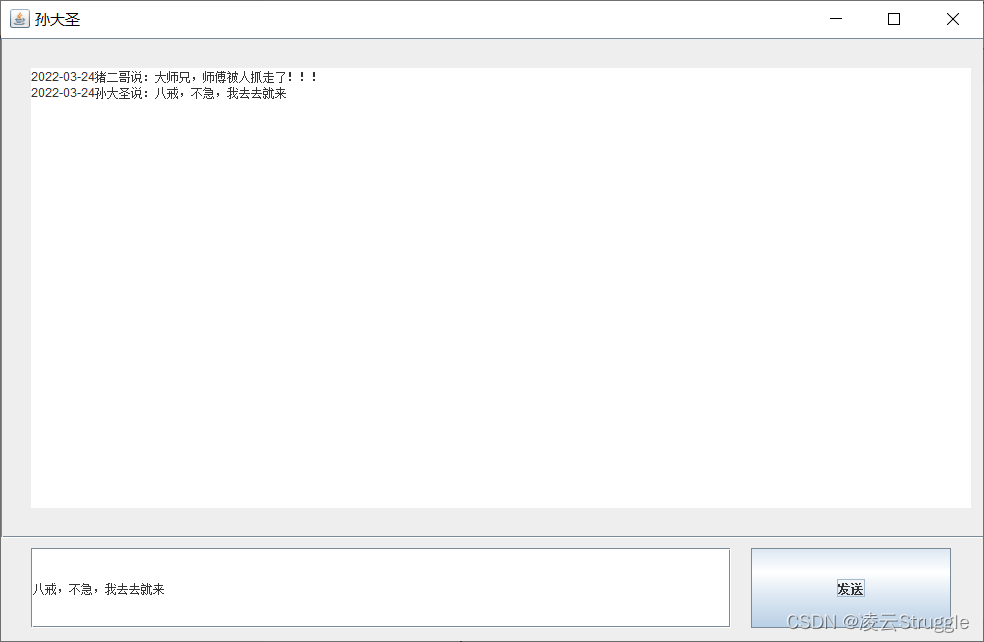
4. 运行效果演示:
tips:
IDEA中开启多窗口运行同一个程序:点击Edit Configurations,勾选Allow Parallel Run,并Apply即可


5. 项目改进
?