VS2017开发Python C++扩展库并调试
1. Prerequisites
-
VS2017或更高版本
-
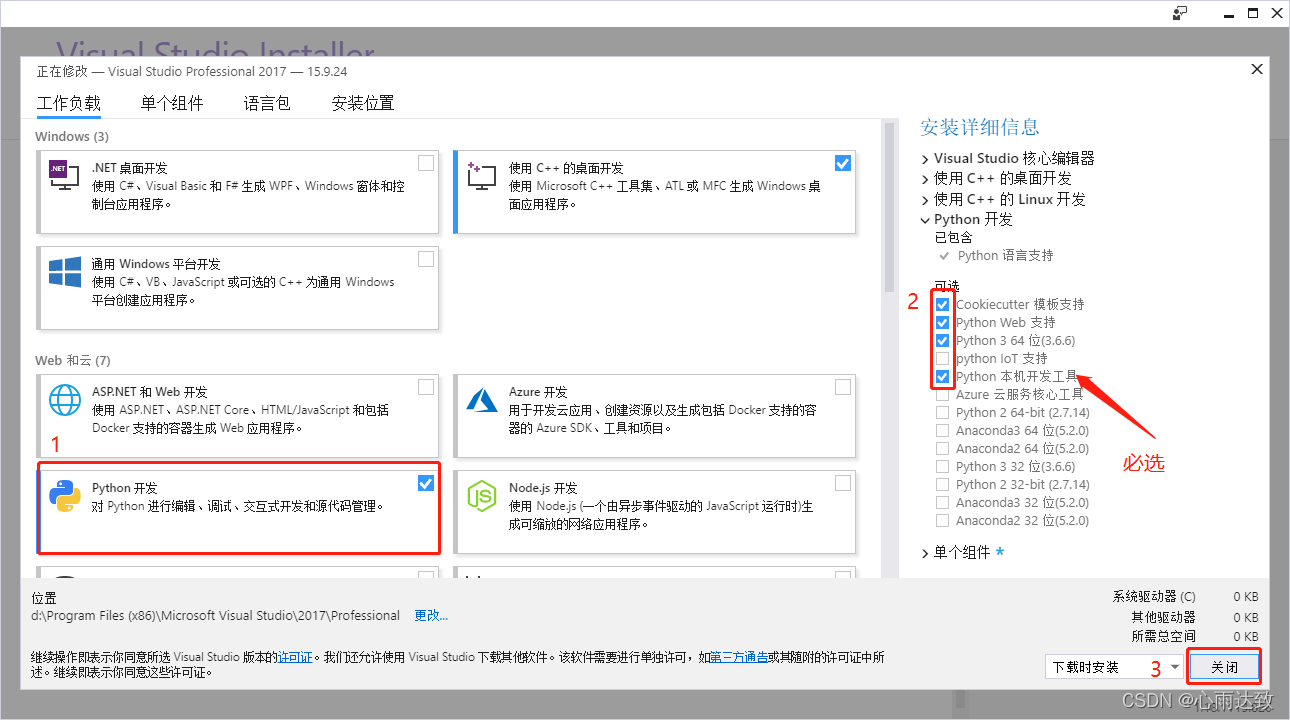
安装好Python开发环境依赖
- 打开Visual Studio install > 修改 > 选择Python开发,按图进行配置。

-
配置环境变量:此电脑 > 属性 > 高级系统设置 > 环境变量
- 选择用户环境变量中的Path进行编辑,将上一步安装好的Python环境添加到用户环境变量的Path中。

-
选择新建,创建PYTHONHOME环境变量。

2. 创建Python工程
-
文件 > 新建 > 项目 > 已安装 > 其他语言 > Python > Python应用程序,设置好名称后选择确定,完成Python工程创建。

-
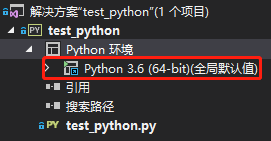
检查解决方案窗口中Python工程的Python环境是否为之前通过Visual Studio Installer安装的版本,如果不是,则右键选择Python环境 > 查看所有Python环境 > 选择合适的Python环境,然后点击将此作为新项目的默认环境。

-
在Python脚本下添加以下代码。
from itertools import islice from random import random from time import perf_counter COUNT = 500000 # Change this value depending on the speed of your computer DATA = list(islice(iter(lambda: (random() - 0.5) * 3.0, None), COUNT)) e = 2.7182818284590452353602874713527 def sinh(x): return (1 - (e ** (-2 * x))) / (2 * (e ** -x)) def cosh(x): return (1 + (e ** (-2 * x))) / (2 * (e ** -x)) def tanh(x): tanh_x = sinh(x) / cosh(x) return tanh_x def test(fn, name): start = perf_counter() result = fn(DATA) duration = perf_counter() - start print('{} took {:.3f} seconds\n\n'.format(name, duration)) for d in result: assert -1 <= d <= 1, " incorrect values" if __name__ == "__main__": print('Running benchmarks with COUNT = {}'.format(COUNT)) test(lambda d: [tanh(x) for x in d], '[tanh(x) for x in d] (Python implementation)') -
选择调试 > 开始执行(不调试),运行Python脚本,正常情况下会输出如下结果。

3. 创建Python扩展库C++工程(CPython)
-
右键解决方案 > 添加 > 新建项目 > 已安装 > Visual C++ > Python > Python扩展模块,设置好名称后选择确定,完成Python工程创建。

-
右键C++工程(本文为superfastcode) > 属性,按照下表进行属性配置
项目 属性 值 配置 - 所有配置 平添 - x64 常规 目标文件名 $(ProjectName) C/C++ > 预处理器 预处理器定义 添加Py_LIMITED_API,只有使用CPython才添加,使用PyBind11时,应去掉此选项。 -
在superfastcode.c中添加如下代码
#include <Python.h> #include <Windows.h> #include <math.h> const double e = 2.7182818284590452353602874713527; double sinh_impl(double x) { return (1 - pow(e, (-2 * x))) / (2 * pow(e, -x)); } double cosh_impl(double x) { return (1 + pow(e, (-2 * x))) / (2 * pow(e, -x)); } /** * @brief 计算双曲正切值 */ // tanh_impl(x)说明文档 PyDoc_STRVAR(superfastcode_tanh_impl_doc, "tanh_impl(x) tanh function"); // tanh_impl(x)方法实现 PyObject* tanh_impl(PyObject *self, PyObject* args) { double x = PyFloat_AsDouble(args); double tanh_x = sinh_impl(x) / cosh_impl(x); return PyFloat_FromDouble(tanh_x); } /** * List of functions to add to superfastcode in exec_superfastcode(). */ static PyMethodDef superfastcode_functions[] = { { "fast_tanh", (PyCFunction)tanh_impl, METH_O, superfastcode_tanh_impl_doc}, { NULL, NULL, 0, NULL } /* marks end of array */ }; /* * Initialize superfastcode. May be called multiple times, so avoid * using static state. */ int exec_superfastcode(PyObject *module) { PyModule_AddFunctions(module, superfastcode_functions); PyModule_AddStringConstant(module, "__author__", "AILEE"); PyModule_AddStringConstant(module, "__version__", "1.0.0"); PyModule_AddIntConstant(module, "year", 2020); return 0; /* success */ } /* * Documentation for superfastcode. */ PyDoc_STRVAR(superfastcode_doc, "The superfastcode module"); static PyModuleDef_Slot superfastcode_slots[] = { { Py_mod_exec, exec_superfastcode }, { 0, NULL } }; /** * @brief 模块定义 */ static PyModuleDef superfastcode_def = { PyModuleDef_HEAD_INIT, "superfastcode", /* 模块名 */ superfastcode_doc, /* 模块说明 通过help */ 0, /* m_size: 模块空间,子解释器用,-1为不使用*/ NULL, /* m_methods */ superfastcode_slots, NULL, /* m_traverse */ NULL, /* m_clear */ NULL, /* m_free */ }; /** * @brief 扩展库入口函数,PyInit_+模块名,固定格式。 */ PyMODINIT_FUNC PyInit_superfastcode() { // 模块创建函数 // 当使用该方式创建模块时,应使用PyModuleDef_Slot,并将m_size设置为非负值, // 启用子解释器。 否则报错。 // Traceback (most recent call last): // File "E:\Code-of-C++\Python_Ext\test_python\test_python\test_python.py", line 5, in <module> // from superfastcode import fast_tanh // SystemError: module superfastcode: m_size may not be negative for multi-phase initialization // return PyModuleDef_Init(&superfastcode_def); // 当使用该方式创建模块时,应将模块定义内容修改如下, // static PyModuleDef superfastcode_def = { // PyModuleDef_HEAD_INIT, // "superfastcode", // superfastcode_doc, // -1, /* m_size 模块空间,子解释器用,-1不使用 */ // superfastcode_functions, /* m_methods 模块函数*/ // NULL, /* m_slots */ // NULL, /* m_traverse */ // NULL, /* m_clear */ // NULL, /* m_free */ // }; // 否则报错: // Traceback (most recent call last): // File "E:\Code-of-C++\Python_Ext\test_python\test_python\test_python.py", line 5, in <module> // from superfastcode import fast_tanh // SystemError: module superfastcode: PyModule_Create is incompatible with m_slots // return PyModule_Create(&superfastcode_def); } -
配置成Release模式,选择生成 > 生成解决方案(快捷键:F7)
-
Python调用刚生成的模块,进行测试。
-
右键解决方案窗口中Python工程的引用 > 添加引用,勾选superfastcode。

-
在test_python.py脚本里添加如下程序,调用superfastcode包。
from superfastcode import fast_tanh test(lambda d: [fast_tanh(x) for x in d], '[fast_tanh(x) for x in d] (CPython C++ extension)') -
单击调试 > 开始执行(不调试),运行Python代码。出现如下结果即为成功。

-
4. 联合调试C++代码
-
在解决方案窗口中,右键Python工程(test_python) > 属性 > 调试,勾选启用本机代码调试,Ctrl+S保存。

-
配置为Debug模式,在C++代码中设置好断点,选择调试 > 开始调试,(快捷键:F5)如图所示。

5. 发布安装扩展包
-
在解决方案窗口中,右键C++工程(superfastcode) > 添加 > 新建项 > 已安装 > Visual C++ > 实用工具 > 文本文件,将名称修改为setup.py,选择添加完成。

-
在setup.py中添加如下代码。
from distutils.core import setup, Extension, DEBUG sfc_module = Extension('superfastcode', sources = ['superfastcode.c']) setup(name = 'superfastcode', version = '1.0', description = 'Python Package with superfastcode C++ extension', ext_modules = [sfc_module] ) -
打开PowerShell(cmd也可以,PowerShell操作更方便),切换到superfastcode目录,本文如下
PS E:\Code-of-C++\Python_Ext\test_python\superfastcode> ls 目录: E:\Code-of-C++\Python_Ext\test_python\superfastcode Mode LastWriteTime Length Name ---- ------------- ------ ---- d----- 2020/12/3 11:03 x64 -a---- 2020/12/3 17:10 278 setup.py -a---- 2020/12/3 16:25 1981 superfastcode.c -a---- 2020/12/3 15:42 13609 superfastcode.vcxproj -a---- 2020/12/3 15:20 963 superfastcode.vcxproj.filters -a---- 2020/12/3 10:44 165 superfastcode.vcxproj.user -
执行python.exe setup.py install命令,无报错即为成功,如下为结果。
PS E:\Code-of-C++\Python_Ext\test_python\superfastcode> python.exe .\setup.py install running install running build running build_ext building 'superfastcode' extension d:\Program Files (x86)\Microsoft Visual Studio\2017\Professional\VC\Tools\MSVC\14.16.27023\bin\HostX86\x64\cl.exe /c /nologo /Ox /W3 /GL /DNDEBUG /MD "-ID:\Program Files (x86)\Microsoft Visual Studio\Shared\Python36_64\include" "-ID:\Program Files (x86)\Microsoft Visual Studio\Shared\Python36_64\include" "-Id:\Program Files (x86)\Microsoft Visual Studio\2017\Professional\VC\Tools\MSVC\14.16.27023\ATLMFC\include" "-Id:\Program Files (x86)\Microsoft Visual Studio\2017\Professional\VC\Tools\MSVC\14.16.27023\include" "-IC:\Program Files (x86)\Windows Kits\NETFXSDK\4.6.1\include\um" "-IC:\Program Files (x86)\Windows Kits\10\include\10.0.17763.0\ucrt" "-IC:\Program Files (x86)\Windows Kits\10\include\10.0.17763.0\shared" "-IC:\Program Files (x86)\Windows Kits\10\include\10.0.17763.0\um" "-IC:\Program Files (x86)\Windows Kits\10\include\10.0.17763.0\winrt" "-IC:\Program Files (x86)\Windows Kits\10\include\10.0.17763.0\cppwinrt" /Tcsuperfastcode.c /Fobuild\temp.win-amd64-3.6\Release\superfastcode.obj superfastcode.c creating E:\Code-of-C++\Python_Ext\test_python\superfastcode\build\lib.win-amd64-3.6 d:\Program Files (x86)\Microsoft Visual Studio\2017\Professional\VC\Tools\MSVC\14.16.27023\bin\HostX86\x64\link.exe /nologo /INCREMENTAL:NO /LTCG /DLL /MANIFEST:EMBED,ID=2 /MANIFESTUAC:NO "/LIBPATH:D:\Program Files (x86)\Microsoft Visual Studio\Shared\Python36_64\libs" "/LIBPATH:D:\Program Files (x86)\Microsoft Visual Studio\Shared\Python36_64\PCbuild\amd64" "/LIBPATH:d:\Program Files (x86)\Microsoft Visual Studio\2017\Professional\VC\Tools\MSVC\14.16.27023\ATLMFC\lib\x64" "/LIBPATH:d:\Program Files (x86)\Microsoft Visual Studio\2017\Professional\VC\Tools\MSVC\14.16.27023\lib\x64" "/LIBPATH:C:\Program Files (x86)\Windows Kits\NETFXSDK\4.6.1\lib\um\x64" "/LIBPATH:C:\Program Files (x86)\Windows Kits\10\lib\10.0.17763.0\ucrt\x64" "/LIBPATH:C:\Program Files (x86)\Windows Kits\10\lib\10.0.17763.0\um\x64" /EXPORT:PyInit_superfastcode build\temp.win-amd64-3.6\Release\superfastcode.obj /OUT:build\lib.win-amd64-3.6\superfastcode.cp36-win_amd64.pyd /IMPLIB:build\temp.win-amd64-3.6\Release\superfastcode.cp36-win_amd64.lib 正在创建库 build\temp.win-amd64-3.6\Release\superfastcode.cp36-win_amd64.lib 和对象 build\temp.win-amd64-3.6\Release\superfastcode.cp36-win_amd64.exp 正在生成代码 已完成代码的生成 running install_lib copying build\lib.win-amd64-3.6\superfastcode.cp36-win_amd64.pyd -> D:\Program Files (x86)\Microsoft Visual Studio\Shared\Python36_64\Lib\site-packages running install_egg_info Removing D:\Program Files (x86)\Microsoft Visual Studio\Shared\Python36_64\Lib\site-packages\superfastcode-1.0-py3.6.egg-info Writing D:\Program Files (x86)\Microsoft Visual Studio\Shared\Python36_64\Lib\site-packages\superfastcode-1.0-py3.6.egg-info -
验证安装。输入python.exe,运行python环境,输入如下代码:
import superfastcode
superfastcode.fast_tanh(0.5)
exit()
得到如下结果,即为成功。
PS E:\Code-of-C++\Python_Ext\test_python\superfastcode> python.exe
Python 3.6.6 (v3.6.6:4cf1f54eb7, Jun 27 2018, 03:37:03) [MSC v.1900 64 bit (AMD64)] on win32
Type "help", "copyright", "credits" or "license" for more information.
>>> import superfastcode
>>> superfastcode.fast_tanh(0.5)
0.4621171572600098
>>> exit()
6. PyBind11
参考微软官方文档
参考文献
- 微软官方文档Create a C++ extension for Python
- python-sample-vs-cpp-extension
- 扩展Python模块系列(二)----一个简单的例子
- 扩展Python模块系列(三)----参数解析与结果封装
- https://www.rddoc.com/doc/Python/3.6.0/zh/c-api/module/#c.PyModuleDef
- Error:存在正文时不允许未命名的原型参数:定义函数时,参数名为空,加上参数名即可解决
- error C2061: 语法错误: 标识符“noexcept”:后缀名和头文件不匹配导致