今天在写业务的时候,需要通过feign调用远程接口,平常只是调用就行了,没有了解到他是如何代码实现的,今天就使用debug来解开feign为什么可以远程调用的面纱。
希望看本文章的同学朋友们,可以自己写一个简单的远程调用方法跟着我一起走一遍debug,自己走一遍debug比过硬看文章十遍。
首先,我们在需要调用远程接口的地方,打上断点。

ReflectiveFeign.java
然后我们使用IDEA的step Into进入方法内部(不是hasStock方法)
首先我们会进入这个类里边ReflectiveFeign.java并且,我们发现它继承抽象类feign
并且我们进入的invoke方法是在一个名为FeignInvocationHandler的静态内部类内,这个类实现接口InvocationHandler

此时我们把目光放在invoke方法上边
public Object invoke(Object proxy, Method method, Object[] args) throws Throwable {
      if ("equals".equals(method.getName())) {
        try {
          Object otherHandler =
              args.length > 0 && args[0] != null ? Proxy.getInvocationHandler(args[0]) : null;
          return equals(otherHandler);
        } catch (IllegalArgumentException e) {
          return false;
        }
      } else if ("hashCode".equals(method.getName())) {
        return hashCode();
      } else if ("toString".equals(method.getName())) {
        return toString();
      }

      return dispatch.get(method).invoke(args);
    }
他会判断我们是否调用的是equals、hashCode还是toString方法,如果是的话,会进行不同的逻辑处理,以上代码都有,我相信看本文章的朋友们都会很轻松的看出他所做的逻辑处理,我就在此不做赘述。
接下来的dispatch.get(method).invoke(args)才是我们今天的重头戏,那我们直接进入invoke方法,看看他里边都做了什么事情吧~
SynchronousMethodHandler
我们会进入到SynchronousMethodHandler.java里,它实现MethodHandler本文不多关注这些内容,重要的是我们进入到的invoke方法
public Object invoke(Object[] argv) throws Throwable {
    RequestTemplate template = buildTemplateFromArgs.create(argv);
    Retryer retryer = this.retryer.clone();
    while (true) {
      try {
        return executeAndDecode(template);
      } catch (RetryableException e) {
        try {
          retryer.continueOrPropagate(e);
        } catch (RetryableException th) {
          Throwable cause = th.getCause();
          if (propagationPolicy == UNWRAP && cause != null) {
            throw cause;
          } else {
            throw th;
          }
        }
        if (logLevel != Logger.Level.NONE) {
          logger.logRetry(metadata.configKey(), logLevel);
        }
        continue;
      }
    }
  }
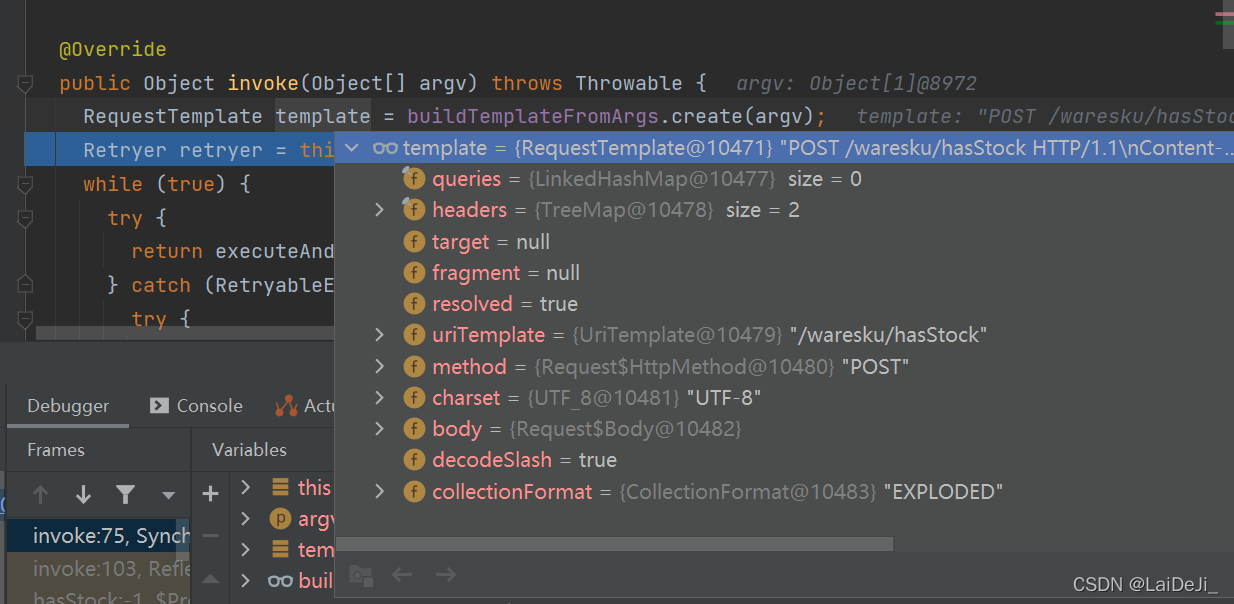
通过下图我们可以看到RequestTemplate template = buildTemplateFromArgs.create(argv);
其中uriTemplate中就有此次我们调用接口的路径,method中是我们的请求方式

我们再看第二行的Retryer retryer = this.retryer.clone();我们就可以知道,这里会clone出一个重试器,用于执行接下来是否需要重试的操作
接下来的executeAndDecode(template)便是我们执行feign操作的方法
Object executeAndDecode(RequestTemplate template) throws Throwable {
    Request request = targetRequest(template);

    if (logLevel != Logger.Level.NONE) {
      logger.logRequest(metadata.configKey(), logLevel, request);
    }

    Response response;
    long start = System.nanoTime();
    try {
      response = client.execute(request, options);
    } catch (IOException e) {
      if (logLevel != Logger.Level.NONE) {
        logger.logIOException(metadata.configKey(), logLevel, e, elapsedTime(start));
      }
      throw errorExecuting(request, e);
    }
    long elapsedTime = TimeUnit.NANOSECONDS.toMillis(System.nanoTime() - start);

    boolean shouldClose = true;
    try {
      if (logLevel != Logger.Level.NONE) {
        response =
            logger.logAndRebufferResponse(metadata.configKey(), logLevel, response, elapsedTime);
      }
      if (Response.class == metadata.returnType()) {
        if (response.body() == null) {
          return response;
        }
        if (response.body().length() == null ||
            response.body().length() > MAX_RESPONSE_BUFFER_SIZE) {
          shouldClose = false;
          return response;
        }
        // Ensure the response body is disconnected
        byte[] bodyData = Util.toByteArray(response.body().asInputStream());
        return response.toBuilder().body(bodyData).build();
      }
      if (response.status() >= 200 && response.status() < 300) {
        if (void.class == metadata.returnType()) {
          return null;
        } else {
          Object result = decode(response);
          shouldClose = closeAfterDecode;
          return result;
        }
      } else if (decode404 && response.status() == 404 && void.class != metadata.returnType()) {
        Object result = decode(response);
        shouldClose = closeAfterDecode;
        return result;
      } else {
        throw errorDecoder.decode(metadata.configKey(), response);
      }
    } catch (IOException e) {
      if (logLevel != Logger.Level.NONE) {
        logger.logIOException(metadata.configKey(), logLevel, e, elapsedTime);
      }
      throw errorReading(request, response, e);
    } finally {
      if (shouldClose) {
        ensureClosed(response.body());
      }
    }
  }
这里我们看到,请求方法和url都已经在request变量中

我们直接来到try代码块中的response = client.execute(request, options);方法,看看是如何执行
	public Response execute(Request request, Request.Options options) throws IOException {
		try {
			URI asUri = URI.create(request.url());
			String clientName = asUri.getHost();
			URI uriWithoutHost = cleanUrl(request.url(), clientName);
			FeignLoadBalancer.RibbonRequest ribbonRequest = new FeignLoadBalancer.RibbonRequest(
					this.delegate, request, uriWithoutHost);

			IClientConfig requestConfig = getClientConfig(options, clientName);
			return lbClient(clientName)
					.executeWithLoadBalancer(ribbonRequest, requestConfig).toResponse();
		}
		catch (ClientException e) {
			IOException io = findIOException(e);
			if (io != null) {
				throw io;
			}
			throw new RuntimeException(e);
		}
	}
来到这里,我们终于可以看到!原来我们底层代码是在这里使用ribbon的负载均衡进行执行并获取响应数据并在·executeAndDecode`进行后续的逻辑判断解码之类的逻辑操作。
至此,我们就知道了feign的调用在底层代码中大概是如何实现的,写完这篇文章,我也不再是一个只会api调用feign的码农,真正理解了它底层的实现方法,不会再觉得对于feign的空洞的理解。基于api方面的理解。
对了,还记得上边我们说到的重试器吗?我们再回到上面到吗
while (true) {
      try {
        return executeAndDecode(template);
      } catch (RetryableException e) {
        try {
          retryer.continueOrPropagate(e);
        } catch (RetryableException th) {
          Throwable cause = th.getCause();
          if (propagationPolicy == UNWRAP && cause != null) {
            throw cause;
          } else {
            throw th;
          }
        }
        if (logLevel != Logger.Level.NONE) {
          logger.logRetry(metadata.configKey(), logLevel);
        }
        continue;
      }
    }
感觉我们学习框架的底层代码实现真的可以学到好多东西,我以前没想到可以这样做重试机制(是我太菜了)
分析: 首先,如果return executeAndDecode(template);方法,抛出RetryableException的话,会被捕获到,并执行下边的代码。其中retryer.continueOrPropagate(e);便是重试器进行多次重试操作,其实内部实现特别简单
public void continueOrPropagate(RetryableException e) {
	  // maxAttempts为5
      if (attempt++ >= maxAttempts) {
        throw e;
      }
进入这个方法attempt便会自增1并判断是否超过最大重试次数,如果没有超过,方法则执行完毕,如果超过,就直接抛出参数传递进来的异常。只要没超过最大重试次数5便会一直进行continue在while循环中一直重试执行executeAndDecode(template)。而当次数超过五时,便会抛出异常,跳出while循环,结束方法并报错。
本文完