参考文章:
https://blog.csdn.net/weixin_45783947/article/details/105580604
https://www.runoob.com/git/git-install-setup.html
https://www.runoob.com/w3cnote/git-guide.html
概述

Git 是一个开源的分布式版本控制系统,用于敏捷高效地处理任何或小或大的项目。
git原理简介
https://www.runoob.com/git/git-workspace-index-repo.html
仓库:本地仓库和远程仓库(托管在网络端的仓库)
工作区:就是你在电脑里能看到的目录。
暂存区:英文叫 stage 或 index。一般存放在 .git 目录下的 index 文件(.git/index)中,所以我们把暂存区有时也叫作索引(index)。
版本库:工作区有一个隐藏目录 .git,这个不算工作区,而是 Git 的版本库。
本地仓库:工作区、版本区(其中版本区包含暂存区丶仓库区
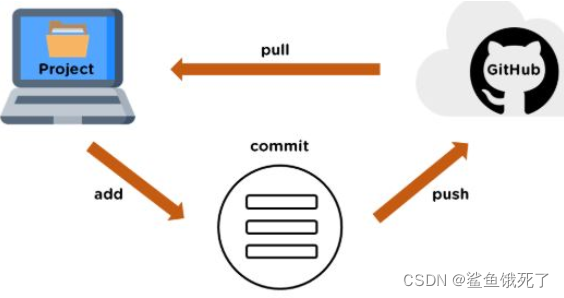
从本地仓库将文件git到远程仓库流程:工作区----> 暂存区 ----> 仓库区 ----> 远程仓库

 `
`
图中左侧为工作区,右侧为版本库。在版本库中标记为 "index" 的区域是暂存区(stage/index),标记为 "master" 的是 master 分支所代表的目录树。

图中我们可以看出此时 "HEAD" 实际是指向 master 分支的一个"游标"。所以图示的命令中出现 HEAD 的地方可以用 master 来替换。

图中的 objects 标识的区域为 Git 的对象库,实际位于 ".git/objects" 目录下,里面包含了创建的各种对象及内容。

当对工作区修改(或新增)的文件执行 git add 命令时,暂存区的目录树被更新,同时工作区修改(或新增)的文件内容被写入到对象库中的一个新的对象中,而该对象的ID被记录在暂存区的文件索引中。

当执行提交操作(git commit)时,暂存区的目录树写到版本库(对象库)中,master 分支会做相应的更新。即 master 指向的目录树就是提交时暂存区的目录树。

当执行 git reset HEAD 命令时,暂存区的目录树会被重写,被 master 分支指向的目录树所替换,但是工作区不受影响。

当执行 git rm --cached <file> 命令时,会直接从暂存区删除文件,工作区则不做出改变。

当执行 git checkout . 或者 git checkout -- <file> 命令时,会用暂存区全部或指定的文件替换工作区的文件。这个操作很危险,会清除工作区中未添加到暂存区中的改动。

当执行 git checkout HEAD . 或者 git checkout HEAD <file> 命令时,会用 HEAD 指向的 master 分支中的全部或者部分文件替换暂存区和以及工作区中的文件。这个命令也是极具危险性的,因为不但会清除工作区中未提交的改动,也会清除暂存区中未提交的改动。 `
目前我们使用到的 Git 命令都是在本地执行,如果想通过 Git 分享代码或者与其他开发人员合作。 就需要将数据放到一台其他开发人员能够连接的服务器上。我使用了 Github 作为远程仓库。
安装–配置
下载git:https://git-scm.com/download/win

官网慢,可以用国内的镜像:https://npm.taobao.org/mirrors/git-for-windows/
安装
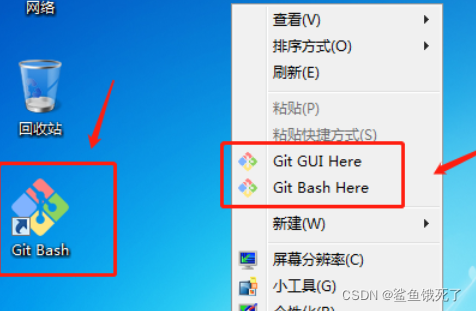
安装完成后,在桌面会有Git Bash快捷方式,以及桌面空白处右击出现Git命令
配置
桌面打开Git Bash快捷方式,或者是桌面右击选择Git Bash Here
Git 提供了一个叫做 git config 的工具,专门用来配置或读取相应的工作环境变量。
1> 配置用户名:git config --global user.name “username“(GitHub上注册的用户名)
2> 配置用户邮箱:git config --global user.email ”xx@163.com"(GitHub上注册时的邮箱)
本地 Git 仓库和 GitHub 仓库之间的传输是通过SSH加密的,所以我们需要配置验证信息:
3>(创建SSH Key)在Git终端在输入ssh-keygen -t rsa -C “xx@163.com” ( GitHub上注册时的邮箱 )
命令执行过程中,会跳出一句话,让你输入保存key的文件,这里使用默认地址的默认文件即可,即什么都不输入直接按回车;
然后让你输入密码,如果你不需要密码,什么都不输入直接按回车;
确认输入密码,因为上一步并没有设置密码,所以这一步也是直接按回车;
SSH Key创建完成后,可在用户主目录里找到.ssh目录,里面有id_rsa和id_rsa.pub两个文件,这两个就是SSH Key的秘钥对,id_rsa是私钥,不能泄露,id_rsa.pub是公钥,可以放心地告诉任何人

检查已有的配置信息,可以使用 git config --list 命令

登录github,点“New SSH Key”,填上任意Title如gti-win10,粘贴id_rsa.pub文件的内容
 为了验证是否成功,输入以下命令。

说明已成功连上 Github。
使用
目标1:将GitHub上的项目,克隆到本地一份
1、在github新建仓库

2、复制地址

在本地win10合适的地方,新建文件夹,我这里是Github_test文件夹
将GitHub上的仓库克隆到该文件夹目录下
$ git clone https://github.com/username/test.git

克隆成功:嘻嘻~

进入该仓库就会显示(master分支)(为啥我显示main?

目标2:将本地文件git到GitHub远程仓库
要添加一个新的远程仓库,可以指定一个简单的名字,以便将来引用,命令格式如下:
git remote add [shortname] [url]
在GitHub_test目录下创建test2文件夹,
该文件夹下创建一个test.txt文件,
在test.txt文件内容中输入 hello from the outside(用于测试)
$ git init 初始化版本库
$ git remote add origin 你的GitHub仓库的HTTPS地址或者是SSH地址,
此时在test2目录下会有远程仓库上的README.md文件
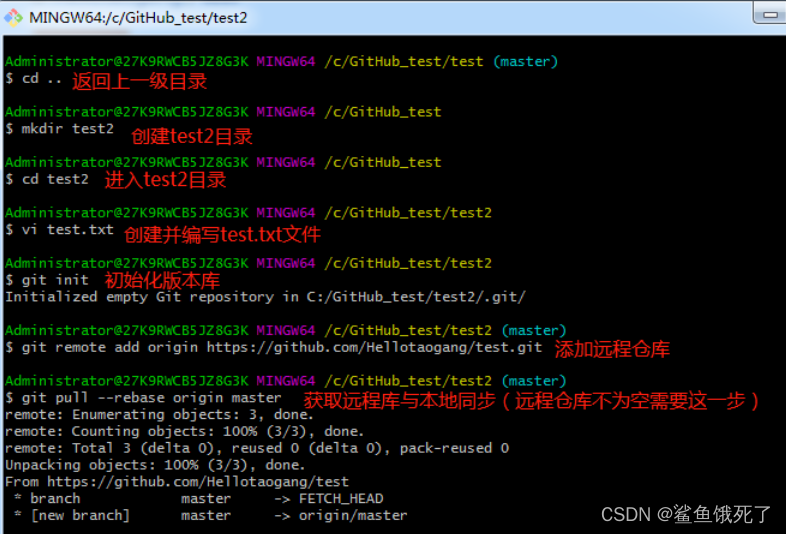
init后,会有个.git目录,,该目录包含了资源的所有元数据

查看当前远程仓库:执行时加上 -v 参数,你还可以看到每个别名的实际链接地址。
$ git remote
origin
$ git remote -v
origin  https://github.com/sxxo/testx.git (fetch)
origin  https://github.com/sxxo/testx.git (push)
不知道什么时候我的变成master了

但是我的出错了

不管它(大概是因为什么原因呢?因为我的远程上没有新的文件?
将创建好的test.txt文件提交到远程仓库GitHub上


当执行git push origin master会出现登录验证(只有第一次会出现此验证),
输入GitHub账号和密码点击登录即可,然后出现提交成功
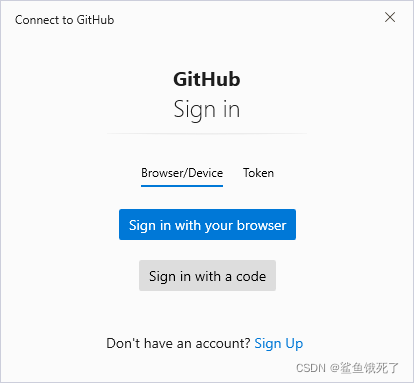
我点击了sign in with a code,然后就没了,慌
想了个办法,我又新建了个文件test3.txt
vi test3.txt
git add test3.txt
git commit -m “第二次提交”
git push origin master
然后登录框就再次出现了,选择sign in with your browser,浏览器打开后,授权就好了,没登录过程(可能是因为我之前在浏览器登录了github)


刚提交,github这边以及显示变化了

我怎么有两条线,刚才提交的txt都在master线上,main没有
为了验证我的猜想:

github在线创建新文件pulltest
 执行 git pull --rebase origin master

果然执行成功,嘻嘻~
本地也出现了pulltest文件

HEAD指向的版本就是当前版本(HEAD指向当前的分支)
返回过去,用git log可以查看提交历史,以便确定要回退到哪个版本。
要重返未来,用git reflog查看命令历史,以便确定要回到未来的哪个版本。

git命令
git基本操作:https://www.runoob.com/git/git-basic-operations.html
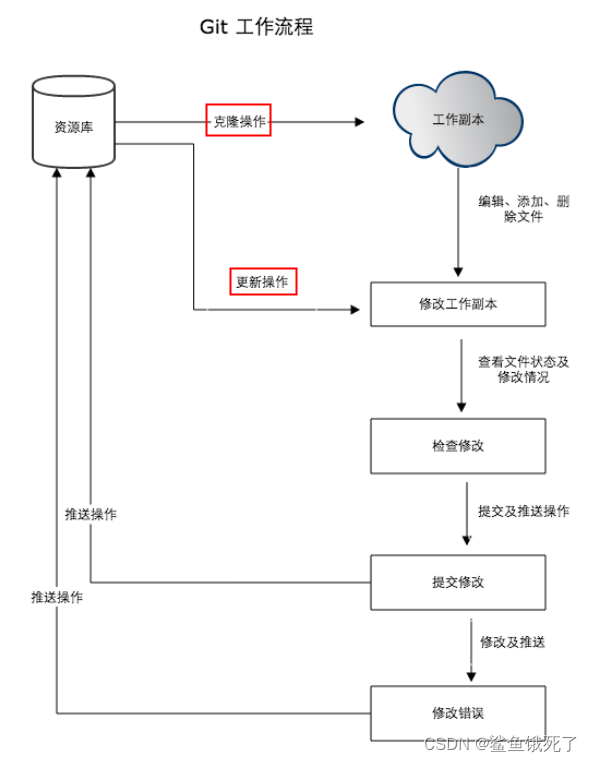
创建仓库
1、如果要使用当前目录作为 Git 仓库,只需使用 git init 命令,使其初始化为一个 Git 仓库。
2、git clone
语法: git clone <repo> <directory>
参数说明:
repo:Git 仓库。
directory:本地目录。
如果当前目录下有几个文件想要纳入版本控制,需要先用 git add 命令告诉 Git 开始对这些文件进行跟踪,然后commit提交,参数 -m 进行备注:
将目录下以 .c 结尾及 README 文件提交到仓库中。
$ git add *.c
$ git add README
$ git commit -m '初始化项目版本'


用 --reverse 参数来逆向显示所有日志

 删除远程仓库你可以使用命令:
git remote rm [别名]
git 标签
如果你达到一个重要的阶段,并希望永远记住那个特别的提交快照,你可以使用 git tag 给它打上标签。
用 git tag -a v1.0 命令给最新一次提交打上(HEAD)"v1.0"的标签。
-a 选项意为"创建一个带注解的标签"。 不用 -a 选项也可以执行的,但它不会记录这标签是啥时候打的,谁打的,也不会让你添加个标签的注解。
分支管理
几乎每一种版本控制系统都以某种形式支持分支。
使用分支意味着你可以从开发主线上分离开来,然后在不影响主线的同时继续工作。
当你执行 git init 的时候,默认情况下 Git 就会为你创建 master 分支。
查看分支:git branch
创建分支:git branch <name>
当你切换分支的时候,Git 会用该分支的最后提交的快照替换你的工作目录的内容, 所以多个分支不需要多个目录。
切换分支:git checkout <name>
创建+切换分支:git checkout -b <name>
合并并不仅仅是简单的文件添加、移除的操作,Git 也会合并修改。
合并冲突
合并某分支到当前分支:git merge <name>
删除分支:git branch -d <name>

使用分支将工作切分开来,从而让我们能够在不同开发环境中做事,并来回切换。
Git Gitee
https://www.runoob.com/git/git-gitee.html
国内访问 Github 速度比较慢,很影响我们的使用。
如果你希望体验到 Git 飞一般的速度,可以使用国内的 Git 托管服务
配置ssh
先删除已关联的名为 origin 的远程库:
git remote rm origin
然后,先关联 GitHub 的远程库:
git remote add github git@github.com:tianqixin/runoob-git-test.git
注意,远程库的名称叫 github,不叫 origin 了。
接着,再关联 Gitee 的远程库:
git remote add gitee git@gitee.com:imnoob/runoob-test.git
同样注意,远程库的名称叫 gitee,不叫 origin。
现在,我们用 git remote -v 查看远程库信息,可以看到两个远程库:
git remote -v
gitee    git@gitee.com:imnoob/runoob-test.git (fetch)
gitee    git@gitee.com:imnoob/runoob-test.git (push)
github    git@github.com:tianqixin/runoob.git (fetch)
github    git@github.com:tianqixin/runoob.git (push)
如果要推送到 GitHub,使用命令:
git push github master
如果要推送到 Gitee,使用命令:
git push gitee master
gitblit简介
Gitblit 是一个纯 Java 库用来管理、查看和处理 Git 资料库。相当于 Git 的 Java 管理工具。
下载:http://gitblit.github.io/gitblit/
gitblib 安装教程:https://blog.csdn.net/bcbobo21cn/article/details/105456846

git服务器搭建
https://www.runoob.com/git/git-server.html
以前,远程仓库使用了 Github,Github 公开的项目是免费的,2019 年开始 Github 私有存储库也可以无限制使用。
当然我们也可以自己搭建一台 Git 服务器作为私有仓库使用。