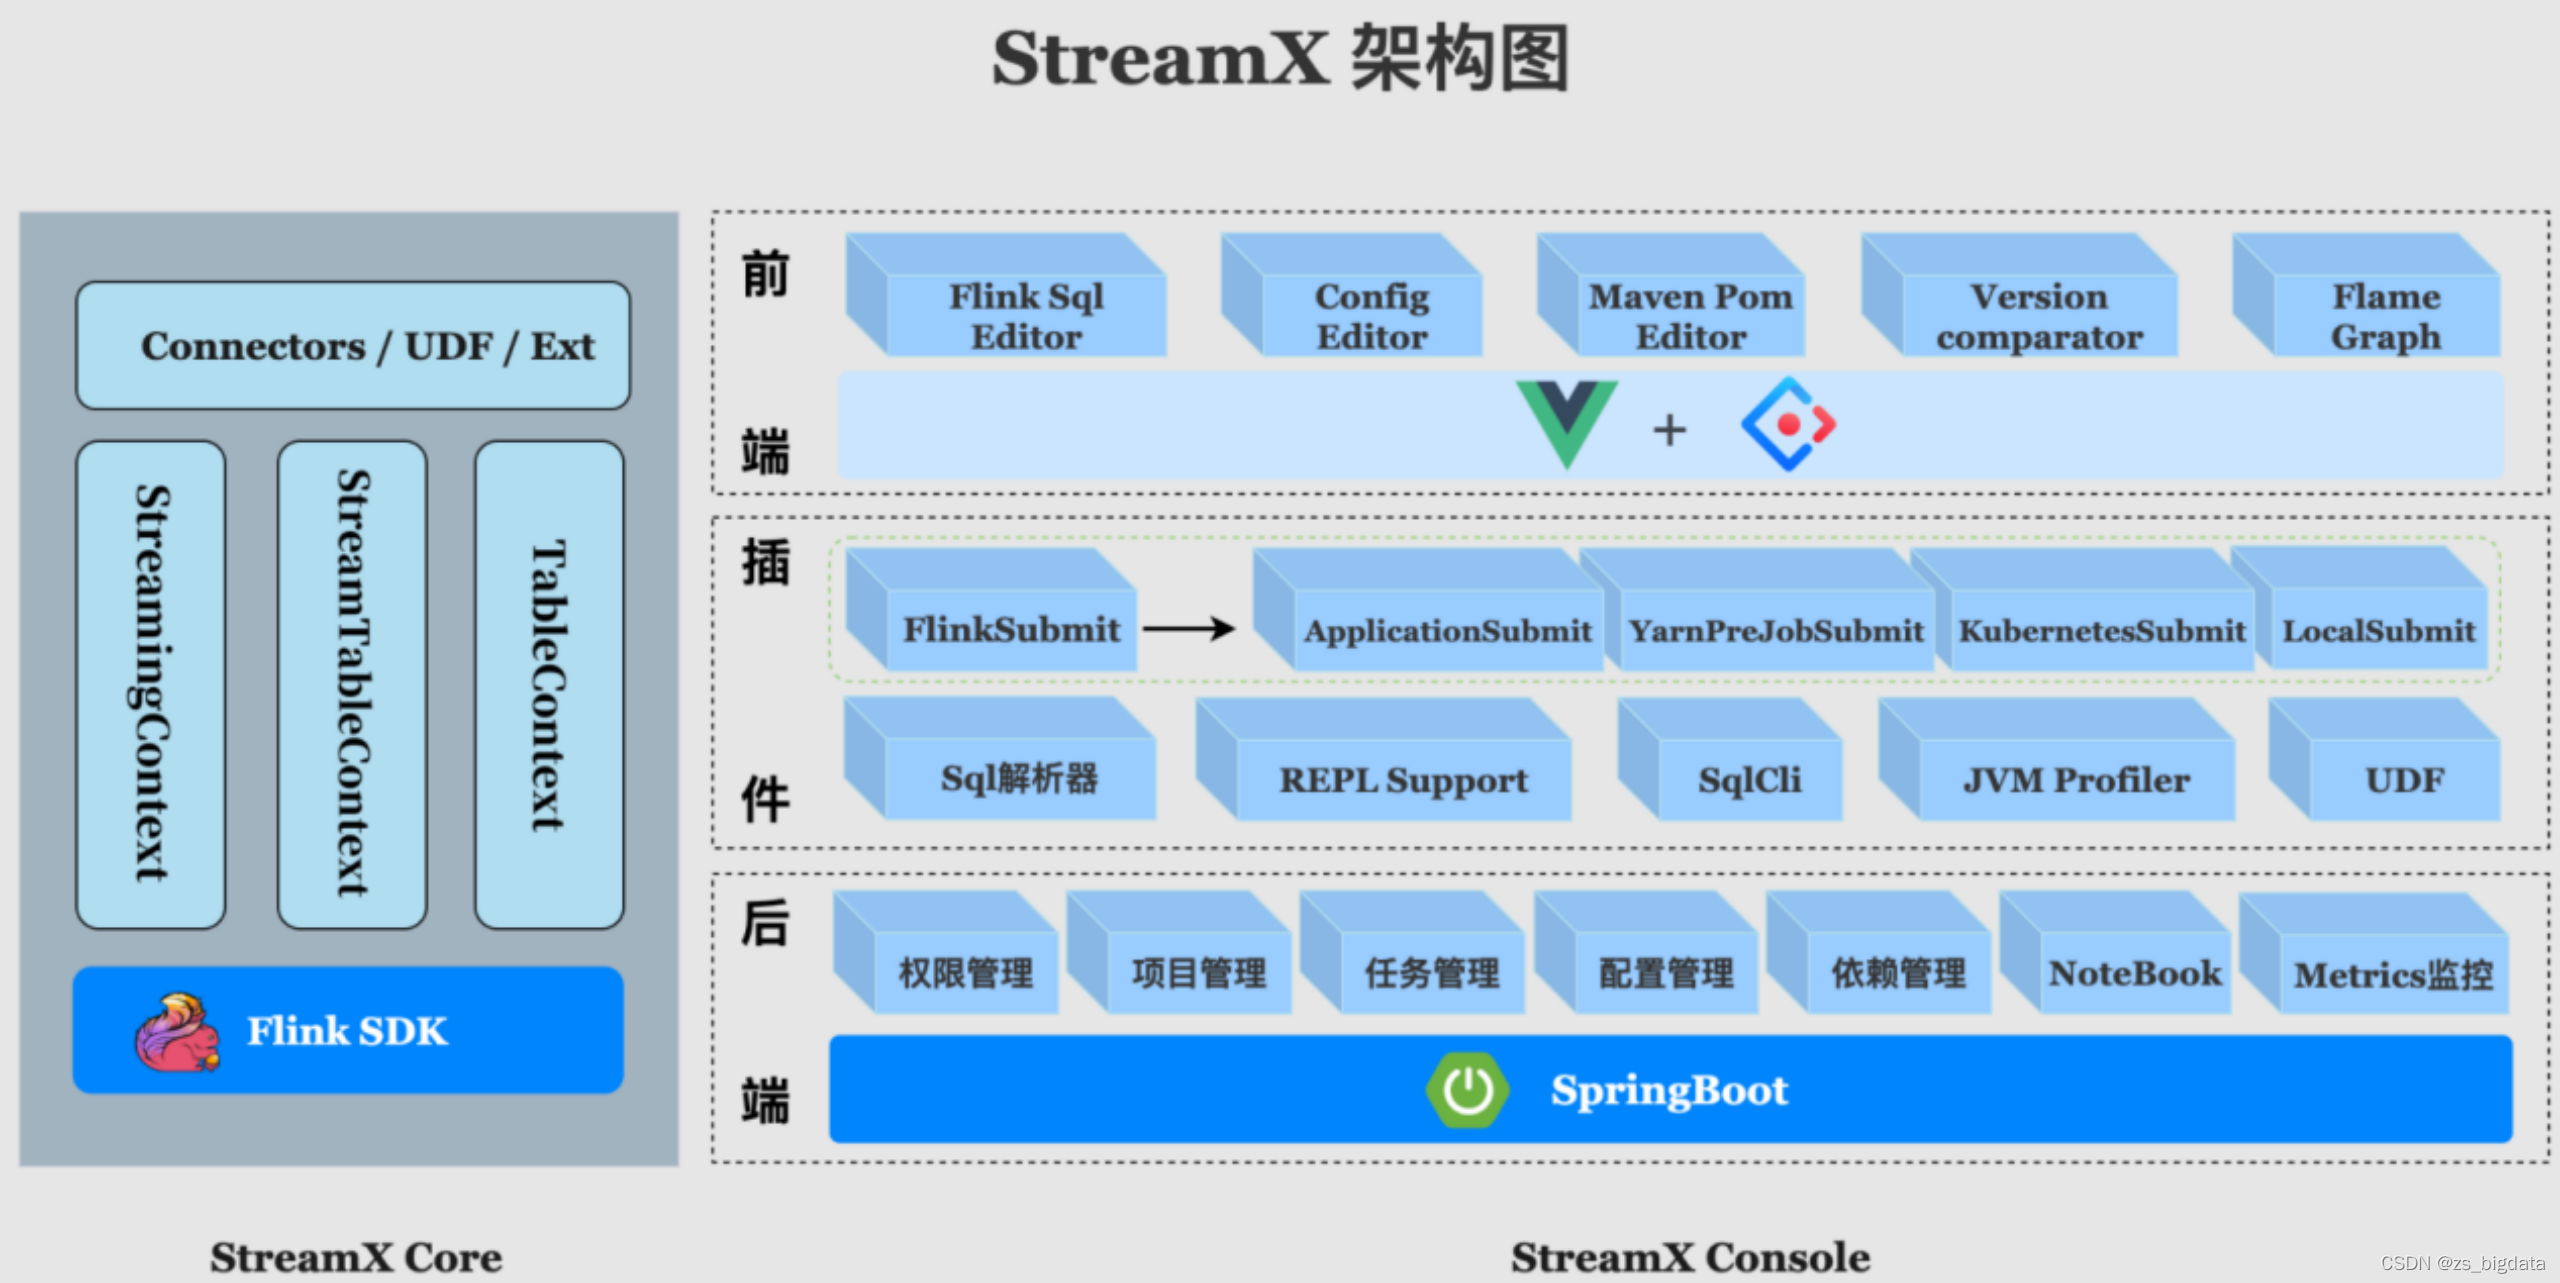
一. 介绍
StreamX, 项目的初衷是 —— 让 Flink 开发更简单, 使用StreamX开发,可以极大降低学习成本和开发门槛, 让开发者只用关心最核心的业务,StreamX 规范了项目的配置,鼓励函数式编程,定义了最佳的编程方式,提供了一系列开箱即用的Connectors,标准化了配置、开发、测试、部署、监控、运维的整个过程, 提供scala和java两套api, 其最终目的是打造一个一站式大数据平台,流批一体,湖仓一体的解决方案

二. 快速开始
2.1 构建StreamX(需要jdk和maven环境)
安装node,git,maven
curl -sL https://rpm.nodesource.com/setup_16.x | sudo bash -
sudo yum install -y nodejs
sudo yum git -y
sudo yum maven -y
2.1.1 第一种安装方法(建议第二种方法)
- 下载安装包:https://github.com/streamxhub/streamx/releases
- 上传streamx-release-1.2.2.zip,并解压
unzip streamx-release-1.2.0.zip -d /opt/module/
- 编译源码,1.2.2默认flink版本为1.4,如需更改修改pom.xml再进行编译,第二种方法同理。
mvn clean install -DskipTests -Denv=prod
2.1.2 第二种安装方法,我选择的
- 使用官网的1.2.1以后的混合打包
git clone https://github.com/streamxhub/streamx.git
cd streamx

# 注意哦,要把代码分支切换到发行版,否则可能有坑
git branch -a
git checkout remotes/origin/1.2.2-release

# 修改配置文件flink版本
vim pom.xml
<flink.version>1.14.4</flink.version>修改为你想要的版本

# 比较建议本地打包
mvn clean install -DskipTests -Pwebapp

# 打包文件目录
cd streamx-console/streamx-console-service/target/

# 打包的文件
streamx-console-service-${version}-bin.tar.gz

# 解压到对应目录
tar -zxvf streamx-console-service_2.11-1.2.3-bin.tar.gz -C /opt/frame/

# 1.2.1之后需要手动执行streamx库的建表动作,需要看装mysql
script/final.sql   #文件,自己到mysql执行下
2.2 修改配置文件
2.2.1 mysql
进入到对应目录,修改配置文件,需要使用mysql地址来存储数据。注意:数据库不会自动创建,需要手动创建
修改为你的mysql的url账号密码
注意,密码不要带特殊字符
vim conf/application.yml


datasource:
        # 数据源-1,名称为 primary
        primary:
          username: streamx
          password: streamx
          driver-class-name: com.mysql.cj.jdbc.Driver
          url: jdbc:mysql://localhost:3306/streamx?useUnicode=true&characterEncoding=UTF-8&useJDBCCompliantTimezoneShift=true&useLegacyDatetimeCode=false&serverTimezone=GMT%2B8

# StreamX Console Workspace
streamx:
  # HADOOP_USER_NAME
  hadoop-user-name: hdfs
  # 本地的工作空间,用于存放项目源码,构建的目录等.
  workspace:
    local: /opt/frame/streamx-console-service-1.2.2/streamx_workspace
    remote: hdfs:///streamx   # support hdfs:///streamx/ 、 /streamx 、hdfs://host:ip/streamx/
2.2.2 启动
# 如果启动失败,去 logs/streamx.out 查看日志
bin/startup.sh
三. 使用
3.1 登录系统
- 启动完毕后打开访问端口10000:http://你的服务器id:10000/
默认账号:admin 密码:streamx


3.2 系统配置
Flink_HOME

FLINK_CLUSTER
这个url是你的standalone模式的web ui的连接地址,到flink/conf/flink.ymal查看配置,默认是8081,由于我有两个版本,所以配置成8082

StreamX Env
StreamX Webapp address
这里配置 StreamX Console 的 web url 访问地址,主要火焰图功能会用到,具体任务会将收集到的信息通过此处暴露的 url 发送 http 请求到系统,进行收集展示

3.3 部署DataStreaming任务
- 添加项目

- 填写项目信息
url是你的gitlab的项目
账号密码是你gitlab的账号密码
完了点击提交

- 打包项目
点击这里,然后开始打包继续点击这里可以查看mvn的log,mvn报错就看看是不是java版本或者没有配置阿里云仓库的锅
<mirror>
	<id>alimaven</id>
	<name>aliyun maven</name>
	<url>http://maven.aliyun.com/nexus/content/groups/public/</url>
	<mirrorOf>central</mirrorOf>
</mirror>


<profile>
        <id>jdk-1.8</id>
         <activation>
                <activeByDefault>true</activeByDefault>
                <jdk>1.8</jdk>
        </activation>
         <properties>
                <maven.compiler.source>1.8</maven.compiler.source>
                <maven.compiler.target>1.8</maven.compiler.target>
                <maven.compiler.compilerVersion>1.8</maven.compiler.compilerVersion>
        </properties>
  </profile>

表示打包成功

4) 创建程序


因为是standalone模式,所以内存配置应该是不生效的,最后点击提交

点击两次运行

3.4 部署Flink Sql任务
- 添加任务,编写flink sql


sql
CREATE TABLE device_info (id string, lastModifiedTime bigint) WITH (
  'connector' = 'kafka',
  -- 使用 kafka connector
  'topic' = 'robotChange',
  'properties.bootstrap.servers' = 'xxxxxxxxxxx',
  'properties.group.id' = 'testGroup001',
  'scan.startup.mode' = 'earliest-offset',
  'format' = 'json',
  'json.fail-on-missing-field' = 'false',
  'json.ignore-parse-errors' = 'true'
);
CREATE TABLE robot_day_count (dateDay VARCHAR, orderCount BIGINT,PRIMARY KEY (dateDay) NOT ENFORCED) WITH (
  'connector' = 'jdbc',
  -- 使用 jdbc connector
  'driver'='com.mysql.jdbc.Driver',
  'url' = 'jdbc:mysql://localhost:3306/flink',
  -- jdbc url
  'table-name' = 'robot_day_count',
  -- 表名
  'username' = 'streamx',
  -- 用户名
  'password' = 'streamx',
  -- 密码
  'sink.buffer-flush.max-rows' = '1' -- 默认 5000 条,为了演示改为 1 条
);
insert into
  robot_day_count
select
  from_unixtime(lastModifiedTime / 1000, 'yyyy-MM-dd') dateDay,
  count(distinct id)
from
  device_info
group by
  from_unixtime(lastModifiedTime / 1000, 'yyyy-MM-dd')
<dependency>
            <groupId>org.apache.flink</groupId>
            <artifactId>flink-connector-kafka_2.11</artifactId>
            <version>1.14.2</version>
        </dependency>

        <dependency>
            <groupId>org.apache.flink</groupId>
            <artifactId>flink-connector-jdbc_2.11</artifactId>
            <version>1.14.2</version>
        </dependency>
        <dependency>
            <groupId>org.apache.flink</groupId>
            <artifactId>flink-json</artifactId>
            <version>1.14.2</version>
        </dependency>
        <dependency>
            <groupId>mysql</groupId>
            <artifactId>mysql-connector-java</artifactId>
            <version>5.1.48</version>
        </dependency>
点击提交

点击运行
