读书,学会和伟大的灵魂沟通;学会独处,学会独立思考;学会坚韧,也学会谦卑

一、工程化
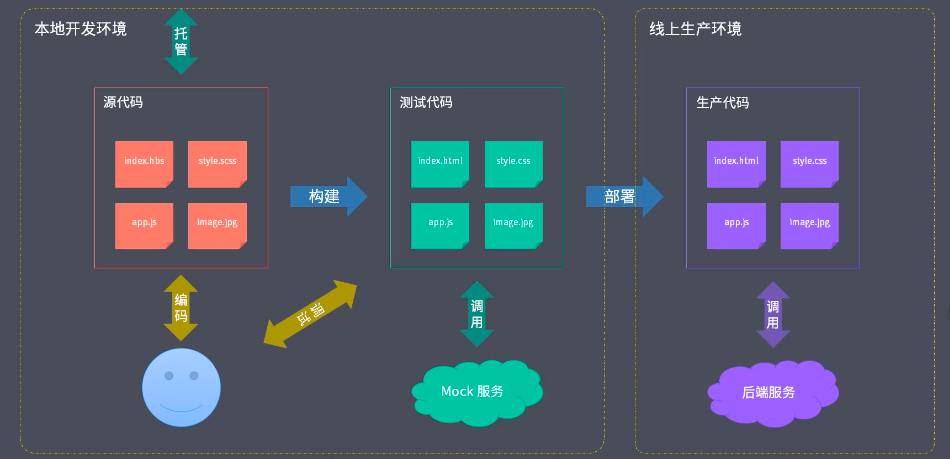
定义: 一切以提高效率、降低成本、质量保证为目的的手段都属于 工程化
1. 主要解决的问题:
- 想要使用ES6+新特性,但是兼容有问题 (传统语言或语法的弊端)
- 想要使用Less/Sass/PostCSS增强CSS的编程性,但是运行环境不能直接支持想要使用模块化的方式提高项目的可维护性,但运行环境不能直接支持 (无法使用模块化、组件化)
- 部署上线前需要手动压缩代码及资源文件,部署过程需要手动上传代码到服务器 (重复的机械式工作)
- 多人协作开发,无法硬性统一大家的代码风格,从仓库pull回来的代码质量无法保证 (代码风格不统一,质量无法保证)
- 部分功能开发时需要等待后端服务接口提前完成
- 整体依赖后端项目
2. 工程化的表现:
- 创建项目 (使用脚手架完成基础工具的搭建)
- 编码 (代码格式化、代码风格校验,编译工具可以将使用的新特性自动编译可运行的语言)
- 预览/测试 (Web Server/Mock前端服务器、Live Reloading/HMR热更新、Source Map定位源代码位置)
- 提交 (Git Hooks代码整体质量检查、Lint-staged代码风格检查,持续集成)
- 部署 (CI/CD、自动发布)
二、脚手架工具
1. 概述
作用: 创建项目基础结构、提供项目规范和约定(相同的组织结构、开发范式、模块依赖、工具配置,更有一些基础代码都相同)
2. 常用的脚手架工具
脚手架工作过程:
- 通过命令行交互询问用户问题 (
node中发起交互命令我们使用inquirer模块) - 根据用户回答的结果生成文件 (入口文件中进行逻辑实现)
常用的脚手架工具:
React项目 - - -create-react-appVue项目 - - -vue-cliAngular项目 - - -angular-cliYeoman通用脚手架工具Plop同于创建特定类型的文件
3. Yeoman
⑴. 概述
一个通用的脚手架工具
- 优势: 更像脚手架的运行平台,Yeoman搭配不同的generator可以创建任何类型的项目,我们可以根据自己的generator定制自己的前端脚手架
- 劣势: 优点即缺点,过于通用不够专注
⑵. 基础使用
安装:
# 检查 node 版本
node -v
# 安装 yeoman
npm install -g yo
# 配使用 node 的 generator
npm install -g generator-node
使用:
$ yo node
# 是否同意被收集数据?
? ==========================================================================
We're constantly looking for ways to make yo better!
May we anonymously report usage statistics to improve the tool over time?
More info: https://github.com/yeoman/insight & http://yeoman.io
========================================================================== (Y/n)

# 模块的名称
? Module Name (code)
$ my_modules

# 以上名称已存在于npm上,请选择其他名称?
? The name above already exists on npm, choose another? (Y/n)
$ n

# 项目描述
? Description
$ awesome node module

# 项目主页地址
? Project homepage url
$ https://gitee.com/...

# 作者姓名
? Author s Name ()
$ yuan

# 作者邮箱
? Author s Email ()
$ ...@163.com

# 作者主页
? Author s Homepage
$ https://gitee.com/...

# 包关键词(逗号分割)
? Package keywords (comma to split)
$ modules, node

# 是否发送代码覆盖率报告到平台上(后续持续集成、代码质量保证会用到)
? Send coverage reports to coveralls (Y/n)
$ n

# node 的支持版本
? Enter Node versions (comma separated)
$ (不输入时支持全部版本)

# GitHub 的用户名
? GitHub username or organization ()
$ yuan

# 项目许可证
  Apache 2.0
? MIT
  Mozilla Public License 2.0
  BSD 2-Clause (FreeBSD) License
  BSD 3-Clause (NewBSD) License
  Internet Systems Consortium (ISC) License
  GNU AGPL 3.0
(Move up and down to reveal more choices)

# 安装完成...
⑶. sub generator
有时候我们并不需要创建完整的项目结构,只需要在原有项目的基础上创建一些特定的文件,例如在项目中添加yeoman,比如在项目中添加eslint,babel配置文件…;就可以通过生成器帮我们实现
使用:
yo node:cli

# 是否要重写 package.json 文件
? Overwrite package.json? (ynaxdH)
$ Y

# 将 npm模块 链接到对应的运行项目中去,方便地对模块进行调试和测试
$ npm link(博主这里使用 npm 未成功)
$ yarn link(npm install yarn 安装)

# 运行项目模块
$ my_modules --help
⑷. yeoman 使用步骤
- 明确需求
- 找到合适的 Generator
- 全局范围安装找到的
Generator - 通过Yo运行对应的
Generator - 通过命令行交互填写选项
- 生成你所需要的项目结构
4. 自定义 Generator
⑴. 概述
基于Yeoman搭建自己的脚手架
基础结构:
  generators/  ...  生成器目录
 |     app/ ... 默认生成器目录
 |   |       index.js ... 默认生成器实现
+|     component/  ... 如果有sub generator写这个目录下面
+|           index.js ... 其他生成器实现
   package.json ... 模块包配置文件
名称规范: 必须是 generator-<name> 的格式
⑵. 使用
# 创建项目
mkdir generator-sample
# 进入目录
cd generator-sample
# 安装的这个模块提供了生成器的基类
npm install yeoman-generator
创建 index.js 文件 - generator/app/index.js:
/**
 * 此文件作为 Generator 的核心入口
 * 需要导出一个继承自 Yeoman Generator 的类型
 * Yeoman Generator 在工作时会自动调用在此类型中定义的一些生命周期方法
 * 在这些方法中可以通过调用父类提供的一些工具方法实现一些功能,例如文件写入
 */

 const Generator = require('yeoman-generator')

 module.exports = class extends Generator {
   writing () {
     // Yeoman 自动在生成文件阶段调用此方法
     // 这里尝试往项目目录中写入文件
     this.fs.write(
       this.destinationPath('temp.txt'),
       Math.random().toString()
     )
   }
 }
链接到全局:
npm link
其他项目使用:
# 创建项目
mkdir myjob
# 进入项目目录
cd myjob
# yeoman 命令
yo sample

# 能看到生成的文件...
⑶. 根据模板创建文件
相对于上面手动创建每一个文件,模板方式效率更高
创建 foo.txt 文件 - generator/app/templates:
这是一个模板文件
内部可以使用 EJS 模板标记输出数据
例如: <%= title %>

<% if (success) {%>
歌尽花落
<% }%>
编辑 index.js 文件 - generator/app/index.js:
const Generator = require('yeoman-generator')

 module.exports = class extends Generator {
   writing () {
    // 使用模板方式写入文件到目标目录

    // 模板文件路径
    const tmpl = this.templatePath('foo.txt')
    // 输出目标路径
    const output = this.destinationPath('foo.txt')
    // 模板数据上下文
    const context = { title: 'hello xm~', success: true}
    // 这个方法会把模板文件映射到输出文件上
    this.fs.copyTpl(tmpl, output, context)
   }
 }
其他项目使用:
# 进入项目目录
cd myjob
# yeoman 命令
yo sample

# 能看到生成的文件...
⑷. 动态接收用户输入数据
创建 test.html 文件 - generator/app/templates:
<!DOCTYPE html>
<html lang="en">
<head>
  <meta charset="UTF-8">
  <meta name="viewport" content="width=device-width, initial-scale=1.0">
  <title><%= name%></title>
</head>
<body>
  <h1><%= title%></h1>
</body>
</html>
编辑 index.js 文件 - generator/app/index.js:
const Generator = require('yeoman-generator')

 module.exports = class extends Generator {
   prompting() {
     // Yeoman再次询问用户环节会自动调用此方法
     // 在此方法中可以调用父类的 prompt() 方法发出对用户的命令行询问
     // this.prompt接收一个数组,数组的每一项都是一个问题
     // this.prompt返回一个promise对象

     return this.prompt([
      {
        // input 使用用户输入的方式接收提交信息
        type: 'input',
        // 最终得到结果的键
        name: 'name',
        // 给用户的提示
        message: 'your project name is :',
        // 默认值
        default: this.appname // appname 为项目生成目录名称
      },
      {
        type: 'input',
        name: 'title',
        message: 'your title is :',
        default: '目录'
      },
     ])
     .then(answers => {
       // answers是用户输入后我们拿到的一个结果
       // answers => { name: 'user input value', title: 'user input value'}
       // 赋值给属性我们可以在writing中使用它
       this.answers = answers
     })
   }
   writing () {
    // 使用模板方式写入文件到目标目录

    // 模板文件路径
    const tmpl = this.templatePath('test.html')
    // 输出目标路径
    const output = this.destinationPath('test.html')
    // 模板数据上下文
    const context = { name: this.answers.name, title: this.answers.title}
    // 这个方法会把模板文件映射到输出文件上
    this.fs.copyTpl(tmpl, output, context)
   }
 }
其他项目使用:
# 进入项目目录
cd myjob
# yeoman 命令
yo sample
# 文件命名
> ? your project name is : test myjob
> ? your title is : session1

# 能看到生成的文件...
5. Vue Generator 案例
⑴. 创建项目
# 创建项目
mkdir generator-vue
# 进入目录
cd generator-vue
# 初始化
npm init
# 安装项目依赖
npm install yeoman-generator
⑵. 添加项目模板
创建 templates 文件夹 - generator/app/templates:
将Vue 项目(自己创建的)的目录直接拷贝进来
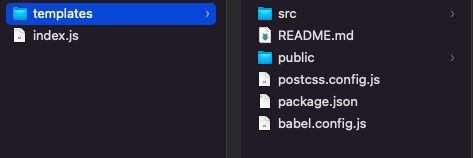
对项目名称替换为模板标记:
# 文件: README.md、package.json、index.html
my-vue-project  =>  <%= name %>
⑶. inidex.js
编辑 index.js 文件 - generator/app/index.js:
const Generator = require('yeoman-generator')

module.exports = class extends Generator {
  prompting () {
    return this.prompt([
      {
        type: 'input',
        name: 'name',
        message: 'Your project name',
        default: this.appname
      }
    ])
    .then(answers => {
      this.answers = answers
    })
  }

  writing () {
    // 把每一个文件都通过模板转换到目标路径

    const templates = [
      '.browserslistrc',
      '.editorconfig',
      '.env.development',
      '.env.production',
      '.eslintrc.js',
      '.gitignore',
      'babel.config.js',
      'package.json',
      'postcss.config.js',
      'README.md',
      'public/favicon.ico',
      'public/index.html',
      'src/App.vue',
      'src/main.js',
      'src/router.js',
      'src/assets/logo.png',
      'src/components/HelloWorld.vue',
      'src/store/actions.js',
      'src/store/getters.js',
      'src/store/index.js',
      'src/store/mutations.js',
      'src/store/state.js',
      'src/utils/request.js',
      'src/views/About.vue',
      'src/views/Home.vue'
    ]

    templates.forEach(item => {
      // item => 每个文件路径
      this.fs.copyTpl(
        this.templatePath(item),
        this.destinationPath(item),
        this.answers
      )
    })
  }
}
⑷. inidex.js
# link 到全局
npm link
# 创建一个新项目
mkdir my-proj
# 进入项目目录
cd my proj
# 运行刚刚创建的 generator-vue
yo generator-vue

# 项目名称
? Your project name (my proj)
$ 直接回车(之前设置的用户需要填写项目名称)

# 一个 Vue 的项目模板就搭建完成了...
⑷. 发布 Generator
Generator实际是一个npm模块,那么发布generator就是发布npm模块,我们需要通过npm publish命令发布成一个公开的模块
创建本地仓库:
创建 .gitignore (generator-vue/node_module)文件,用于管理需要被忽略写入的文件
# 初始化本地仓库
git init
# 查看仓库状态
git status
# 添加
git add .
# 进行第一次提交
git commit -m 'init project'

...
// 绑定云端仓库
git remote add origin <仓库ssh地址>
# 把本地代码推送到远程master分支
git push -u origin master
# 进行发布
npm publish
6. Plop
主要用于创建项目中特定文件类型的小工具,类似于Yeoman中的sub generator,一般不会独立使用。
一般会把Plop集成到项目中,用来自动化的创建同类型的项目文件
使用步骤:
1. 安装 plop
# 初始化项目
npm init -y
# 安装 plop
npm install -g plop
2. 模板文件
根目录下创建 plop-templates 文件夹,里面创建三个模板文件:
component.css.hbs:
.{{name}} {
}
component.hbs:
import React from 'react';

export default () => (
  <div className="{{ name }}">
    <h1>{{name}} Component</h1>
  </div>
)
component.test.hbs:
import React from 'react';
import ReactDOM from 'react-dom';
import {{name}} from './{{name}}';

it('renders widthout crashing', () => {
  const div = document.createElement('div');
  ReactDOM.render(<{{name}} />, div);
  ReactDOM.unmountComponentAtNode(div);
});
3. 入口文件
在根目录下创建一个
plopfile.js的文件,这个文件是Plop的入口文件,需要导出一个函数,这个函数接收一个plop对象,用于创建生成器任务
module.exports = plop => {
  // 设置一个生成器,第一个参数是项目名称,第二个函数是对象,对应设置选项
  plop.setGenerator('compontent', {
    // 描述
    description: 'create a component',
    // 命令行交互问题
    prompts: [
        // 一个问题对应一个对象,配置参考自定义Generator
      {
        type: 'input',
        name: 'name',
        message: 'component name',
        default: 'MyComponent'
      }
    ],
    // 完成命令行交互过后完成的一些动作
    actions: [
      //每一个对象都是一个动作
      {
        type: 'add', // 代表添加文件
        // 被添加的文件在输出的哪个路径,双花括号插值表达式可以获取交互得到的数据
        path: 'src/components/{{name}}/{{name}}.js',
        // 模板文件是什么
        templateFile: 'plop-templates/component.hbs'
      },
      {
        type: 'add',
        path: 'src/components/{{name}}/{{name}}.css',
        templateFile: 'plop-templates/component.css.hbs'
      },
      {
        type: 'add',
        path: 'src/components/{{name}}/{{name}}.test.js',
        templateFile: 'plop-templates/component.test.hbs'
      }
    ]
  })
}
- plop.setGenerator:设置一个生成器,第一个参数是项目名称,第二个函数是对象,对应设置选项
- 配置项内容:
- description:描述
- prompts:值是数组,命令行交互问题,一个问题对应一个对象
- actions:值是数组,完成命令行交互过后完成的一些动作,一个对象一个动作
4. 运行
在 package.json 中添加
"scripts": {
    "plop": "plop"
}
# 运行 plop
npm run plop
# 输入模块名称
? component name Header

# 在根目录的src\components下面,有了三个文件...
7. 手撕一个简易的脚手架工具
1. 创建项目
# 创建项目
mkdir sample-scaffold
# 进入目录
cd sample-scaffold
# 初始化
npm init
2. 入口文件搭建
编辑 package.json 文件:
{
  ...
  // 项目入口文件
  "bin": "cli.js",
}
根目录创建 cli.js 文件:
#!/usr/bin/env node

// Node CLI 应用入口文件必须要有这样的文件头
// 如果是 Linux 或者 macOS 系统下还需要修改此文件的读写权限为 755

console.log('cli working!')
链接到全局:
npm link
# 执行 console.log()
sample-scaffold
# => cli working!
3. 安装依赖
# 用于命令行交互
npm install inquirer
# 用于模板引擎渲染
npm install ejs
4. 模板创建
根目录下创建 templates 文件夹,里面创建两个模板文件:
index.html:
<!DOCTYPE html>
<html lang="en">
<head>
  <meta charset="UTF-8">
  <meta name="viewport" content="width=device-width, initial-scale=1.0">
  <title><%= name %></title>
</head>
<body>
</body>
</html>
style.css:
body{
  margin: 0;
  background-color: bisque;
}
编辑 cli.js 文件:
#!/usr/bin/env node
// 用于命令行交互
const inquirer = require('inquirer')
// 用户获取文件路径
const path = require('path')
// 用于读取写入文件
const fs = require('fs')
// 用于模板引擎渲染
const ejs = require('ejs')

inquirer.prompt([
  {
    type:'input',
    name:'name',
    message: 'Project name?'
  }
])
.then(answers => {
  console.log(answers)
  // 引入path模块,模板目录写绝对路径
  const tmplDir = path.join(__dirname, 'templates')
  // 目标目录:目标执行的目录,一般在cwd目录
  const destDir = process.cwd()

  // 引入fs模块,将模板下面文件全部转换到目标目录
  fs.readdir(tmplDir, (err, files) => {
    if(err) throw err
    files.forEach(file => {
      // 文件的相对路径
      console.log(file) // index.html    style.css

      // 引入ejs模块
      // 通过模板引擎渲染路径对应的文件
      // 第一个参数是文件的绝对路径
      // 第二个参数是模板引擎工作时候的数据上下文
      // 第三个参数是回调函数
      ejs.renderFile(path.join(tmplDir, file), answers, (err, result) => {
        if(err) throw err
        // 成功的话就是已经渲染过的文件
        console.log(result)
        // 写入文件,目标目录绝对路径,第二个参数是文件内容
        fs.writeFileSync(path.join(destDir, file), result)
      })
    })
  })
})
5. 运行
# 创建一个新项目
mkdir demo
# 进入目录
cd demo
# 执行 命令
sample-scaffold
# 项目名称
> ? Project name? myProject

# 能看到生成的文件...

