主要
基础篇
1: Git Commit
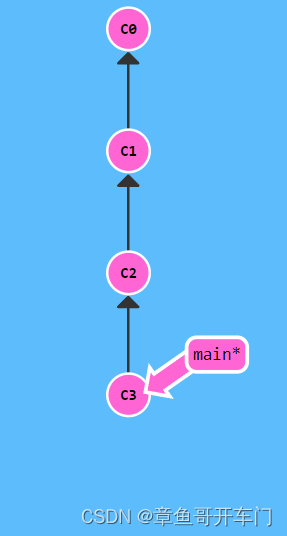
使用两次git commit进行两次提交
2: Git Branch
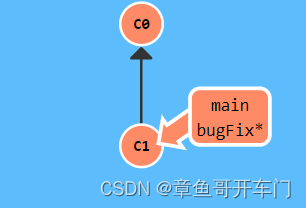
git branch <分支名> ---- 创建分支
git checkout <分支名> ---- 切换到分支
git checkout -b <分支名> ---- 创建并切换到分支
3: Git Merge
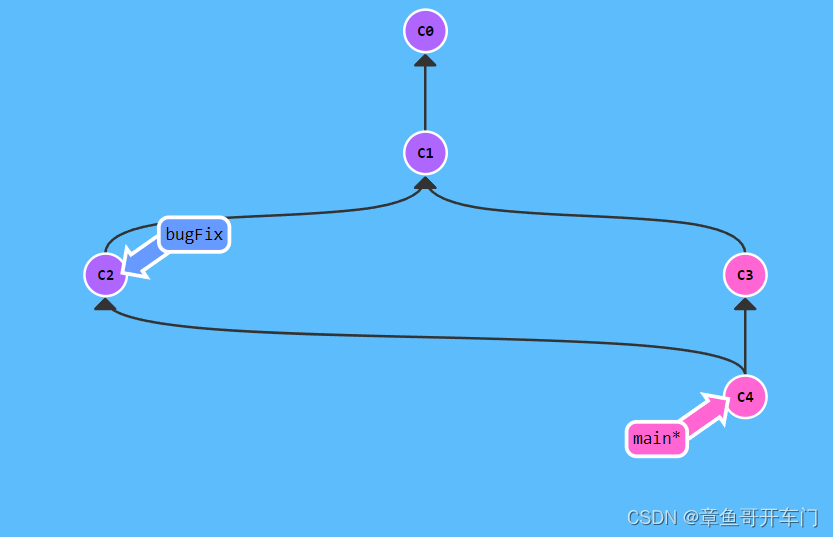
(1)用 git checkout -b bugFix 创建并转到新分支bugFix
(2)用 git commit 进行C2的提交
(3)用 git checkout main 重新回到main
(4)用 git commit 进行C3的提交
(5)用 git merge bugfix 进行合并bugFix和main的C4的提交
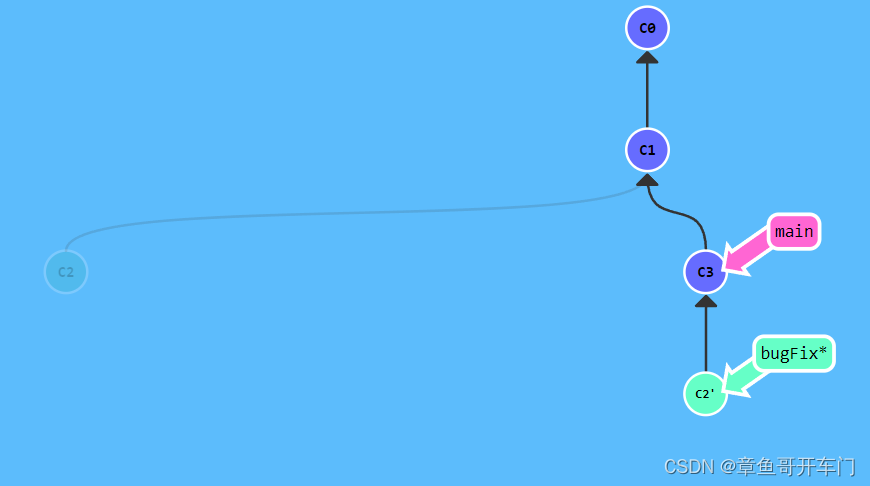
4: Git Rebase
(1)用 git checkout -b bugFix 创建并转到新分支bugFix
(2)用 git commit 进行C2的提交
(3)用 git checkout main 重新回到main
(4)用 git commit 进行C3的提交
(5)用 git checkout bugFix 重新回到bugFix
(6)用 git rebase main 从C3创建C2的副本
高级篇
1: 分离HEAD
HEAD 通常情况下是指向分支名的(如 bugFix),
分离的 HEAD 就是让其指向了某个具体的提交记录而不是分支名
通过哈希值指定提交记录。每个提交记录的哈希值显示在代表提交记录的圆圈中。
这里使用 git checkout C4 便能够使HEAD指向C4
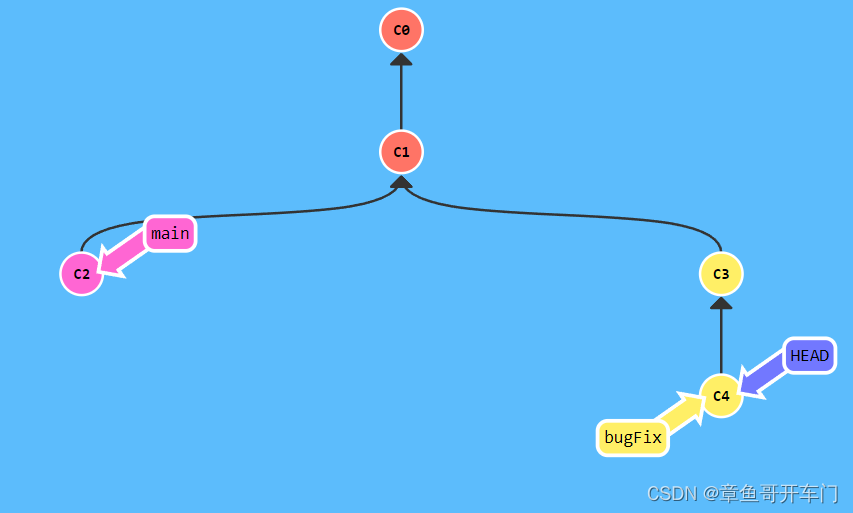
2: 相对引用(^)
<节点>^可以指向这一节点的上一节点
所以这里用 git checkout bugFix^ 指向C3
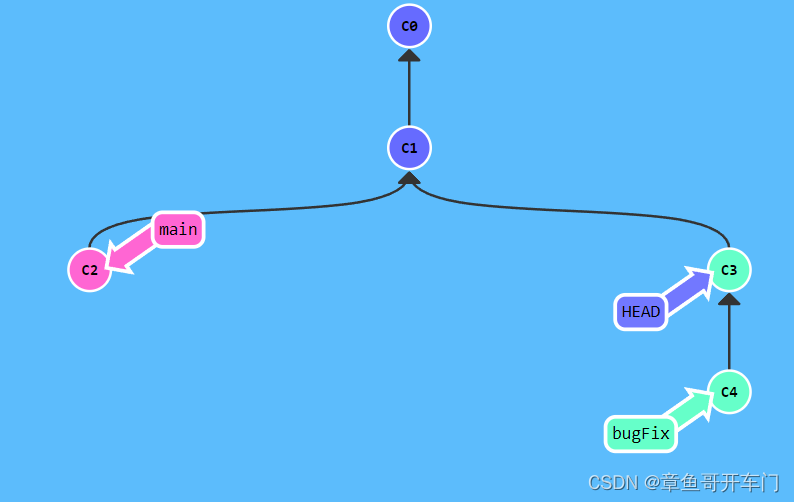
3: 相对引用(~)
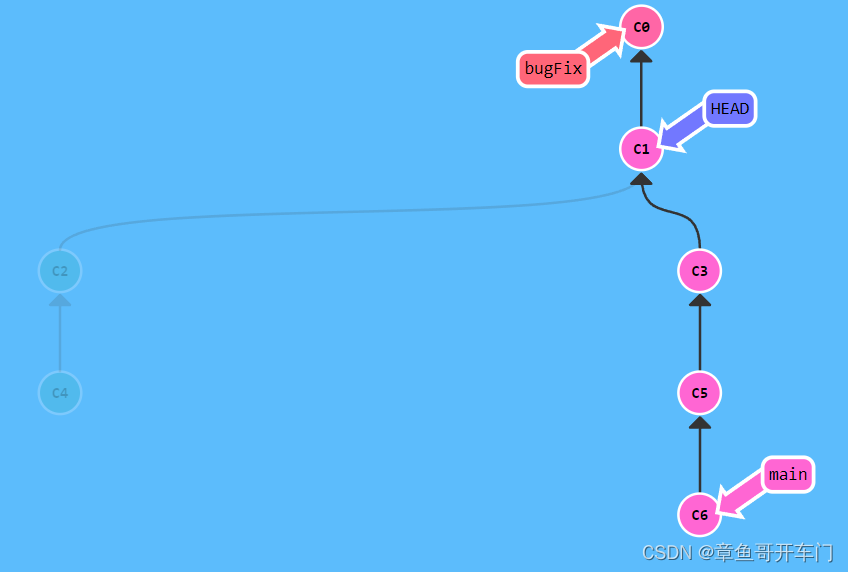
<节点>~num可以指向这一节点的上num节点
(1)用 git branch -f main C6 直接引用提交C6,强制main指向C6
(2)用 git checkout bugFix~2 将HEAD通过相对引用指向C1
(3)用 git branch -f bugFix HEAD^ 将bugFix分支通过相对引用指向C0
4:撤销变更
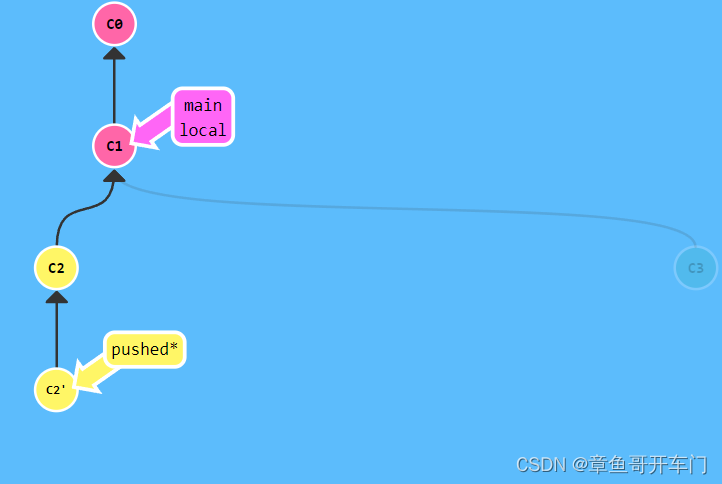
(1)用 git reset HEAD~1 对本地的local分支操作,撤销到上一级
(2)用 git checkout pushed 使HEAD移到pushed处
(3)用 git revert HEAD 对远端的pushed进行操作,生成与C1相同的提交来撤销C2
移动提交记录
1: Git Cherry-pick
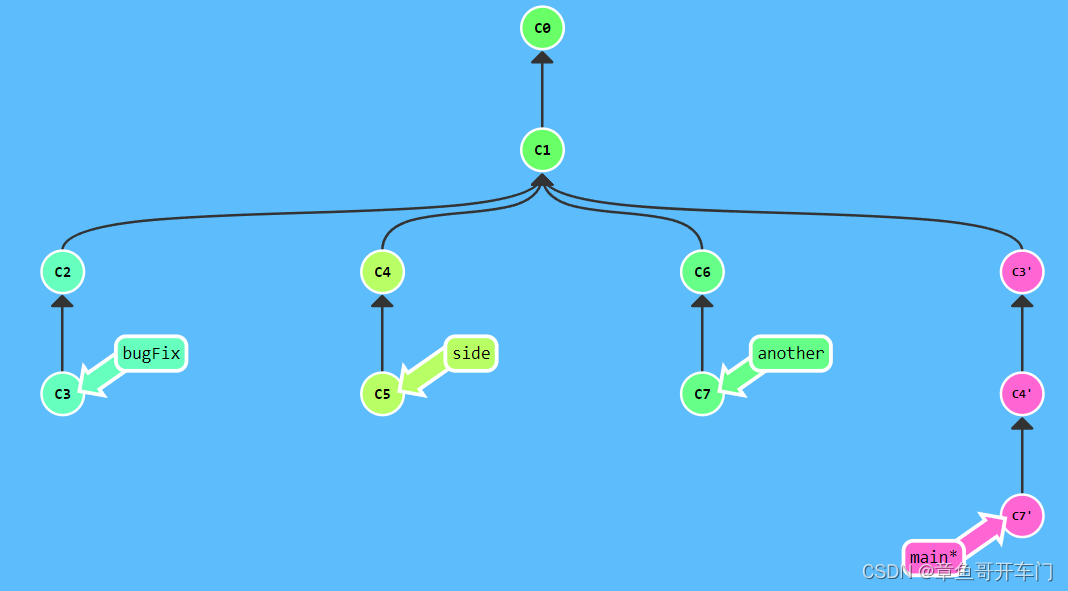
用 git cherry-pick C3 C4 C7 将C3、C4、C7复制到当前main的分支下
2: 交互式 rebase
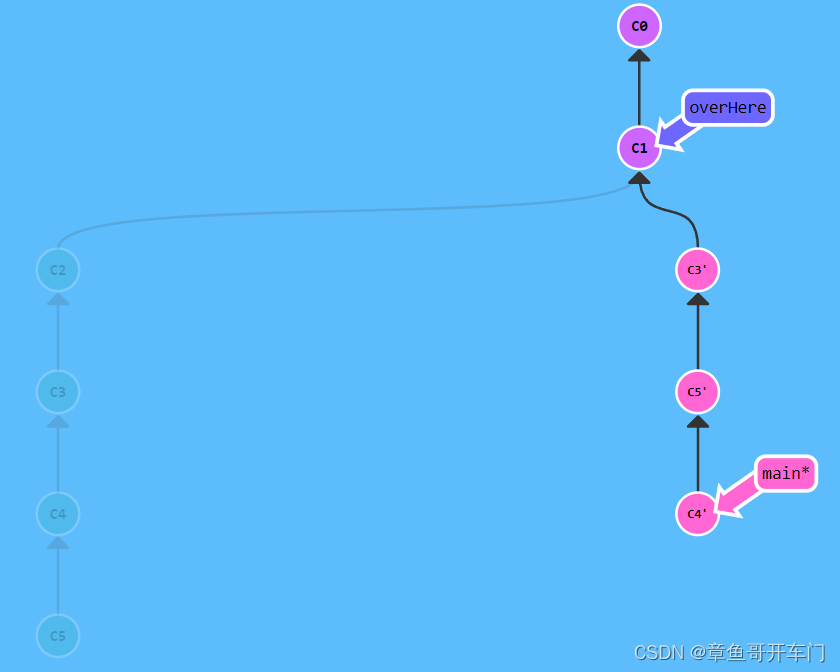
用 git rebase -i HEAD~4 进入到交互式页面,选择删除C2,调整C3、C4、C5的顺序
杂项
1: 只取一个提交记录
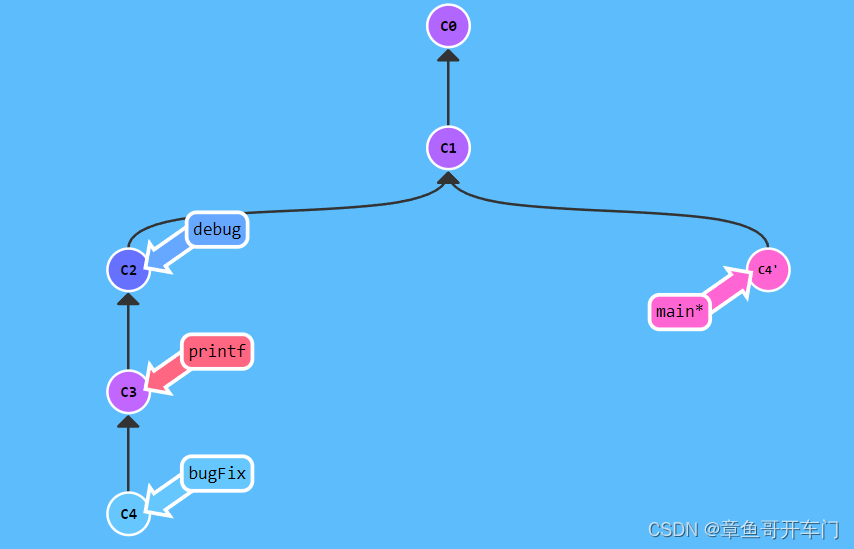
用 git cherry-pick C4 只取C4提交记录放在C1下
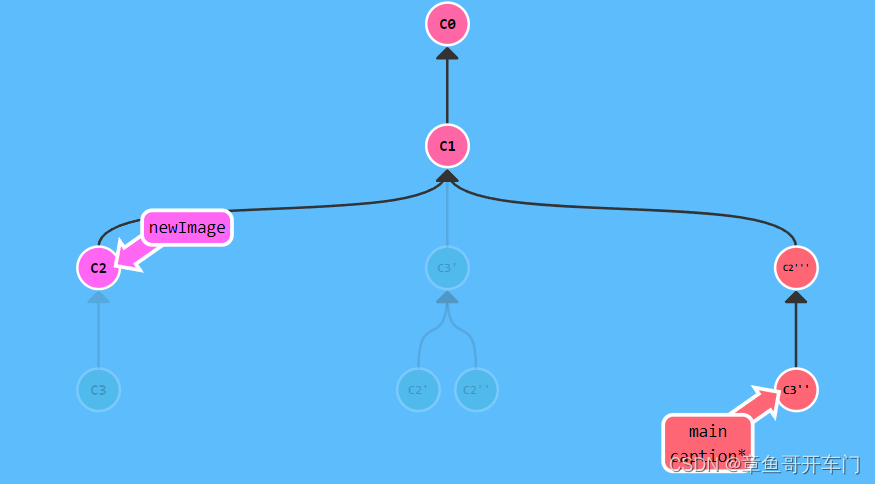
2: 提交的技巧 #1
(1)用 git rebase -i HEAD~2 对C2、C3进行重新排序,便于对C2操作
(2)用 git commit --amend 对C2修改,生成C2’’
(3)用 git rebase -i HEAD~2 对C2’'、C3再次排序
(4)用 git brance -f main HEAD 强制将main分支移到HEAD处
3: 提交的技巧 #2
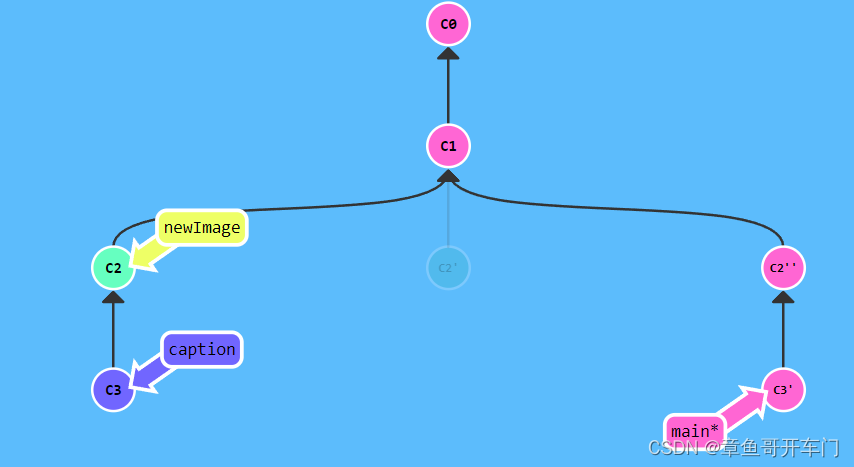
(1)用 git checkout main 将HEAD移到main分支处
(2)用 git cherry-pick C2 复制C2生成C2’
(3)用 git commit --amend 对C2’修改,生成C2’‘’
(4)用 git cherry-pick C3 复制C3生成C3’
4: Git Tags
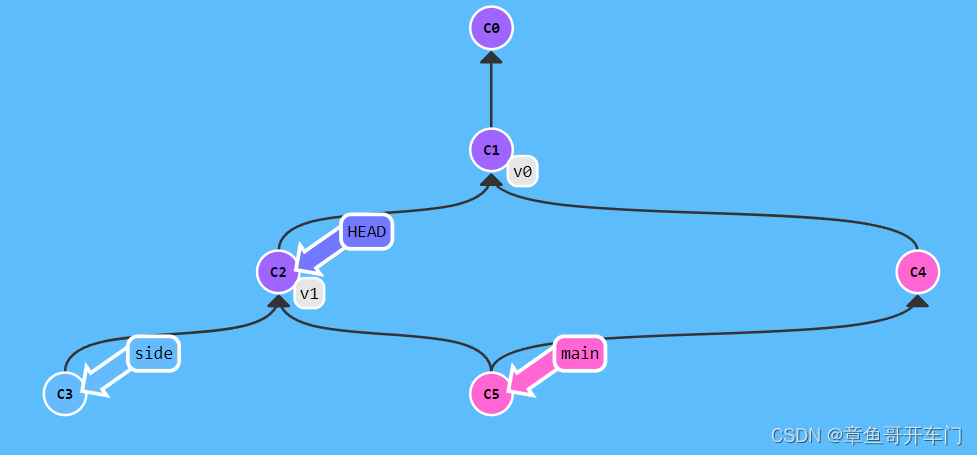
(1)用 git tag v0 C1 在C1建立锚点v0
(2)用 git tag v1 C2 在C2建立锚点v1
(3)用 git checkout v1 将HEAD移到v1节点
5: Git Describe
git describe <ref>
<ref> 可以是任何能被 Git 识别成提交记录的引用
输出的结果是这样的:<tag>_<numCommits>_g<hash>
tag 表示的是离 ref 最近的标签, numCommits 是表示这个 ref 与 tag 相差有多少个提交记录, hash 表示的是所给定的 ref 所表示的提交记录哈希值的前几位
高级话题
1: 多次 Rebase
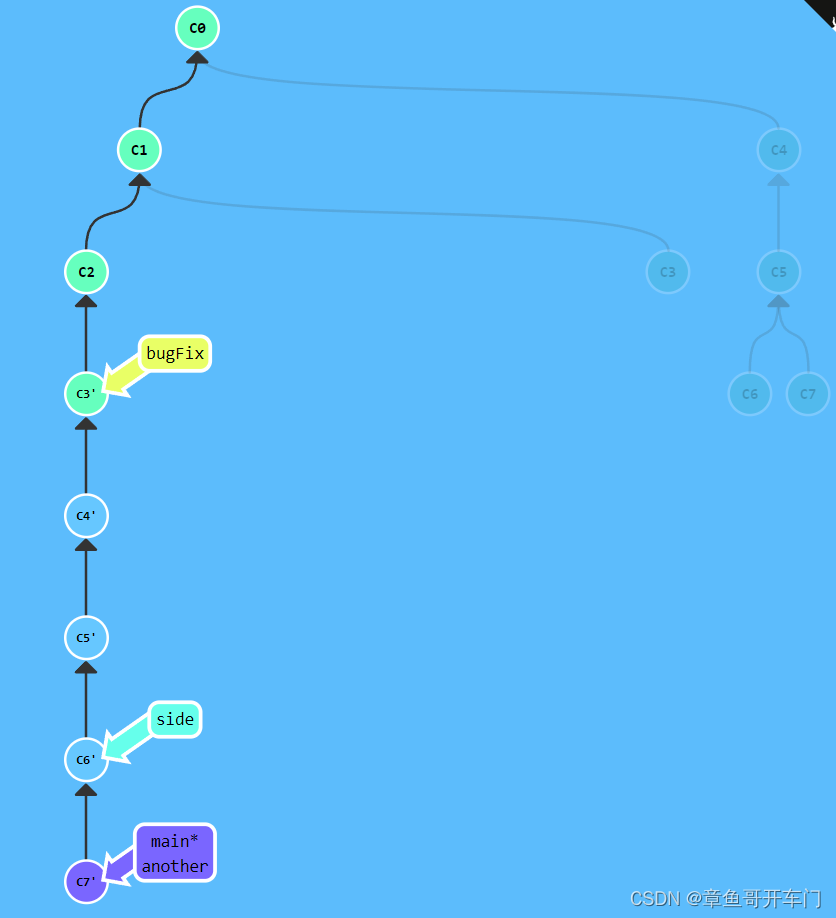
(1)用 git rebase main bugFix 将bugFix和main合并
(2)用 git rebase bugFix side 将bugFix和side合并
(3)用 git rebase side another 将side和another合并
(4)用 git rebase another main 将another和main合并
2: 两个父节点
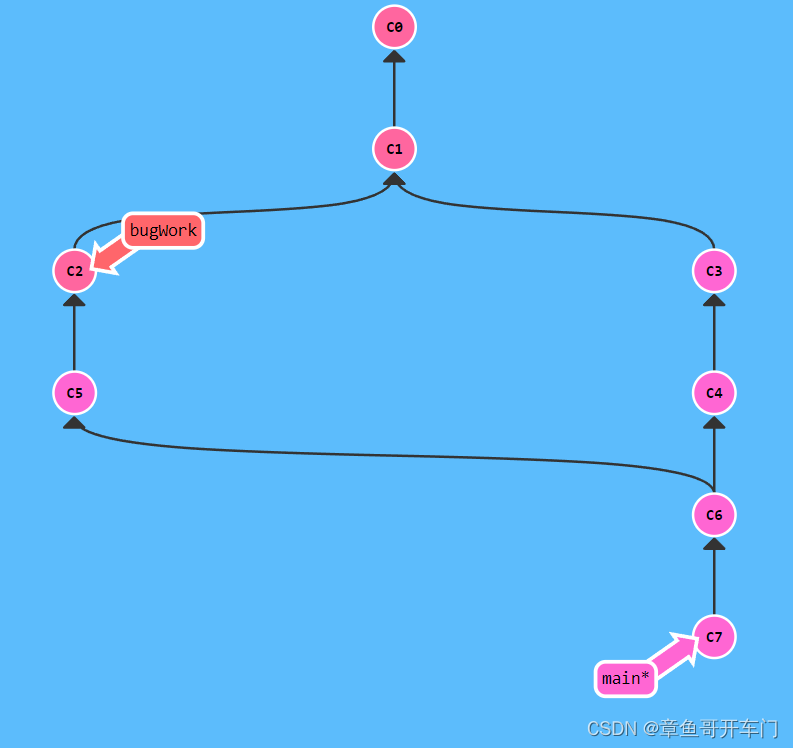
用 git branch -f bugWork HEAD~1^2~1 创建分支bugWork,并且移动到HEAD上一个节点的第二个父节点的上一个节点
3: 纠缠不清的分支
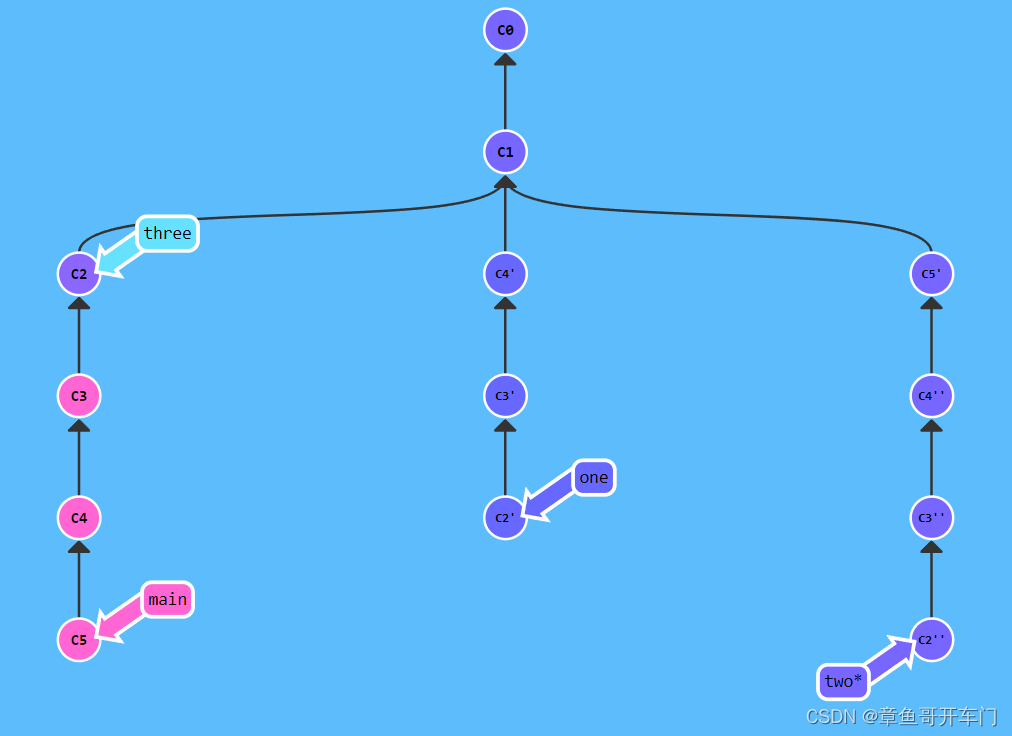
(1)用 git checkout one 选中one分支
(2)用 git cherry-pick C4 C3 C2 复制节点
(3)用 git checkout two 选中two分支
(4)用 git cherry-pick C5 C4 C3 C2 复制节点
(5)用 git branch -f three C2 强制移动three分支
远程仓库
Push & Pull —— Git 远程仓库!
1: Git Clone
用 git clone 建立虚线的远程仓库

2: 远程分支
操作本地的分支时,不会对远程分支产生影响
远程分支的前面的 o/ 是什么意思,大多数的开发人员会将它们主要的远程仓库命名为 origin
3: Git Fetch
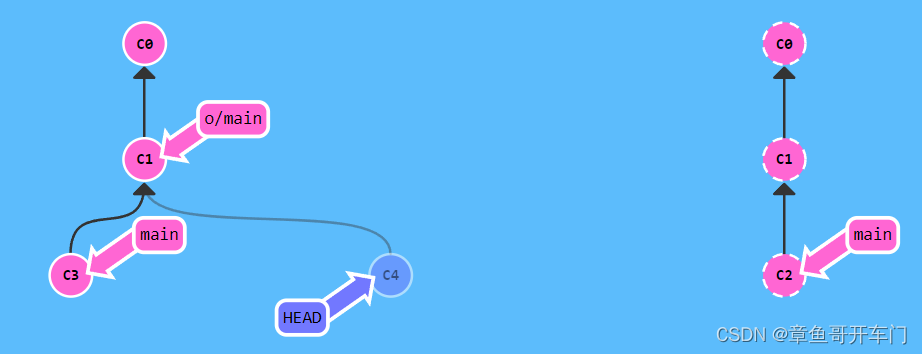
git fetch 完成了仅有的但是很重要的两步:
- 从远程仓库下载本地仓库中缺失的提交记录
- 更新远程分支指针(如 o/main)
git fetch 实际上将本地仓库中的远程分支更新成了远程仓库相应分支最新的状态。
但是对本地的仓库不会产生影响,不会移动main分支
4: Git Pull
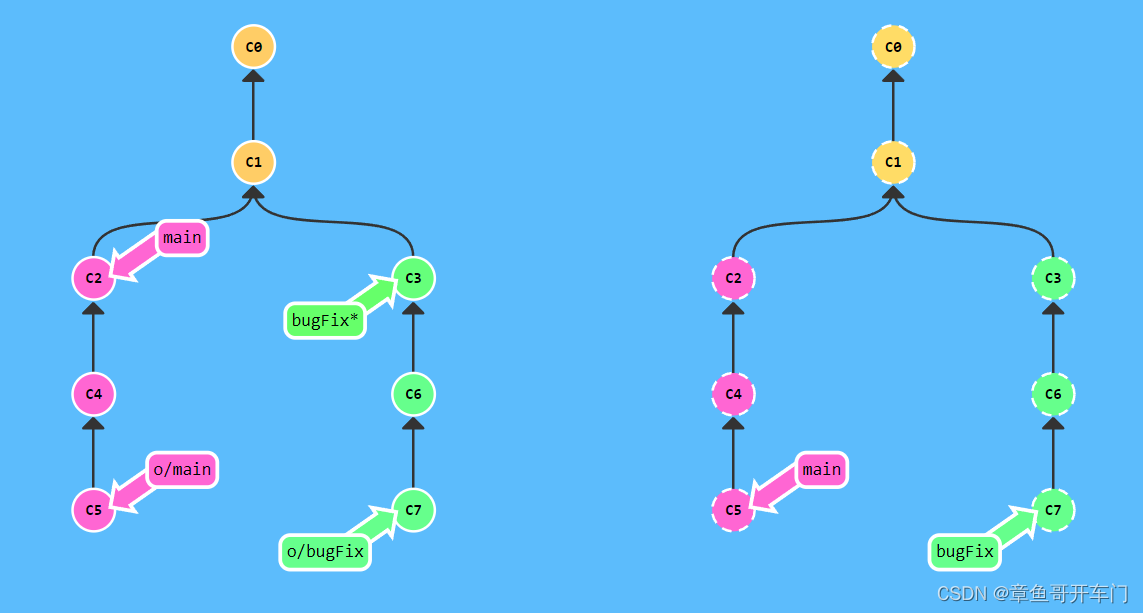
git pull 命令相当于git fetch + git merge,即下载远程分支的同时,还将其与本地分支进行了合并
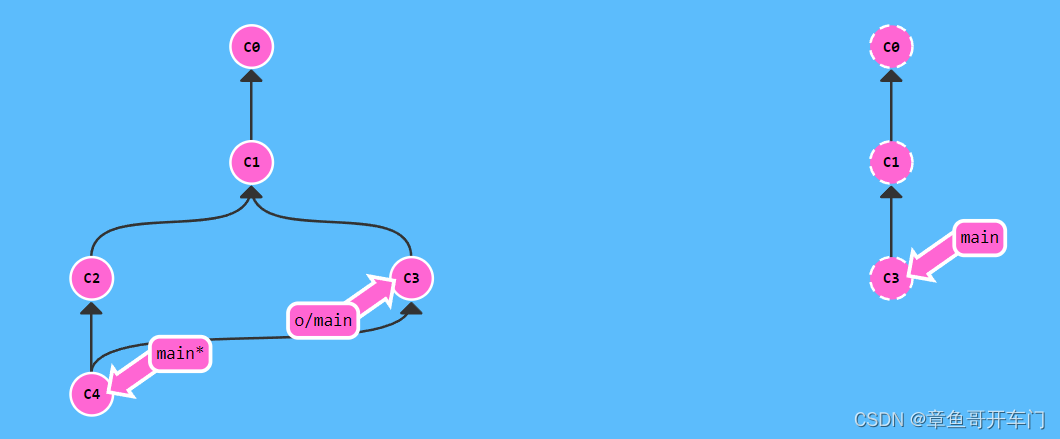
5: 模拟团队合作
(1)用 git clone 建立远程仓库
(2)用 git fakeTeamwork 2 在远程建立C2、C3提交
(3)用 git commit 提交C4
(4)用 git pull 下载远程分支并整合main
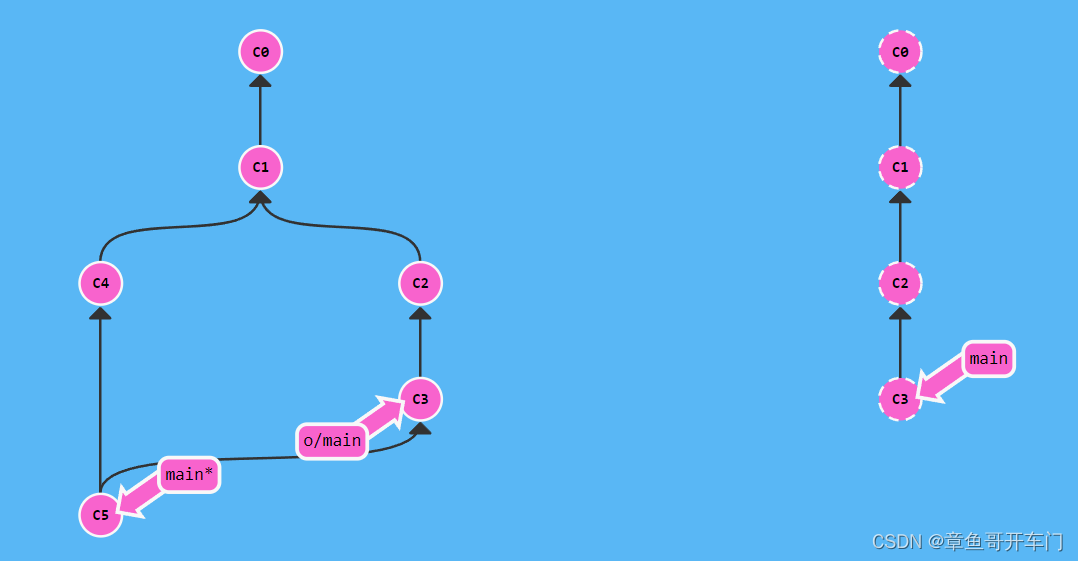
6: Git Push
(1)用 git commit 创建C2
(2)用 git commit 创建C3
(3)用 git push 将本地分支送到远程分支
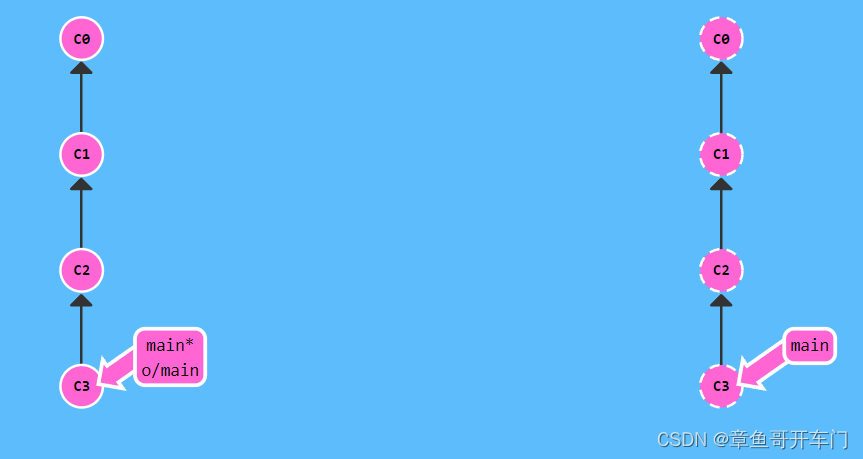
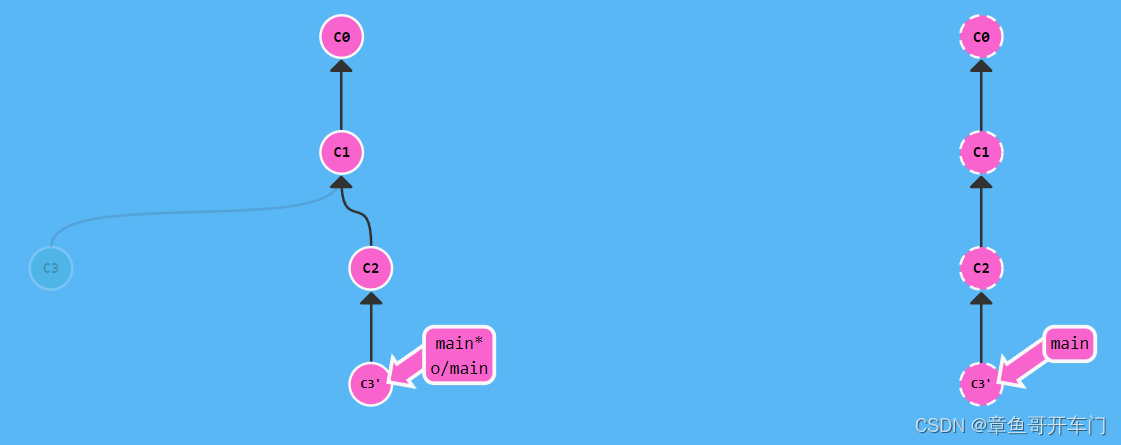
7: 偏离的提交历史
(1)用 git clone 创建远程仓库
(2)用 git fakeTeamwork 进行远程提交
(3)用 git commit 进行本地提交
(4)用 git pull --rebase 进行远程仓库的rebase下载
(5)用 git push 将本地仓库提交到远程仓库
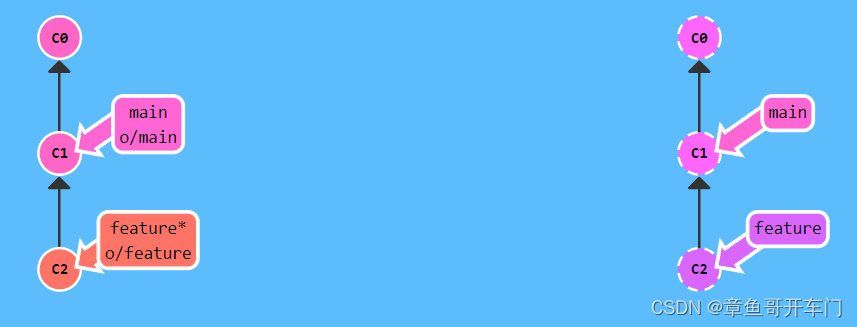
8: 锁定的Main(Locked Main)
(1)用 git checkout -b feature 创建并选中feature
(2)用 git push 将本地仓库上传至远程仓库
(3)用 git branch -f main C1 强制移动main分支到C1
关于 origin 和它的周边 —— Git 远程仓库高级操作
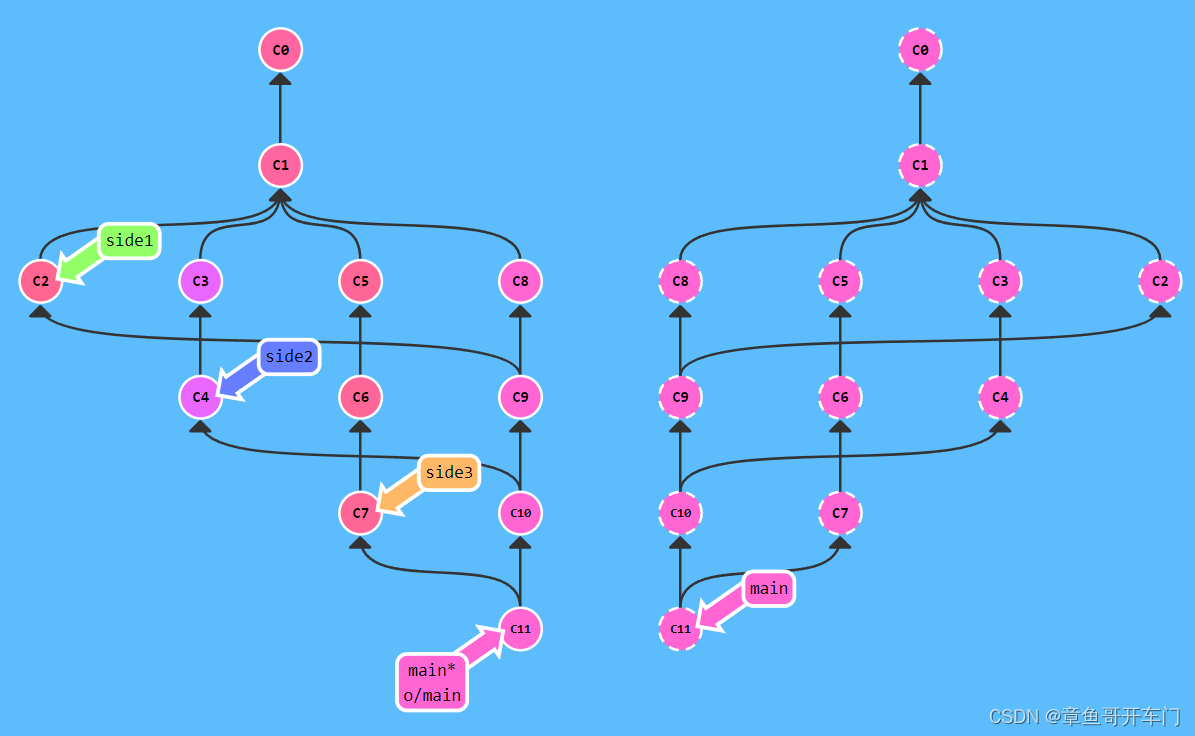
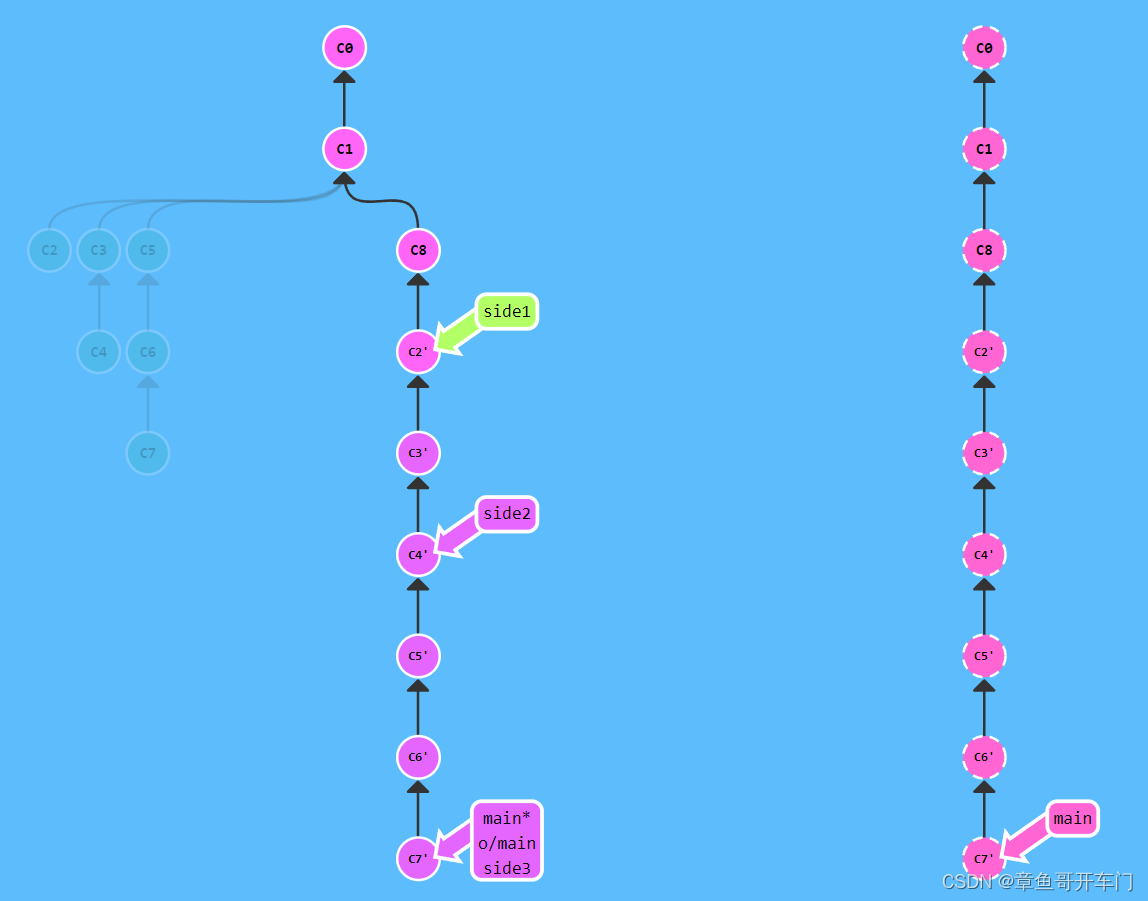
1: 推送主分支
(1)用 git fetch 先下载远程仓库的分支
(2)用 git rebase o/main side1
(3)用 git rebase side1 side2
(4)用 git rebase side2 side3
(5)用 git rebase side3 main
(6)用 git push 将本地重新调整的分支推送到远程仓库
2: 合并远程仓库
(1)用 git checkout main
(2)用 git pull
(3)用 git merge side1
(4)用 git merge side2
(5)用 git merge side3
(6)用 git push
