尚硅谷Git系列笔记
1. Git概述
Git 是一个免费的、开源的分布式版本控制系统
1.1 版本控制工具
1.1.1 集中式版本控制工具
CVS、SVN(Subversion)、VSS…… 集中化的版本控制系统诸如 CVS、SVN 等,都有一个单一的集中管理的服务器,保存 所有文件的修订版本,而协同工作的人们都通过客户端连到这台服务器,取出最新的文件或 者提交更新。多年以来,这已成为版本控制系统的标准做法。
优点
- 每个成员都可以在一定程度上看到项目中的其他成员正在做些什 么
- 管理员轻松掌控每个开发者的权限
- 且管理一个集中化的版本控制系统,要远比在各个客户端上维护本地数据库来得轻松容易
缺点
中央服务器的单点故障
1.1.2 分布式版本控制工具
Git、Mercurial、Bazaar、Darcs……
像 Git 这种分布式版本控制工具,客户端提取的不是最新版本的文件快照,而是把代码仓库完整地镜像下来(本地库)。这样任何一处协同工作用的文件发生故障,事后都可以用 其他客户端的本地仓库进行恢复。因为每个客户端的每一次文件提取操作,实际上都是一次对整个文件仓库的完整备份。
如何弥补集中式版本控制工具的缺点
- 服务器断网的情况下也可以进行开发(因为版本控制是在本地进行的)
- 每个客户端保存的也都是整个完整的项目(包含历史记录,更加安全)
2. Git常用命令
| 命令名称 | 作用 |
|---|---|
| git config --global user.name 用户名 | 设置用户签名 |
| git config --global user.email 邮箱 | 设置用户签名 |
| git init | 初始化本地库 |
| git status | 查看本地库状态 |
| git add 文件名 | 添加到暂存区 |
| git commit -m “日志信息” 文件名 | 提交到本地库 |
| git reflog | 查看历史记录 |
| git reset --hard 版本号 | 版本穿梭 |
2.1 设置用户签名
基本语法:
git config --global user.name 用户名设置
git config --global user.email 邮箱

说明:
签名的作用是区分不同操作者身份。用户的签名信息在每一个版本的提交信息中能够看到,以此确认本次提交是谁做的。Git 首次安装必须设置一下用户签名,否则无法提交代码。
※注意:这里设置用户签名和将来登录 GitHub(或其他代码托管中心)的账号没有任何关系。
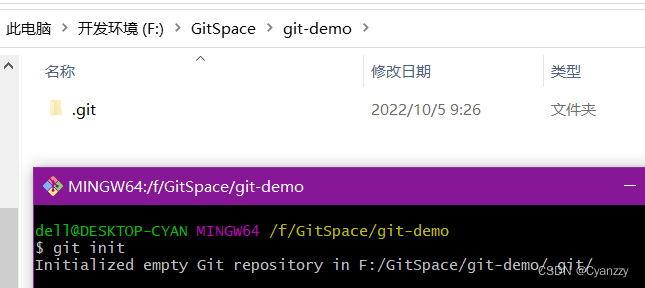
2.2 初始化本地库
基本语法
git init
2.3 查看本地库状态
基本语法
git status
首次查看(工作区无任何文件)

新增文件(hello.txt)
vim hello.txt

提示:'i'进入insert模式,'Esc'退出insert模式,'yy'复制整行,'p'粘贴

'Shift'+';'输入'wq'保存一下

再次查看(检测到未追踪的文件)

2.4 添加暂存区
将工作区的文件添加到暂存区
基本语法
git add 文件名

查看状态(检测到暂存区有新文件)
git status

2.5 提交本地库
将暂存区的文件提交到本地库
基本语法
git commit -m "日志信息" 文件名

查看状态(没有文件需要提交)
git status

查看引用日志信息
git reflog

查看详细日志
git log

2.6 修改文件(hello.txt)
修改文件
vim hello.txt

查看状态(检测到工作区有文件被修改)
git status

将修改的文件再次添加到暂存区
git add hello.txt

查看状态(工作区的修改添加到暂存区)
git status

再次提交到本地库
git commit -m "second commit" hello.txt

查看状态和日志

cat hello.txt

2.7 历史版本
2.7.1 查看历史版本
基本语法
git relog 查看版本信息
git log 查看版本详细信息
2.7.2 版本穿梭
基本语法
git reset --hard 版本号

2.8 Git切换版本的底层逻辑
Git 切换版本,底层其实是移动的 HEAD 指针,具体原理如下图所示


3. Git分支操作
3.1 分支的概念

在版本控制过程中,同时推进多个任务,为每个任务,就可以创建每个任务的单独分支。使用分支意味着程序员可以把自己的工作从开发主线上分离开来,开发自己分支的时候,不会影响主线分支的运行。(分支底层其实也是指针的引用)

3.2 分支的优点
- 同时并行推进多个功能开发,提高开发效率。
- 各个分支在开发过程中,如果某一个分支开发失败,不会对其他分支有任何影响。失败的分支删除重新开始即可。
3.3 分支的操作
| 命令名称 | 作用 |
|---|---|
| git branch 分支名 | 创建分支 |
| git branch -v | 查看分支 |
| git checkout 分支名 | 切换分支 |
| git merge 分支名 | 把指定的分支合并到当前分支上 |
3.3.1 查看分支
基本语法
git branch -v

3.3.2 创建分支
基本语法
git branch 分支名

3.3.3 修改分支
在hot-fix分支上修改
vim hello.txt
查看状态
git status
添加到暂存区
git add hello.txt
添加本地仓库
git commit -m "hot-fix first commit" hello.txt


3.3.4 切换分支
基本语法
git checkout 分支名

切换回master分支

此时若输入命令cat hello.txt会发现txt是master分支的内容,并不是之前在hot-fix分支修改的
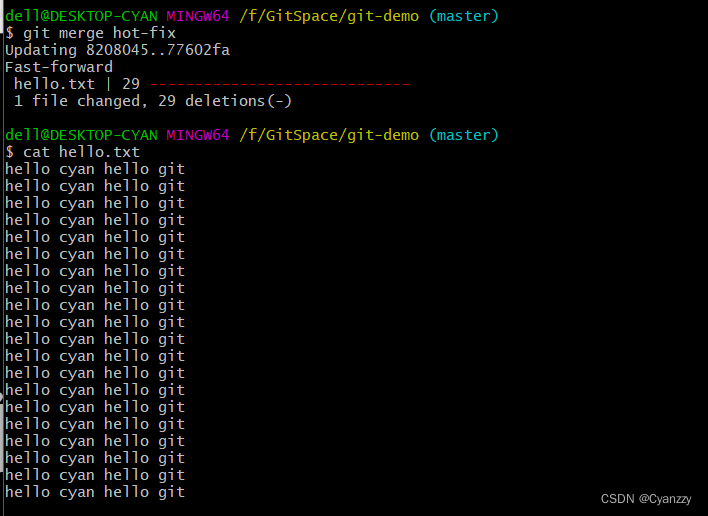
3.3.5 合并分支
基本语法
git merge 分支名
3.3.6 产生冲突
冲突产生的表现:后面状态为MERGING
dell@DESKTOP-CYAN MINGW64 /f/Git-Space/SH0720 (master|MERGING)
冲突产生的原因:
合并分支时,两个分支在同一个文件的同一个位置有两套完全不同的修改。Git 无法替我们决定使用哪一个。必须人为决定新代码内容。
演示冲突
1.修改master分支


2.添加暂存区和本地仓库

3.切换到hot-fix分支

4.修改hot-fix分支

5.添加到暂存区和本地仓库
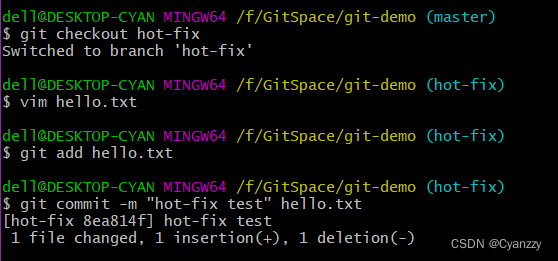
6.切换回master,在master分支上合并hot-fix分支


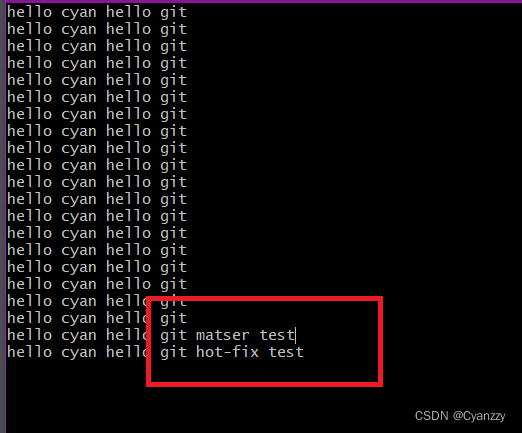
3.3.7 解决冲突
vim hello.txt

1.编辑有冲突的文件,删除特殊符号,决定要使用的内容
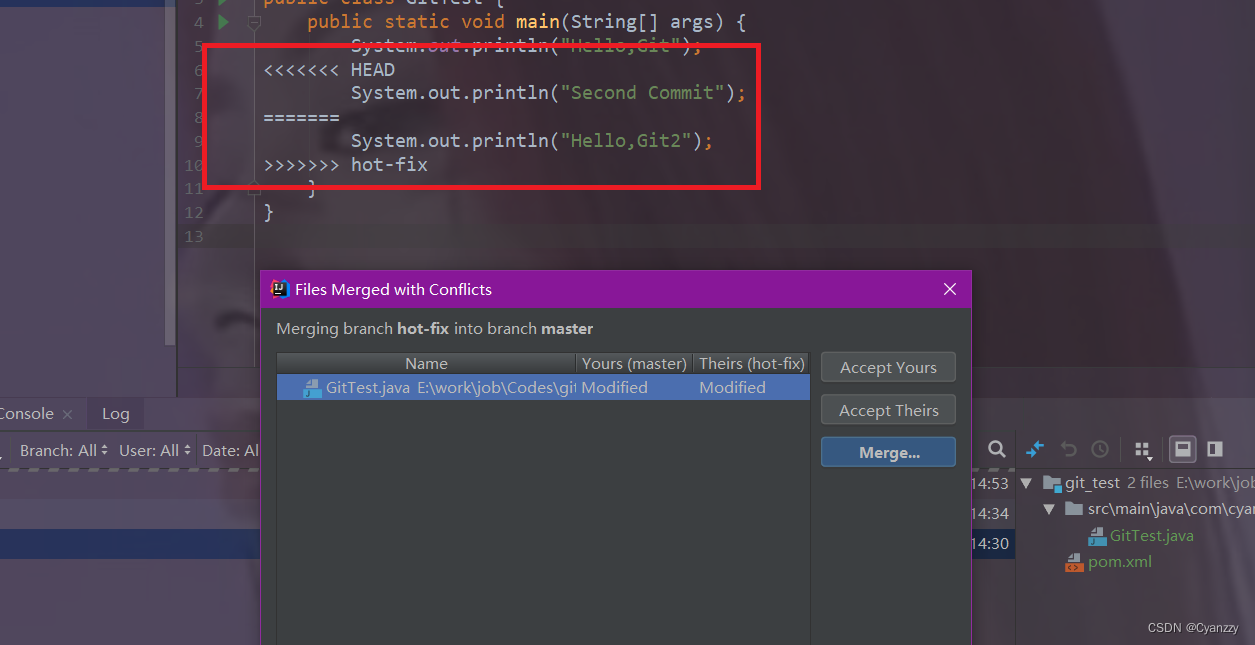
特殊符号:<<<<<<< HEAD 当前分支的代码 =======合并过来的代码 >>>>>>> hot-fix
2.添加到暂存区

3.提交到本地仓库 (注意:此时使用 git commit 命令时不能带文件名)

合并分支只会修改合并的内容
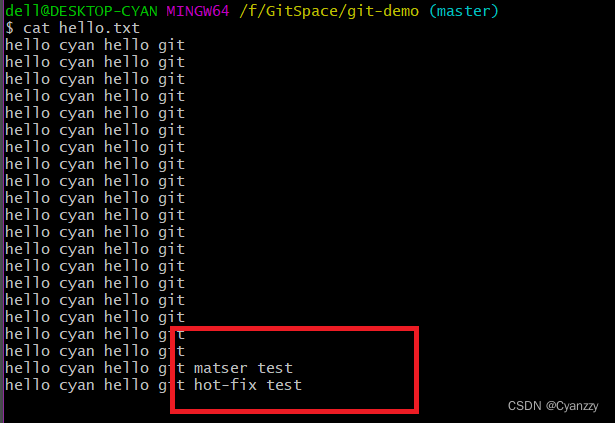

3.4 创建分支和切换分支图解

master、hot-fix其实都是指向具体版本记录的指针。当前所在的分支,其实是由HEAD决定的。所以创建分支的本质就是多创建一个指针。HEAD如果指向master,那么现在就在master分支上。HEAD如果执行hotfix,那么我们现在就在hotfix分支上。- 所以切换分支的本质就是移动
HEAD指针。
4. GitHub操作
4.1 创建远程仓库

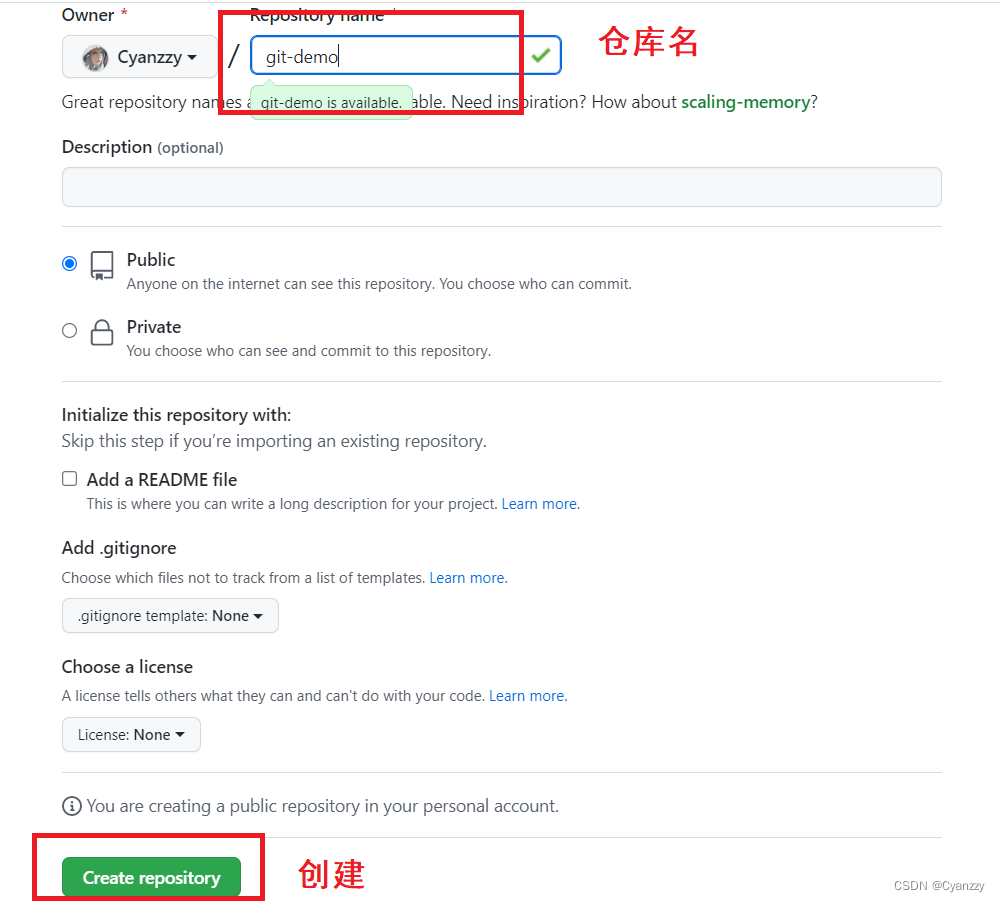
4.2 远程仓库操作
| 命令名称 | 作用 |
|---|---|
| git remote -v | 查看当前所有远程地址别名 |
| git remote add 别名 远程地址 | 起别名 |
| git push 别名 分支 | 推送本地分支上的内容到远程仓库 |
| git clone 远程地址 | 将远程仓库的内容克隆到本地 |
| git pull 远程库地址别名 远程分支名 | 将远程仓库对于分支最新内容拉下来后与 当前本地分支直接合并 |
4.2.1 创建远程仓库别名
基本语法
git remote -v 查看当前所有远程地址别名
git remote add 别名 远程地址


4.2.2 推送本地分支到远程仓库
PUSH基本语法
git push 别名 分支


推送成功

PULL基本语法
git pull 别名 分支
需求:修改远程仓库文件,pull到本地仓库


如果SSL失败先加 git config --global http.sslVerify "false"


4.2.3 克隆远程仓库到本地
基本语法
git clone 远程地址

clone 会做如下操作。1、拉取代码。2、初始化本地仓库。3、创建别名
5. IDEA集成Git
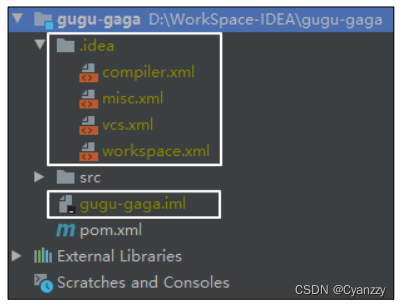
5.1 配置IDEA忽略文件
eclipse特定文件

IDEA特定文件
maven工程的target目录
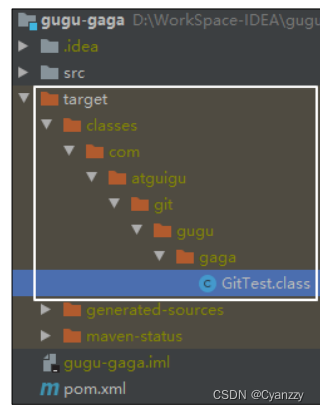
为什么忽略它们
与项目的实际功能无关,不参与服务器上部署运行。把它们忽略掉能够屏蔽 IDE 工具之 间的差异
如何忽略
1.**创建忽略规则文件 xxxx.ignore(前缀名随便起,建议是 git.ignore) **
这个文件的存放位置原则上在哪里都可以,为了便于让~/.gitconfig 文件 引用,建议也放在用 户家目录下 git.ignore 文件模版内容如下:
# Compiled class file
*.class

# Log file
*.log

# BlueJ files
*.ctxt

# Mobile Tools for Java (J2ME)
.mtj.tmp/# Package Files #
*.jar
*.war
*.nar
*.ear
*.zip
*.tar.gz
*.rar

hs_err_pid*

.classpath
.project
.settings
target
.idea
*.iml
2.**在.gitconfig 文件中引用忽略配置文件(此文件在 Windows 的家目录中) **
[core]
	excludesfile = C:/Users/dell/git.ignore
注意:这里要使用“正斜线(/)”,不要使用“反斜线(\)”
5.2 定位Git程序

5.3 初始化本地库
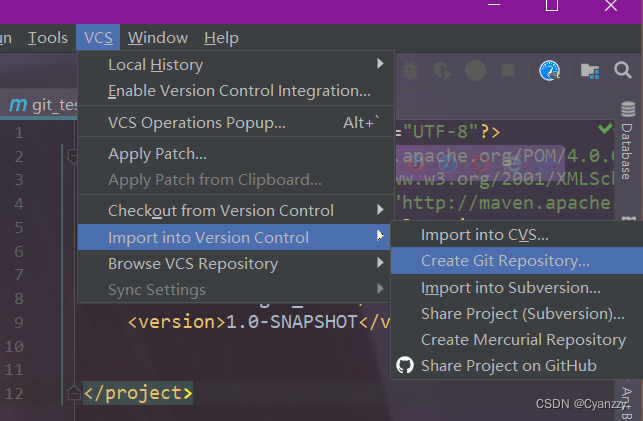
5.4 添加到暂存区
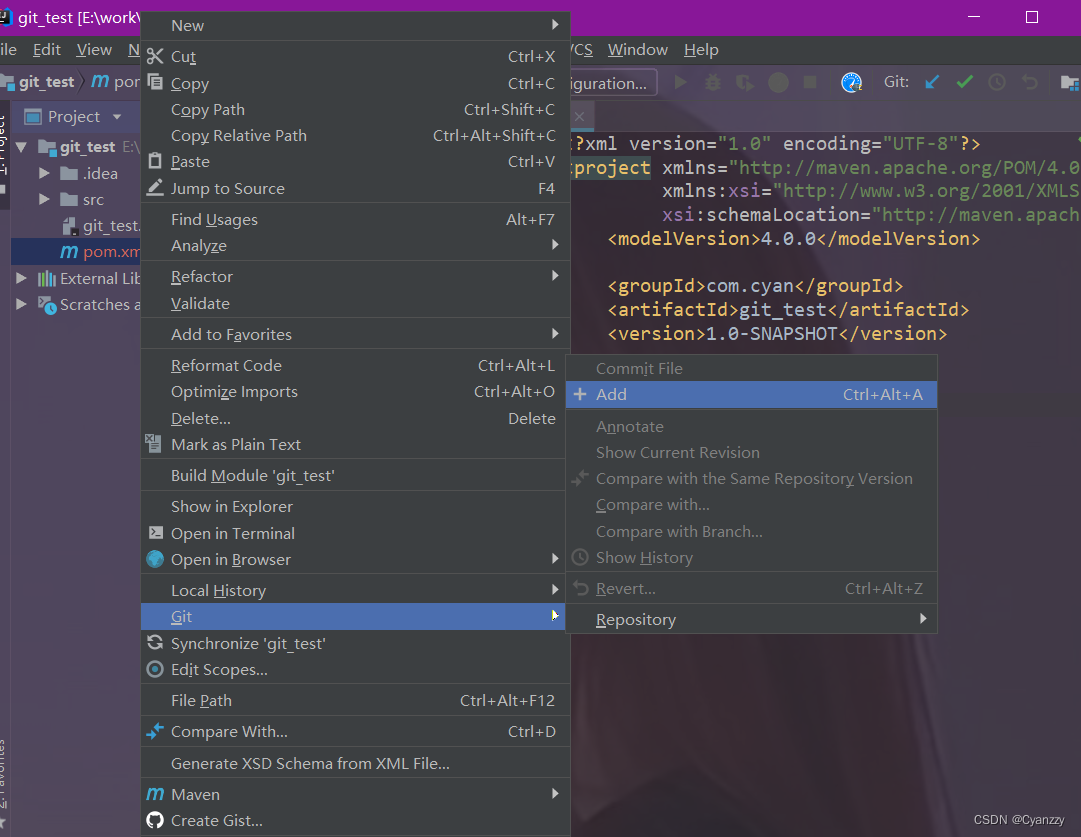
5.5 提交到本地仓库

5.6 切换版本
提交两次
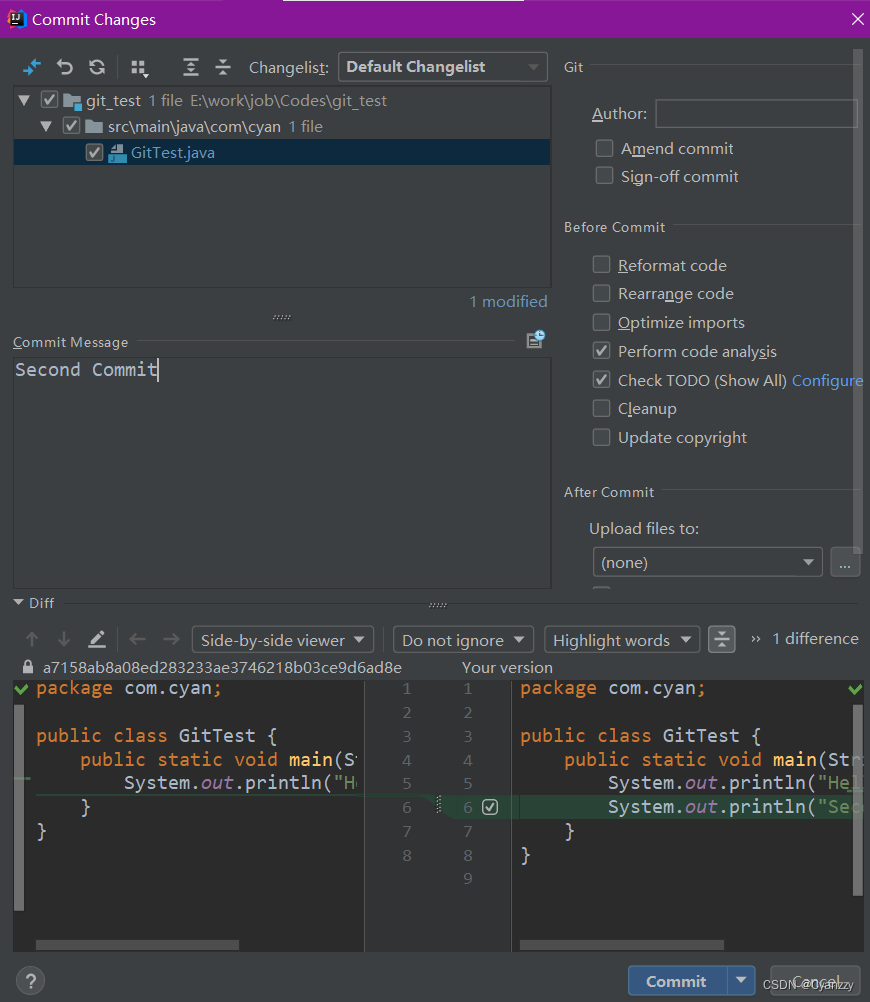
在 IDEA 的左下角,点击 Version Control,然后点击 Log 查看版本

右键选择要切换的版本,然后在菜单里点击 Checkout Revision。


5.7 创建分支
选择 Git,在 Repository 里面,点击 Branches 按钮。

在弹出的 Git Branches 框里,点击 New Branch 按钮。


5.8 切换分支


5.9 合并分支(正常合并)
在 IDEA 窗口的右下角,将 hot-fix 分支合并到当前 master 分支
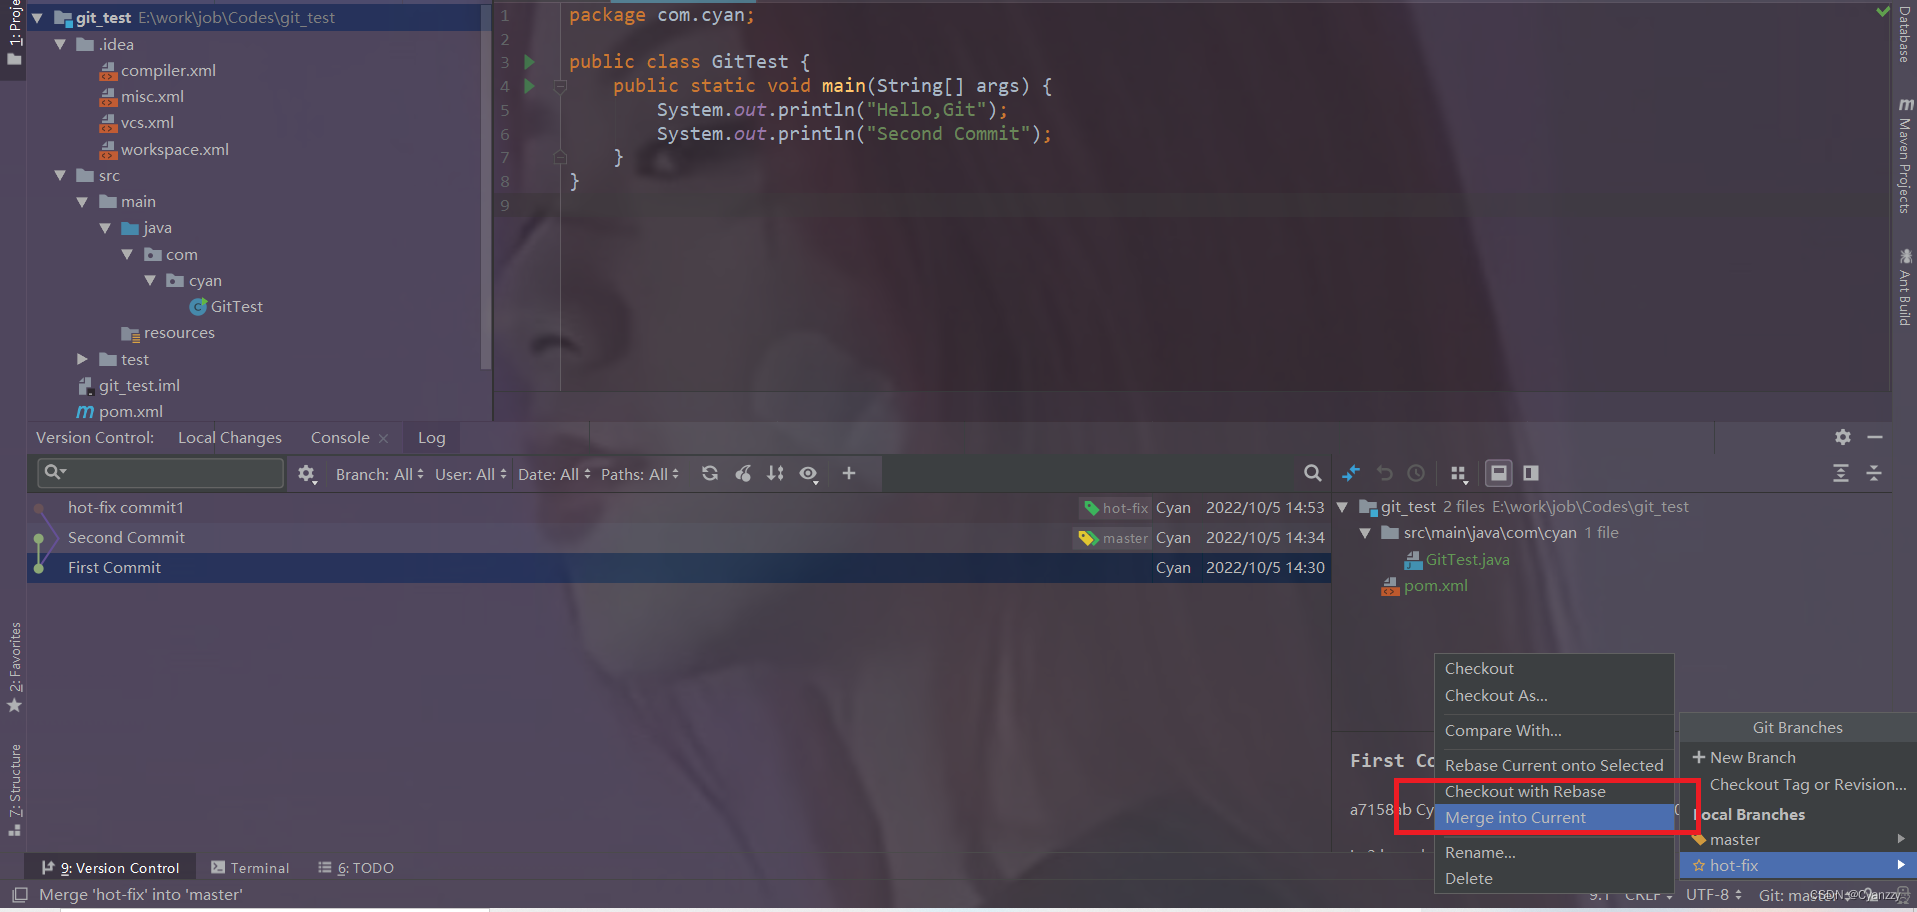
如果代码没有冲突,分支直接合并成功,分支合并成功以后,代码自动提交,无需手动 提交本地库。
5.10 解决冲突
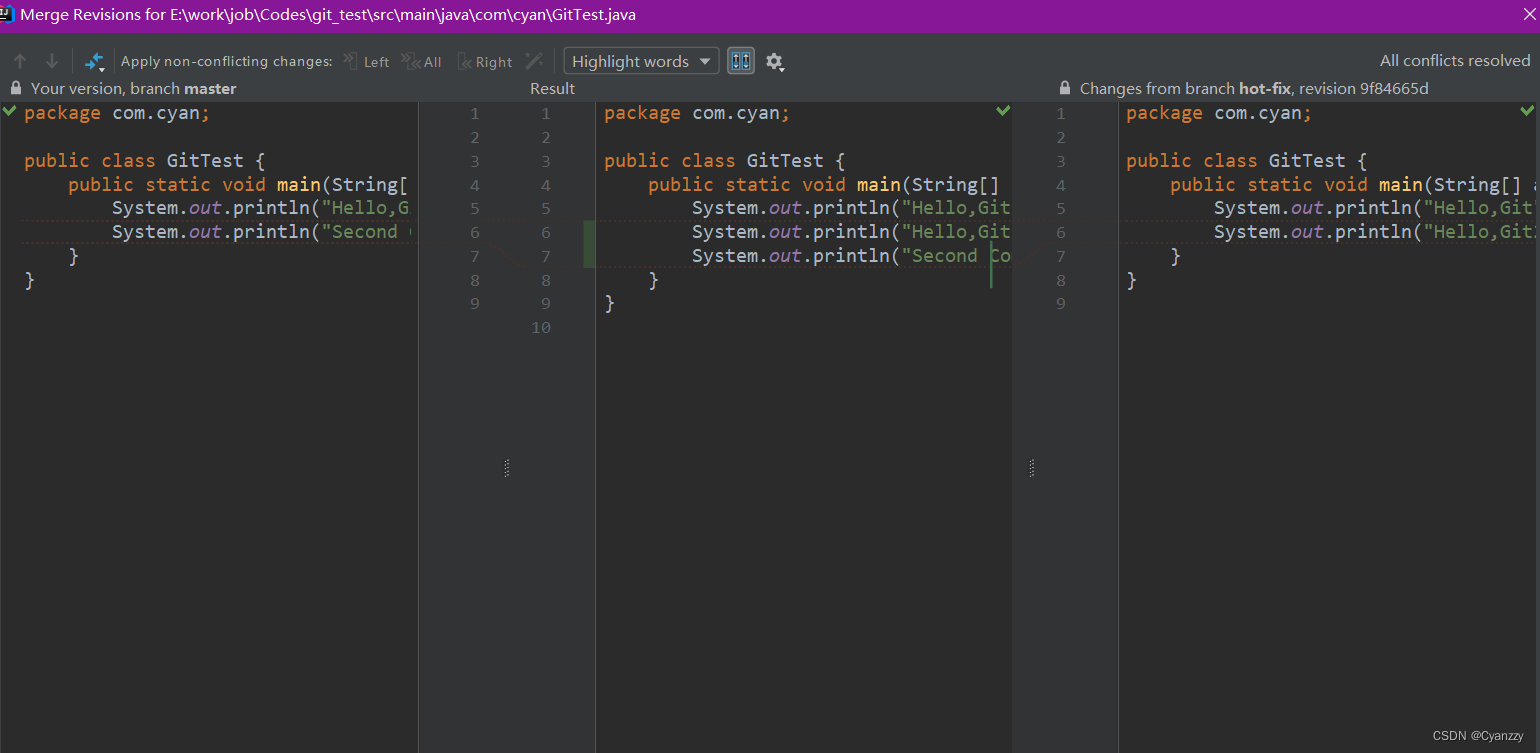
如果 master 分支和 hot-fix 分支都修改了代码,在合并分支的时候就会发生冲突。 现在站在 master 分支上合并 hot-fix 分支,就会发生代码冲突。点击 Conflicts 框里的 Merge 按钮,进行手动合并代码。 手动合并完代码以后,点击右下角的 Apply 按钮。 代码冲突解决,自动提交本地 仓库。

6. IDEA集成GitHub
6.1 设置GitHub账号

如果出现 401 等情况连接不上的,是因为网络原因,可以使用以下方式连接:
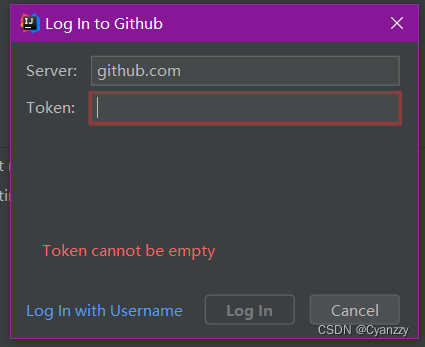
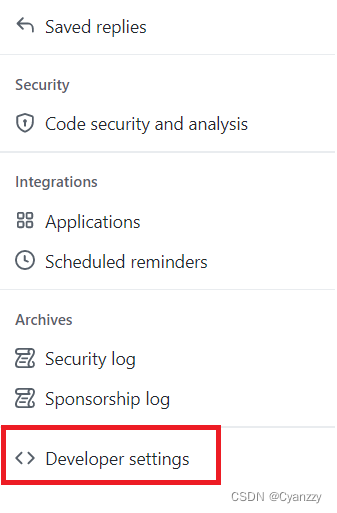
然后去 GitHub 账户上设置 token。



6.2 分享工程到Github


6.3 push推送本地库到远程库
右键点击项目,可以将当前分支的内容 push 到 GitHub 的远程仓库中

注意:
push 是将本地库代码推送到远程库,如果本地库代码跟远程库代码版本不一致, push 的操作是会被拒绝的。也就是说,要想 push 成功,一定要保证本地库的版本要比远程库的版本高!
因此在动手改本地代码之前,一定会先检查下远程库跟本地 代码的区别!如果本地的代码版本已经落后,切记要先 pull 拉取一下远程库的代码,将本地代码更新到最新以后,然后再修改,提交,推送!
6.4 pull拉取远程仓库到本地仓库
右键点击项目,可以将远程仓库的内容 pull 到本地仓库。

注意:。
pull 是拉取远端仓库代码到本地,如果远程库代码和本地库代码不一致,会自动合并,如果自动合并失败,还会涉及到手动解决冲突的问题
6.5 clone克隆远程库到本地

7. IDEA集成Gitee
7.0 创建Gitee远程仓库
点击首页右上角的加号,选择下面的新建仓库
7.1 连接Gitee
Idea 连接码云和连接 GitHub 几乎一样,首先在 Idea 里面创建一个工程,初始化 git 工 程,然后将代码添加到暂存区,提交到本地库,这些步骤上面已经讲过,此处不再赘述。
7.1.1 将本地代码 push 到码云远程库

自定义远程库链接。
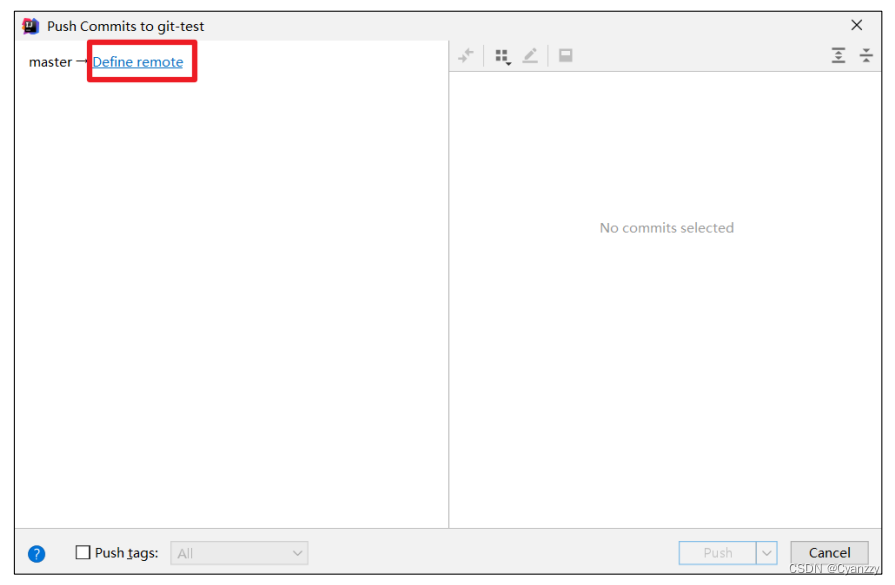
给远程库链接定义个 name,然后再 URL 里面填入码云远程库的 HTTPS 链接即可。码云服务器在国内,用 HTTPS 链接即可,没必要用 SSH 免密链接。

然后选择定义好的远程链接,点击 Push 即可。
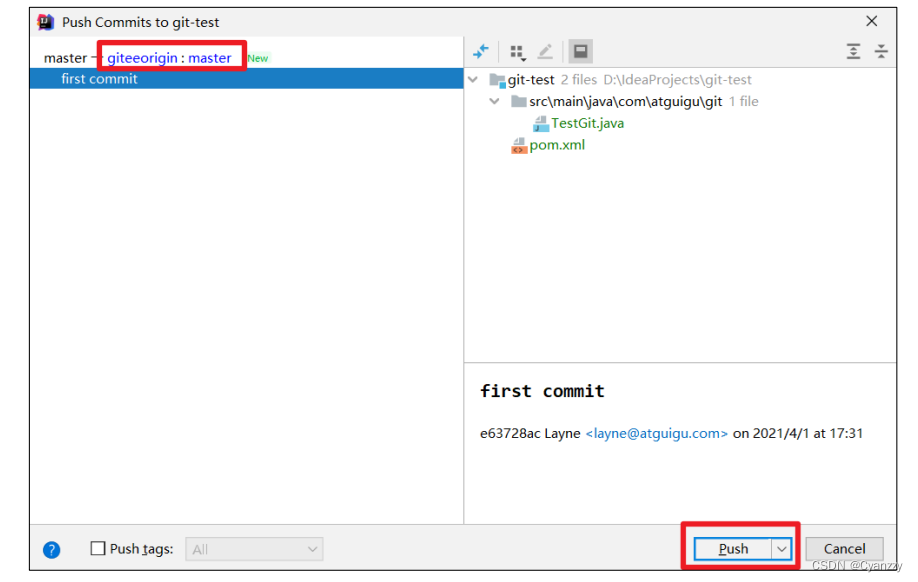
去码云远程库查看代码。

7.2 Gitee复制GitHub项目
码云提供了直接复制 GitHub 项目的功能,方便我们做项目的迁移和下载。
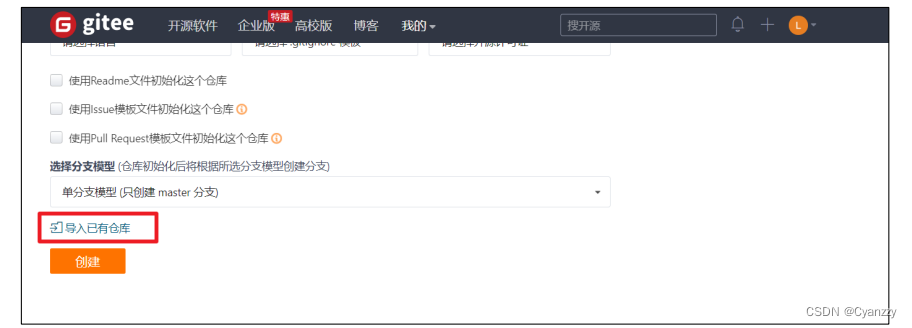
将 GitHub 的远程库 HTTPS 链接复制过来,点击创建按钮即可。
