目录
?3.4.拷贝开机启动脚本设置为开机自启、还原ssh-keygen文件
为什么要升级openssl、openssh,关闭rpcbind服务?
由于Centos7自带的openssh、openssl版本过低、第三方安全软件扫描过不了存在严重漏洞所以必须升级
京东云安全团队检测到多起黑客利用云主机上的RPCBind服务进行UDP反射DDoS攻击导致用户流量暴增的案例
#升级前记得一定一定要提前备份好数据
?环境:CentOS 7.6 64bit
?查看当前系统openssl、openssh版本
[root@cowboy ~]# ssh -V
OpenSSH_7.4p1, OpenSSL 1.0.2k-fips  26 Jan 2017

[root@cowboy ~]# rpm -qa |egrep "openssh|openssl"
openssh-7.4p1-22.el7_9.x86_64
openssl-1.0.2k-25.el7_9.x86_64
openssh-server-7.4p1-22.el7_9.x86_64
openssl-devel-1.0.2k-25.el7_9.x86_64
openssh-clients-7.4p1-22.el7_9.x86_64
openssl-libs-1.0.2k-25.el7_9.x86_64
? ?wget下载openssh-8.1p1.tar.gz、openssl-1.1.1q.tar.gz
- openssl官网:https://www.openssl.org/
- openssh官网:http://www.openssh.com/
[root@cowboy ~]# wget http://cdn.openbsd.org/pub/OpenBSD/OpenSSH/portable/openssh-8.3p1.tar.gz
[root@cowboy ~]# wget -c https://www.openssl.org/source/openssl-1.1.1q.tar.gz --no-check-certificate

[root@cowboy ~]# tar -zxvf openssh-8.3p1.tar.gz
[root@cowboy ~]# tar -zxvf openssl-1.1.1q
[root@cowboy ~]#  ls
openssh-8.3p1  openssh-8.3p1.tar.gz  openssl-1.1.1q  openssl-1.1.1q.tar.gz
--no-check-certificate: 不检查证书
tar -C: 指定解压到那个目录?
#下载编译安装的依赖
yum -y install gcc gcc-c++ zlib zlib-devel openssl openssl-devel  libselinux-devel perl pam-devel
1. 安装telnet服务(可选)
?#防止ssh连接不上,安装telnet作为备用远程连接服务
yum -y install telnet-server xinetd
systemctl restart xinetd
systemctl restart telnet.socket
#telnet服务由xinetd守护的,安装完telnet-server后,需要重新启动xinetd守护进程
1.2. 启动xinetd
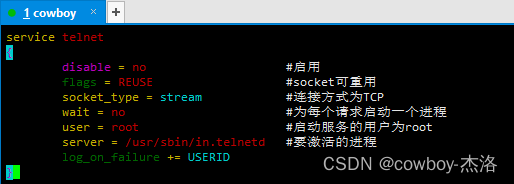
?修改配置文件,安装完之后是默认不开启的(如果文件不存在则vim 创建)
cat /etc/xinetd.d/telnet
service telnet
{
	disable = no
	flags = REUSE
	socket_type = stream
	wait = no
	user = root
	server = /usr/sbin/in.telnetd
	log_on_failure += USERID
}
参数含义
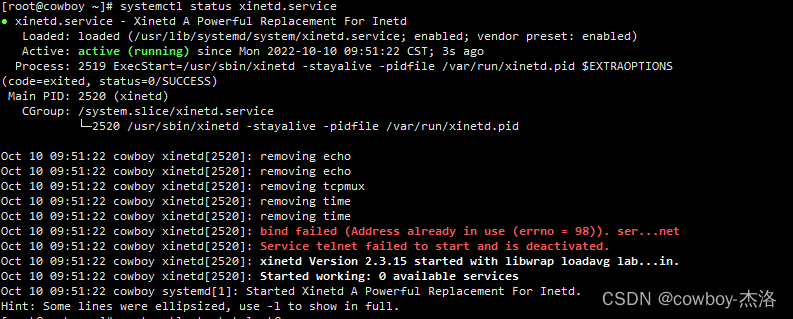
?启动报错:bind failed (Address already in use (errno = 98)). ser...net
信息表明,有其它的程度占用了端口,致使xinetd服务无法启动.
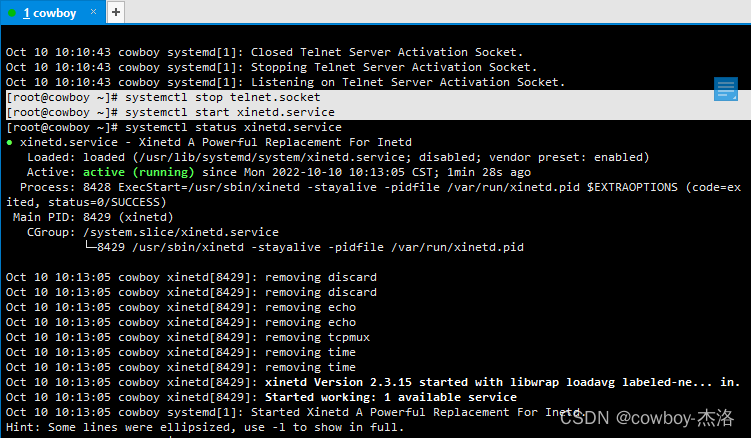
?解决方法: 有两种启动telnet服务的方式,两种方法同时使用会导致端口占用,所以停止telnet.socket服务
systemctl stop telnet.socket
systemctl disble telnet.socket
systemctl restart xinetd.service
1.3.防火墙、端口服务的放通?
查看进程知否正常运行、过滤23端口
[root@cowboy ~]# ps -ef|grep telnet
root      9674  1155  0 10:18 pts/1    00:00:00 grep --color=auto telnet
[root@cowboy ~]# lsof -i :23
COMMAND  PID USER   FD   TYPE  DEVICE SIZE/OFF NODE NAME
xinetd  8429 root    5u  IPv6 2217950      0t0  TCP *:telnet (LISTEN)
服务器端防火墙放通23端口?
[root@cowboy ~]# firewall-cmd --zone=public --add-port=23/udp --permanent
[root@cowboy ~]# firewall-cmd --zone=public --add-port=23/tcp --permanent
[root@cowboy ~]# firewall-cmd --reload
success
[root@cowboy ~]# firewall-cmd --list-ports
80/tcp 23/tcp 23/udp
?因为博主用的是云服务器,所以还需在 云服务器控制台进行操作
#注意 云服务器放通 安全组 轻量级服务器放通防火墙
云服务器
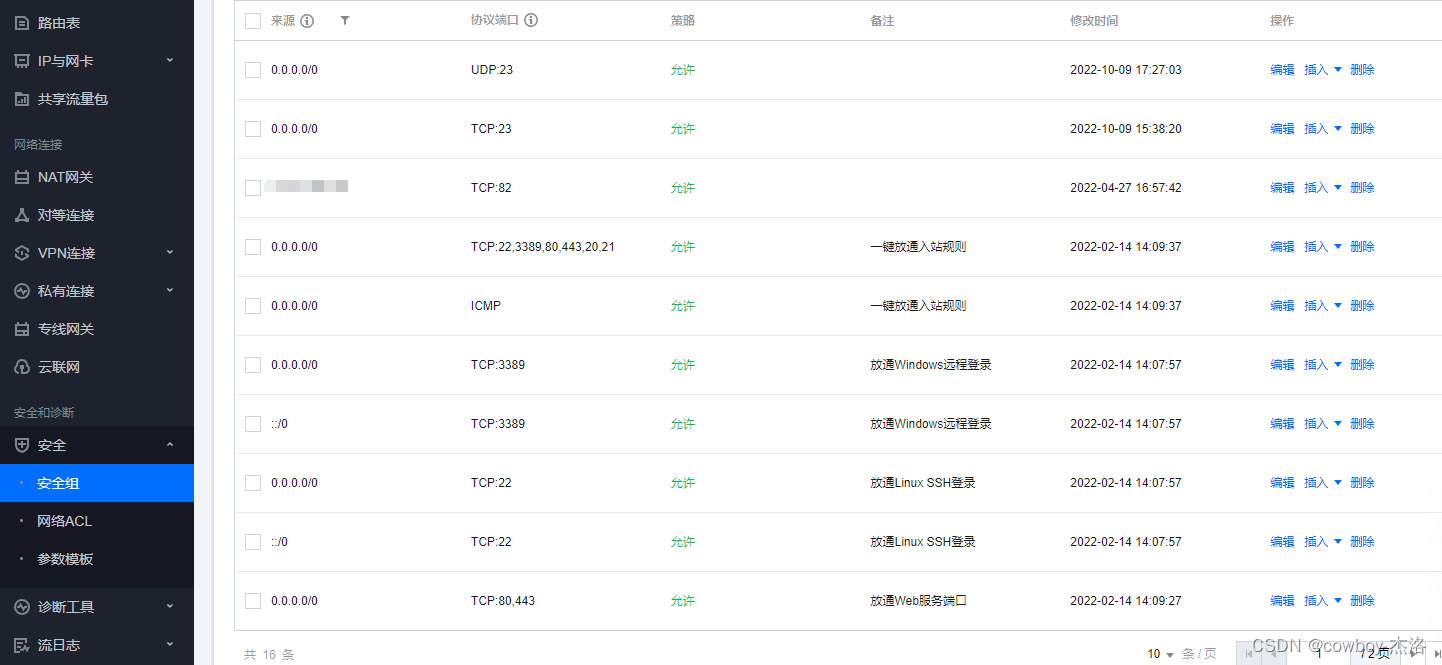
?轻量级服务器
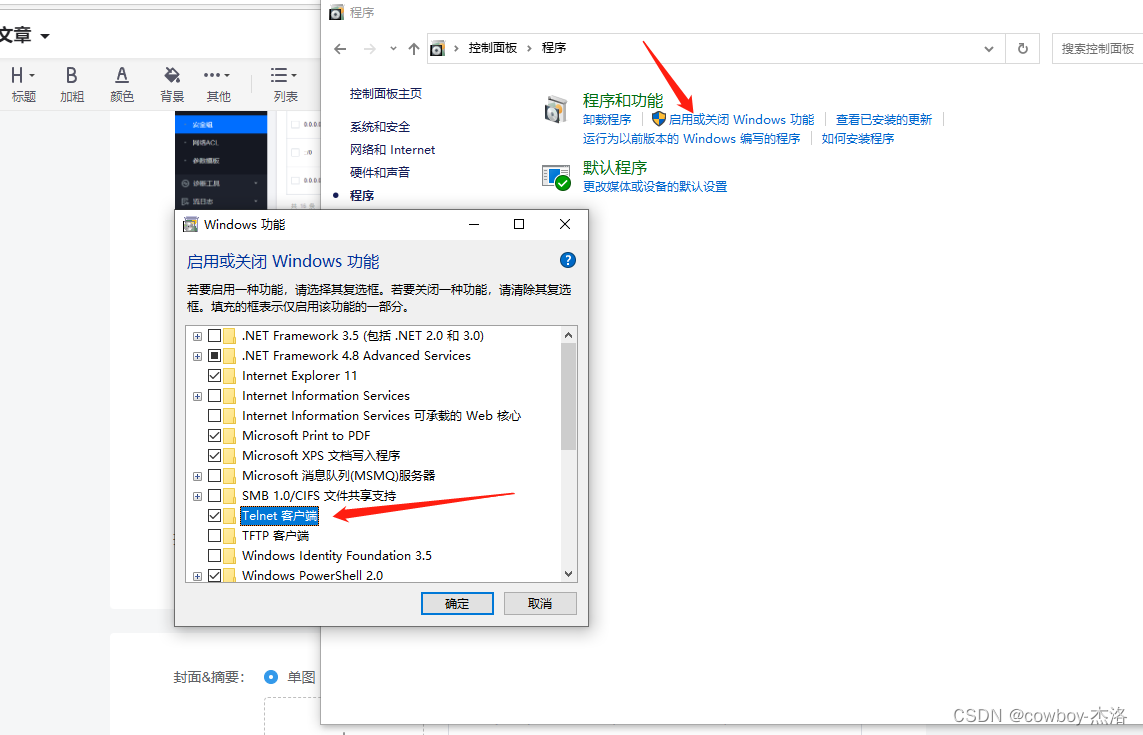
?win端
打开控制面板→程序
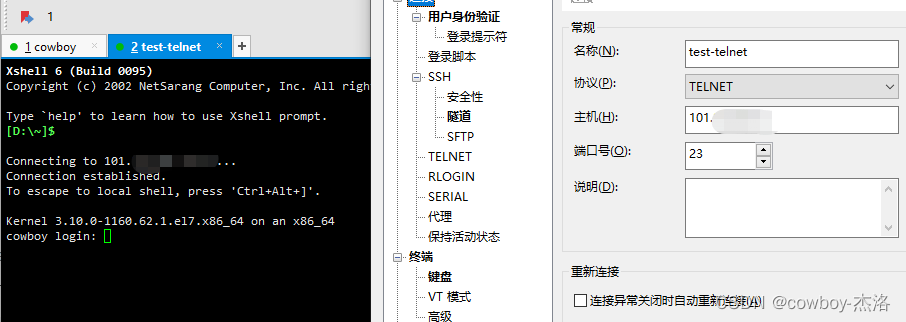
4.测试是否可以正常连接
?
2. openssl升级?
?2.1 备份原有openssl服务
find / -name openssl
cp -r /usr/lib64/openssl /usr/lib64/openssl.old
cp -r /usr/bin/openssl /usr/bin/openssl.old
cp -r /etc/pki/ca-trust/extracted/openssl /etc/pki/ca-trust/extracted/openssl.old

cp /usr/lib64/libcrypto.so.10 /usr/lib64/libcrypto.so.10.old
cp /usr/lib64/libssl.so.10 /usr/lib64/libssl.so.10.old
#如下两个库文件必须先备份,因系统内部分工具(如yum、wget等)依赖此库,而新版OpenSSL不包含这两个库

[root@cowboy ~]# echo $?
0
[root@cowboy ~]# ls /usr/lib64 |grep openssl
openssl
openssl.old
[root@cowboy ~]# ls /usr/bin/ |grep openssl
openssl
openssl.old
[root@cowboy ~]# ls -al /usr/lib64/libcrypto.so.10
lrwxrwxrwx 1 root root 19 Jul 25 17:04 /usr/lib64/libcrypto.so.10 -> libcrypto.so.1.0.2k
[root@cowboy ~]# ls -al /usr/lib64/libssl.so.10
lrwxrwxrwx 1 root root 16 Jul 25 17:04 /usr/lib64/libssl.so.10 -> libssl.so.1.0.2k
#确认已经备份
?2.2编译安装、及编译安装出现的报错
cd /openssl-1.1.1q
./config shared && make && make install

ll /usr/local/bin/openssl
ll -d /usr/local/include/openssl/
#编译完成之后,可以在以下目录找到文件

[root@cowboy openssl-1.1.1q]# ll /usr/local/bin/openssl
-rwxr-xr-x 1 root root 749088 Oct 14 10:17 /usr/local/bin/openssl
[root@cowboy openssl-1.1.1q]# ll -d /usr/local/include/openssl/
drwxr-xr-x 2 root root 4096 Oct 14 10:17 /usr/local/include/openssl/
?2.3 建立软连接?
ln -sf /usr/local/bin/openssl /usr/bin/openssl
ln -s /usr/local/include/openssl/ /usr/include/openssl
?2.4 更新动态连接数据库
echo "/usr/local/lib64" >> /etc/ld.so.conf
将新的库文件地址写入记录so库的配置文件

/sbin/ldconfig
#更新动态连接数据库
?2.5查看openssl版本,确认是否升级成功
openssl version -a

3.? SSH升级
?3.1备份原有ssh数据? ?!!!!!
[root@cowboy ~]# mkdir /opt/sshbak
[root@cowboy ~]# find / -name ssh
/etc/ssh
/etc/selinux/targeted/active/modules/100/ssh
/usr/share/bash-completion/completions/ssh
/usr/bin/ssh

############数据备份#############
cp /etc/ssh/sshd_config /opt/sshbak
tar -cvf /opt/sshbak/ssh.bak.tar /etc/ssh
cp /usr/bin/ssh-copy-id /usr/bin/ssh-copy-id.bak 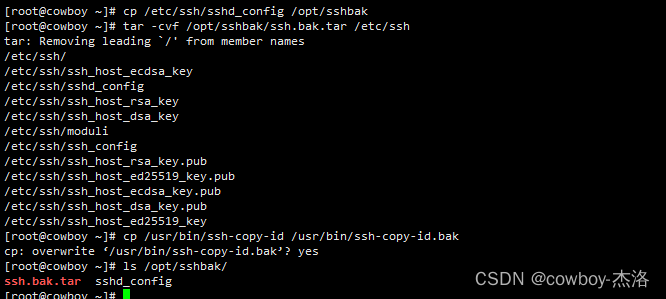
?3.2. 卸载原有ssh服务
rpm -qa |grep openssh |xargs rpm -e --allmatches ?--nodeps
xargs:? ? ? ? ? ? ???给命令传递参数的一个过滤器,也是组合多个命令的一个工具
--allmatches:? ??删除与 packge_name?匹配的包的所有版本
--nodeps:? ? ? ? ?不检查依赖直接删除rpm包
rm -rf /etc/ssh/? ??
#删除之前,建议安装telnet远程服务防止ssh断开
只要不重启sshd服务,就不会断开

?3.3.源码包编译升级
mkdir /usr/local/openssh
###########编译安装################
./configure --prefix=/usr/local/openssh --sysconfdir=/etc/ssh \
--with-openssl-includes=/usr/local/include \
--with-ssl-dir=/usr/local/lib64 \
--with-md5-passwords \
--with-zlib \
--with-pam

make && make install参数含义:–prefix?安装目录
??????????????????–sysconfdir 配置文件目录? ? ? ?
? ? ? ? ? ? ? ? ? –with-privsep-path 支持特权分离
? ? ? ? ? ? ? ? ? –with-md5-passwords 支持读取经过MD5加密的口令
?zlib库:一套通用的解压缩开源库,提供了内存(in-memory)压缩和解压函数,
?能检测解压出来的数据完整性
?3.4.拷贝开机启动脚本设置为开机自启、还原ssh-keygen文件
cp ./contrib/redhat/sshd.init /etc/init.d/sshd
chkconfig --add sshd
cp -a ./contrib/redhat/sshd.pam /etc/pam.d/sshd.pam
cp /usr/local/ssh/sbin/sshd /usr/sbin/sshd
cp /usr/local/ssh/bin/ssh /usr/bin/ssh
cp /usr/local/ssh/bin/ssh-keygen /usr/bin/ssh-keygen
将脚本添加至开机自启列表
[root@cowboy init.d]# chkconfig --add sshd  && chkconfig sshd on
Note: Forwarding request to 'systemctl enable sshd.socket'.
Created symlink from /etc/systemd/system/sockets.target.wants/sshd.socket to /usr/lib/systemd/system/sshd.socket.

[root@cowboy openssh-8.3p1]# systemctl enable sshd --now
??chkconfig?--add?sshd &&chkconfig sshd on:?新增加sshd服务并设置开机启动
? chkconfig --list |grep sshd:? ? ? ? ? ? ? ? ? ? ? ? ? ? ?列出sshd服务的设置情况

?3.5.修改sshd服务端的配置文件
echo 'PermitRootLogin yes' >> /etc/ssh/sshd_config
echo 'PasswordAuthentication yes' >> /etc/ssh/sshd_config
echo 'Port 22' >> /etc/ssh/sshd_config
echo 'AddressFamily any' >> /etc/ssh/sshd_config
echo 'ListenAddress 0.0.0.0' >> /etc/ssh/sshd_config
[root@cowboy sshd]# vim /etc/ssh/sshd_config
#注释 ?:set number ?显示行号默认监听22端口
17 Port 22? ? ? ? ? ? ? ? ? ? ? ? ? ? ? ? ? ? ? ? ? ? ? ? ? ? ? ? ? ? ? ? ?(去掉注释)ipv4和ipv6协议地址簇用那个一个,any 表示全用
18 AddressFamily any? ? ? ? ? ? ? ? ? ? ? ? ? ? ? ? ? ? ? ? ? ? ? (去掉注释)?指名监控的地址,0.0.0.0表示本机的所有地址
19 ListenAddress 0.0.0.0? ? ? ? ? ? ? ? ? ? ? ? ? ? ? ? ? ? ? ? ? (去掉注释)?允许使用ROOT用户登录
32 #PermitRootLogin prohibit-password? ? ? ? ? ? ? ? ??? ?改成 32 PermitRootLogin yes运行使用公钥认证
37 PubkeyAuthentication yes? ? ? ? ? ? ? ? ? ? ? ? ? ? ? ? ? ? (去掉注释) ? ?禁止解析(优化项如果使用DNS解析速度会很慢)
98 UseDNS no? ? ? ? ? ? ? ? ? ? ? ? ? ? ? ? ? ? ? ? ? ? ? ? ? ? ? ? ? ?(去掉注释)
###建立软连接###
ln -s /usr/local/openssh/bin/ssh /usr/bin/ssh
ln -s /usr/local/openssh/bin/ssh-keygen /usr/bin/ssh-keygen
ln -s /usr/local/openssh/sbin/sshd /usr/sbin/sshd
systemctl daemon-reload
?3.6.检查、测试SSH服务是否正常
[root@cowboy init.d]# systemctl daemon-reload
[root@cowboy init.d]# /etc/init.d/sshd restart
Restarting sshd (via systemctl):                           [  OK  ]
[root@cowboy init.d]# lsof -i :22
COMMAND   PID USER   FD   TYPE  DEVICE SIZE/OFF NODE NAME
sshd     1143 root    3u  IPv4 2666867      0t0  TCP cowboy:ssh->183.62.240.234:57082 (ESTABLISHED)
sshd     3040 root    3u  IPv4 2926334      0t0  TCP cowboy:ssh->183.62.240.234:61485 (ESTABLISHED)
sshd    15107 root    3u  IPv4 3027264      0t0  TCP *:ssh (LISTEN)
sshd    15107 root    4u  IPv6 3027266      0t0  TCP *:ssh (LISTEN)
[root@cowboy init.d]# netstat -ntup|grep 22
tcp        0      0 10.0.20.2:22            183.62.240.234:57082    ESTABLISHED 1143/sshd: root@pts
tcp        0     52 10.0.20.2:22            183.62.240.234:61485    ESTABLISHED 3040/sshd: root@pts
tcp        0      0 10.0.20.2:23            176.97.210.224:42958    ESTABLISHED 11518/in.telnetd
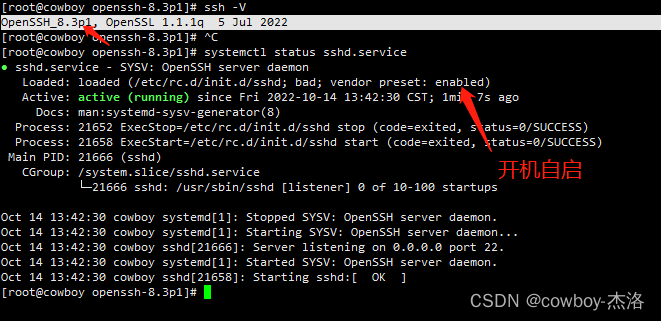
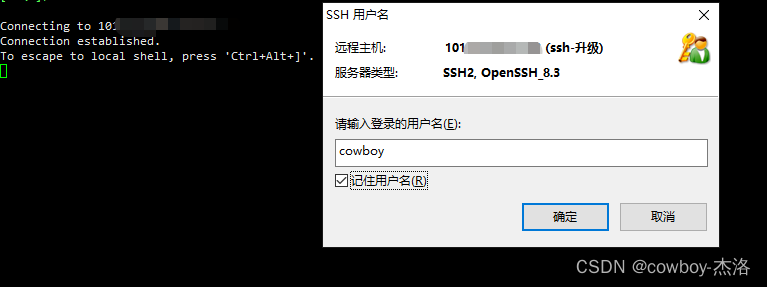
[root@cowboy init.d]# ssh -V
OpenSSH_8.3p1, OpenSSL 1.1.1q  5 Jul 2022
4.关闭rpcbind服务
大部分服务是不依赖于rpcbind的,只有NFS需要用到这个服务。
systemctl status rpcbind.service
systemctl disable --now rpcbind.service
systemctl stop rpcbind.socket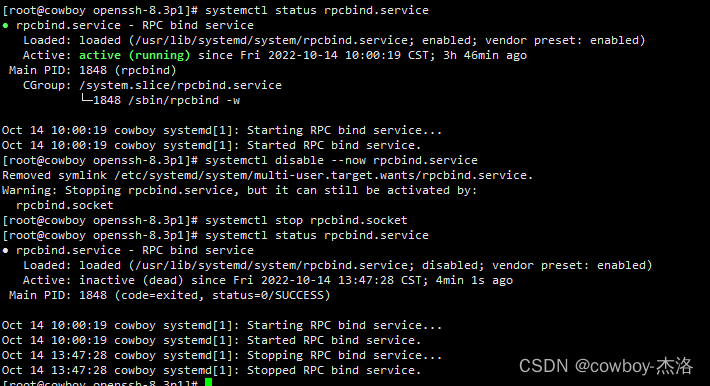
?rpcbind服务作用:Centos上禁用 rpcbind 111端口 - 一路狂飙 (ylkb.net)
5.禁用telnet远程连接(可选)
[root@cowboy init.d]# systemctl disable xinetd.service && systemctl stop xinetd.service