基于Docker+Code-server+Anaconda打造在线多python虚拟环境,并设置宝塔Apache反向代理
-
If you can from dockerhub,please run this to run your docker.
docker run -d --name code-server-anaconda -p 666:8080 -p 777:8888 \ -v "$HOME/.config/code-server:/root/.config/code-server" \ -v "/home/vscode:/root/coder/project" \ -u "$(id -u):$(id -g)" \ -e "DOCKER_USER=$USER" \ landasika/vscode-conda -
And If you need to enable jupyter in anaconda, go into the container and execute.
-
First you need to create a new session.
tmux new -s conda_online -
And then run this command.
cd ~ && jupyter lab --ip='*' --port=8888 --no-browser --allow-root -
You can see…
[I 13:37:11.236 LabApp] Use Control-C to stop this server and shut down all kernels (twice to skip confirmation). [C 13:37:11.239 LabApp] To access the notebook, open this file in a browser: file:///root/.local/share/jupyter/runtime/nbserver-30-open.html Or copy and paste one of these URLs: http://10f788d1f6a3:8888/?token=*********** or http://127.0.0.1:8888/?token=********** -
After that,close the terminal.And use this token to open jupyter on web.
-
直接无脑pull法
拉取我整好的镜像
docker pull landasika/vscode-conda:latest
直接run就行了
docker run -d --name code-server-anaconda -p 666:8080 -p 777:8888 \
  -v "$HOME/.config/code-server:/root/.config/code-server" \
  -v "/home/vscode:/root/coder/project" \
  -u "$(id -u):$(id -g)" \
  -e "DOCKER_USER=$USER" \
  landasika/vscode-conda
如果需要开启anaconda中的jupyter就进入容器,
首先创建一个新的会话
tmux new -s conda_online
然后执行
cd ~ && jupyter lab --ip='*' --port=8888 --no-browser --allow-root
然后可以看到类似这样的:
[I 13:37:11.236 LabApp] Use Control-C to stop this server and shut down all kernels (twice to skip confirmation).
[C 13:37:11.239 LabApp]

    To access the notebook, open this file in a browser:
        file:///root/.local/share/jupyter/runtime/nbserver-30-open.html
    Or copy and paste one of these URLs:
        http://10f788d1f6a3:8888/?token=***********
     or http://127.0.0.1:8888/?token=**********
最后关掉终端就行了。
然后用这个token去浏览器打开就行了
手动搭建
总的来说就是:先用anaconda的docker镜像拉取下来,再在里面手动搭建vscode
可能有人问为什么不在code-sever里面搭虚拟环境?
这个因为,code-server的docker里面有自带的python3.9的环境,并且当创建之后,无法写入用户设置,所以放弃了。
利用Docker搭建Anaconda
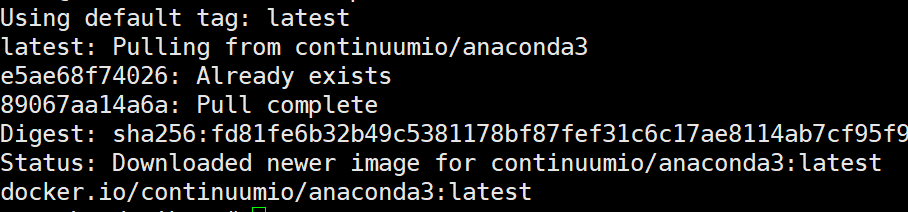
这个就很简单,首先docker pull下来镜像
docker pull continuumio/anaconda3
这里呢,run的时候,顺带把下面的code-server的目录映射也做好。还有一个注意点,就是要指定命令运行,不然的话容器会一直处于退出状态。
docker run -d --name code-server-anaconda -p 666:8080 -p 777:8888 \
  -v "$HOME/.config/code-server:/root/.config/code-server" \
  -v "/home/vscode:/root/coder/project" \
  -u "$(id -u):$(id -g)" \
  -e "DOCKER_USER=$USER" \
  continuumio/anaconda3  \
  tail -f /dev/null
解释一下上面的命令
docker run -d --name code-server -p 666:8080 -p 777:8888 \ #-d是后台运行,-it是交互模式,-p做端口映射,外部端口:内部端口
  -v "$HOME/.config/code-server:/root/.config/code-server" \ #做目录映射,配置文件目录
  -v "/home/vscode:/root/coder/project" \ #目录映射,宿主机代码目录:docker里面的代码目录
  -u "$(id -u):$(id -g)" \ #指定用户
  -e "DOCKER_USER=$USER" \ # 设置环境
   continuumio/anaconda3  \
   tail -f /dev/null  #command执行的终端命令
之后你就进入容器中了。在容器中,运行如下命令安装jupyter笔记本
conda install -c conda-forge jupyterlab
-
如果需要配置python的虚拟环境,参考: anaconda 创建虚拟环境_往南顾的博客-CSDN博客_anaconda虚拟环境创建
直接配置即可
手动搭建Code-server
准备
创建一个配置文件映射的一个文件夹
mkdir ~/.config/code-server
进入docker,下载需要的东西
apt-get update
apt-get install -y vim tmux
下载并解压
进入docker容器
下载Code-server,可能会很慢很慢
mkdir /vscode
cd /vscode
wget https://github.com/coder/code-server/releases/download/v4.7.1/code-server-4.7.1-linux-amd64.tar.gz
下载完成之后解压
tar -xvf code-server-4.7.1-linux-amd64.tar.gz
修改配置文件
vim ~/.config/code-server/config.yaml
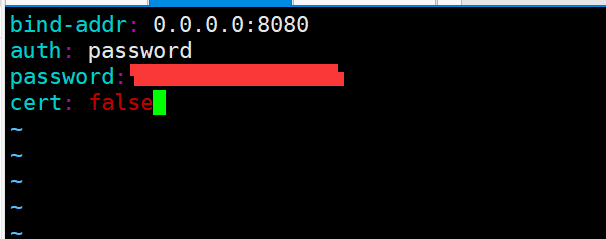
bind-addr: 0.0.0.0:8080
auth: password
password: 123456
cert: false
密码就是登录你自己code-server需要的密码
打包镜像,修改初始COMMAND
退出镜像,查看容器id

打包镜像,并删除容器
docker commit 容器id coder/anaconda
docker rm -f 容器id
设置新的COMMAND重新启动
docker run -d --name code-server-anaconda -p 666:8080 -p 777:8888 \
  -v "$HOME/.config/code-server:/root/.config/code-server" \
  -v "/home/vscode:/root/coder/project" \
  -u "$(id -u):$(id -g)" \
  -e "DOCKER_USER=$USER" \
  coder/anaconda  \
 /vscode/code-server-4.7.1-linux-amd64/bin/code-server --port 8080 --host 0.0.0.0 --auth password
然后再打包镜像,并删除容器
docker commit 容器id coder/anaconda
docker rm -f 容器id
再启动即可
docker run -d --name code-server-anaconda -p 666:8080 -p 777:8888 \
  -v "$HOME/.config/code-server:/root/.config/code-server" \
  -v "/home/vscode:/root/coder/project" \
  -u "$(id -u):$(id -g)" \
  -e "DOCKER_USER=$USER" \
  coder/anaconda
最后访问你的http://ip:666
输入密码登录
开启anaconda的jupyter
如果需要开启anaconda中的jupyter就进入容器,
首先创建一个新的会话
tmux new -s conda_online
然后执行
cd ~ && jupyter lab --ip='*' --port=8888 --no-browser --allow-root
然后可以看到类似这样的:
[I 13:37:11.236 LabApp] Use Control-C to stop this server and shut down all kernels (twice to skip confirmation).
[C 13:37:11.239 LabApp]

    To access the notebook, open this file in a browser:
        file:///root/.local/share/jupyter/runtime/nbserver-30-open.html
    Or copy and paste one of these URLs:
        http://10f788d1f6a3:8888/?token=***********
     or http://127.0.0.1:8888/?token=**********
最后关掉终端就行了。
然后用这个token去浏览器打开就行了
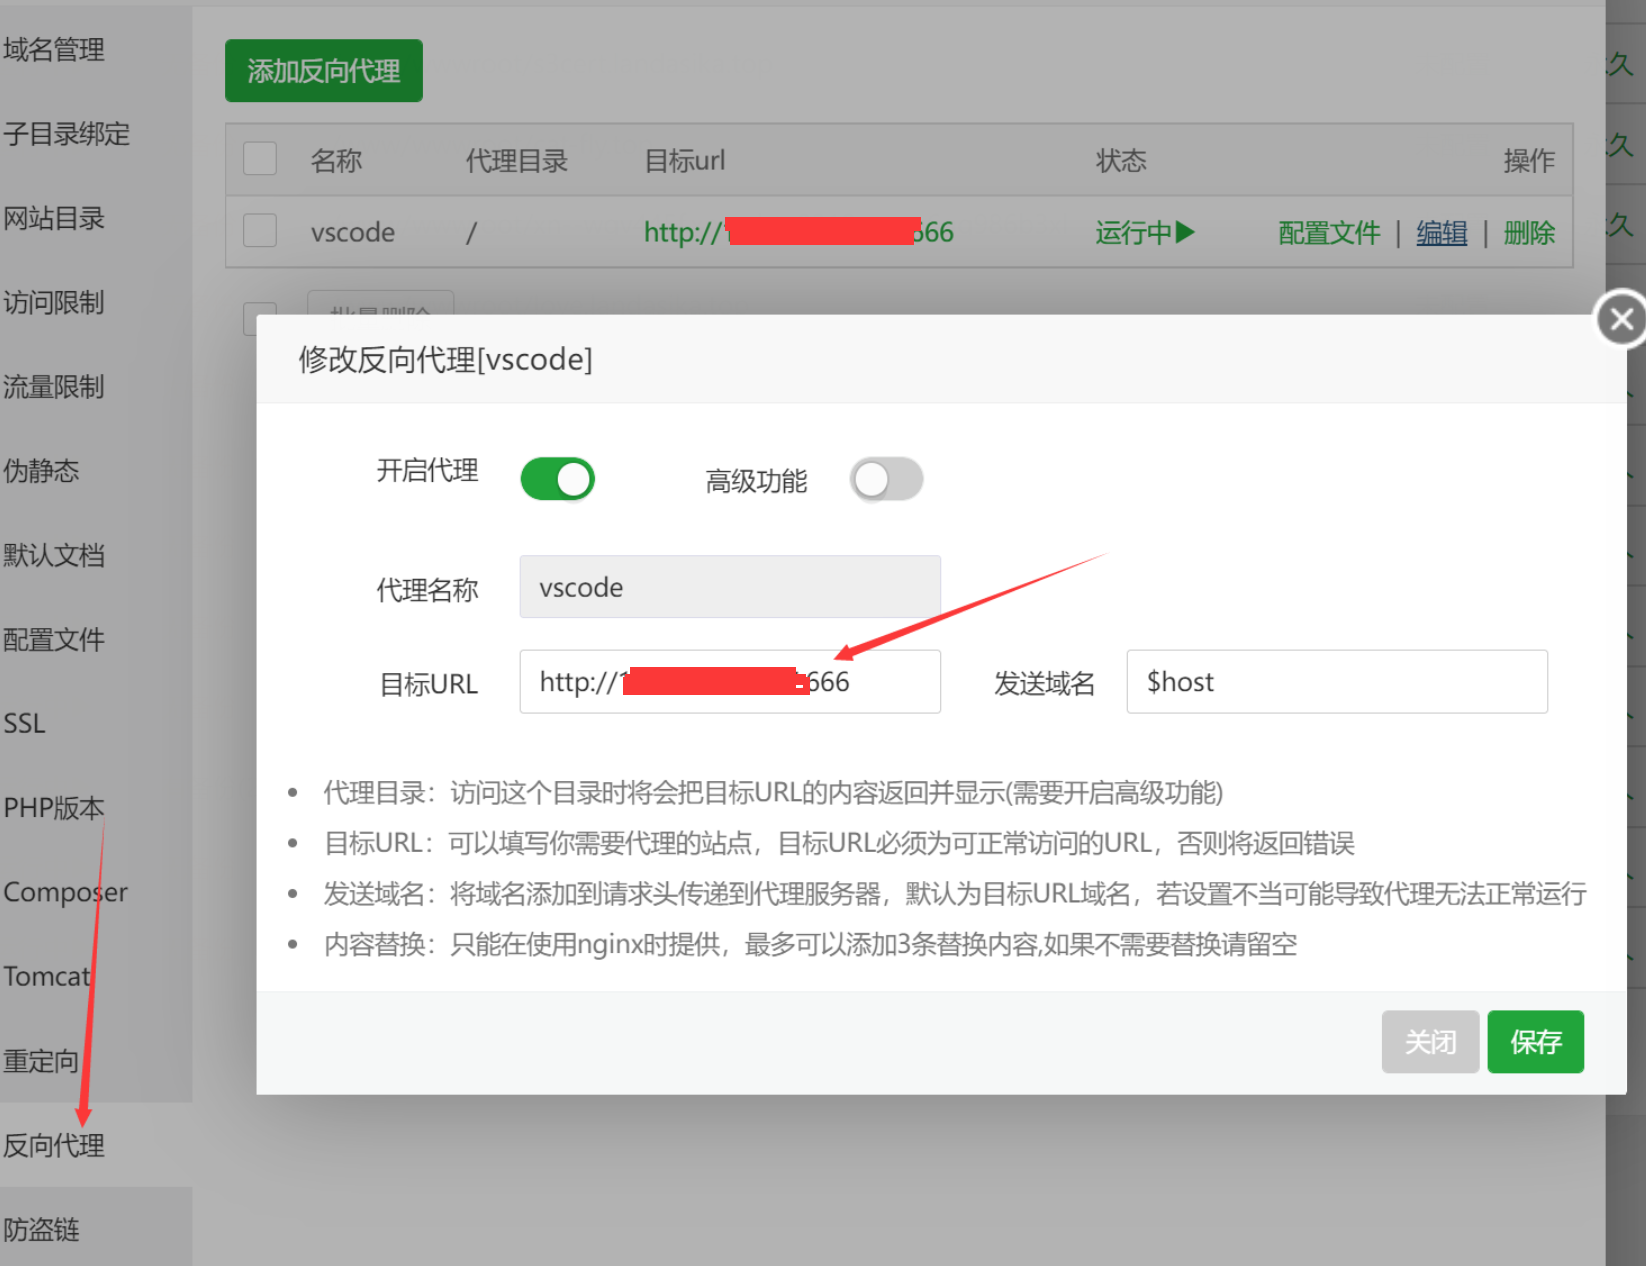
设置宝塔Apache反向代理
- 若要用Nginx搭建反向代理,参考:code-server Dokcer+Nginx 部署方法及踩坑 - 浅い空的小站
首先创建一个站点,然后设置反向代理
如果这个时候访问,会出现
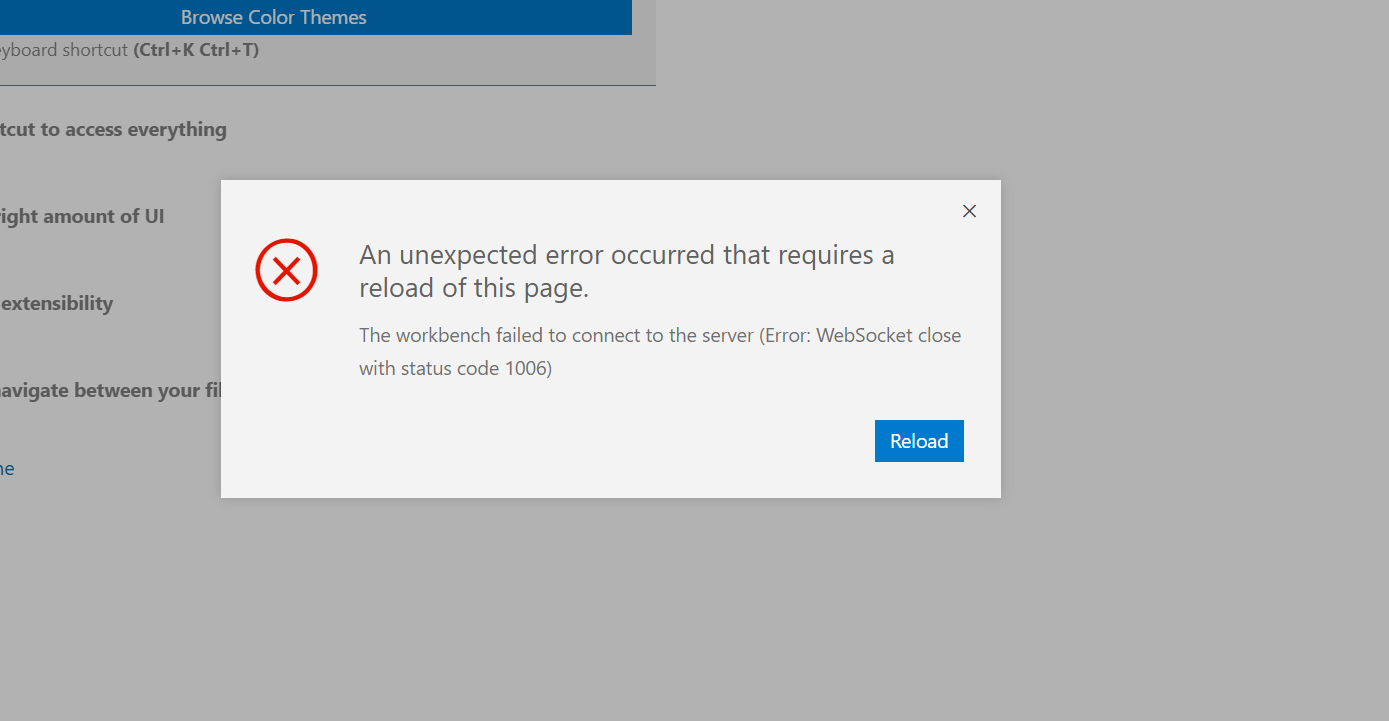
这个是因为,WebSocket没有长久连接,这个跟Apache的生命周期有关,有兴趣可以深入了解了解
编辑配置文件吗,注意对应就行
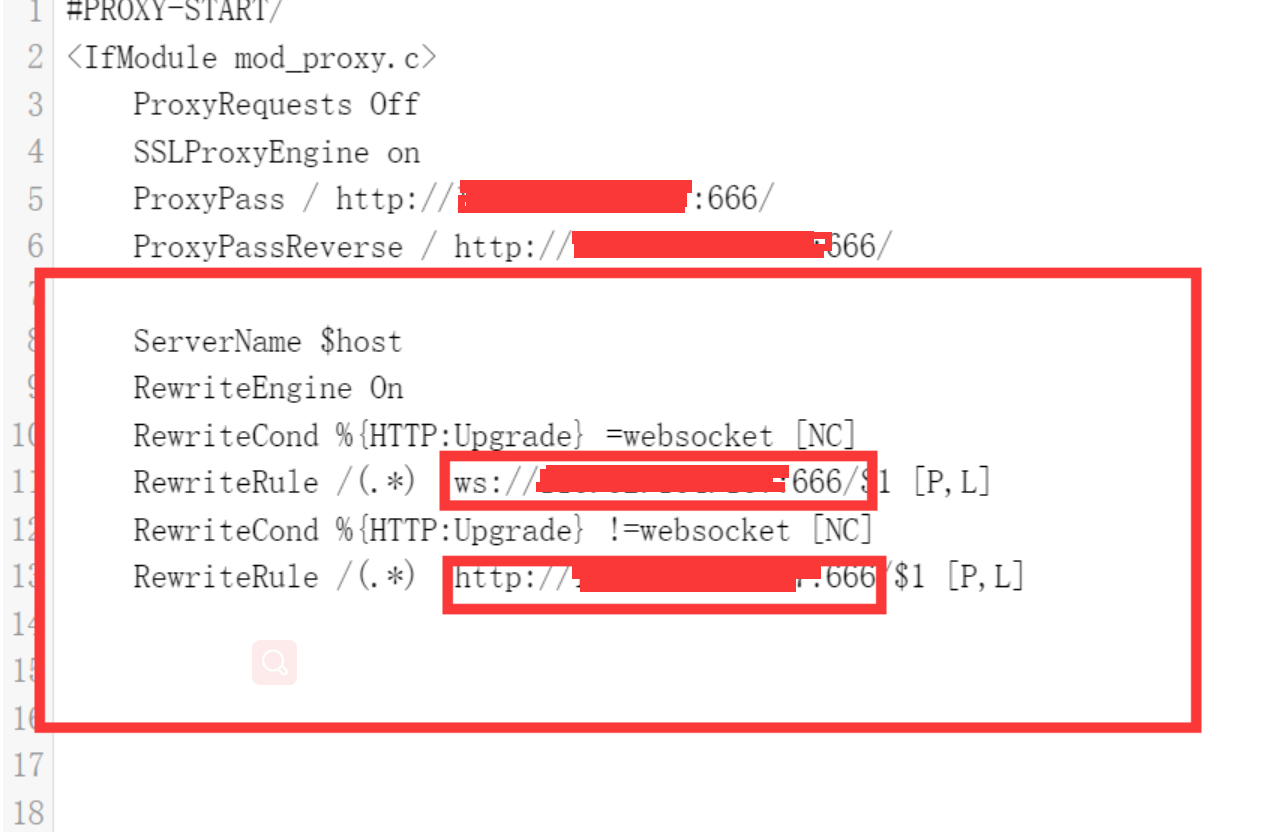
    ServerName $host
    RewriteEngine On
         RewriteCond %{HTTP:Upgrade} =websocket [NC]
    RewriteRule /(.*)  ws://ip:666/$1 [P,L]
    RewriteCond %{HTTP:Upgrade} !=websocket [NC]
    RewriteRule /(.*)  http://ip:666/$1 [P,L]
再次访问即可
常见问题
运行python或其他编译器加载插件过于缓慢
vscode会自动向微软发反馈而导致的,禁用后就可以正常使用了。
在.vscode文件夹下的setting.json中添加下列语句,重新加载即可。
"telemetry.enableCrashReporter": false
%{HTTP:Upgrade} =websocket [NC]
    RewriteRule /(.*)  ws://ip:666/$1 [P,L]
    RewriteCond %{HTTP:Upgrade} !=websocket [NC]
    RewriteRule /(.*)  http://ip:666/$1 [P,L]
再次访问即可
常见问题
运行python或其他编译器加载插件过于缓慢
vscode会自动向微软发反馈而导致的,禁用后就可以正常使用了。
在.vscode文件夹下的setting.json中添加下列语句,重新加载即可。
"telemetry.enableCrashReporter": false