1.创建一个版本库
(1)新建一个目录code,在code目录下创建一个版本库,命令如下:
$mkdir code
$git init
说明:可以看到code目录下创建了一个.git隐藏目录,这就是版本库目录。
2.版本的创建与回退
2.1 使用
(1)在code目录下创建一个文件code.txt,编辑内容如下:
$touch
$vi
$cat
(2)使用如下两条命令可以创建一个版本
$git add code.txt
$git commit -m "版本1"
(3)使用如下命令可以查看版本记录
$git log
进入log界面后,按q键退出
(4)如果想回到某一个版本,可以使用如下命令:
git reset --hard HEAD^
改变指针HEAD的位置,由时间轴版本2倒退到版本1
其中HEAD表示当前最新版本(请记死),HEAD表示当前版本的前一个版本,HEAD^表示当前版本的前前个版本,也可以使用HEAD-1表示当前版本的前一个版本,HEAD-100表示当前版本的前100个版本。
(5)查看操作记录
git reflog
(6)使用版本号直接跳转到某一个版本
git reset --hard a21dfa3eef20466ce489f450d8a372f1313f3b7f
4.2 工作区和缓存区
4.2.1 工作区(WorkingDirectory)
工作区 电脑中的目录,比如我们的code,就是一个工作区
4.2.2 版本库(Repository)
工作区中有一个隐藏目录.git,这不是工作区,而是git的版本库。git的版本库里存了很多东西,其中最重要的就是成为stage(或者叫index)的暂存区,还有git为我们自动创建的第一个分支master的一个指针叫HEAD。
因为我们创建git版本库时,git自动为我们创建了唯一一个master分支,所以,现在git commit就是往master分支上提交更改。可以简单理解为,需要提交的文件修改统统放到暂存区【计算机的缓存区】,然后一次性提交暂存区的所有修改。
一次性将两个文件加入到暂存区,然后再执行commit:
gaoobo@SK-20220621CTKI MINGW64 /d/code (testing)
$ touch code2.txt

gaoobo@SK-20220621CTKI MINGW64 /d/code (testing)
$ vi code2.txt

gaoobo@SK-20220621CTKI MINGW64 /d/code (testing)
$ cat code2.txt
code2.txt文件创建,第一行内容填充

gaoobo@SK-20220621CTKI MINGW64 /d/code (testing)
$ vi code.txt

gaoobo@SK-20220621CTKI MINGW64 /d/code (testing)
$ cat code1.txt
cat: code1.txt: No such file or directory

gaoobo@SK-20220621CTKI MINGW64 /d/code (testing)
$ cat code.txt
code.txt编辑测试,(真code,刚刚创建了一个conde文件)第一行
code.txt添加一行 第二行
code.txt第三行

gaoobo@SK-20220621CTKI MINGW64 /d/code (testing)
$ git status
On branch testing
Changes not staged for commit:
  (use "git add <file>..." to update what will be committed)
  (use "git restore <file>..." to discard changes in working directory)
        modified:   code.txt

Untracked files:
  (use "git add <file>..." to include in what will be committed)
        code2.txt
        conde.txt
        test/

no changes added to commit (use "git add" and/or "git commit -a")

gaoobo@SK-20220621CTKI MINGW64 /d/code (testing)
$ git add code.txt code2.txt
warning: in the working copy of 'code2.txt', LF will be replaced by CRLF the next ti

gaoobo@SK-20220621CTKI MINGW64 /d/code (testing)
$ git status
On branch testing
Changes to be committed:
  (use "git restore --staged <file>..." to unstage)
        modified:   code.txt
        new file:   code2.txt

Untracked files:
  (use "git add <file>..." to include in what will be committed)
        conde.txt
        test/


gaoobo@SK-20220621CTKI MINGW64 /d/code (testing)
$ git commit -m "版本3"
[testing a21dfa3] 版本3
 2 files changed, 4 insertions(+), 2 deletions(-)
 create mode 100644 code2.txt

gaoobo@SK-20220621CTKI MINGW64 /d/code (testing)
$ git status
On branch testing
Untracked files:
  (use "git add <file>..." to include in what will be committed)
        conde.txt
        test/

nothing added to commit but untracked files present (use "git add" to track)
4.3 管理修改
git管理的文件的修改,它只会提交暂存区的修改来创建版本(commit之前没有add,则修改不会被提交)
gaoobo@SK-20220621CTKI MINGW64 /d/code (testing)
$ git add code.txt

gaoobo@SK-20220621CTKI MINGW64 /d/code (testing)
$ vi code.txt

gaoobo@SK-20220621CTKI MINGW64 /d/code (testing)
$ git commit -m "版本4"
[testing cb83e1c] 版本4
 1 file changed, 2 insertions(+)

gaoobo@SK-20220621CTKI MINGW64 /d/code (testing)
$ git status
On branch testing
Changes not staged for commit:
  (use "git add <file>..." to update what will be committed)
  (use "git restore <file>..." to discard changes in working directory)
        modified:   code.txt

Untracked files:
  (use "git add <file>..." to include in what will be committed)
        conde.txt
        test/

no changes added to commit (use "git add" and/or "git commit -a")

gaoobo@SK-20220621CTKI MINGW64 /d/code (testing)
$ cat code.txt
code.txt编辑测试,(真code,刚刚创建了一个conde文件)第一行
code.txt添加一行 第二行
code.txt第三行
code.txt第四行
code.txt第五行
code.txt第六行
4.4 撤销修改
(1)继续上面的操作,提示我们使用git checkout – < 文件 > 来丢弃工作区的改动。执行如下命令,发现工作区干净了,第二次改动的内容也没了
gaoobo@SK-20220621CTKI MINGW64 /d/code (testing)
$ git diff
diff --git a/code.txt b/code.txt
index d70f52a..0ebb26b 100644
--- a/code.txt
+++ b/code.txt
@@ -3,3 +3,4 @@ code.txt添加一行 第二行
 code.txt第三行
 code.txt第四行
 code.txt第五行
+code.txt第六行

gaoobo@SK-20220621CTKI MINGW64 /d/code (testing)
$ git checkout -- code.txt

gaoobo@SK-20220621CTKI MINGW64 /d/code (testing)
$ git diff

gaoobo@SK-20220621CTKI MINGW64 /d/code (testing)
$ git status
On branch testing
Untracked files:
  (use "git add <file>..." to include in what will be committed)
        conde.txt
        test/

nothing added to commit but untracked files present (use "git add" to track)
(2)撤销暂存区的内容
$ git reset HEAD file
gaoobo@SK-20220621CTKI MINGW64 /d/code (testing)
$ git add code.txt

gaoobo@SK-20220621CTKI MINGW64 /d/code (testing)
$ git status
On branch testing
Changes to be committed:
  (use "git restore --staged <file>..." to unstage)
        modified:   code.txt

Untracked files:
  (use "git add <file>..." to include in what will be committed)
        conde.txt
        test/

gaoobo@SK-20220621CTKI MINGW64 /d/code (testing)
$ git reset HEAD code.txt
Unstaged changes after reset:
M       code.txt

gaoobo@SK-20220621CTKI MINGW64 /d/code (testing)
$ git status
On branch testing
Changes not staged for commit:
  (use "git add <file>..." to update what will be committed)
  (use "git restore <file>..." to discard changes in working directory)
        modified:   code.txt

Untracked files:
  (use "git add <file>..." to include in what will be committed)
        conde.txt
        test/

no changes added to commit (use "git add" and/or "git commit -a")
4.5 对比文件的不同
(1)对比工作区中的code.txt和HEAD版本中code.txt的不同:
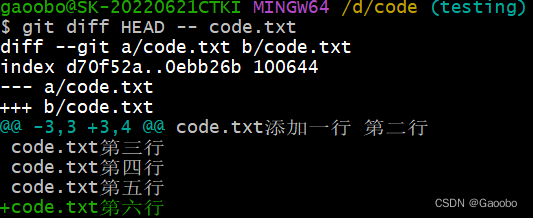
gaoobo@SK-20220621CTKI MINGW64 /d/code (testing)
$ git diff HEAD -- code.txt
diff --git a/code.txt b/code.txt
index d70f52a..0ebb26b 100644
--- a/code.txt
+++ b/code.txt
@@ -3,3 +3,4 @@ code.txt添加一行 第二行
 code.txt第三行
 code.txt第四行
 code.txt第五行
+code.txt第六行
(2)丢弃工作区的改动

$git checkout code.txt
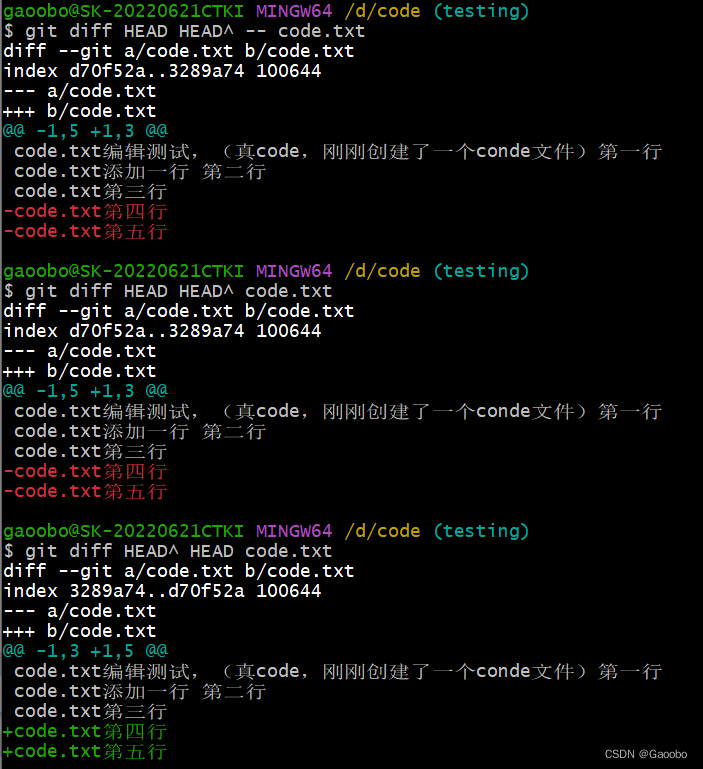
(3)对比两个版本间文件的不同:
现在要对比HEAD和HEAD^版本中code.txt的不同,使用如下命令:
4.6删除文件
(1)我们把目录中code2.txt删除
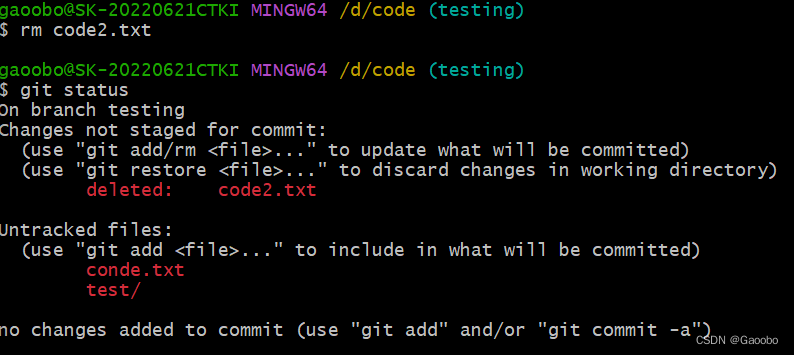
这个时候,git知道删除了文件,因此工作区和版本库就不一致了,git status命令会立刻提示哪些文件被删除。
(2)现在有两个选择,一种情况是确实要从版本库中删除该文件,那就用命令git rm删除【永久删除,无法撤回】,并且git commit
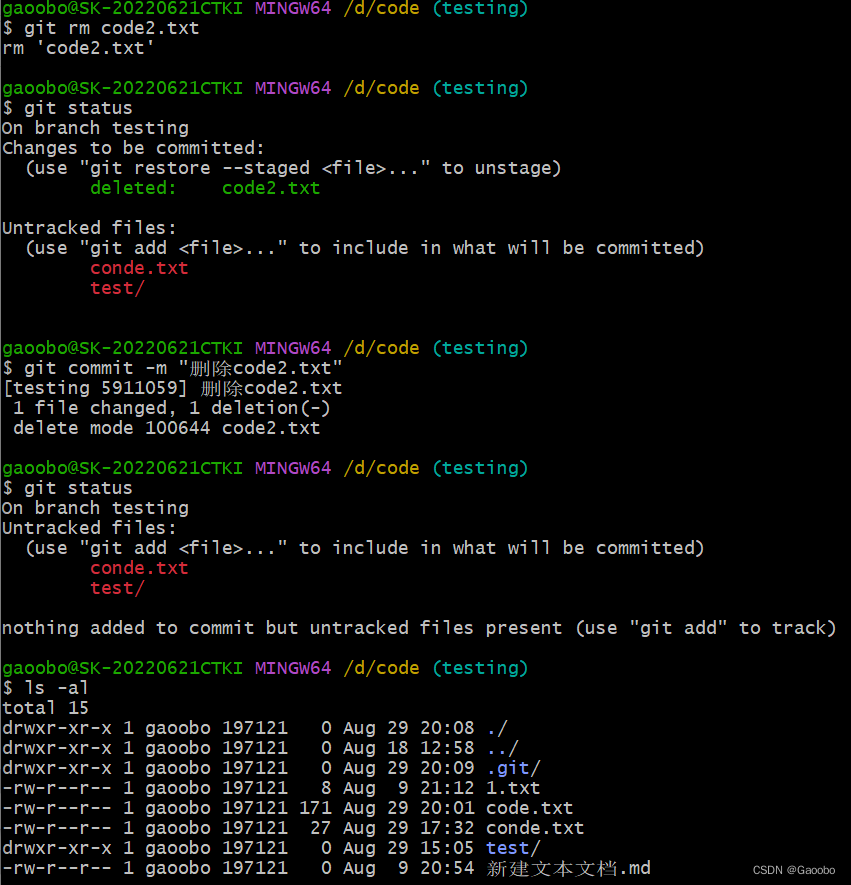
另一种情况就是删错了,可以使用git checkout – code2.txt,文件又回来了
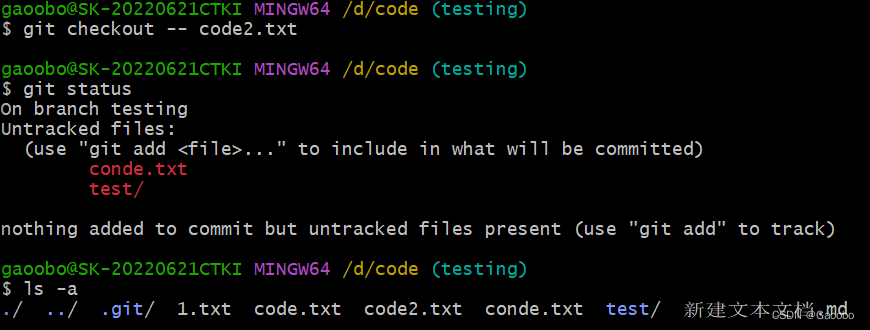
(3)查看简短版log
git log --pretty=oneline

3.分支管理
3.1 创建与合并分支
主分支即master分支。HEAD严格来说不是指向提交,而是指向master,master才是指向提交。所以,HEAD指向的是当前分支。
(1)一开始master分支是一条线,git用master指向最新的提交,再用HEAD指向master,就能确定当前分支,以及当前分支的提交点。
每次提交,master分支都会向前移动一步,这样,随着不断提交,master分支的线会越来越长。
(2)当我们创建新的分支,例如dev时,git兴建了一个指针叫dev,指向master相同的提交。再把HEAD指向dev,就表示当前分支在dev上。
git创建一个分支很快,因为除了增加一个dev指针,改变HEAD的指向,工作区的文件没有任何变化。
(3)不过,从现在开始,对工作去的修改和提交就是针对dev分支了,比如新提交一次后,dev指针往前移动一步,而master指针不变。
(4)假如我们在dev上的工作完成了,就可以把dev合并到master上。就是直接把master指向dev的当前提交,就完成了合并。
git合并分支也很快,改变指针,工作区内容也不变。
(5)合并完成后甚至可以删除dev分支。删除dev分支就是把dev指针删掉,删掉后我们就剩下一条master分支。
3.2 创建与合并分支
(1)执行如下命令可以查看当前有几个分支并且看到在哪个分支下工作

git branch
(2)创建一个分支dev并却换到其上进行工作

$git checkout -b dev
(3)现在我们把dev分支的工作:
git merge命令用于合并指定分支到当前分支。合并后再查看code.txt的内容,就可以看到,和dev分支的最新提交是完全一样的。

$git merge dev
注意看到上面的fast forward信息,git告诉我们这次合并是“快进模式”,也就是直接把master指向dev的当前提交,所以合并速度非常快。
(4)合并完成后,就可以放心地删除dev分支了,删除后,查看branch

$git branch -d dev
$git branch
小结
查看分支:git branch
创建分支:git branch < name >
切换分支:git checkout < name >
创建+切换分支:git checkout -b < name >
合并某分支到当前分支:git merge < name >
删除分支:git branch -d < name >
3.3 解决冲突
两个分支对同一个文件提交不同的修改时,git无法执行“快速合并”,只能试图把各自的修改合并起来,但这种合并就可能会有冲突。
(1)执行如下命令尝试将dev分支合并到master分支上来。
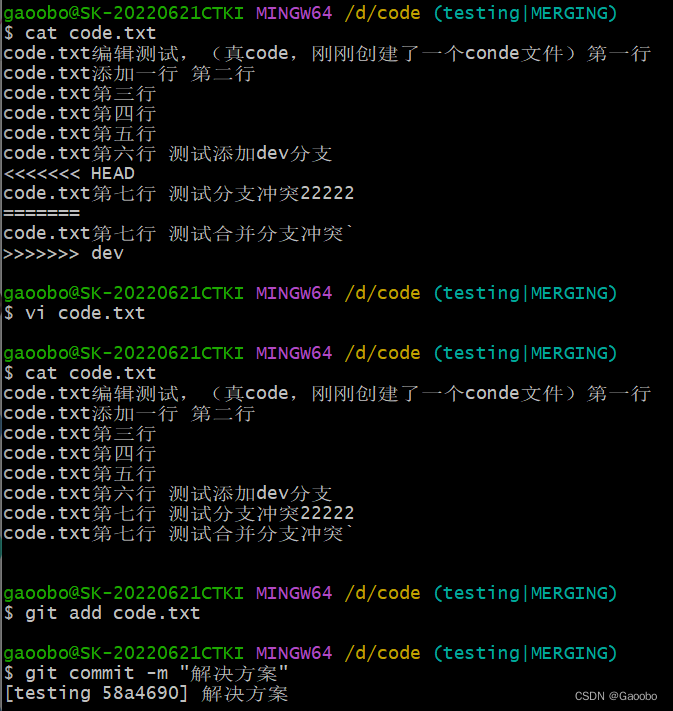
冲突原因:master分支和dev分支各自都分别有新的提交,并且编辑了同一个文件,变成了这样:
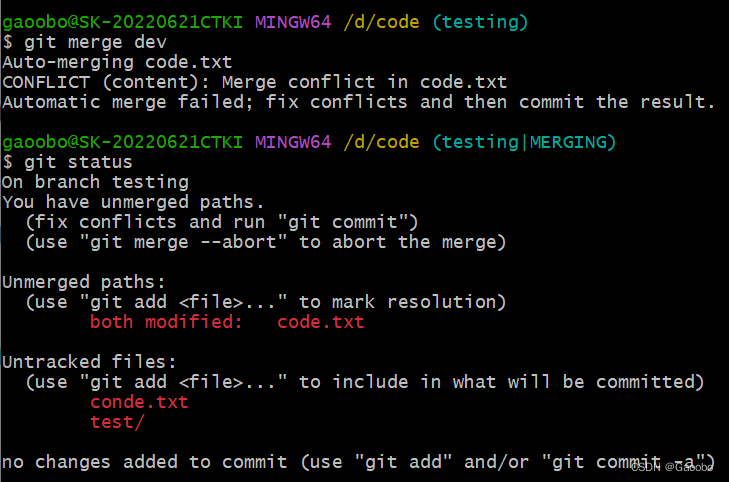
解决方法:手动删除冲突部分,再将冲突的文件add、commit。
3.4 分支管理策略
通常合并分支时,git会用fast forword模式,但是有些快速合并不能成功而且合并时没有冲突,这个时候git会帮我们在合并之后做一次新的提交,但是这种模式下删除分支后会丢失信息。
使用分支命令查看分支信息:
git log --pretty=oneline --graph
合并时禁用fast forward:
$git merge --no-ff -m "禁用fast forward合并" dev
本次合并要创建一个新的commit,所以加上-m参数,把commit描述写进去
3.5 Bug分支
储存当前的工作现场:
$git stash
列出保存的工作现场:
$git stash list
工作现场恢复:
$git stash pop
4.使用github
4.1克隆项目
$git clone
4.2上传分支/推送代码
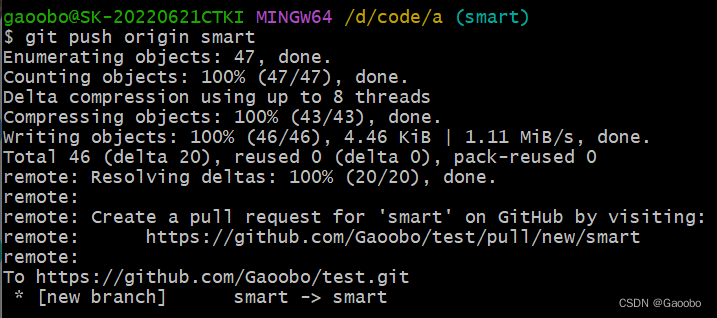
推送分支,就是把该分支上的所有本地提交推送到远程库,推送时要制定本地分支,这样,git就会把该分支推送到远程对应的远程分支上:
git push origin 分支名称
4.3 将本地分支跟踪服务器分支
git branch --set-upsteam-to=origin/smart smart
git branch --set-upsteam-to=origin/smart smart-1


推送代码:
git push
git push origin HEAD:smart(本地分支与远程分支不同名时使用)

4.4 从远程分支上拉去代码
git pull origin 分支名称
