上次文章我们实现了单向链表,链接如下 : 单向链表的实现与讲解
而这篇文章博主就对双向链表如何实现以及实现原理进行讲解;
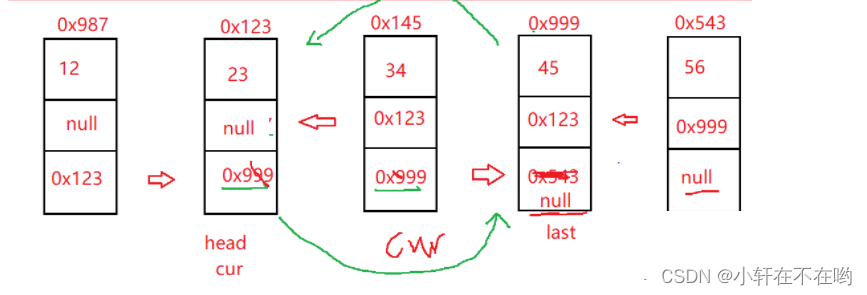
双向链表和单向链表本质上区别不大,双向链表就比单向链表每个节点多了一个先驱prev,以实现链表能够逆向链接:

双向链表需要有一个头结点引用head 以及一个尾结点引用last
而有力单向链表的知识基础,双向链表实现以及理解上就会容易很多,讲解如下 :
快速跳转:
1.节点类实现
class ListNode{
    public int val; //数据域
    public ListNode prev;//前驱域
    public ListNode next;//后驱域

    public ListNode(int val){ //一个参数的构造方法 实现对数据域的数据赋值
        this.val=val; //this : 表示当前对象引用(注意不是当前对象)
    }
}
2. 双向链表各个模块功能实现
2.1 头插法
//头插法
    public void addFirst(int data) {
        ListNode node = new ListNode(data); //实例化插入的节点
        if (this.head == null) {//链表为空情况
            this.head = node;
            this.last = node;
        } else {
            node.next = this.head; //node的next改为head
            this.head.prev = node; //head的prev改为node
            this.head = node; //此时新的head为node
        }
    }

2.2 尾插法
//尾插法
    public void addLast(int data) {
        ListNode node = new ListNode(data);//实例化插入的节点
        if (head == null) { //链表为空情况
            this.head = node;
            this.last = node;
        } else {
            this.last.next = node; //last尾结点的next改为node
            node.prev = this.last; //node的前驱prev改为last
            this.last = node; //此时last为node
        }
    }

2.3 查找关键字key是否在单链表当中
 //查找是否包含关键字key是否在单链表当中
    public boolean contains(int key){
        ListNode cur=this.head; //定义cur引用指向head
        while (cur!=null){ //遍历链表
            if (cur.val==key){
                return true; //找到返回TRUE
            }
            cur=cur.next; //没找到继续找下一个节点
        }
        return false; //遍历完成没有返回true 则没有找到 返回false
    }

2.4 删除第一次出现关键字为key的节点
单向链表删除节点操作要先找到需要删除的那个节点的前一个节点,在进行删除操作;而双向链表不需要找前一个节点,找到要删除的节点它本身就可以进行操作
    //删除第一次出现关键字为key的节点
    public void remove(int key){
        ListNode cur=this.head; //cur引用来遍历
        while(cur!=null){ //遍历
            if (cur.val==key){
                if (cur==head){ //要删除的节点是头节点情况
                    head=head.next; //head直接引用向下一个节点
                    if(head!=null){
                    head.prev=null; //下一个节点的prev改为null
                    }else{
                    last=null; //因为last是成员变量 不手动制空会一直浪费着内存
                    }
                }else if(cur==last){ //删除节点是尾结点情况
                    cur.prev.next=cur.next; //尾结点的前一个节点的next改为此时尾结点的next 也就是null
                    last=last.prev; //last引用向前一个节点 实现删除
                }else{ //节点既不是头结点也不是尾结点的情况
                    cur.prev.next=cur.next; //前一个节点的next直接指向后一个节点
                    cur.next.prev=cur.prev; //后一个节点的prev直接指向前一个节点  实现删除
                }
                return; //只删除一个 删除执行的话返回
            }else{
                cur=cur.next; //没有找到的话  继续查找下一个节点
            }
        }
    }

2.5 删除所有值为key的节点
步骤与删除一次key相同 只是在删除操作后不return 继续进行遍历删除
 //删除所有值为key的节点
    public void removeAllKey(int key){
        ListNode cur=this.head;
        while(cur!=null){
            if (cur.val==key){
                if (cur==head){
                    head=head.next;
                    if(head!=null){
                        head.prev=null;
                    }else{
                        last=null;
                    }
                }else if(cur==last){
                    cur.prev.next=cur.next;
                    last=last.prev;
                }else{
                    cur.prev.next=cur.next;
                    cur.next.prev=cur.prev;
                }
                // return; 删除一次是直接return 删除所有的话就不return 继续进行遍历删除
            }else{
                cur=cur.next;
            }
        }

    }
2.6 得到单链表的长度
//得到单链表的长度
    public int size(){
        ListNode cur=this.head; //cur引用来遍历
        int count=0; //计数器
        while (cur!=null){ //遍历操作
            count++;
            cur=cur.next;
        }
        return count; //返回长度
    }
2.7 打印单链表
 public void display(){
        ListNode cur=this.head;//cur引用来遍历
        while(cur!=null){//遍历
            System.out.print(cur.val+" ");
            cur=cur.next;
        }
        System.out.println();
    }
2.8任意位置插入,第一个数据节点为0号下标
回顾上次的单向链表,我们要在index位置插入需要找到index位置前面一个节点,而这里的双向链表 我们要在index插入 就只需要找到index位置的节点进行操作
首先我们要完成一个查找index位置节点的方法
 public ListNode searchIndex(int index){
       ListNode cur=this.head;
       while (index!=0){
           cur=cur.next;
           index--;
       }
       return cur; //找到index位置的节点进行返回
     }
进行插入操作 :
  //任意位置插入,第一个数据节点为0号下标
    public void addIndex(int index,int data){
       ListNode node=new ListNode(data); //实例化需要插入的节点
       if (index<0 || index>size()){ //判断index是否合法
           System.out.println("index位置不合法!");
           return;
       }
       if (index==0){ //头插法
           addFirst(data);
           return;
       }
       if (index==size()){// 尾插法
           addLast(data);
           return;
       }
       ListNode cur=searchIndex(index); //找到index位置节点定义为cur
       // 进行插入操作 :插入操作需要改变**4个**引用域的值 实现插入
       node.next=cur.prev.next;
       cur.prev.next=node;
       node.prev=cur.prev;
       cur.prev=node;
    }

需要改变的4个引用域就是蓝色圈起来的4个引用域 具体改变代码 :
node.next=cur.prev.next;
       cur.prev.next=node;
       node.prev=cur.prev;
       cur.prev=node;
照着进行画图就能很容易理解 ~
2.9 清空链表
public void clear(){
//不采用直接把head last制空的暴力情况方法
//而是采取逐一情况prev last的操作
        ListNode cur=this.head;
        while(cur!=null){
            ListNode curNext=cur.next;
            cur.prev=null;
            cur.next=null;
            cur=curNext;
        }
        //不要忘记把head last 引用也制空
        this.head=null;
        this.last=null;
    }

清空成功 !
3. 整体 MyLinkedList 代码展示
class ListNode{
    public int val;
    public ListNode prev;
    public ListNode next;

    public ListNode(int val){
        this.val=val;
    }
}

public class MyLinkedList {
    ListNode head;
    ListNode last;

    // 2、无头双向链表实现

    //头插法
    public void addFirst(int data) {
        ListNode node = new ListNode(data);
        if (this.head == null) {
            this.head = node;
            this.last = node;
        } else {
            node.next = this.head;
            this.head.prev = node;
            this.head = node;
        }
    }

    //尾插法
    public void addLast(int data) {
        ListNode node = new ListNode(data);
        if (head == null) {
            this.head = node;
            this.last = node;
        } else {
            this.last.next = node;
            node.prev = this.last;
            this.last = node;
        }
    }

     public ListNode searchIndex(int index){
       ListNode cur=this.head;
       while (index!=0){
           cur=cur.next;
           index--;
       }
       return cur;
     }


    //任意位置插入,第一个数据节点为0号下标
    public void addIndex(int index,int data){
       ListNode node=new ListNode(data);
       if (index<0 || index>size()){
           System.out.println("index位置不合法!");
           return;
       }
       if (index==0){
           addFirst(data);
           return;
       }
       if (index==size()){
           addLast(data);
           return;
       }
       ListNode cur=searchIndex(index);
       node.next=cur.prev.next;
       cur.prev.next=node;
       node.prev=cur.prev;
       cur.prev=node;
    }

    //查找是否包含关键字key是否在单链表当中
    public boolean contains(int key){
        ListNode cur=this.head;
        while (cur!=null){
            if (cur.val==key){
                return true;
            }
            cur=cur.next;
        }
        return false;
    }


    //删除第一次出现关键字为key的节点
    public void remove(int key){
        ListNode cur=this.head;
        while(cur!=null){
            if (cur.val==key){
                if (cur==head){
                    head=head.next;
                    if(head!=null){
                        head.prev=null;
                    }else{
                        last=null;
                    }
                }else if(cur==last){
                    cur.prev.next=cur.next;
                    last=last.prev;
                }else{
                    cur.prev.next=cur.next;
                    cur.next.prev=cur.prev;
                }
                return;
            }else{
                cur=cur.next;
            }
        }
    }


    //删除所有值为key的节点
    public void removeAllKey(int key){
        ListNode cur=this.head;
        while(cur!=null){
            if (cur.val==key){
                if (cur==head){
                    head=head.next;
                    if(head!=null){
                        head.prev=null;
                    }else{
                        last=null;
                    }
                }else if(cur==last){
                    cur.prev.next=cur.next;
                    last=last.prev;
                }else{
                    cur.prev.next=cur.next;
                    cur.next.prev=cur.prev;
                }
                // return;
            }else{
                cur=cur.next;
            }
        }

    }
    //得到单链表的长度
    public int size(){
        ListNode cur=this.head;
        int count=0;
        while (cur!=null){
            count++;
            cur=cur.next;
        }
        return count;
    }

    public void display(){
        ListNode cur=this.head;
        while(cur!=null){
            System.out.print(cur.val+" ");
            cur=cur.next;
        }
        System.out.println();
    }

    public void clear(){
        ListNode cur=this.head;
        while(cur!=null){
            ListNode curNext=cur.next;
            cur.prev=null;
            cur.next=null;
            cur=curNext;
        }
        this.head=null;
        this.last=null;
    }

}
4. 部分测试 test 代码展示 :
public class TestDemo {
    public static void main(String[] args) {
        MyLinkedList myLinkedList=new MyLinkedList();
        myLinkedList.addFirst(1);
        myLinkedList.addFirst(2);
        myLinkedList.addFirst(3);
       // System.out.println(myLinkedList.size());
        myLinkedList.display();
      //  System.out.println(myLinkedList.contains(2));
      //  myLinkedList.remove(3);
      //  myLinkedList.display();
        System.out.println("-------------------");

        myLinkedList.clear();
        myLinkedList.display();

    }

}

5. 总结
讲解到这里 双向链表的实现就已经完成了
对于链表的学习我们一定要多画图理解 多思考 多写代码 才能真正学好链表
如果觉得博主的文章对自己有所帮助 欢迎大家多多点赞收藏 ~