一、树模型的可视化展示
官网下载安装包

右击管理员身份运行,直接下一步即可。
配置环境变量:
将安装好的可视化软件的bin文件夹路径添加到系统环境变量Path下即可

打开cmd,输入dot -version,出现相关信息即安装成功

二、决策树过程运行
import numpy as np
import os
%matplotlib inline
import matplotlib
import matplotlib.pyplot as plt
plt.rcParams['axes.labelsize'] = 14
plt.rcParams['xtick.labelsize'] = 12
plt.rcParams['ytick.labelsize'] = 12
import warnings
warnings.filterwarnings('ignore')
from sklearn.datasets import load_iris
from sklearn.tree import DecisionTreeClassifier

iris = load_iris()
X = iris.data[:,2:] # petal length and width
y = iris.target

tree_clf = DecisionTreeClassifier(max_depth=2)
tree_clf.fit(X,y)
from sklearn.tree import export_graphviz

export_graphviz(
    tree_clf,
    out_file="iris_tree.dot",
    feature_names=iris.feature_names[2:],
    class_names=iris.target_names,
    rounded=True,
    filled=True
)
运行完上述代码之后,会在jupyter notebook同级目录下生成一个iris_tree.dot文件

在jupyterNotebook文件夹目录下打开cmd命令查看输入命令dot -Tpng iris_tree.dot -o iris_tree.png,将.dot文件转换为.png图片


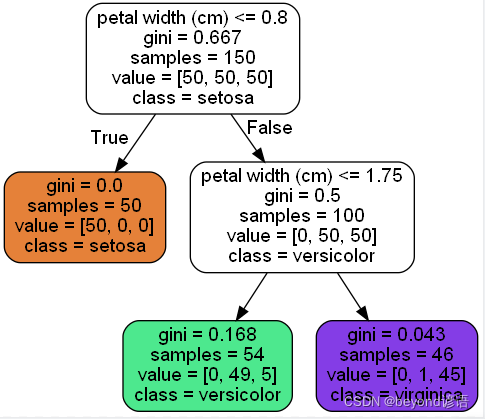
其中,petal width(cm)以花瓣的宽度为根节点进行判断,看是否≤0.8cm
gini系数相当于此时当前节点的结果
samples表示当前节点一共有多少个样本数
value当前节点对于整体类别的分类情况,例如根节点中的[50,50,50]表示ABC类别各50个
class表示在当前节点上分类的结果,以众数为标准,少数服从多数,这里的50,50,50只是个例外,很少出现这种情况。
#本地图像在notebook中展示
from IPython.display import Image
Image(filename='iris_tree.png',width=400,height=400)

三、决策边界的展示
from matplotlib.colors import ListedColormap

def plot_decision_boundary(clf, X, y, axes=[0, 7.5, 0, 3], iris=True, legend=False, plot_training=True):
    x1s = np.linspace(axes[0], axes[1], 100)
    x2s = np.linspace(axes[2], axes[3], 100)
    x1, x2 = np.meshgrid(x1s, x2s)
    X_new = np.c_[x1.ravel(), x2.ravel()]
    y_pred = clf.predict(X_new).reshape(x1.shape)
    custom_cmap = ListedColormap(['#fafab0','#9898ff','#a0faa0'])
    plt.contourf(x1, x2, y_pred, alpha=0.3, cmap=custom_cmap)
    if not iris:
        custom_cmap2 = ListedColormap(['#7d7d58','#4c4c7f','#507d50'])
        plt.contour(x1, x2, y_pred, cmap=custom_cmap2, alpha=0.8)
    if plot_training:
        plt.plot(X[:, 0][y==0], X[:, 1][y==0], "yo", label="Iris-Setosa")
        plt.plot(X[:, 0][y==1], X[:, 1][y==1], "bs", label="Iris-Versicolor")
        plt.plot(X[:, 0][y==2], X[:, 1][y==2], "g^", label="Iris-Virginica")
        plt.axis(axes)
    if iris:
        plt.xlabel("Petal length", fontsize=14)
        plt.ylabel("Petal width", fontsize=14)
    else:
        plt.xlabel(r"$x_1$", fontsize=18)
        plt.ylabel(r"$x_2$", fontsize=18, rotation=0)
    if legend:
        plt.legend(loc="lower right", fontsize=14)

plt.figure(figsize=(8, 4))
plot_decision_boundary(tree_clf, X, y)
plt.plot([2.45, 2.45], [0, 3], "k-", linewidth=2)
plt.plot([2.45, 7.5], [1.75, 1.75], "k--", linewidth=2)
plt.plot([4.95, 4.95], [0, 1.75], "k:", linewidth=2)
plt.plot([4.85, 4.85], [1.75, 3], "k:", linewidth=2)
plt.text(1.40, 1.0, "Depth=0", fontsize=15)
plt.text(3.2, 1.80, "Depth=1", fontsize=13)
plt.text(4.05, 0.5, "(Depth=2)", fontsize=11)
plt.title('Decision Tree decision boundaries')

plt.show()

概率估计
输入数据为:花瓣长5厘米,宽1.5厘米的花。 相应的叶节点是深度为2的左节点,因此决策树应输出以下概率:
Iris-Setosa 为 0%(0/54)
Iris-Versicolor 为 90.7%(49/54)
Iris-Virginica 为 9.3%(5/54)
tree_clf.predict_proba([[5,1.5]])#查看当前的每个类别的概率值
"""
array([[0.        , 0.90740741, 0.09259259]])
"""
tree_clf.predict([[5,1.5]])#直接算结果
"""
array([1])
"""
四、决策树中的正则化
DecisionTreeClassifier类还有一些其他参数类似地限制了决策树的形状:
min_samples_split(节点在分割之前必须具有的最小样本数),
min_samples_leaf(叶子节点必须具有的最小样本数),
max_leaf_nodes(叶子节点的最大数量),
max_features(在每个节点处评估用于拆分的最大特征数)。
max_depth(树最大的深度)
from sklearn.datasets import make_moons
X,y = make_moons(n_samples=100,noise=0.25,random_state=53)#100个数据,离散程度为0.25,随机种子
tree_clf1 = DecisionTreeClassifier(random_state=42)#构建树模型
tree_clf2 = DecisionTreeClassifier(min_samples_leaf=4,random_state=42)#设置参数
tree_clf1.fit(X,y)#训练
tree_clf2.fit(X,y)

plt.figure(figsize=(12,4))#绘制图像
plt.subplot(121)
plot_decision_boundary(tree_clf1,X,y,axes=[-1.5,2.5,-1,1.5],iris=False)
plt.title('No restrictions')

plt.subplot(122)
plot_decision_boundary(tree_clf2,X,y,axes=[-1.5,2.5,-1,1.5],iris=False)
plt.title('min_samples_leaf=4')

五、树模型对数据的敏感
将同样的一份数据,转换了角度,决策树模型会发生很大的改变。
np.random.seed(6)#随机构造出一份数据集
Xs = np.random.rand(100, 2) - 0.5
ys = (Xs[:, 0] > 0).astype(np.float32) * 2

angle = np.pi / 4#指定旋转角度
rotation_matrix = np.array([[np.cos(angle), -np.sin(angle)], [np.sin(angle), np.cos(angle)]])#构造旋转矩阵
Xsr = Xs.dot(rotation_matrix)#对数据矩阵进行旋转

tree_clf_s = DecisionTreeClassifier(random_state=42)#没旋转之前的
tree_clf_s.fit(Xs, ys)
tree_clf_sr = DecisionTreeClassifier(random_state=42)#旋转之后的
tree_clf_sr.fit(Xsr, ys)

plt.figure(figsize=(11, 4))
plt.subplot(121)
plot_decision_boundary(tree_clf_s, Xs, ys, axes=[-0.7, 0.7, -0.7, 0.7], iris=False)
plt.title('Sensitivity to training set rotation')

plt.subplot(122)
plot_decision_boundary(tree_clf_sr, Xsr, ys, axes=[-0.7, 0.7, -0.7, 0.7], iris=False)
plt.title('Sensitivity to training set rotation')

plt.show()

六、回归任务
np.random.seed(42)
m=200#随机选择200个数据点
X=np.random.rand(m,1)
y = 4*(X-0.5)**2#随便定义一个方程
y = y + np.random.randn(m,1)/10#再次方程基础上再加上一些随机的抖动
from sklearn.tree import DecisionTreeRegressor

tree_reg = DecisionTreeRegressor(max_depth=2)#实例化
tree_reg.fit(X,y)#训练
export_graphviz(
        tree_reg,
        out_file=("regression_tree.dot"),
        feature_names=["x1"],
        rounded=True,
        filled=True
    )
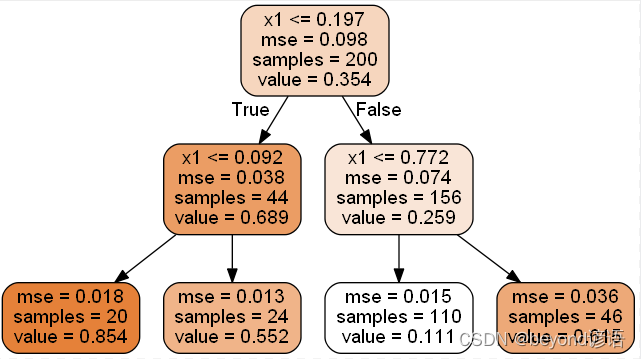
运行完上述代码之后,会在jupyter notebook同级目录下生成一个regression_tree.dot文件

在jupyterNotebook文件夹目录下打开cmd命令查看输入命令dot -Tpng regression_tree.dot -o regression_tree.png,将.dot文件转换为.png图片


# 第二个决策树长这样
from IPython.display import Image
Image(filename="regression_tree.png",width=400,height=400,)

对比树的深度对结果的影响
from sklearn.tree import DecisionTreeRegressor

tree_reg1 = DecisionTreeRegressor(random_state=42, max_depth=2)#对比最大树的深度不同有什么影响
tree_reg2 = DecisionTreeRegressor(random_state=42, max_depth=3)
tree_reg1.fit(X, y)
tree_reg2.fit(X, y)

def plot_regression_predictions(tree_reg, X, y, axes=[0, 1, -0.2, 1], ylabel="$y$"):
    x1 = np.linspace(axes[0], axes[1], 500).reshape(-1, 1)
    y_pred = tree_reg.predict(x1)
    plt.axis(axes)
    plt.xlabel("$x_1$", fontsize=18)
    if ylabel:
        plt.ylabel(ylabel, fontsize=18, rotation=0)
    plt.plot(X, y, "b.")
    plt.plot(x1, y_pred, "r.-", linewidth=2, label=r"$\hat{y}$")

plt.figure(figsize=(11, 4))
plt.subplot(121)

plot_regression_predictions(tree_reg1, X, y)
for split, style in ((0.1973, "k-"), (0.0917, "k--"), (0.7718, "k--")):
    plt.plot([split, split], [-0.2, 1], style, linewidth=2)
plt.text(0.21, 0.65, "Depth=0", fontsize=15)
plt.text(0.01, 0.2, "Depth=1", fontsize=13)
plt.text(0.65, 0.8, "Depth=1", fontsize=13)
plt.legend(loc="upper center", fontsize=18)
plt.title("max_depth=2", fontsize=14)

plt.subplot(122)

plot_regression_predictions(tree_reg2, X, y, ylabel=None)
for split, style in ((0.1973, "k-"), (0.0917, "k--"), (0.7718, "k--")):
    plt.plot([split, split], [-0.2, 1], style, linewidth=2)
for split in (0.0458, 0.1298, 0.2873, 0.9040):
    plt.plot([split, split], [-0.2, 1], "k:", linewidth=1)
plt.text(0.3, 0.5, "Depth=2", fontsize=13)
plt.title("max_depth=3", fontsize=14)

plt.show()

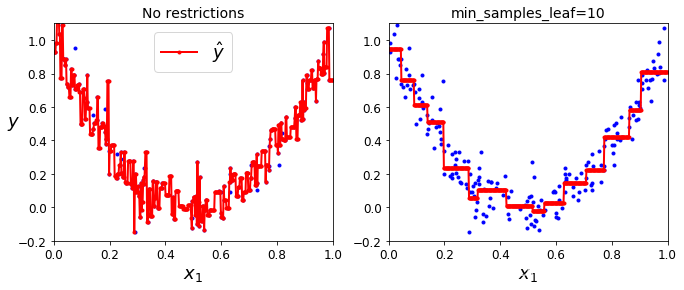
对比min_samples_leaf对结果的影响
tree_reg1 = DecisionTreeRegressor(random_state=42)
tree_reg2 = DecisionTreeRegressor(random_state=42, min_samples_leaf=10)
tree_reg1.fit(X, y)
tree_reg2.fit(X, y)

x1 = np.linspace(0, 1, 500).reshape(-1, 1)
y_pred1 = tree_reg1.predict(x1)
y_pred2 = tree_reg2.predict(x1)

plt.figure(figsize=(11, 4))

plt.subplot(121)
plt.plot(X, y, "b.")
plt.plot(x1, y_pred1, "r.-", linewidth=2, label=r"$\hat{y}$")
plt.axis([0, 1, -0.2, 1.1])
plt.xlabel("$x_1$", fontsize=18)
plt.ylabel("$y$", fontsize=18, rotation=0)
plt.legend(loc="upper center", fontsize=18)
plt.title("No restrictions", fontsize=14)

plt.subplot(122)
plt.plot(X, y, "b.")
plt.plot(x1, y_pred2, "r.-", linewidth=2, label=r"$\hat{y}$")
plt.axis([0, 1, -0.2, 1.1])
plt.xlabel("$x_1$", fontsize=18)
plt.title("min_samples_leaf={}".format(tree_reg2.min_samples_leaf), fontsize=14)

plt.show()

