目录
1. 数据结构的介绍
1.1 什么是数据结构?
数据结构是计算机存储、组织数据的方式。
数据结构是指相互之间存在一种或多种特定关系的数据元素的集合。
1.2 为什么要学数据结构?
通常情况下,精心选择的数据结构可以带来更高的运行或者存储效率。
数据结构往往同高效的检索算法和索引技术有关。
1.3 常用的数据结构有哪些?
数组(Array)、栈(Stack)、队列(Queue)、链表(Linked List)、树(Tree)、图(Graph)、堆(Heap)、散列表(Hash)等;
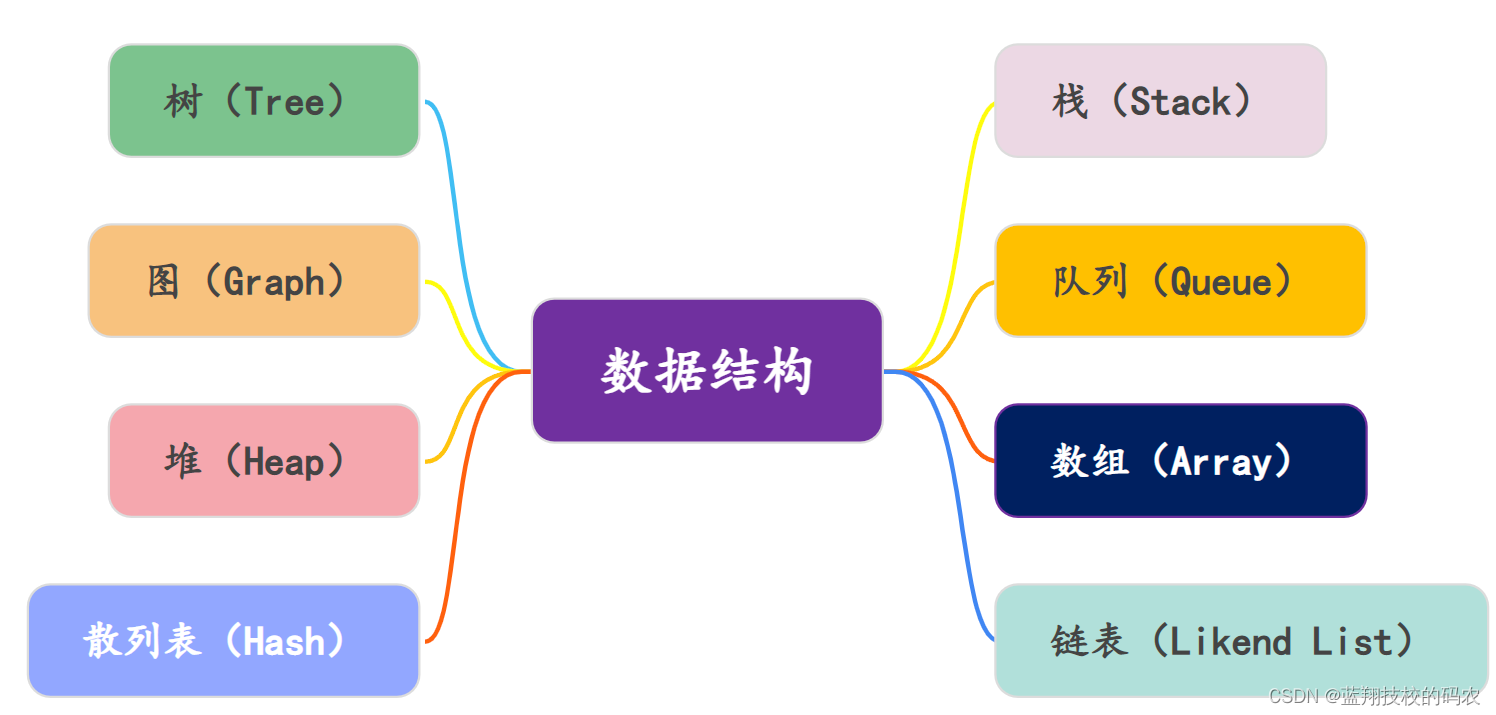
1.4 数据结构的分类
程序=数据结构+算法
数据结构分为逻辑结构和物理结构。
同一逻辑结构可以对应不同的存储结构。算法的设计取决于数据的逻辑结构,而算法的实现依赖于指定的存储结构。
1.4.1 逻辑结构
逻辑结构:是指数据对象中数据元素之间的相互关系
- 集合结构:除了同属一个集合,没有其他任何关系。
- 线性结构:数据元素一对一的关系。
- 树形结构:数据元素一对多的层次关系。
- 图形结构:数据元素多对多的关系。
1.4.2 物理结构
物理结构(也叫存储结构):指数据的逻辑结构在计算机中的存储形式。
存储结构形式有两种:顺序存储和链式存储。
- 顺序存储结构: 数据元素放在地址连续的存储单元里,逻辑关系和物理关系一致。
- 链式存储结构: 通过一个指针存放数据元素的地址,通过地址来找到对应数据元素的位置,因此数据元素可存放任意存储单元中。
2. 线性数据结构
2.1 数组
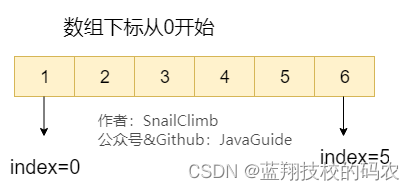
数组(array) 是一种很常见的数据结构。它由相同类型的元素组成,并且是使用一块连续的内存来存储。
我们直接可以利用元素的索引(index)来计算出该元素对应的存储地址。
数组的特点:提供随机访问 并且 容量有限。
假如数组的长度为 n。
访问:O(1)//访问特定位置的元素
插入:O(n )//最坏的情况发生在 插入发生在数组的首部并需要移动所有元素时
删除:O(n)//最坏的情况发生在 删除数组的开头发生并需要移动第一元素后面所有的元素时
2.1.1 声明数组变量
首先必须声明数组变量,才能在程序中使用数组。下面是声明数组变量的语法:
dataType[] arrayRefVar;   // 首选的方法
或
dataType arrayRefVar[];  // 效果相同,但不是首选方法
注意: 建议使用 dataType[] arrayRefVar 的声明风格声明数组变量。 dataType arrayRefVar[] 风格是来自 C/C++ 语言 ,在Java中采用是为了让 C/C++ 程序员能够快速理解java语言。
2.1.2 创建数组
Java语言使用new操作符来创建数组,语法如下:
arrayRefVar = new dataType[arraySize];
数组变量的声明,和创建数组可以用一条语句完成,如下所示:
dataType[] arrayRefVar = new dataType[arraySize];
或
dataType[] arrayRefVar = {value0, value1, ..., valuek};
2.1.3 多维数组
多维数组可以看成是数组的数组,比如二维数组就是一个特殊的一维数组,其每一个元素都是一个一维数组,例如:
String[][] str = new String[3][4];
2.1.4 Arrays 类
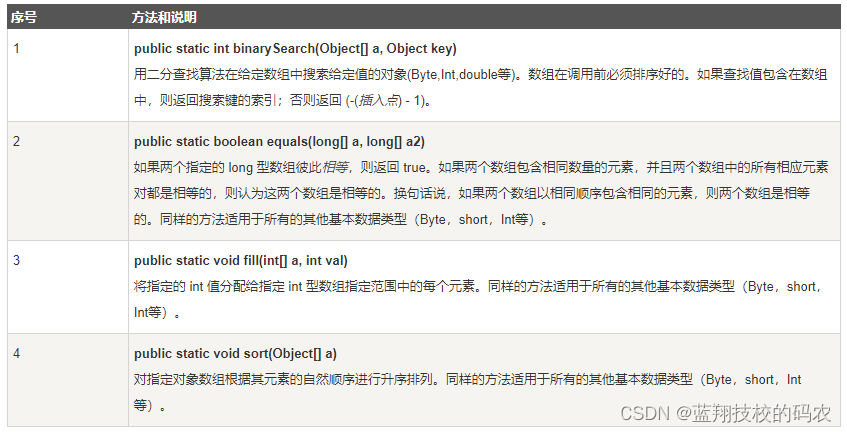
java.util.Arrays 类能方便地操作数组,它提供的所有方法都是静态的。
具有以下功能:
- 给数组赋值:通过 fill 方法。
- 对数组排序:通过 sort 方法,按升序。
- 比较数组:通过 equals方法比较数组中元素值是否相等。
- 查找数组元素:通过 binarySearch 方法能对排序好的数组进行二分查找法操作。
2.1.5 问题与实例
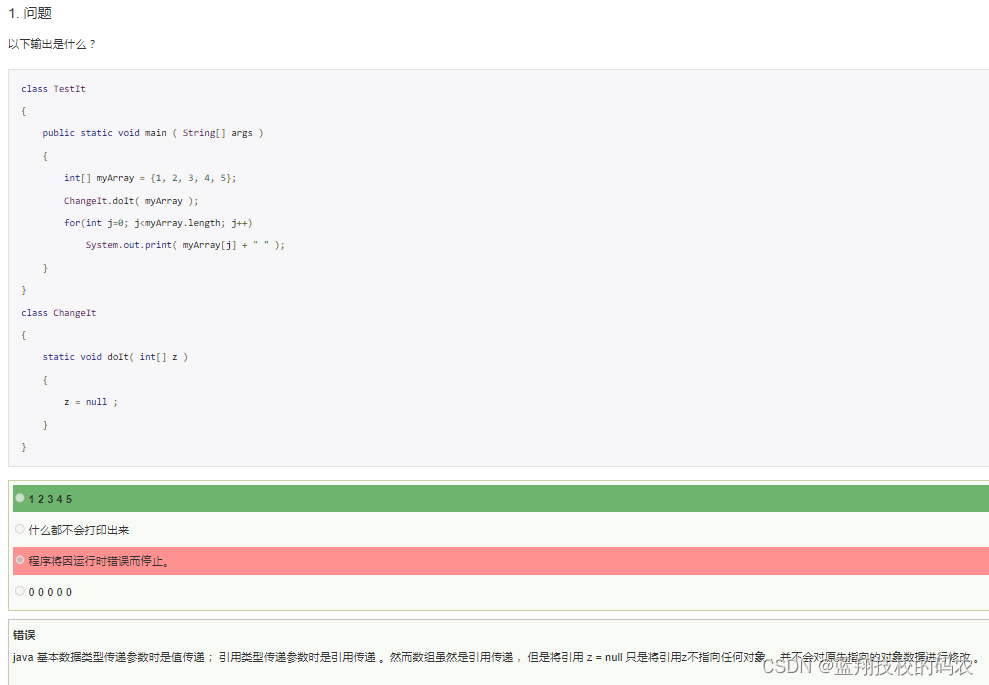
问题
问题1:
问题2:
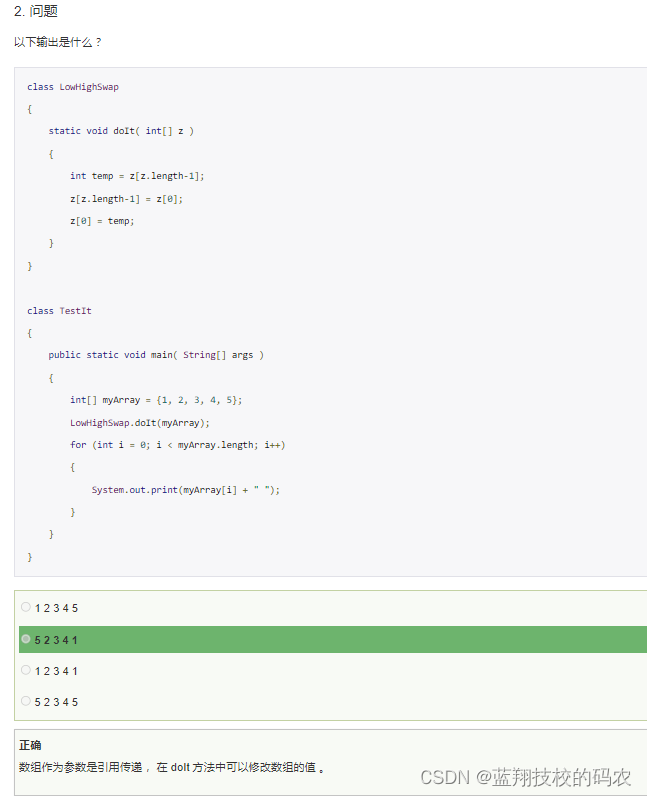
问题3:
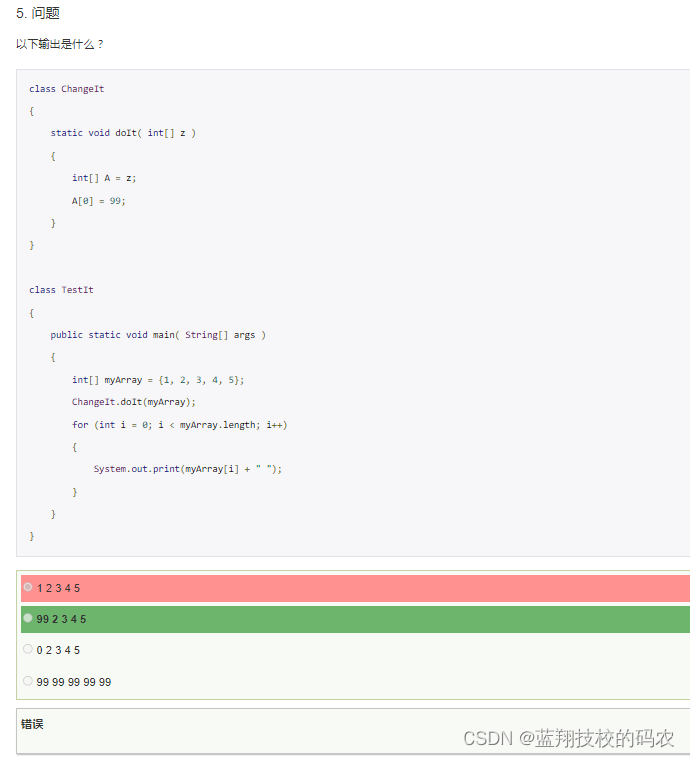
实例
public class TestArray {
   public static void main(String[] args) {
      // 定义数组
      double[] myList = {1.9, 2.9, 3.4, 3.5};

      // 用 基本循环 来打印所有数组元素
      for (int i = 0; i < myList.length; i++) {
         System.out.println(myList[i] + " ");
      }

      //用 For-Each 循环来打印所有数组元素
      for (double element: myList) {
         System.out.println(element);
      }

      // 计算所有元素的总和
      double total = 0;
      for (int i = 0; i < myList.length; i++) {
         total += myList[i];
      }

      System.out.println("Total is " + total);
      // 查找最大元素
      double max = myList[0];
      for (int i = 1; i < myList.length; i++) {
         if (myList[i] > max) max = myList[i];
      }
      System.out.println("Max is " + max);
   }
}
2.2 链表
2.2.1 链表简介
链表(LinkedList) 虽然是一种线性表,但是并不会按照线性的顺序存储数据,使用的不是连续的内存空间来存储数据。
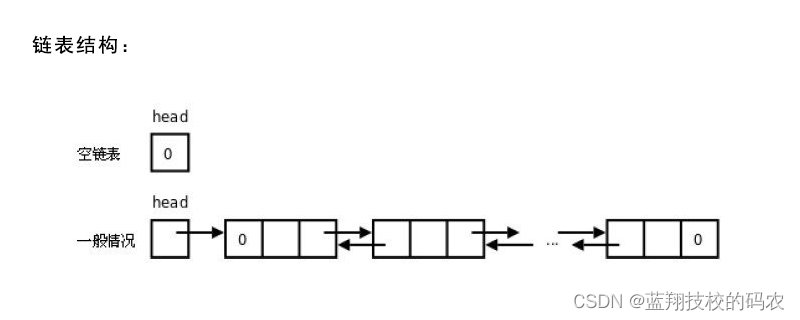
链表的插入和删除操作的复杂度为 O(1) ,只需要知道目标位置元素的上一个元素即可。但是,在查找一个节点或者访问特定位置的节点的时候复杂度为 O(n) 。
2.2.1.1 链表的优缺点
链表结构的优点
- 动态数据结构
链表是一种动态数据结构,因此它可以在运行时通过分配和取消分配内存来增长和缩小。所以没有必要给出链表的初始大小。
- 易于插入和删除
在链表中进行插入和删除节点真的很容易。与数组不同,我们不必在插入或删除元素后移位元素。在链表中,我们只需要更新节点下一个指针中的地址。
- 内存利用率高
由于链表的大小可以在运行时增加或减少,因此没有内存浪费。在数组的情况下,存在大量的内存浪费,就像我们声明一个大小为10的数组并且只存储6个元素,那么浪费了4个元素的空间。链表中没有这样的问题,因为只在需要时才分配内存。
链表结构的缺点
- 内存的使用
与数组相比,在链表中存储元素需要更多内存。因为在链表中每个节点都包含一个指针,它需要额外的内存。
- 遍历困难,不易于查询
链表中的元素或节点遍历很困难,访问元素的效率低。我们不能像数组的索引一样随机访问任何元素。例如,如果我们想要访问位置n的节点,那么我们必须遍历它之前的所有节点。因此,访问节点所需的时间很长。
- 反向遍历困难
在链表中反向遍历非常困难。在双链表的情况下,后指针需要更容易但额外的内存因此浪费内存。
2.2.2 链表分类
常见链表分类:
- 单链表
- 双向链表
- 循环链表
- 双向循环链表
假如链表中有n个元素。
访问:O(n)//访问特定位置的元素
插入删除:O(1)//必须要要知道插入元素的位置
2.2.2.1. 单链表
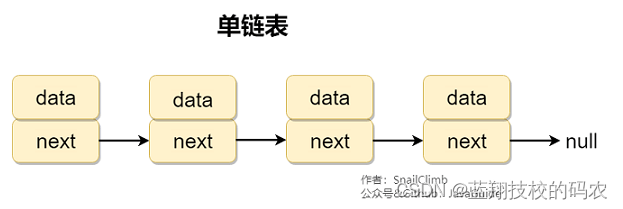
单链表 单向链表只有一个方向,结点只有一个后继指针 next 指向后面的节点。因此,链表这种数据结构通常在物理内存上是不连续的。我们习惯性地把第一个结点叫作头结点,链表通常有一个不保存任何值的 head 节点(头结点),通过头结点我们可以遍历整个链表。尾结点通常指向 null。
2.2.2.2. 循环链表
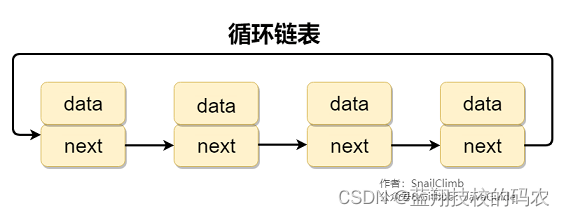
循环链表 其实是一种特殊的单链表,和单链表不同的是循环链表的尾结点不是指向 null,而是指向链表的头结点。
2.2.2.3. 双向链表
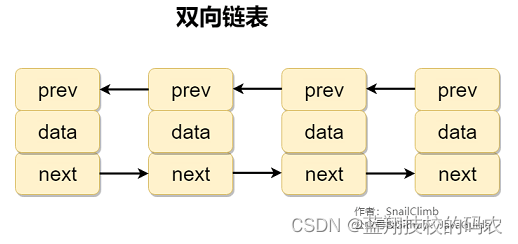
双向链表 包含两个指针,一个 prev 指向前一个节点,一个 next 指向后一个节点。
2.2.2.4. 双向循环链表
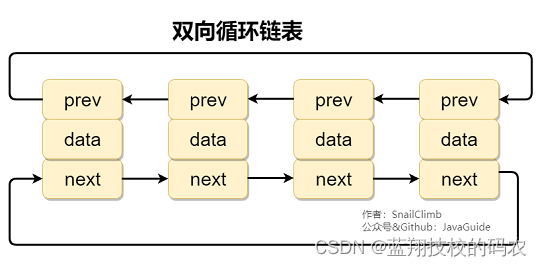
双向循环链表 最后一个节点的 next 指向 head,而 head 的 prev 指向最后一个节点,构成一个环。
2.2.3. 应用场景
- 如果需要支持随机访问的话,链表没办法做到。
- 如果需要存储的数据元素的个数不确定,并且需要经常添加和删除数据的话,使用链表比较合适。
- 如果需要存储的数据元素的个数确定,并且不需要经常添加和删除数据的话,使用数组比较合适。
2.2.4. 数组 vs 链表
- 数组支持随机访问,而链表不支持。
- 数组使用的是连续内存空间对 CPU 的缓存机制友好,链表则相反。
- 数组的大小固定,而链表则天然支持动态扩容。如果声明的数组过小,需要另外申请一个更大的内存空间存放数组元素,然后将原数组拷贝进去,这个操作是比较耗时的!
2.2.5. 问题与实例
2.2.5.1 基本结构
- 基本结构
class ListNode {        //类名 :Java类就是一种自定义的数据结构
    int val;            //数据 :节点数据
    ListNode next;      //对象 :引用下一个节点对象。在Java中没有指针的概念,Java中的引用和C语言的指针类似
}
- 添加构造方法方便初始化
class ListNode {        //类名 :Java类就是一种自定义的数据结构
    int val;            //数据 :节点数据
    ListNode next;      //对象 :引用下一个节点对象。在Java中没有指针的概念,Java中的引用和C语言的指针类似

    ListNode(int val){  //构造方法 :构造方法和类名相同
        this.val=val;     //把接收的参数赋值给当前类的val变量
    }
}
- 范型写法:使用范型可以兼容不同的数据类型(了解)
class ListNode<E>{                //类名 :Java类就是一种自定义的数据结构
    E val;                        //数据 :节点数据
    ListNode<E> next;             //对象 :引用下一个节点对象。在Java中没有指针的概念,Java中的引用和C语言的指针类似

    ListNode(E val){              //构造方法 :构造方法和类名相同
        this.val=val;             //把接收的参数赋值给当前类的val变量
    }
}
2.2.5.2 创建链表及遍历链表
class ListNode {        //类名 :Java类就是一种自定义的数据结构
    int val;            //数据 :节点数据
    ListNode next;      //对象 :引用下一个节点对象。在Java中没有指针的概念,Java中的引用和C语言的指针类似

    ListNode(int val){  //构造方法 :构造方法和类名相同
        this.val=val;   //把接收的参数赋值给当前类的val变量
    }
}

public class Main{
    public static void main(String[] args){

        ListNode nodeSta = new ListNode(0);    //创建首节点
        ListNode nextNode;                     //声明一个变量用来在移动过程中指向当前节点
        nextNode=nodeSta;                      //指向首节点

        //创建链表
        for(int i=1;i<10;i++){
            ListNode node = new ListNode(i);  //生成新的节点
            nextNode.next=node;               //把心节点连起来
            nextNode=nextNode.next;           //当前节点往后移动
        } //当for循环完成之后 nextNode指向最后一个节点,

        nextNode=nodeSta;                     //重新赋值让它指向首节点
        print(nextNode);                      //打印输出

    }

    //打印输出方法
    static void print(ListNode listNoed){
        //创建链表节点
        while(listNoed!=null){
            System.out.println("节点:"+listNoed.val);
            listNoed=listNoed.next;
        }
        System.out.println();
    }

}
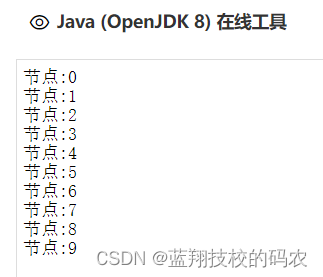
结果:
2.2.5.3 链表的基本操作
插入节点
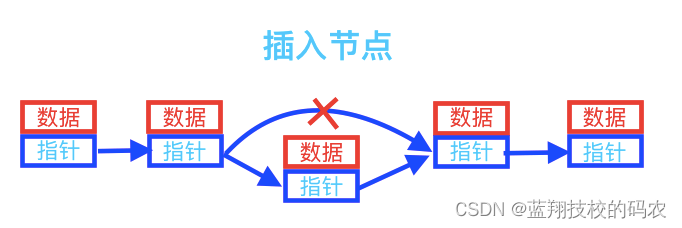
class ListNode {        //类名 :Java类就是一种自定义的数据结构
    int val;            //数据 :节点数据
    ListNode next;      //对象 :引用下一个节点对象。在Java中没有指针的概念,Java中的引用和C语言的指针类似

    ListNode(int val){  //构造方法 :构造方法和类名相同
        this.val=val;   //把接收的参数赋值给当前类的val变量
    }
}

public class Main{
    public static void main(String[] args){

        ListNode nodeSta = new ListNode(0);          //创建首节点
        ListNode nextNode;                           //声明一个变量用来在移动过程中指向当前节点
        nextNode=nodeSta;                            //指向首节点

        //创建链表
        for(int i=1;i<10;i++){
            ListNode node = new ListNode(i);         //生成新的节点
            nextNode.next=node;                      //把心节点连起来
            nextNode=nextNode.next;                  //当前节点往后移动
        } //当for循环完成之后 nextNode指向最后一个节点,

        nextNode=nodeSta;                            //重新赋值让它指向首节点
        print(nextNode);                             //打印输出

        //插入节点
        while(nextNode!=null){
            if(nextNode.val==5){
                ListNode newnode = new ListNode(99);  //生成新的节点
                ListNode node=nextNode.next;          //先保存下一个节点
                nextNode.next=newnode;                //插入新节点
                newnode.next=node;                    //新节点的下一个节点指向 之前保存的节点
            }
            nextNode=nextNode.next;
        }//循环完成之后 nextNode指向最后一个节点
         nextNode=nodeSta;                            //重新赋值让它指向首节点
         print(nextNode);                             //打印输出

    }

    static void print(ListNode listNoed){
        //创建链表节点
        while(listNoed!=null){
            System.out.println("节点:"+listNoed.val);
            listNoed=listNoed.next;
        }
        System.out.println();
    }
}
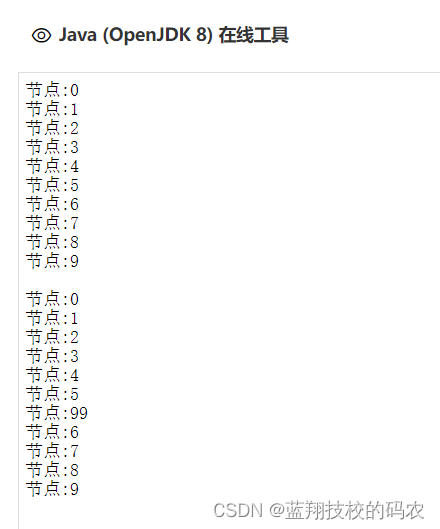
结果:
替换节点
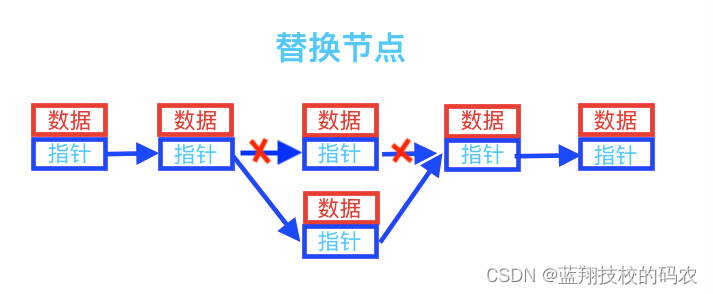
class ListNode {        //类名 :Java类就是一种自定义的数据结构
    int val;            //数据 :节点数据
    ListNode next;      //对象 :引用下一个节点对象。在Java中没有指针的概念,Java中的引用和C语言的指针类似

    ListNode(int val){  //构造方法 :构造方法和类名相同
        this.val=val;   //把接收的参数赋值给当前类的val变量
    }
}

public class Main{
    public static void main(String[] args){

        ListNode nodeSta = new ListNode(0);          //创建首节点
        ListNode nextNode;                           //声明一个变量用来在移动过程中指向当前节点
        nextNode=nodeSta;                            //指向首节点

        //创建链表
        for(int i=1;i<10;i++){
            ListNode node = new ListNode(i);         //生成新的节点
            nextNode.next=node;                      //把心节点连起来
            nextNode=nextNode.next;                  //当前节点往后移动
        } //当for循环完成之后 nextNode指向最后一个节点,

        nextNode=nodeSta;                            //重新赋值让它指向首节点
        print(nextNode);                             //打印输出

        //替换节点
        while(nextNode!=null){
            if(nextNode.val==4){
                ListNode newnode = new ListNode(99);  //生成新的节点
                ListNode node=nextNode.next.next;     //先保存要替换节点的下一个节点
                nextNode.next.next=null;              //被替换节点 指向为空 ,等待java垃圾回收
                nextNode.next=newnode;                //插入新节点
                newnode.next=node;                    //新节点的下一个节点指向 之前保存的节点
            }
            nextNode=nextNode.next;
        }//循环完成之后 nextNode指向最后一个节点
         nextNode=nodeSta;                            //重新赋值让它指向首节点
         print(nextNode);                             //打印输出

    }

    //打印输出方法
    static void print(ListNode listNoed){
        //创建链表节点
        while(listNoed!=null){
            System.out.println("节点:"+listNoed.val);
            listNoed=listNoed.next;
        }
        System.out.println();
    }
}
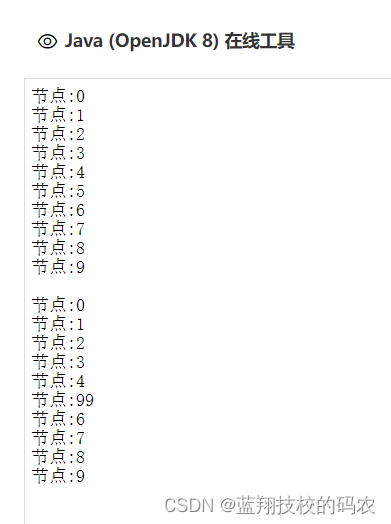
结果:
删除节点

class ListNode {        //类名 :Java类就是一种自定义的数据结构
    int val;            //数据 :节点数据
    ListNode next;      //对象 :引用下一个节点对象。在Java中没有指针的概念,Java中的引用和C语言的指针类似

    ListNode(int val){  //构造方法 :构造方法和类名相同
        this.val=val;   //把接收的参数赋值给当前类的val变量
    }
}

public class Main{
    public static void main(String[] args){

        ListNode nodeSta = new ListNode(0);          //创建首节点
        ListNode nextNode;                           //声明一个变量用来在移动过程中指向当前节点
        nextNode=nodeSta;                            //指向首节点

        //创建链表
        for(int i=1;i<10;i++){
            ListNode node = new ListNode(i);         //生成新的节点
            nextNode.next=node;                      //把心节点连起来
            nextNode=nextNode.next;                  //当前节点往后移动
        } //当for循环完成之后 nextNode指向最后一个节点,

        nextNode=nodeSta;                            //重新赋值让它指向首节点
        print(nextNode);                             //打印输出

        //删除节点
        while(nextNode!=null){
            if(nextNode.val==5){
                ListNode listNode=nextNode.next.next;     //保存要删除节点的下一个节点
                nextNode.next.next=null;                  //被删除节点 指向为空 ,等待java垃圾回收
                nextNode.next=listNode;                   //指向要删除节点的下一个节点
            }
            nextNode=nextNode.next;
        }//循环完成之后 nextNode指向最后一个节点
         nextNode=nodeSta;                            //重新赋值让它指向首节点
         print(nextNode);                             //打印输出
    }

    //打印输出方法
    static void print(ListNode listNoed){
        //创建链表节点
        while(listNoed!=null){
            System.out.println("节点:"+listNoed.val);
            listNoed=listNoed.next;
        }
        System.out.println();
    }
}
结果:
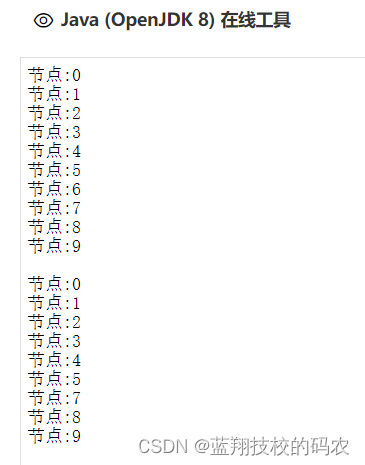
补充说明:
在对节点进行替换或删除的时候,被替换或被删节点的next引用需不需要设置为null?
答案是: 不需要,因为一个对象被回收的前提是因为没有任何地方持有这个对象的引用(引用计数器为0)也就是说它不在被引用,那么那么它将被回收,至于它引用什么对象无关紧要,因为对于它所引用的对象来说依然是看引用计数器是否为0;
2.3 栈
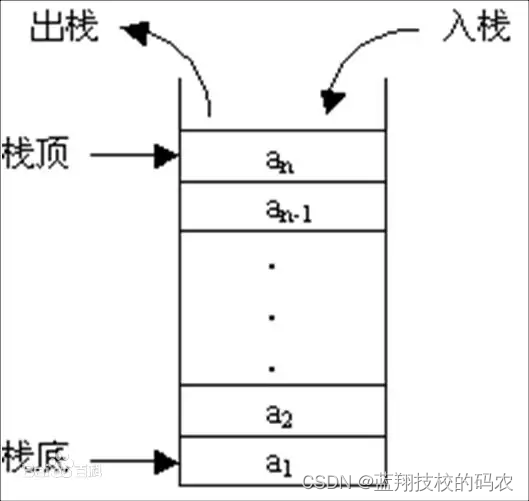
栈(stack) 又名堆栈,它是一种运算受限的线性表。
限定仅在表尾进行插入和删除操作的线性表。这一端被称为栈顶,相对地,把另一端称为栈底。向一个栈插入新元素又称作进栈、入栈或压栈,它是把新元素放到栈顶元素的上面,使之成为新的栈顶元素;从一个栈删除元素又称作出栈或退栈,它是把栈顶元素删除掉,使其相邻的元素成为新的栈顶元素。
2.3.1. 栈简介
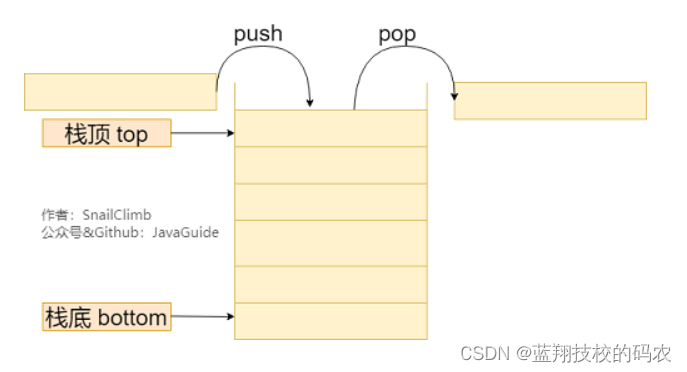
栈 (stack) 只允许在有序的线性数据集合的一端(称为栈顶 top)进行加入数据(push)和移除数据(pop)。因而按照 后进先出(LIFO, Last In First Out) 的原理运作。在栈中,push 和 pop 的操作都发生在栈顶。
栈常用一维数组或链表来实现,用数组实现的栈叫作 顺序栈 ,用链表实现的栈叫作 链式栈 。
假设堆栈中有n个元素。
访问:O(n)//最坏情况
插入删除:O(1)//顶端插入和删除元素
2.3.2. 栈的常见应用常见应用场景
当我们我们要处理的数据只涉及在一端插入和删除数据,并且满足 后进先出(LIFO, Last In First Out) 的特性时,我们就可以使用栈这个数据结构。
2.3.2.1. 实现浏览器的回退和前进功能
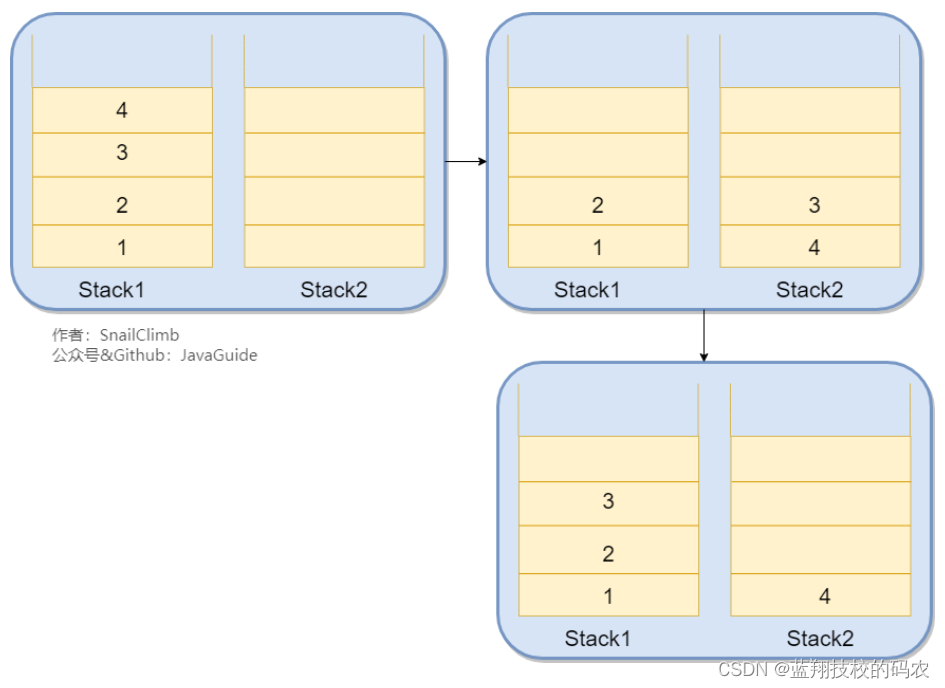
我们只需要使用两个栈(Stack1 和 Stack2)和就能实现这个功能。比如你按顺序查看了 1,2,3,4 这四个页面,我们依次把 1,2,3,4 这四个页面压入 Stack1 中。当你想回头看 2 这个页面的时候,你点击回退按钮,我们依次把 4,3 这两个页面从 Stack1 弹出,然后压入 Stack2 中。假如你又想回到页面 3,你点击前进按钮,我们将 3 页面从 Stack2 弹出,然后压入到 Stack1 中。示例图如下:
2.3.2.2. 检查符号是否成对出现
给定一个只包括 '(',')','{','}','[',']' 的字符串,判断该字符串是否有效。

有效字符串需满足:

左括号必须用相同类型的右括号闭合。
左括号必须以正确的顺序闭合。
比如 "()"、"()[]{}"、"{[]}" 都是有效字符串,而 "(]" 、"([)]" 则不是。
这个问题实际是 Leetcode 的一道题目,我们可以利用栈 Stack 来解决这个问题。
- 首先我们将括号间的对应规则存放在 Map 中,这一点应该毋容置疑;
- 创建一个栈。遍历字符串,如果字符是左括号就直接加入stack中,否则将stack 的栈顶元素与这个括号做比较,如果不相等就直接返回false。遍历结束,如果stack为空,返回 true。
public boolean isValid(String s){
    // 括号之间的对应规则
    HashMap<Character, Character> mappings = new HashMap<Character, Character>();
    mappings.put(')', '(');
    mappings.put('}', '{');
    mappings.put(']', '[');
    Stack<Character> stack = new Stack<Character>();
    char[] chars = s.toCharArray();
    for (int i = 0; i < chars.length; i++) {
        if (mappings.containsKey(chars[i])) {
            char topElement = stack.empty() ? '#' : stack.pop();
            if (topElement != mappings.get(chars[i])) {
                return false;
            }
        } else {
            stack.push(chars[i]);
        }
    }
    return stack.isEmpty();
}
2.3.2.3. 反转字符串
将字符串中的每个字符先入栈再出栈就可以了。
2.3.2.4. 维护函数调用
最后一个被调用的函数必须先完成执行,符合栈的 后进先出(LIFO, Last In First Out) 特性。
2.3.3. 栈的实现
栈既可以通过数组实现,也可以通过链表来实现。不管基于数组还是链表,入栈、出栈的时间复杂度都为 O(1)。
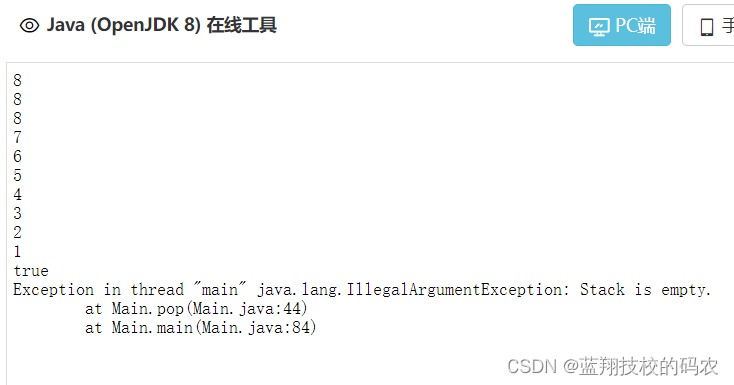
下面我们使用数组来实现一个栈,并且这个栈具有push()、pop()(返回栈顶元素并出栈)、peek() (返回栈顶元素不出栈)、isEmpty()、size()这些基本的方法。
import java.util.Arrays;

public class Main {
    private int[] storage;//存放栈中元素的数组
    private int capacity;//栈的容量
    private int count;//栈中元素数量
    private static final int GROW_FACTOR = 2;

    //不带初始容量的构造方法。默认容量为8
    public Main() {
        this.capacity = 8;
        this.storage=new int[8];
        this.count = 0;
    }

    //带初始容量的构造方法
    public Main(int initialCapacity) {
        if (initialCapacity < 1)
            throw new IllegalArgumentException("Capacity too small.");

        this.capacity = initialCapacity;
        this.storage = new int[initialCapacity];
        this.count = 0;
    }

    //入栈
    public void push(int value) {
        if (count == capacity) {
            ensureCapacity();
        }
        storage[count++] = value;
    }

    //确保容量大小
    private void ensureCapacity() {
        int newCapacity = capacity * GROW_FACTOR;
        storage = Arrays.copyOf(storage, newCapacity);
        capacity = newCapacity;
    }

    //返回栈顶元素并出栈
    private int pop() {
        if (count == 0)
            throw new IllegalArgumentException("Stack is empty.");
        count--;
        return storage[count];
    }

    //返回栈顶元素不出栈
    private int peek() {
        if (count == 0){
            throw new IllegalArgumentException("Stack is empty.");
        }else {
            return storage[count-1];
        }
    }

    //判断栈是否为空
    private boolean isEmpty() {
        return count == 0;
    }

    //返回栈中元素的个数
    private int size() {
        return count;
    }

    public static void main(String[] args) {
        Main myStack = new Main(3);
        myStack.push(1);
        myStack.push(2);
        myStack.push(3);
        myStack.push(4);
        myStack.push(5);
        myStack.push(6);
        myStack.push(7);
        myStack.push(8);
        System.out.println(myStack.peek());//8
        System.out.println(myStack.size());//8
        for (int i = 0; i < 8; i++) {
            System.out.println(myStack.pop());
        }
        System.out.println(myStack.isEmpty());//true
        myStack.pop();//报错:java.lang.IllegalArgumentException: Stack is empty.

    }
}
结果:
2.4 队列
队列是一种特殊的线性表,特殊之处在于它只允许在表的前端(front)进行删除操作,而在表的后端(rear)进行插入操作,和栈一样,队列是一种操作受限制的线性表。进行插入操作的端称为队尾,进行删除操作的端称为队头。
2.4.1 队列简介
队列 是 先进先出( FIFO,First In, First Out) 的线性表。在具体应用中通常用链表或者数组来实现,用数组实现的队列叫作 顺序队列 ,用链表实现的队列叫作 链式队列 。队列只允许在后端(rear)进行插入操作也就是 入队 enqueue,在前端(front)进行删除操作也就是出队 dequeue
队列的操作方式和堆栈类似,唯一的区别在于队列只允许新数据在后端进行添加。
假设队列中有n个元素。
访问:O(n)//最坏情况
插入删除:O(1)//后端插入前端删除元素

2.4.2 队列分类
2.4.2.1 单队列
单队列就是常见的队列, 每次添加元素时,都是添加到队尾。单队列又分为 顺序队列(数组实现) 和 链式队列(链表实现)。
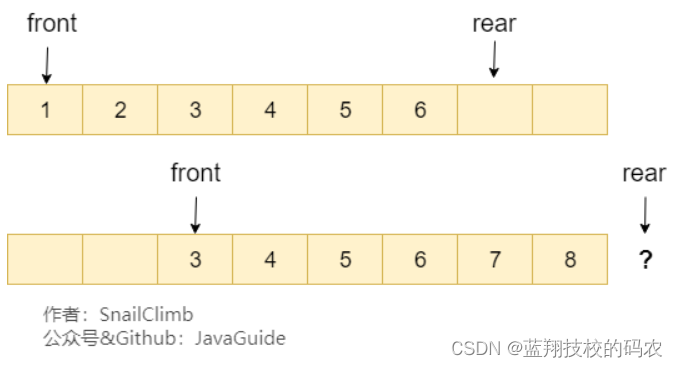
顺序队列存在“假溢出”的问题也就是明明有位置却不能添加的情况。
假设下图是一个顺序队列,我们将前两个元素 1,2 出队,并入队两个元素 7,8。当进行入队、出队操作的时候,front 和 rear 都会持续往后移动,当 rear 移动到最后的时候,我们无法再往队列中添加数据,即使数组中还有空余空间,这种现象就是 ”假溢出“ 。除了假溢出问题之外,如下图所示,当添加元素 8 的时候,rear 指针移动到数组之外(越界)。
为了避免当只有一个元素的时候,队头和队尾重合使处理变得麻烦,所以引入两个指针,front 指针指向对头元素,rear 指针指向队列最后一个元素的下一个位置,这样当 front 等于 rear 时,此队列不是还剩一个元素,而是空队列。——From 《大话数据结构》
2.4.2.2 循环队列
循环队列可以解决顺序队列的假溢出和越界问题。解决办法就是:从头开始,这样也就会形成头尾相接的循环,这也就是循环队列名字的由来。
还是用上面的图,我们将 rear 指针指向数组下标为 0 的位置就不会有越界问题了。当我们再向队列中添加元素的时候, rear 向后移动。
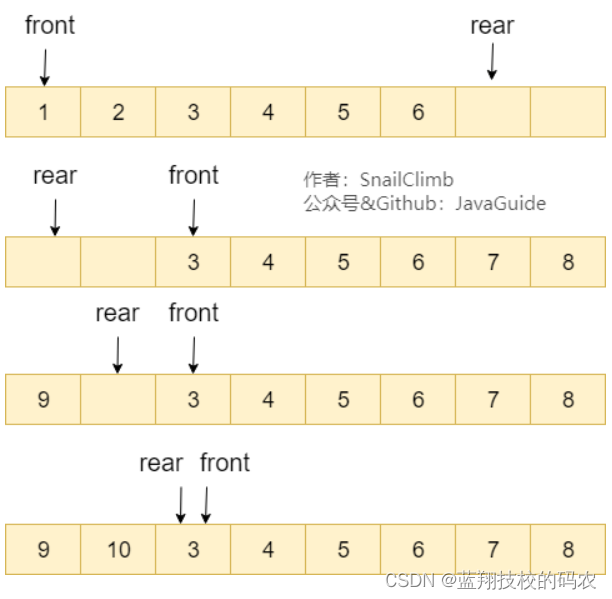
顺序队列中,我们说 front==rear 的时候队列为空,循环队列中则不一样,也可能为满,如上图所示。解决办法有两种:
- 可以设置一个标志变量 flag,当 frontrear 并且 flag=0 的时候队列为空,当frontrear 并且
flag=1 的时候队列为满。 - 队列为空的时候就是 front==rear ,队列满的时候,我们保证数组还有一个空闲的位置,rear
就指向这个空闲位置,如下图所示,那么现在判断队列是否为满的条件就是: (rear+1) % QueueSize= front 。

2.4.3 常见应用场景
当我们需要按照一定顺序来处理数据的时候可以考虑使用队列这个数据结构。
- 阻塞队列:
阻塞队列可以看成在队列基础上加了阻塞操作的队列。当队列为空的时候,出队操作阻塞,当队列满的时候,入队操作阻塞。使用阻塞队列我们可以很容易实现“生产者-消费者“模型。 - 线程池中的请求/任务队列:
线程池中没有空闲线程时,新的任务请求线程资源时,线程池该如何处理呢?答案是将这些请求放在队列中,当有空闲线程的时候,会循环中反复从队列中获取任务来执行。队列分为无界队列(基于链表)和有界队列(基于数组)。无界队列的特点就是可以一直入列,除非系统资源耗尽,比如 :FixedThreadPool 使用无界队列 LinkedBlockingQueue。但是有界队列就不一样了,当队列满的话后面再有任务/请求就会拒绝,在 Java中的体现就是会抛出java.util.concurrent.RejectedExecutionException 异常。 - Linux 内核进程队列(按优先级排队)
- 现实生活中的派对,播放器上的播放列表;
- 消息队列
- 等等…
2.4.4 实例
import java.util.Iterator;
public class Queue<T> implements Iterable<T>{
    private Node head;
    private Node last;
    private int N;

    private class Node{  //内部类
        public T item; //链表所存元素
        public Node next;

        public Node(T item,Node next){//Node的有参构造
            this.item=item;
            this.next=next;
        }
    }


    public Queue(){ //队列的构造
        this.head=new Node(null,null); //head结点不存储元素
        this.last=null;
        this.N=0;
    }


    public boolean isEmpty(){
        return N==0;
    }


    public int size(){
        return N;
    }

    //尾插
    public void enqueue(T t){
        if(last==null){ //尾结点为null
            last=new Node(t,null);
            head.next=last;
        }else{ //尾结点不为null
            Node oldlast=last;//记录旧尾结点
            last=new Node(t,null); //更新尾结点
            oldlast.next=last;//旧的尾结点指向新的尾结点
        }
        N++;
    }

    //头取
    public T dequeue(){
        if(isEmpty()){
            return null;
        }else{
            Node oldFirst=head.next;//旧的首结点的下一个结点
            head.next=oldFirst.next;//更新首结点的下一个结点
            N--;
            //因为取元素是在删除,如果删完了就需要重置last=null;
            if(isEmpty()){
                last=null;
            }
            return oldFirst.item;//先进先出, 头取
        }
    }


    @Override
    public Iterator<T> iterator() {
        return new MyIterator();}

    private class MyIterator implements Iterator{
        private Node n;//记录每次遍历的结点

        MyIterator(){
            this.n=head;
        }

        @Override
        public boolean hasNext() {
            return n.next!=null;
        }

        @Override
        public Object next() {
            n=n.next;
            return n.item;
        }
    }

    public static void main(String[] args) {
        Queue<String> q=new Queue();
        q.enqueue("a");
        q.enqueue("b");
        q.enqueue("c");
        q.enqueue("d");

        for(String k:q){
            System.out.println(k);
        }
        System.out.println("==========");
        System.out.println(q.dequeue()); //删除一个元素(先进先出)
        System.out.println("==========");
        for(String k:q){
            System.out.println(k);
        }
    }
}
3. 非线性数据结构
3.1 图
3.1.1 图的基本概念、存储、搜索
3.1.2 实例
图的实例
Java没有提供图形数据结构的完整实现。但是,我们可以使用Java中的Collections以编程方式表示图形。我们还可以使用像矢量这样的动态数组来实现图。
通常,我们使用HashMap集合在Java中实现图形。HashMap元素采用键-值对的形式。我们可以在HashMap中表示图邻接表。
创建图的最常见方法是使用图的表示形式之一,例如邻接矩阵或邻接列表。接下来,我们将讨论这些表示形式,然后使用将使用ArrayList的邻接列表在Java中实现图形。
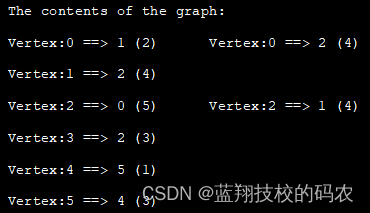
我们使用了邻接表来表示图。
package Graph;

import java.util.*;

//class to store edges of the weighted graph
class Edge {
	int src, dest, weight;

	Edge(int src, int dest, int weight) {
		this.src = src;
		this.dest = dest;
		this.weight = weight;
	}
}

//Graph class
class Graph {
	// node of adjacency list
	static class Node {
		int value, weight;

		Node(int value, int weight) {
			this.value = value;
			this.weight = weight;
		}
	};

//define adjacency list

	List<List<Node>> adj_list = new ArrayList<>();

	// Graph Constructor
	public Graph(List<Edge> edges) {
		// adjacency list memory allocation
		for (int i = 0; i < edges.size(); i++)
			adj_list.add(i, new ArrayList<>());

		// add edges to the graph
		for (Edge e : edges) {
			// allocate new node in adjacency List from src to dest
			adj_list.get(e.src).add(new Node(e.dest, e.weight));
		}
	}

//print adjacency list for the graph
	public static void printGraph(Graph graph) {
		int src_vertex = 0;
		int list_size = graph.adj_list.size();

		System.out.println("The contents of the graph:");
		while (src_vertex < list_size) {
			// traverse through the adjacency list and print the edges
			for (Node edge : graph.adj_list.get(src_vertex)) {
				System.out.print("Vertex:" + src_vertex + " ==> " + edge.value + " (" + edge.weight + ")\t");
			}

			System.out.println();
			src_vertex++;
		}
	}
}

public class Main {
	public static void main(String[] args) {
		// define edges of the graph
		List<Edge> edges = Arrays.asList(new Edge(0, 1, 2), new Edge(0, 2, 4), new Edge(1, 2, 4), new Edge(2, 0, 5),
				new Edge(2, 1, 4), new Edge(3, 2, 3), new Edge(4, 5, 1), new Edge(5, 4, 3));

		// call graph class Constructor to construct a graph
		Graph graph = new Graph(edges);

		// print the graph as an adjacency list
		Graph.printGraph(graph);
	}
}
结果
深度优先搜索(DFS)
算法
- 步骤1:从根节点开始,并将其插入堆栈
- 步骤2:从堆栈中弹出项目,然后插入“已访问”列表
- 步骤3:对于标记为“已访问”(或已访问列表)的节点,将该节点的尚未标记为已访问的相邻节点添加到堆栈中。
- 步骤4:重复步骤2和3,直到堆栈为空。
package GraphDFS;

import java.io.*;
import java.util.*;

//DFS Technique for undirected graph
class Graph {
	private int Vertices; // No. of vertices

	// adjacency list declaration
	private LinkedList<Integer> adj_list[];

	// graph Constructor: to initialize adjacency lists as per no of vertices
	Graph(int v) {
		Vertices = v;
		adj_list = new LinkedList[v];
		for (int i = 0; i < v; ++i)
			adj_list[i] = new LinkedList();
	}

	// add an edge to the graph
	void addEdge(int v, int w) {
		adj_list[v].add(w); // Add w to v's list.
	}

	// helper function for DFS technique
	void DFS_helper(int v, boolean visited[]) {
		// current node is visited
		visited[v] = true;
		System.out.print(v + " ");

		// process all adjacent vertices
		Iterator<Integer> i = adj_list[v].listIterator();
		while (i.hasNext()) {
			int n = i.next();
			if (!visited[n])
				DFS_helper(n, visited);
		}
	}

	void DFS(int v) {
		// initially none of the vertices are visited
		boolean visited[] = new boolean[Vertices];

		// call recursive DFS_helper function for DFS technique
		DFS_helper(v, visited);
	}
}

public class Main {
	public static void main(String args[]) {
		// create a graph object and add edges to it
		Graph g = new Graph(5);
		g.addEdge(0, 1);
		g.addEdge(0, 2);
		g.addEdge(0, 3);
		g.addEdge(1, 2);
		g.addEdge(2, 4);
		// print the DFS Traversal sequence
		System.out.println("Depth First Traversal for given graph" + "(with 0 as starting vertex)");
		g.DFS(0);
	}
}
结果

广度优先搜索(BFS)
算法
- 步骤1:从根节点开始,然后将其插入队列。
- 步骤2:对图中的所有节点重复步骤3和4。
- 步骤3:从队列中删除根节点,并将其添加到Visited列表中。
- 步骤4:现在将根节点的所有相邻节点添加到队列中,并对每个节点重复步骤2至4。[END OF LOOP]
- 步骤5: 退出
package GraphBFS;

import java.io.*;
import java.util.*;

//undirected graph represented using adjacency list.
class Graph {
	private int Vertices; // No. of vertices
	private LinkedList<Integer> adj_list[]; // Adjacency Lists

	// graph Constructor:number of vertices in graph are passed
	Graph(int v) {
		Vertices = v;
		adj_list = new LinkedList[v];
		for (int i = 0; i < v; ++i) // create adjacency lists
			adj_list[i] = new LinkedList();
	}

	// add an edge to the graph
	void addEdge(int v, int w) {
		adj_list[v].add(w);
	}

	// BFS traversal from the root_node
	void BFS(int root_node) {
		// initially all vertices are not visited
		boolean visited[] = new boolean[Vertices];

		// BFS queue
		LinkedList<Integer> queue = new LinkedList<Integer>();

		// current node = visited, insert into queue
		visited[root_node] = true;
		queue.add(root_node);

		while (queue.size() != 0) {
			// deque an entry from queue and process it
			root_node = queue.poll();
			System.out.print(root_node + " ");

			// get all adjacent nodes of current node and process
			Iterator<Integer> i = adj_list[root_node].listIterator();
			while (i.hasNext()) {
				int n = i.next();
				if (!visited[n]) {
					visited[n] = true;
					queue.add(n);
				}
			}
		}
	}
}

public class Main {
	public static void main(String args[]) {
		// create a graph with 5 vertices
		Graph g = new Graph(5);
		// add edges to the graph
		g.addEdge(0, 1);
		g.addEdge(0, 2);
		g.addEdge(0, 3);
		g.addEdge(1, 2);
		g.addEdge(2, 4);
		// print BFS sequence
		System.out.println("Breadth-first traversal of graph with 0 as starting vertex:");
		g.BFS(0);
	}
}
结果

3.2 堆
3.2.1 堆的介绍
3.2.2 实例
- 创建一个大根堆类
里面维护一个数组、堆的大小等信息
class MaxHead {
    private int[] headArr; // 存放数据的数组 (0下标不存值)
    private int headSize=0; // 堆的大小
    private int maxSize = 1000; // 数组最大值, 默认值1000

    // 构造函数
    public MaxHead(int maxSize) {
        this.maxSize = maxSize;
        this.headArr = new int[maxSize];
    }

    public MaxHead() {
        this.headArr = new int[this.maxSize];
    }
}
- 封装几个通用方法
打印数组信息:
/**
 1. 打印数组信息
 2. @param arr
 */
public static void print(int[] arr) {
    for (int item: arr)
        System.out.print(item+" ");
}
交换数组中两个数据的位置:
/**
 3. 交换数组中两个数据的位置
 4. @param arr
 5. @param idx1
 6. @param idx2
 */
public static void swap(int[] arr, int idx1, int idx2) {
    int temp = arr[idx1];
    arr[idx1] = arr[idx2];
    arr[idx2] = temp;
}
向下调整(核心):
/**
 7. 向下调整 (因为向下调整的边界是head的大小 因此需要headSize这个参数)
 8. @param headArr:堆数组
 9. @param curIndex:当前节点的下标
 10. @param headSize: 堆的大小
 */
public void shiftDown(int[] headArr, int curIndex, int headSize) {
    while (curIndex*2 <= headSize) { // 存在左孩子(存在子节点)
        int left = 2*curIndex;
        // 最大子节点下标默认值: 左孩子下标
        int maxSon = left;
        int right = left+1;
        if (right <= headSize) {    // 存在右孩子节点
            if (headArr[right] > headArr[left])
                maxSon = right;
        }
        // 如果当前节点小于最大的孩子节点  则交换位置
        if (headArr[curIndex] < headArr[maxSon]) {
            swap(headArr, curIndex, maxSon);
            // 交换之后 当前节点下移
            curIndex = maxSon;
        }else
            break;
    }
}
向上调整(核心):
/**
 11. 向上调整
 12. @param headArr
 13. @param curIndex
 */
public static void shiftUp(int[] headArr, int curIndex) {
    while (curIndex >1) {  // 如果curIndex=1,则为根节点, 上移结束
        // 父节点为 当前节点/2   curIndex>>1 等同于 curIndex/2
        int fatherIndex = curIndex >> 1;
        if (headArr[fatherIndex] < headArr[curIndex]) { // 父节点比当前节点小(不满足大根堆),向上调整
            swap(headArr, curIndex, fatherIndex);
            // 交换之后 当前节点上移
            curIndex = fatherIndex;
        } else
            break;
    }
}
- 调整堆代码
/**
 1. 根据传来数组,原地将他调整为一个大根堆
 2. @param arr
 */
public static void buildHead(int[] arr) {   // 注意:传来的数组,index=0不存值
    int headSize = arr.length-1;
    for (int i=headSize/2; i>=1; i--) { // headSize所在的下标 即第1个存在孩子节点的子树节点下标
        // 依次调整每一棵子树, 令其满足大根堆
        shiftDown(arr, i, headSize);
    }
}
- 添加元素代码
/**
 1. 添加元素
 2. @param value
 */
void put(int value) {
    if (headSize == maxSize-1) {
        System.out.println("堆已满!");
        return;
    }
    /**
     * 1、堆的大小+1                 ++headSize
     * 2、将插入的数放入堆尾          headArr[headSize] = num
     */
    headArr[++headSize] = value;
    // 操作数刚开始的下标是堆尾元素下标 curIndex = headSize
    int curIndex = headSize;
    // 重新调整为大根堆 (shiftUp)
    shiftUp(this.headArr, curIndex);
}
- 取出堆顶元素代码
/**
 1. 获取堆顶元素 并移除
 2. @return
 */
int pop() {
    if (headSize == 0) {
        System.out.println("堆已空!");
        return -1;
    }
    // 获取堆顶元素
    int topValue = headArr[1];
    /**
     * 1、将堆尾部元素覆盖给arr[1]位置  headArr[1] = headArr[headSize]
     * 2、将堆的大小减1                headSize--
     */
    headArr[1] = headArr[headSize--];
    // 因为队尾元素值已经覆盖到根节点位置 接下来的操作数便是这个值
    int curIndex = 1;
    // 重新调整为小根堆 (shiftDown)
    shiftDown(this.headArr,curIndex, headSize);
    return topValue;
}
- 完整代码
import java.util.Scanner;

class MaxHead {
    private int[] headArr; // 存放数据的数组 (0下标不存值)
    private int headSize=0; // 堆的大小
    private int maxSize = 1000; // 数组最大值, 默认值1000

    // 构造函数
    public MaxHead(int maxSize) {
        this.maxSize = maxSize;
        this.headArr = new int[maxSize];
    }

    public MaxHead() {
        this.headArr = new int[this.maxSize];
    }

    /**
     * 打印数组信息
     * @param arr
     */
    public void print(int[] arr) {
        for (int item: arr)
            System.out.print(item+" ");
    }
    /**
     * 交换数组中两个数据的位置
     * @param arr
     * @param idx1
     * @param idx2
     */
    public void swap(int[] arr, int idx1, int idx2) {
        int temp = arr[idx1];
        arr[idx1] = arr[idx2];
        arr[idx2] = temp;
    }

    /**
     * 向下调整 (因为向下调整的边界是head的大小 因此需要headSize这个参数)
     * @param headArr:堆数组
     * @param curIndex:当前节点的下标
     * @param headSize: 堆的大小
     */
    public void shiftDown(int[] headArr, int curIndex, int headSize) {
        while (curIndex*2 <= headSize) { // 存在左孩子(存在子节点)
            int left = 2*curIndex;
            // 最大子节点下标默认值: 左孩子下标
            int maxSon = left;
            int right = left+1;
            if (right <= headSize) {    // 存在右孩子节点
                if (headArr[right] > headArr[left])
                    maxSon = right;
            }
            // 如果当前节点小于最大的孩子节点  则交换位置
            if (headArr[curIndex] < headArr[maxSon]) {
                swap(headArr, curIndex, maxSon);
                // 交换之后 当前节点下移
                curIndex = maxSon;
            }else
                break;
        }
    }

    /**
     * 向上调整
     * @param headArr
     * @param curIndex
     */
    public void shiftUp(int[] headArr, int curIndex) {
        while (curIndex >1) {  // 如果curIndex=1,则为根节点, 上移结束
            // 父节点为 当前节点/2   curIndex>>1 等同于 curIndex/2
            int fatherIndex = curIndex >> 1;
            if (headArr[fatherIndex] < headArr[curIndex]) { // 父节点比当前节点小(不满足大根堆),向上调整
                swap(headArr, curIndex, fatherIndex);
                // 交换之后 当前节点上移
                curIndex = fatherIndex;
            } else
                break;
        }
    }

    /**
     * 根据传来数组,原地将他调整为一个大根堆
     * @param arr
     */
    public void buildHead(int[] arr) {   // 注意:传来的数组,index=0不存值
        int headSize = arr.length-1;
        for (int i=headSize/2; i>=1; i--) { // headSize所在的下标 即第1个存在孩子节点的子树节点下标
            // 依次调整每一棵子树, 令其满足大根堆
            shiftDown(arr, i, headSize);
        }
    }

    /**
     * 添加元素
     * @param value
     */
    void put(int value) {
        if (headSize == maxSize-1) {
            System.out.println("堆已满!");
            return;
        }
        /**
         * 1、堆的大小+1                 ++headSize
         * 2、将插入的数放入堆尾          headArr[headSize] = num
         */
        headArr[++headSize] = value;
        // 操作数刚开始的下标是堆尾元素下标 curIndex = headSize
        int curIndex = headSize;
        // 重新调整为大根堆 (shiftUp)
        shiftUp(this.headArr, curIndex);
    }

    /**
     * 获取堆顶元素 并移除
     * @return
     */
    int pop() {
        if (headSize == 0) {
            System.out.println("堆已空!");
            return -1;
        }
        // 获取堆顶元素
        int topValue = headArr[1];
        /**
         * 1、将堆尾部元素覆盖给arr[1]位置  headArr[1] = headArr[headSize]
         * 2、将堆的大小减1                headSize--
         */
        headArr[1] = headArr[headSize--];
        // 因为队尾元素值已经覆盖到根节点位置 接下来的操作数便是这个值
        int curIndex = 1;
        // 重新调整为小根堆 (shiftDown)
        shiftDown(this.headArr,curIndex, headSize);
        return topValue;
    }

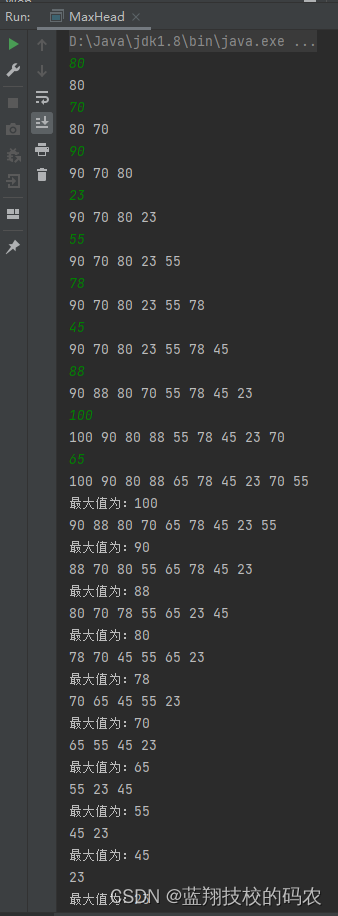
    public static void main(String[] args) {
        MaxHead maxHead = new MaxHead(20);
        for (int i=0; i<10; i++) {
            Scanner sc = new Scanner(System.in);
            int num = sc.nextInt();
            maxHead.put(num);
            for (int j=1; j<=maxHead.headSize; j++) {
                System.out.print(maxHead.headArr[j]+" ");
            }
            System.out.println();
        }
        for (int i=0; i<10; i++) {
            int minNum = maxHead.pop();
            System.out.println("最大值为:"+minNum);
            for (int j=1; j<=maxHead.headSize; j++) {
                System.out.print(maxHead.headArr[j]+" ");
            }
            System.out.println();
        }
    }
}
结果
3.3 树
3.3.1 树的介绍
3.3.2 实例
3.4 红黑树
3.4.1 红黑树的介绍
3.4.2 实例
3.5 布隆过滤器
3.5.1 布隆过滤器的介绍
布隆过滤器(Bloom Filter) 是一个叫做 Bloom 的老哥于 1970 年提出的。我们可以把它看作由二进制向量(或者说位数组)和一系列随机映射函数(哈希函数)两部分组成的数据结构。相比于我们平时常用的的 List、Map 、Set 等数据结构,它占用空间更少并且效率更高,但是缺点是其返回的结果是概率性的,而不是非常准确的。理论情况下添加到集合中的元素越多,误报的可能性就越大。并且,存放在布隆过滤器的数据不容易删除。
总结: 一个名叫 Bloom 的人提出了一种来检索元素是否在给定大集合中的数据结构,这种数据结构是高效且性能很好的,但缺点是具有一定的错误识别率和删除难度。并且,理论情况下,添加到集合中的元素越多,误报的可能性就越大。
3.5.2 实例
步骤
- 一个合适大小的位数组保存数据
- 几个不同的哈希函数
- 添加元素到位数组(布隆过滤器)的方法实现
- 判断给定元素是否存在于位数组(布隆过滤器)的方法实现。
import java.util.BitSet;

public class MyBloomFilter {

    /**
     * 位数组的大小
     */
    private static final int DEFAULT_SIZE = 2 << 24;
    /**
     * 通过这个数组可以创建 6 个不同的哈希函数
     */
    private static final int[] SEEDS = new int[]{3, 13, 46, 71, 91, 134};

    /**
     * 位数组。数组中的元素只能是 0 或者 1
     */
    private BitSet bits = new BitSet(DEFAULT_SIZE);

    /**
     * 存放包含 hash 函数的类的数组
     */
    private SimpleHash[] func = new SimpleHash[SEEDS.length];

    /**
     * 初始化多个包含 hash 函数的类的数组,每个类中的 hash 函数都不一样
     */
    public MyBloomFilter() {
        // 初始化多个不同的 Hash 函数
        for (int i = 0; i < SEEDS.length; i++) {
            func[i] = new SimpleHash(DEFAULT_SIZE, SEEDS[i]);
        }
    }

    /**
     * 添加元素到位数组
     */
    public void add(Object value) {
        for (SimpleHash f : func) {
            bits.set(f.hash(value), true);
        }
    }

    /**
     * 判断指定元素是否存在于位数组
     */
    public boolean contains(Object value) {
        boolean ret = true;
        for (SimpleHash f : func) {
            ret = ret && bits.get(f.hash(value));
        }
        return ret;
    }

    /**
     * 静态内部类。用于 hash 操作!
     */
    public static class SimpleHash {

        private int cap;
        private int seed;

        public SimpleHash(int cap, int seed) {
            this.cap = cap;
            this.seed = seed;
        }

        /**
         * 计算 hash 值
         */
        public int hash(Object value) {
            int h;
            return (value == null) ? 0 : Math.abs(seed * (cap - 1) & ((h = value.hashCode()) ^ (h >>> 16)));
        }

    }
}
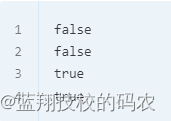
测试
String value1 = "https://javaguide.cn/";
String value2 = "https://github.com/Snailclimb";
MyBloomFilter filter = new MyBloomFilter();
System.out.println(filter.contains(value1));
System.out.println(filter.contains(value2));
filter.add(value1);
filter.add(value2);
System.out.println(filter.contains(value1));
System.out.println(filter.contains(value2));
结果
测试
Integer value1 = 13423;
Integer value2 = 22131;
MyBloomFilter filter = new MyBloomFilter();
System.out.println(filter.contains(value1));
System.out.println(filter.contains(value2));
filter.add(value1);
filter.add(value2);
System.out.println(filter.contains(value1));
System.out.println(filter.contains(value2));
结果

4. 算法
4.1 几道常见的字符串算法题
https://javaguide.cn/cs-basics/algorithms/string-algorithm-problems.html
4.2 几道常见的链表算法题
https://javaguide.cn/cs-basics/algorithms/linkedlist-algorithm-problems.html
4.3 剑指offer部分编程题
https://javaguide.cn/cs-basics/algorithms/the-sword-refers-to-offer.html
