文章借鉴于【尚硅谷】数据结构与算法(Java数据结构与算法),在内容方面会做更改,但是核心依然是他们的学习视频。在这里声明。
1. 线性结构和非线性结构
1.1 线性结构
数据结构包括两大部分,一个叫 线性结构,一个叫 非线性结构
-
线性结构作为最常用的数据结构,其特点是数据元素之间存在一对一的线性关系。 比如数组, var[0] = 20; 存在一对一关系。
-
线性结构有两种不同的存储结构,即顺序存储结构和链式存储结构。顺序存储的线性表称为顺序表,顺序表中的元素是连续的。该元素指的是内存地址。
-
链式存储结构的线性表称为链表,链表中存储的元素不一定是连续的, 元素节点中存放数据元素以及相邻元素的地址信息。
-
线性结构常见的有:数组,队列,链表,栈
1.2 非线性结构
- 非线性结构包括:二维数组,多维数组,广义表,树结构,图结构
2. 稀疏数组
定义: 当一个数组中,大部分元素都为0,或者大部分元素都为同一个数字的时候,可以使用稀疏数组来保存该数组。
2.1 稀疏数组的介绍
稀疏数组的处理方式是:
- 记录一个数组有多少行,多少列,有多少个不同的值。
- 把具有不同元素的行列记录在一个小规模的数组上(这个小规模的数组就是稀疏数组),从而缩小程序的规模。

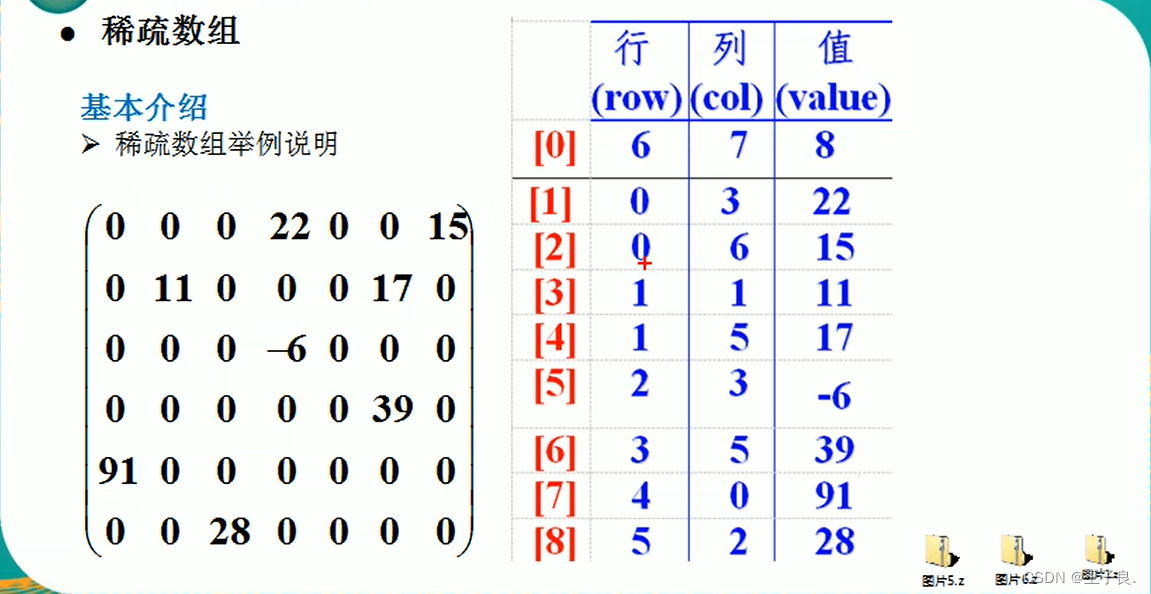
左侧是原有的二维数组,右侧为压缩后的稀疏数组。在稀疏数组的第[0]索引位,第一个元素代表了这个原有的二维数组有几行,第二个代表了这个原有的数组有几列,第三个代表了除去非0以外的元素,还存在几个其他不同的元素。从第[1]号索引到第[8]号索引,他们分别记录的是该不同元素出现在二维数组上的位置所在。比如 元素22 出现在 索引为0 - 3 的地方,那么对应的具体坐标就为 1 - 4 也就是第一行第四个元素。那么,原有的 6行 7列的数组,就会变成 现在稀疏数组的 九行 三列,对应的元素分别是 6 * 7 = 42(压缩前) 和 3 * 9 = 27(压缩后),大大减少了使用空间。
2.2 稀疏数组的实操
那在具有上面的了解后,就可以来具体的学习一下怎么样把一个二维数组,转换为稀疏数组的思路。
- 遍历原始的二维数组,得到有效元素的个数 sum。
- 根据sum就可以创建稀疏数组sparseArray其中稀疏数组的大小为
int[] [] sparseArray = new int[sum + 1][3] - 将二维数组的有效数据,存入到稀疏数组中。
那么存入后,就需要还原二维数组。下面是稀疏数组转二维数组的思路。
- 先读取稀疏数组的第一行,第一行里面有二维数组的行和列。根据第一行的数据,创建原始的二维数组。 int[][] array = new int[sparse[0][1]] [sparse[0][2]]
- 然后读取稀疏数组后几行的数据,并且赋给原始的二维数组。即可。
现在就可以来写具体的代码实操。新建一个类,类名自定义,我这里的类名叫做SparseArray。接下来我直接粘贴代码。具体内容看代码,代码都具有注释。
package com.data_structure.sparse_array;

import java.util.Arrays;

/**
 * 数据结构
 * 稀疏数组的来回转换
 */
public class SparseArray {

    /***
     * 对二维数组的转置输出,观看更客观
     * @param arrays 对应的需要转置的二维数组
     */
    public static void Transpose_2D_Array(int[][] arrays) {
        for (int[] array : arrays) {
            System.out.println(Arrays.toString(array));
        }
    }

    /**
     * 遍历二维数组,得到非0元素的个数
     * @param arrays 传入的二维数组
     * @return 返回非0的个数
     */
    public static Integer Get_Oon_Empty_Element(int[][] arrays) {

        int sum = 0;

        for (int[] array : arrays) {
            for (int i : array) {
                if (i != 0) {
                    sum ++;
                }
            }
        }

        return sum;
    }

    /**
     * 稀疏数组转换二维数组
     * @param sparseArray 传入稀疏数组
     * @return 转换成功的二维数组
     */
    public static int[][] SparseArrayTo2DArray(int[][] sparseArray) {
        // 根据稀疏数组,还原对应二维数组的大小,当然,前提是判断稀疏数组是否可用

        if (sparseArray[0][0] != 0 && sparseArray[0][1] != 0) {

            // 创建一个新的二维数组
            int[][] new2DArray = new int[sparseArray[0][0]][sparseArray[0][1]];

            // 此时只需要循环遍历其他的值即可
            for (int i = 1; i <= sparseArray[0][2]; i++) {

                new2DArray[sparseArray[i][0]][sparseArray[i][1]] = sparseArray[i][2];

            }

            return new2DArray;

        }

        return null;
    }


    /**
     * 二维数组转换为稀疏数组
     */
    public static void Convert_2D_Array_To_Sparse_Array() {

        // 创建一个原始的11 * 11 的 二维数组模拟五子棋 0 表示空值, 1表示黑子,2表示白子
        int[][] arrays = new int[11][11];

        // 初始化棋盘 假设下了两个棋子,第二行第三个(黑色), 第三行第四个(白色)
        arrays[1][2] = 1;
        arrays[2][3] = 2;

        System.out.println("原始二维数组: ");

        // 对二维数组进行转置输出
        Transpose_2D_Array(arrays);

        // 得到非0的元素个数
        Integer integer = Get_Oon_Empty_Element(arrays);

        // 创建对应的稀疏数组 他的行为 对应有元素的个数 + 1 列为固定3
        int[][] sparseArray = new int[integer+1][3];

        //给稀疏数组赋值
        sparseArray[0][0] = 11;
        sparseArray[0][1] = 11;
        sparseArray[0][2] = integer;

        // 遍历原始数组,然后把对应不为0的元素,存储到稀疏数组中。
        int count = 0;
        for (int i = 0; i < 11; i++) {

            for (int j = 0; j < 11; j++) {

                // 如果不为0 代表有数据
                if (arrays[i][j] != 0) {

                    count ++;

                    sparseArray[count][0] = i;

                    sparseArray[count][1] = j;

                    sparseArray[count][2] = arrays[i][j];

                }

            }

        }

        // 输出稀疏数组的形式
        System.out.println("稀疏数组: ");

        Transpose_2D_Array(sparseArray);

        // 稀疏数组转换为 二维数组。以及知道系数组的数据位置,可以直接通过稀疏数组转换二维数组。
        int[][] newArrays = SparseArrayTo2DArray(sparseArray);

        System.out.println("由稀疏数组转换为二维数组: ");

        assert newArrays != null;
        Transpose_2D_Array(newArrays);

    }


    public static void main(String[] args) {

        Convert_2D_Array_To_Sparse_Array();

    }

}
上述代码是可以直接拷贝运行的,但是注意包结构导入,需要更改。
3.队列
特性: 队列最大的特点就是 先进先出;
- 队列是一个有序列表,可以用数组或者链表来实现。
- 遵循先入先出的原则。即先存入的数据,先取出,后存入的数据,后取出。
3.1 队列的代码实现
package com.data_structure.queue;

/**
 * 队列,且是用数组模拟队列
 */
public class ArrayQueueDemo {

    public static void main(String[] args) {
        ArrayQueue arrayQueue = new ArrayQueue(5);
        arrayQueue.addQueue(5);
        arrayQueue.addQueue(1);
        arrayQueue.addQueue(7);
        arrayQueue.addQueue(9);
        arrayQueue.addQueue(4);
        arrayQueue.addQueue(4);
        System.out.println();
        arrayQueue.show();
        System.out.println();
        System.out.println(arrayQueue.getQueue());
        System.out.println(arrayQueue.getQueue());
        System.out.println(arrayQueue.getQueue());
        System.out.println(arrayQueue.getQueue());
        arrayQueue.show();
    }

}

// 新建一个数组模拟队列,编写一个ArrayQueue
class ArrayQueue {

    // 表示数组的最大容量
    private final int maxSize;

    // 指向队列头
    private int front;

    // 指向队列尾
    private int rear;

    // 队列数组
    private final int[] array;

    /**
     * 构造器,初始化数据
     * @param arrSize 队列的大小
     */
    public ArrayQueue(int arrSize) {
        this.maxSize = arrSize;   // 获取到队列的最大容量
        this.array = new int[maxSize];   // 根据最大容量创建数组队列
        this.front = -1;   // 指针头,指向队列头部的前一个位置
        this.rear = -1;  // 指针尾,指向队列尾部的最后一个位置
    }

    /**
     * 判断队列是否为空,只需要检查 指针头和指针尾是否相撞就可以了
     * @return 空为true  反之false
     */
    public boolean queueIsEmpty() {
        return this.front == this.rear;
    }

    /**
     * 判断队列是否已满,只需要检查队列尾部指针是否和最大容量 -1(下标) 相撞
     * @return 满了返回true ,反之反之
     */
    public boolean queueIsFull() {
        return this.rear == this.maxSize - 1;
    }

    /**
     * 添加队列
     * @param num 向队列里添加的值
     */
    public void addQueue(int num) {

        // 判断队列是否已满
        if (!queueIsFull()) {

            this.rear ++;

            array[rear] = num;

        } else {

            System.out.println("队列已满,无法添加数值。");

        }

    }

    /**
     * 获取队列元素
     * @return 队列元素
     */
    public int getQueue() {

        // 判断队列是否为空
        if (!queueIsEmpty()) {

            front++;

            return array[front];

        }

        throw new RuntimeException("队列为空。");

    }

    public void show() {
        for (int i = this.front + 1; i <= this.rear; i++) {
            System.out.println("数据: " + this.array[i]);
        }
    }

}
3.2 环形队列
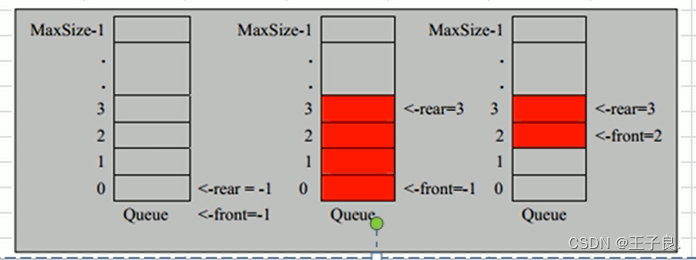
如果按照上面的方式来模拟队列,就会出现用过一次的位置不能第二次去使用。没法达到复用效果。
我们希望取出的空间还可以重复的去使用
对比上面的基本队列,环形队列实现的基本思路做出了调整
- front变量的含义做出调整,front调整为指向队列的第一个元素,也就是说,array[front]时,获取到的是队列的第一个元素。front的初始值为 0;不再是 -1。
- rear变量的含义做出调整,rear调整为指向队列最后一个元素 + 1 的位置。因为希望空留出一个空间作为约定。rear的初始值也 = 0。
- 当队列满的情况下,原先的条件是, rear == maxSize - 1; 但是现在 front和 rear的条件做了调整,变为 (rear + 1) % maxSize == front; 这就是满的条件。
- 当队列为空的条件没有发生变化,如果 rear == front 就是空。
- 当按照上面走的时候,队列中有效的数据个数,永远是(rear + maxSize - front) % maxSize

3.3 环形队列代码的实现
package com.data_structure.queue;

public class CircleArrayQueue {

    public static void main(String[] args) {

        CircleQueue circleQueue = new CircleQueue(5);

        circleQueue.addQueue(5);
        circleQueue.addQueue(8);
        circleQueue.addQueue(1);
        circleQueue.addQueue(2);
        circleQueue.addQueue(9);
        circleQueue.addQueue(4);

        System.out.print("\n展示此时的队列内容: ");

        circleQueue.show();

        System.out.println();

        System.out.println("取出的内容: ");

        System.out.println(circleQueue.getQueue());
        System.out.println(circleQueue.getQueue());
        System.out.println(circleQueue.getQueue());
        System.out.println(circleQueue.getQueue());

        System.out.println("添加三个队列: ");

        circleQueue.addQueue(9);
        circleQueue.addQueue(1);
        circleQueue.addQueue(5);

        circleQueue.show();

    }

}

class CircleQueue {

    private final int maxSize;

    private final int[] array;

    private int front;

    private int rear;

    public CircleQueue(int maxSize) {
        this.maxSize = maxSize;
        this.array = new int[maxSize];
        this.front = 0;
        this.rear = 0;
    }

    public boolean isEmpty() {
        return this.front == this.rear;
    }

    public boolean isFull() {
        // 队列已满情况下。 最大值 % (尾指针 + 1) 如果 == front 就说明元素已经还差一个就满了 ,这一个是约定需要留下来的
        return ((this.rear + 1) % this.maxSize) == this.front;
    }

    public void addQueue(int number) {

        if (!isFull()) {
            // 因为它本身就是在元素的后一个位置,所以我们不需要对他先进行指针后移操作,在添加完成数据后,进行指针后移,保证空留一个,
            // 这里必须考虑取模,如果rear到顶层,切前面有空间,就需要让rear到前面去
            this.array[this.rear] = number;
            // 假设最大容量为5。此时rear为4.我们必须约定空留一个元素空间,
            this.rear = (this.rear + 1) % maxSize;
        } else {
            System.out.println("队列已满");
        }

    }

    public int getQueue() {

        // 不为空的情况下才能取数据
        if (!isEmpty()) {

            // front是指向队列的第一个元素,我们需要先把front的值存储到一个临时变量中,把front后移,考虑取模,然后将临时的变量返回
            int value = this.array[this.front];

            this.front = (front + 1) % maxSize;

            return value;

        }

        throw new RuntimeException("已经空掉了");

    }

    public void show() {

        if (!isEmpty()) {

            // 从front开始遍历, 遍历多少个元素。
            for (int i = this.front; i < front + (rear + maxSize - front) % maxSize; i++) {

                System.out.printf("数据下标arr[%d] = %d", i % maxSize, this.array[i % maxSize]);

            }

        }

    }

}
4. 链表 (Linked List)

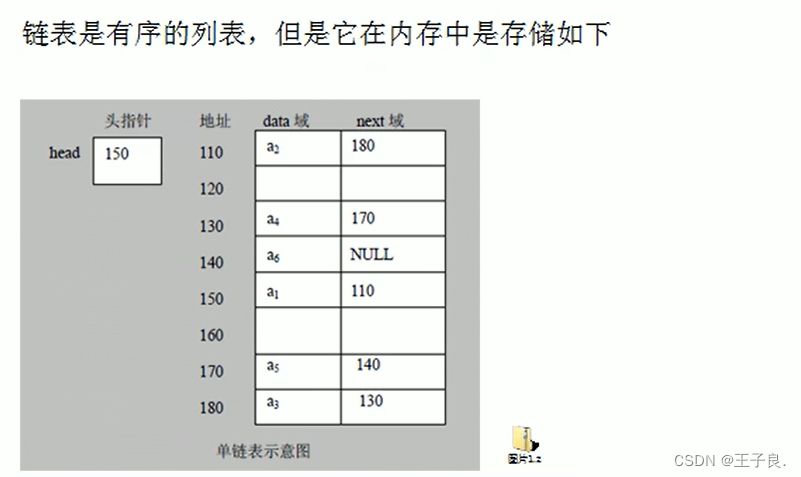
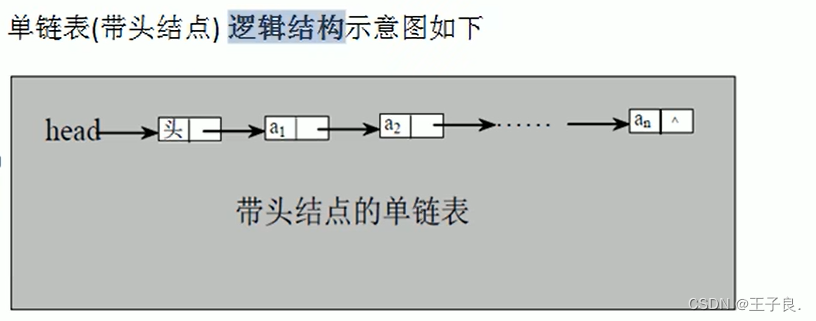
head 为头指针,就是第一个数据,然后data域为数据,next域,就是指向下一个节点的地方。
- 链表是以节点的方式来存储数据的。
- 每个节点包含data域,next域
- 链表的各个节点并不一定是连续的。
- 链表分带头节点的链表和没有头节点的链表,根据实际需求来确定

4.1 单链表的代码实现(不带排序)
package com.data_structure.linkedList;

public class SingleLinkedListDemo {

    public static void main(String[] args) {

        HeroNode heroNode1 = new HeroNode(1, "宋江", "及时雨");
        HeroNode heroNode2 = new HeroNode(2, "李逵", "黑旋风");
        HeroNode heroNode3 = new HeroNode(3, "林冲", "及时雨");
        HeroNode heroNode4 = new HeroNode(4, "鲁智深", "及时雨");

        SingleLinkedList singleLinkedList = new SingleLinkedList();

        singleLinkedList.add(heroNode1);
        singleLinkedList.add(heroNode2);
        singleLinkedList.add(heroNode3);

        singleLinkedList.list();

    }

}

class SingleLinkedList {

    // 初始化头节点,头节点不动,不存放具体数据
    private final HeroNode herd = new HeroNode(0, "", "");

    // 添加节点
    public void add(HeroNode heroNode) {
        // 添加的原理就是,当有新节点时,找到原有链表的最后一个节点,让最后一个节点指向该新节点。
        // 但是头节点不动,就可以使用一个引用来代替头节点
        HeroNode tempHead = this.herd;
        // 遍历链表,找到最后一个元素
        while (tempHead.next != null) {
            // 如果没有找到最后一个元素,就将temp后移
            tempHead = tempHead.next;
        }
        // 当退出while循环时,tempHead就指向了链表的最后。
        tempHead.next = heroNode;
    }

    // 显示链表
    public void list() {
        // 先判断链表是否为空。
        if (herd.next == null) {
            System.out.println("链表为空: []");
            return;
        }
        // 因为头节点不能动,因此我们需要一个辅助变量来遍历
        // 因为他不为空,所以说明他至少有一个数据
        HeroNode temp = this.herd.next;
        while (true) {
            // 判断是否到链表的最后
            if (temp.next == null) {
                // 最后一个元素也是有数据的
                System.out.println(temp);
                break;
            }
            // 输出
            System.out.println(temp);
            // 将temp后移
            temp = temp.next;
        }
    }

}

/**
 * 创建英雄节点
 * 每一个HeroNode就是一个节点
 */
class HeroNode {

    public int no;  // 英雄编号

    public String name;  // 英雄名称

    public String nickname;  // 英雄绰号

    public HeroNode next;  // 指向下一个节点

    public HeroNode(int heroNo, String hName, String nickName) {
        this. no = heroNo;
        this.name = hName;
        this.nickname = nickName;
    }

    /**
     * 为了显示方便 重写toString
     */
    @Override
    public String toString() {
        return "HeroNode{" +
                "no=" + no +
                ", name='" + name + '\'' +
                ", nickname='" + nickname + '\'' +
                ", next=" + next +
                '}';
    }
}
4.1.1 – 4.1的代码拆解
首先我们需要创建英雄节点,每一个英雄除去他们基本的属性以外,还需要有一个节点属性,来对应下一个元素所处于的位置,如果next节点为null,则说明他这个英雄是最后一个节点。
所以我们只需要先实现这个英雄节点功能即可。
// 英雄节点类
class HeroNode {

	// 直接使用public 方便访问
	public int noId;  // 英雄的编号

	public String name; // 英雄名称

	public String nickname; // 英雄绰号

	// 存放下一个英雄的位置
	public HeroNode next;	// next域

	// 使用构造器来构造Hero英雄
	public HeroNode(int noId, String name, String nickname) {
		this.noId = noId;
		this.name = name;
		this.nickname = nickname;
	}

	// 重写toString方法,方便查询
	 @Override
    public String toString() {
        return "HeroNode{" +
                "no=" + no +
                ", name='" + name + '\'' +
                ", nickname='" + nickname + '\'' +
                ", next=" + next +
                '}';
    }

}
到这一步为止。我们的英雄节点就已经创造完成,接下来,就可以去实现我们的链表逻辑。
class SingleLinkedList {
	// 因为头部节点不动, 所以我们先把头部节点创建好,以后使用一个节点引用到头部节点即可。
	private final HeroNode herd = new HeroNod(0, "", "");

	// 用于添加节点元素, 需要传入一个节点
	public void add(HeroNode heroNode) {
		// 创建一个引用指向头部节点, 因为头节点的信息是不变的
		HeroNode temp = this.herd;
		// 遍历循环,判断是否指向的是最后一个节点
		// 判断最后一个节点的逻辑是 节点的 next域 == null
		while(temp.next != null) {
			// 如果不是最后一个元素,就让节点后移
			temp = temp.next;
		}
		// 此时跳出循环的时候,temp指向的就是最后一个节点元素
		temp.next = heroNode;
	}

	// 查询链表内容
	public void list() {
		// 查询前先判断链表是否为空
		// 只需要判断头节点的next是否为null就可以
		if (this.herd.next == null) {
			System.out.println("链表为空");
			return;
		}

		// 头节点是不允许动的。
		HeroNode temp = this.herd;

		while(true) {
			if(temp.next == null){
				// 虽然为null,但是他也是最后一个元素
				System.out.println(temp);
				// 跳出循环
				break;
			}
			System.out.println(temp);
			// 输出当前节点元素后,还需要把这个节点指向下一个内容。
			temp = temp.next;
		}
	}

}
至此完成。测试内容自己写
