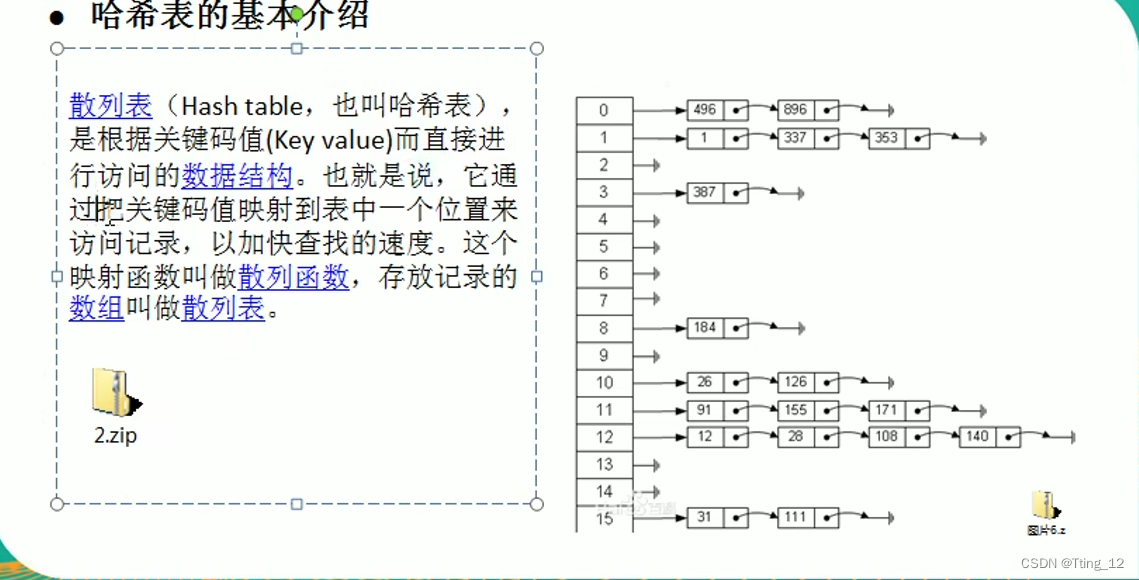
哈希表

google公司的一个上机题

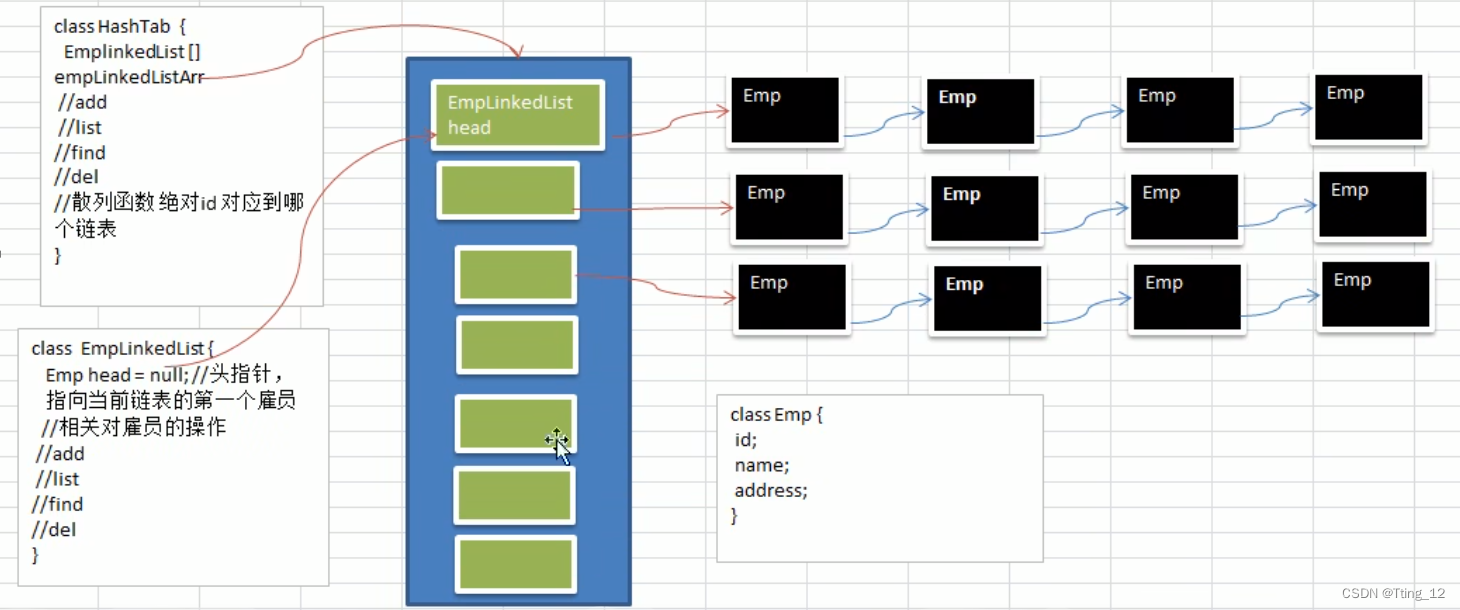
思路分析:
Emp 表示一个个雇员节点,里面有id name next属性
EmpLinkedList 表示链表 里面有head 直接表示第一个Emp,根据第一个Emp.next 接下去
HashTab 里面有一个数组,可以装入EmpLinkedList元素
package com.tt12.hashtab;

import java.util.Scanner;

public class HashTabDemo {
    public static void main(String[] args) {
        //测试添加和遍历功能
        HashTab hashTab = new HashTab(7);
        //简单菜单
        String key = "";
        Scanner scanner = new Scanner(System.in);
        while (true) {
            System.out.println("add : 添加雇员");
            System.out.println("list : 显示雇员");
            System.out.println("exit : 退出程序");

            key = scanner.next();
            switch (key) {
                case "add" :
                    System.out.println("输入id");
                    int id = scanner.nextInt();
                    System.out.println("输入名字");
                    String name = scanner.next();
                    Emp emp = new Emp(id,name);
                    hashTab.add(emp);
                    break;
                case "list" :
                    hashTab.list();
                    break;
                case "exit" :
                    scanner.close();
                    System.exit(0);
                default:
                    break;
            }
        }
    }
}

//哈希表 管理多条链表
class HashTab {
    public EmpLinkedList[] empLinkedListArray; //数组里面放的链表
    public int size; //表示共有多少条链表
    //构造器
    public HashTab(int size) {
        this.size = size;
        //初始化链表数组
        empLinkedListArray = new EmpLinkedList[size];
        //数组里面的元素是null 还需要初始化链表开辟内存
        for(int i = 0; i < size; i++) {
            empLinkedListArray[i] = new EmpLinkedList();
        }
    }

    //添加
    public void add(Emp emp) {
        //根据员工的id得到该员工应该添加到哪条链表
        int empLinkedListNo = hashFun(emp.id);
        //添加到对应链表
        empLinkedListArray[empLinkedListNo].add(emp);
    }

    //编写散列函数,使用一个简答的取模法
    public int hashFun(int id) {
        return id % size;
    }

    //遍历所有的链表
    public void list() {
        for(int i = 0; i < size; i++) {
            empLinkedListArray[i].list(i);
        }
    }
}
//表示一个雇员
class Emp {
    public int id;
    public String name;
    public Emp next;
    //构造器
    public Emp(int id, String name) {
        super();
        this.id = id;
        this.name = name;
    }
}

//创建 EmpLinkedList 表示链表
class EmpLinkedList {
    //这个链表的head直接指向第一个Emp,没有所谓的头指针
    public Emp head;

    //添加
    //说明: 假定添加雇员时,id自增长
    public void add(Emp emp) {
        if (head == null) {
            head = emp;
            return;
        }

        Emp curEmp = head; //辅助指针
        while (true) {
            if (curEmp.next == null) {
                break;
            }
            curEmp = curEmp.next;
        }
        //退出while时curEmp指向最后一个节点 这是将要加的emp接上
        curEmp.next = emp;
    }

    //遍历
    public void list(int no) {
        if (head == null) {
            System.out.println("第" + no + "条链表为空");
            return;
        }
        System.out.print("第" + no + "条链表信息为 ");
        Emp curEmp = head;
        while (true) {
            System.out.printf("=> id=%d name=%s\t", curEmp.id, curEmp.name);
            if (curEmp.next == null) {
                break;
            }
            curEmp = curEmp.next;
        }
        System.out.println();
    }
}
二叉树
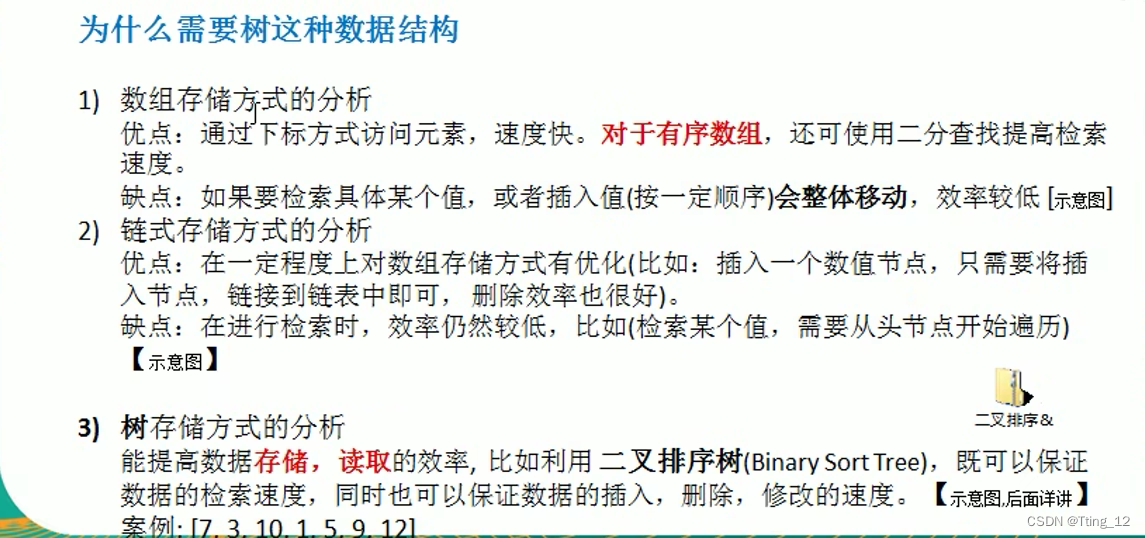
为什么需要树这种数据结构
树的常用术语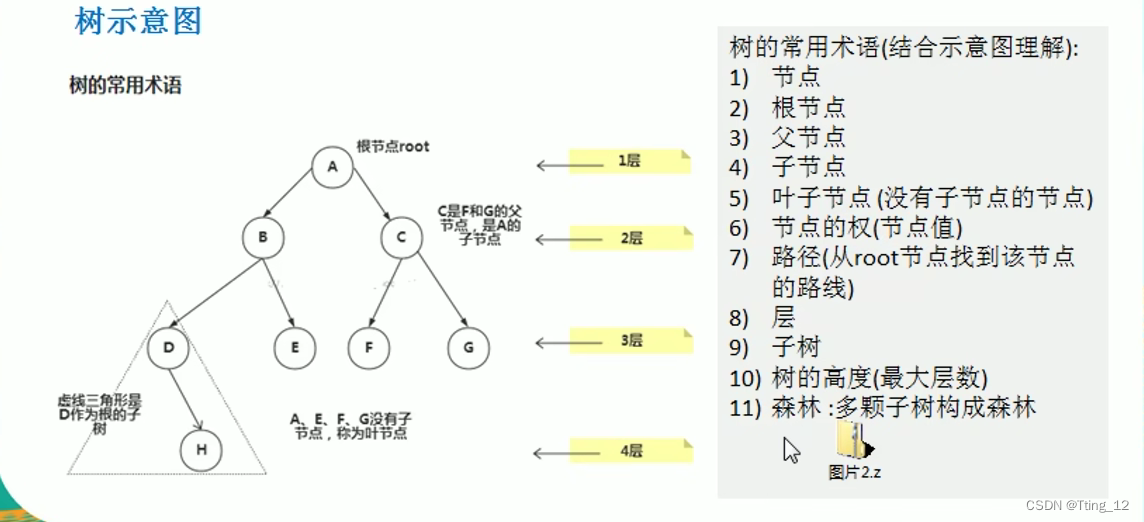
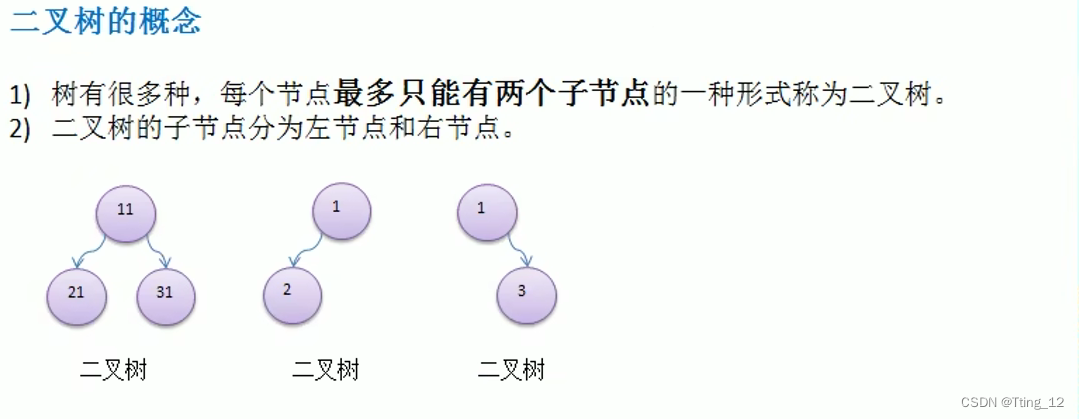
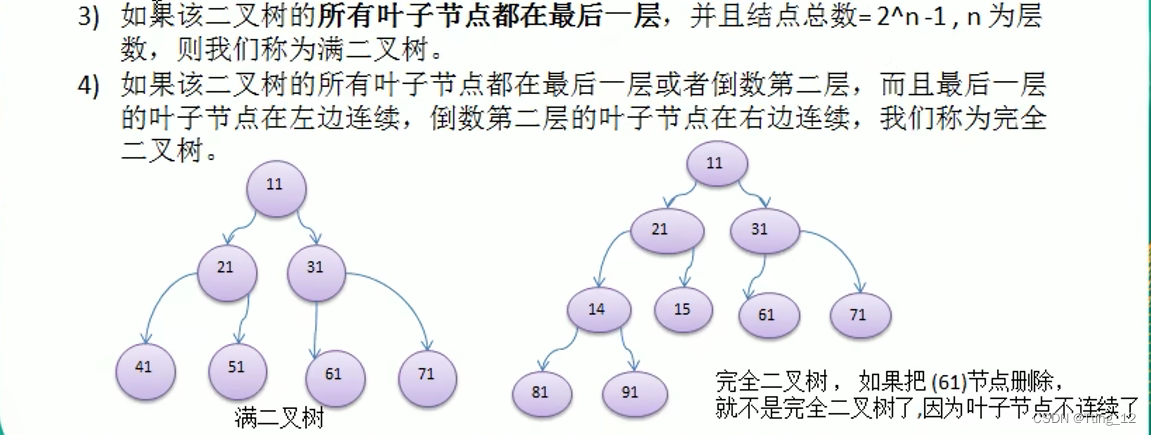
二叉树的概念
二叉树遍历的说明

1)前序遍历
先输出当前节点(初始时是root节点)
如果左子节点不为null,则递归继续前序遍历
如果右子节点不为null,则递归继续前序遍历
2)中序遍历
如果当前节点的左子节点不为null,则递归中序遍历
输出当前节点
如果当前节点的右子节点不为null,则递归中序遍历
3)后序遍历
如果当前节点的左节点不为空,则递归后序遍历
如果当前节点的右子节点不为null,则递归中序遍历
输出当前节点
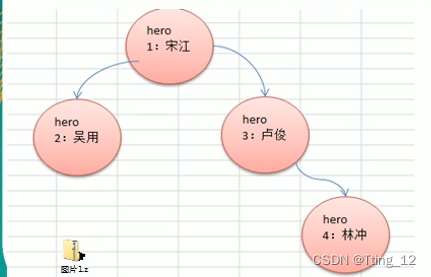
使用前中后序分别遍历下面的二叉树
package com.tt12.tree;

public class BinaryTreeDemo {
    public static void main(String[] args) {
        //创建二叉树
        BinaryTree binaryTree = new BinaryTree();
        //创建需要的节点
        HeroNode root = new HeroNode(1, "宋江");
        HeroNode node2 = new HeroNode(2, "吴用");
        HeroNode node3 = new HeroNode(3, "卢俊义");
        HeroNode node4 = new HeroNode(4, "林冲");
        //手动创建该二叉树,后面学习递归创建二叉树
        root.left = node2;
        root.right = node3;
        node3.right = node4;
        binaryTree.root = root;

        //测试遍历
        System.out.println("前序遍历");
        binaryTree.preOrder();
        System.out.println("中序遍历");
        binaryTree.infixOrder();
        System.out.println("后序遍历");
        binaryTree.postOrder();
    }
}

//定义二叉树
class BinaryTree {
    public HeroNode root;
    //前序遍历
    public void preOrder() {
        if(this.root != null) {
            this.root.preOrder();
        }else {
            System.out.println("二叉树为空无法遍历");
        }
    }
    //中序遍历
    public void infixOrder() {
        if(this.root != null) {
            this.root.infixOrder();
        }else {
            System.out.println("二叉树为空无法遍历");
        }
    }
    //后序
    public void postOrder() {
        if(this.root != null) {
            this.root.postOrder();
        }else {
            System.out.println("二叉树为空无法遍历");
        }
    }
}

//先创建HeroNode节点
class HeroNode {
    public int no;
    public String name;
    public HeroNode left;
    public HeroNode right;
    //构造器
    public HeroNode(int no, String name) {
        this.no = no;
        this.name = name;
    }
    @Override
    public String toString() {
        return "HeroNode [no = " + no + ", name = " + name +  "]";
    }
    //前序遍历的方法
    public void preOrder() {
        System.out.println(this);
        if(this.left != null) {
            this.left.preOrder();
        }
        if(this.right != null) {
            this.right.preOrder();
        }
    }
    //中序
    public void infixOrder(){
        if(this.left != null) {
            this.left.infixOrder();
        }
        System.out.println(this);
        if(this.right != null) {
            this.right.infixOrder();
        }
    }
    //后序
    public void postOrder() {
        if(this.left != null) {
            this.left.postOrder();
        }
        if(this.right != null) {
            this.right.postOrder();
        }
        System.out.println(this);
    }

}
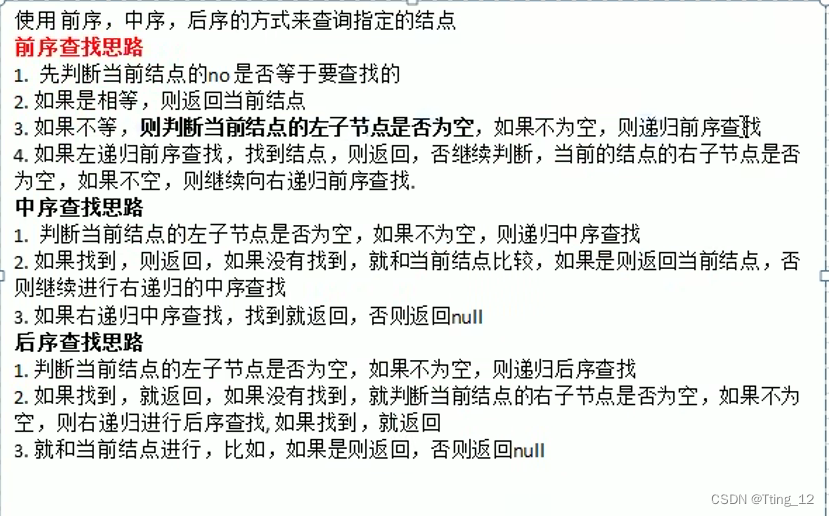
二叉树的前中后序查找
class HeroNode {
    public int no;
    public String name;
    public HeroNode left;
    public HeroNode right;
    //构造器
    public HeroNode(int no, String name) {
        this.no = no;
        this.name = name;

    //前序查找
    public HeroNode preOrderSearch(int no) {
        if(no == this.no) {
            return this;
        }
        HeroNode resNode = null;
        if(this.left != null) {
            resNode  = this.left.preOrderSearch(no);
        }
        if(resNode != null) {
            return resNode;
        }
        if(this.right != null) {
            resNode = this.right.preOrderSearch(no);
        }
        return resNode;
    }
    //中序查找
    public HeroNode infixOrderSearch(int no) {
        HeroNode resNode = null;
        if(this.left != null) {
            resNode = this.left.infixOrderSearch(no);
        }
        if(resNode != null) {
            return resNode;
        }
        if(this.no == no) {
            return this;
        }
        if(this.right != null) {
            resNode = this.right.infixOrderSearch(no);
        }
        return resNode;
    }
    //后序查找
    public HeroNode postOrderSearch(int no) {
        HeroNode resNode= null;
        if(this.left != null) {
            resNode = this.left.postOrderSearch(no);
        }
        if(resNode != null) {
            return resNode;
        }
        if(this.right != null) {
            resNode = this.right.postOrderSearch(no);
        }
        return resNode;
    }
 }
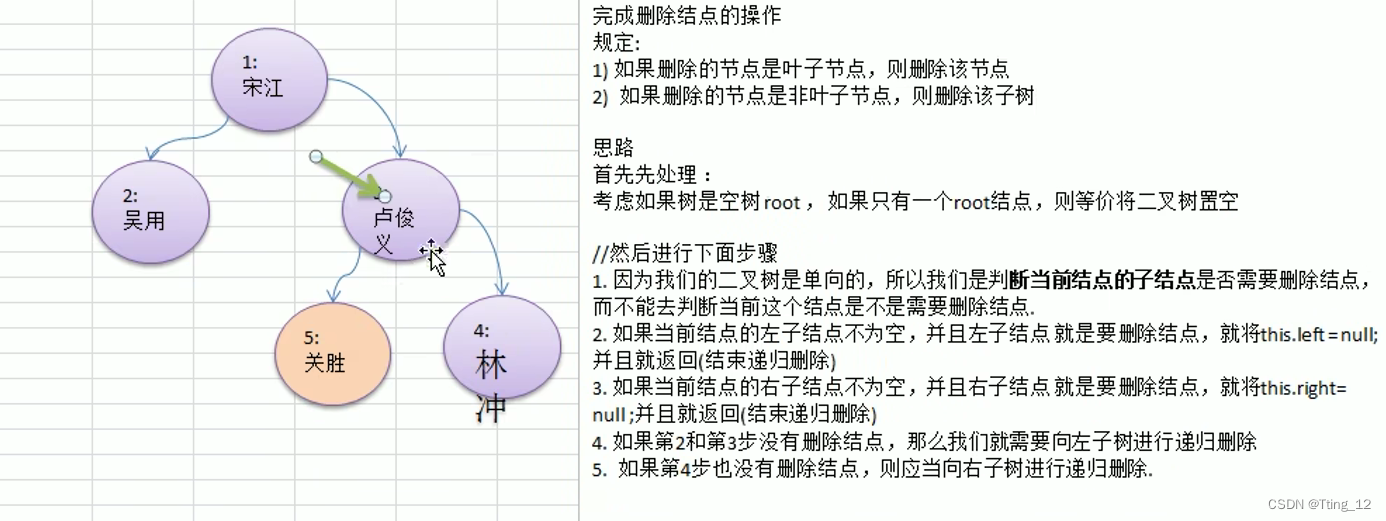
二叉树的删除节点
class BinaryTree {
    public HeroNode root;

    //删除
    public void delNode(int no) {
        if(root != null){
            if(root.no == no) {
                root = null;
            }else {
                root.delNode(no);
            }
        }else {
            System.out.println("空树");
        }
    }
}

class HeroNode {
    public int no;
    public String name;
    public HeroNode left;
    public HeroNode right;
    //构造器
    public HeroNode(int no, String name) {
        this.no = no;
        this.name = name;
    }
    @Override
    public String toString() {
        return "HeroNode [no = " + no + ", name = " + name +  "]";
    }

    /*
    删除节点
    规定:如果删除的节点是叶子节点,则删除该节点
         如果删除的节点是非叶子节点,则删除该子树
    */
    public void delNode(int no) {
        if(this.left != null && this.left.no == no) {
            this.left = null;
            return;
        }
        if(this.right != null && this.right.no == no) {
            this.right = null;
            return;
        }
        if(this.left != null) {
            this.left.delNode(no);
        }
        if(this.right != null) {
            this.right.delNode(no);
        }
    }
}
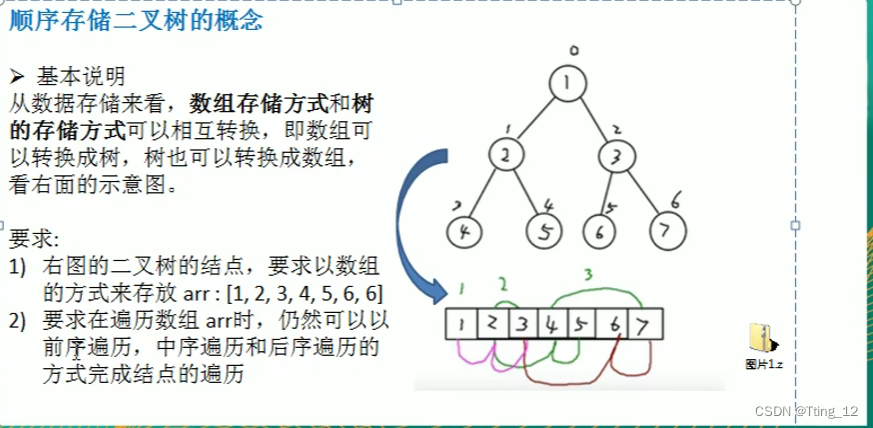
顺序存储二叉树
顺序存储二叉树的概念?
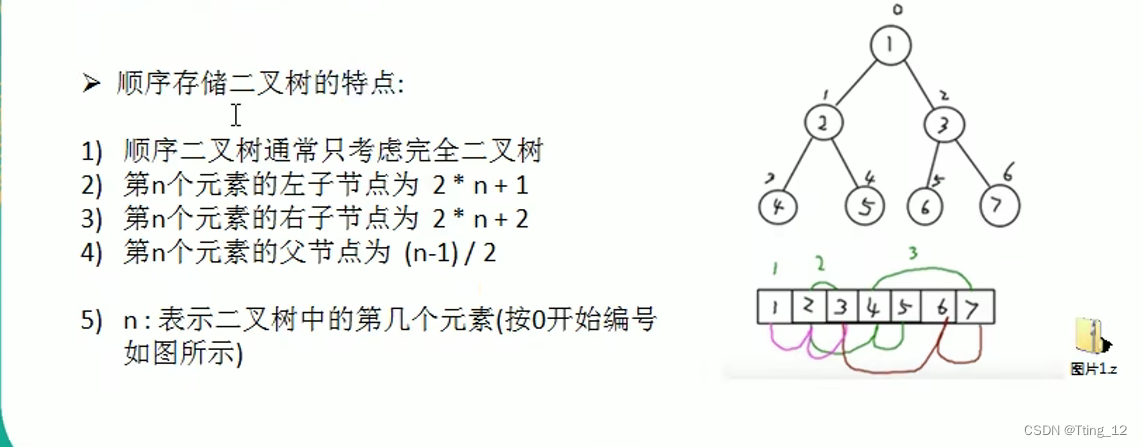
顺序存储二叉树的特点
线索化二叉树
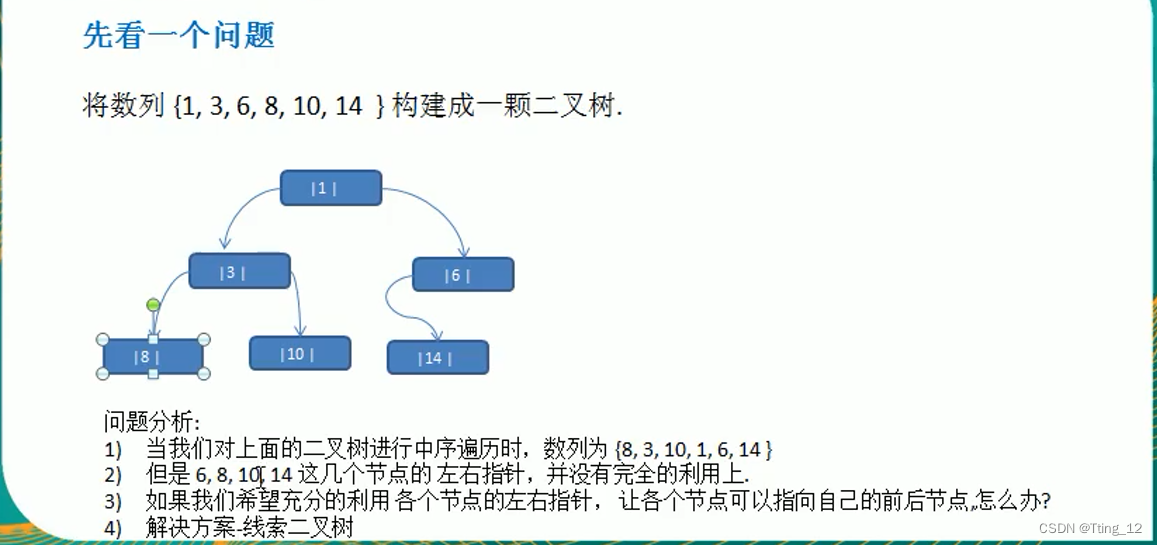
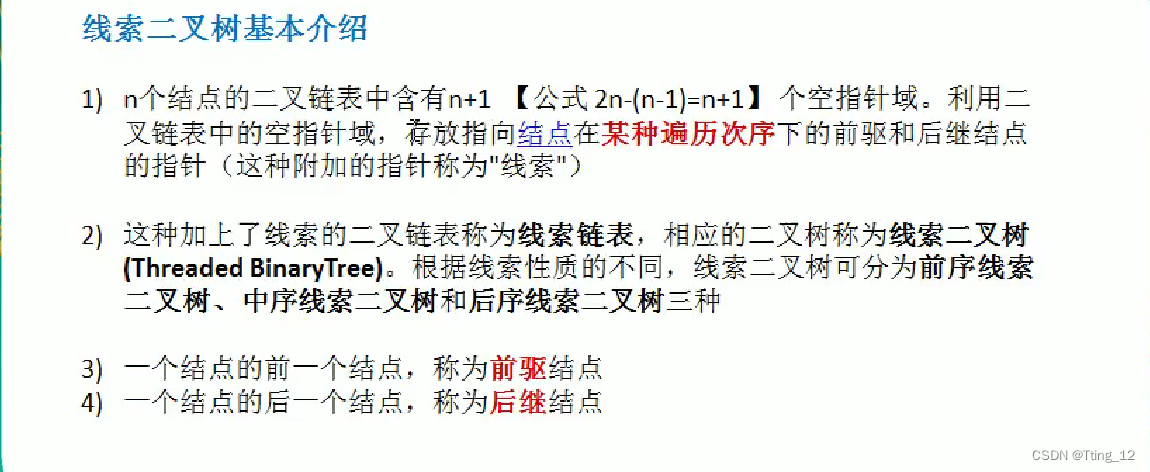
线索化二叉树基本介绍
?线索化二叉树应用案例以及遍历
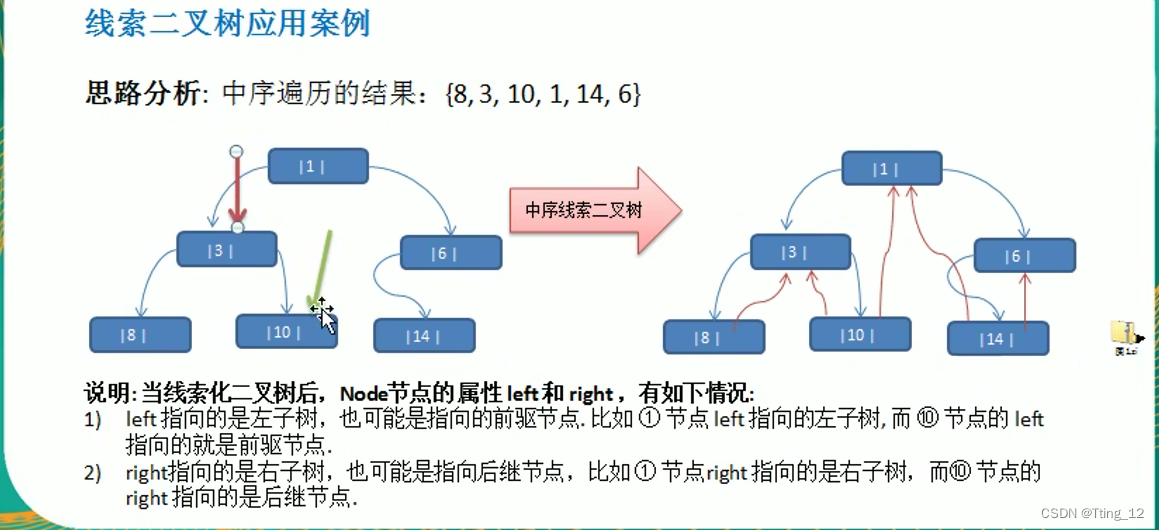

package com.tt12.tree;

public class ThreadedBinaryTreeDemo {
    public static void main(String[] args) {
        ThreadedHeroNode root = new ThreadedHeroNode(1,"tom");
        ThreadedHeroNode node2 = new ThreadedHeroNode(3,"jack");
        ThreadedHeroNode node3 = new ThreadedHeroNode(6,"smith");
        ThreadedHeroNode node4 = new ThreadedHeroNode(8,"mary");
        ThreadedHeroNode node5 = new ThreadedHeroNode(10,"tom");
        ThreadedHeroNode node6 = new ThreadedHeroNode(14,"dim");

        root.left = node2;
        root.right = node3;
        node2.left = node4;
        node2.right = node5;
        node3.left = node6;

        ThreadedBinaryTree threadedBinaryTree = new ThreadedBinaryTree();
        threadedBinaryTree.root = root;
        threadedBinaryTree.infixOrderThreaded(root);

        ThreadedHeroNode testNode = node5;
        System.out.println(node5.left.toString());

        threadedBinaryTree.infixOrderThreadedList();
    }
}

//线索化二叉树
class ThreadedBinaryTree extends BinaryTree {
    //编写对二叉树进行 【中序线索化】 的方法
    //为了实现线索化,需要一个指针,指向要线索化节点的前一节点
    public ThreadedHeroNode pre = null;
    public void infixOrderThreaded(ThreadedHeroNode node) {
        if(node == null) {
            return;
        }
        //先线索化 左子树
        infixOrderThreaded((ThreadedHeroNode) node.left);
        //处理当前节点的前驱节点
        if(node.left == null) {
            node.left = pre;
            node.leftType = true;
        }
        //处理后继节点
        if(pre != null && pre.right == null) {
            pre.right = node;
            pre.rightType = true;
        }
        //每处理一个节点后,让当前节点是下一个节点的前驱节点
        pre = node;
        //右子树
        infixOrderThreaded((ThreadedHeroNode) node.right);
    }

    //中序遍历线索化二叉树的方法
    public void infixOrderThreadedList() {
        ThreadedHeroNode node = (ThreadedHeroNode) root;
        while(node != null) {
            while(node.leftType == false) {
                node = (ThreadedHeroNode) node.left;
            }

            System.out.println(node.toString());
            while(node.rightType == true) {
                node = (ThreadedHeroNode) node.right;
                System.out.println(node);
            }
            node = (ThreadedHeroNode) node.right;
        }
    }
}


class ThreadedHeroNode extends HeroNode {
    //说明:
    //如果leftType == 0(false) 表示指向左子树 如果== 1(true)表示指向前驱节点
    //如果rightType == 0 表示指向右子树,== 1 表示指向后继节点
    public boolean leftType;
    public boolean rightType;

    public ThreadedHeroNode(int no, String name) {
        super(no, name);
    }
}
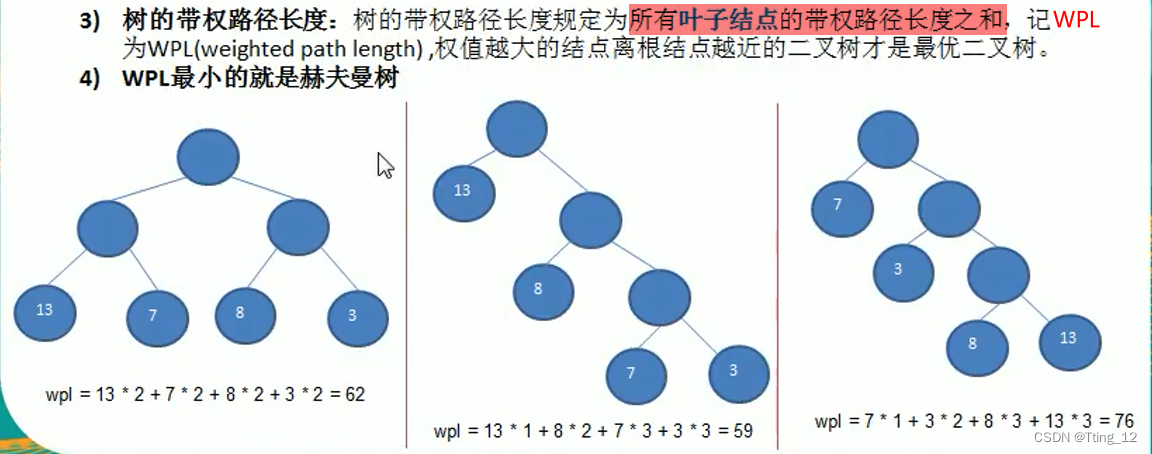
赫夫曼树
基本介绍

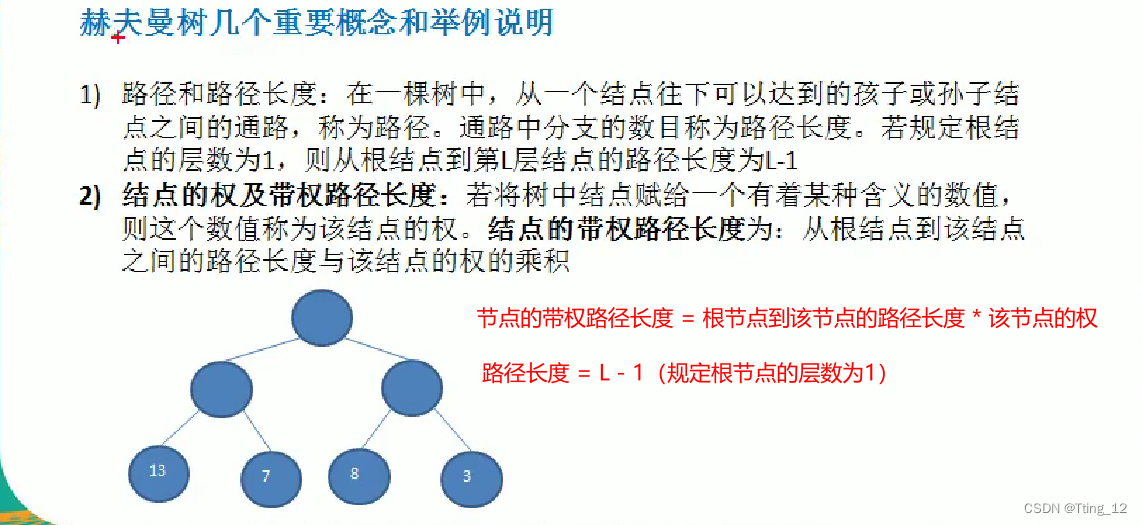
?
?构建赫夫曼树思路

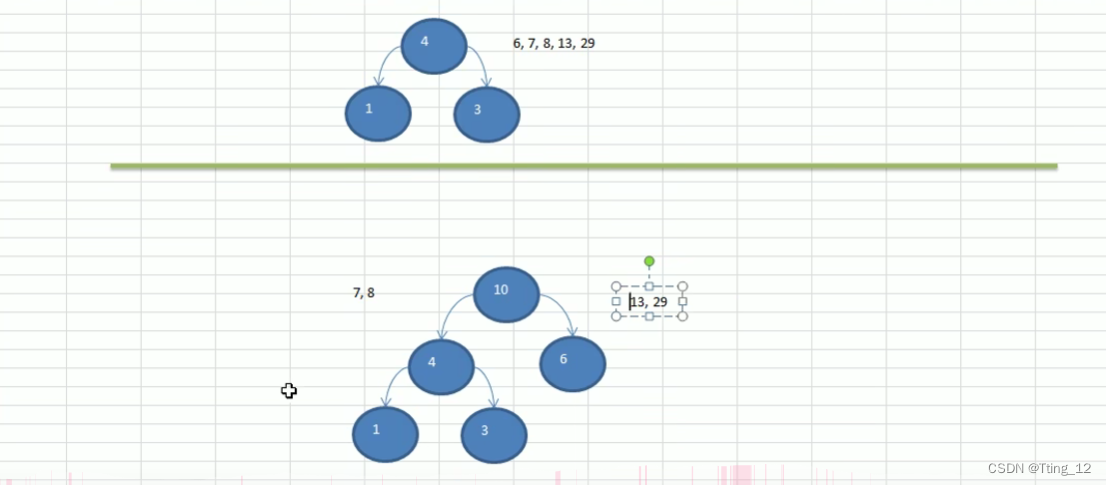
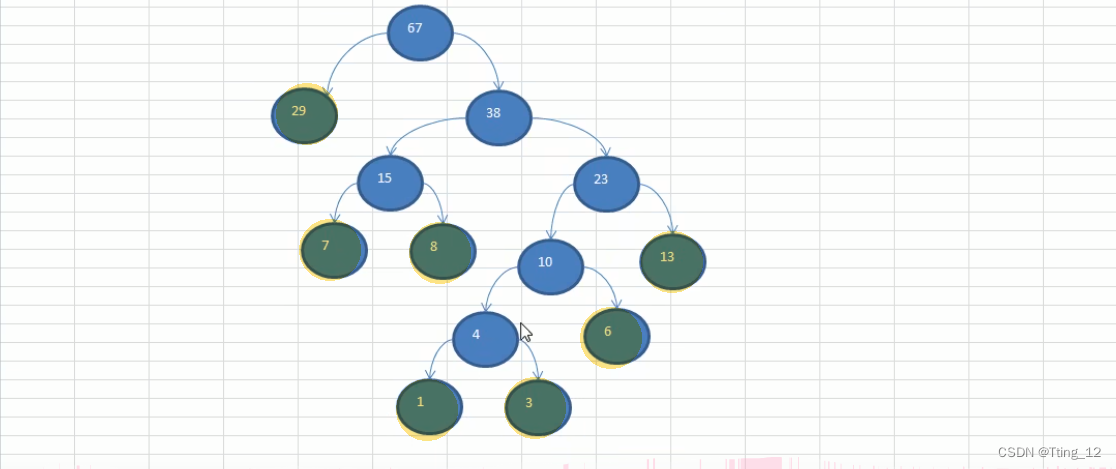
package com.tt12.huffmantree;

import java.util.ArrayList;
import java.util.Collections;
import java.util.List;

public class Huffmantree {
    public static void main(String[] args) {
        int arr[] = {13, 7, 8, 3, 29, 6, 1};
        //测试赫夫曼树已经建成
    }

    //创建赫夫曼树的方法
    public static Node createHuffmanTree(int arr[]) {
        //遍历arr数组,将每个元素构建成一个Node,将这个Node放入ArrayList中
        List<Node> nodes = new ArrayList<Node>();
        for(int value : arr) {
            nodes.add(new Node(value));
        }

        while (nodes.size() > 1) {
            //排序 从小到大
            Collections.sort(nodes);
            //取出根节点权值最小的两颗二叉树(一个节点也可以看作一颗二叉树)
            Node leftNode = nodes.get(0);
            Node rightNode = nodes.get(1);
            Node parent = new Node(leftNode.value + rightNode.value);
            parent.left = leftNode;
            parent.right = rightNode;

            //从List中删除已经处理过的Node
            nodes.remove(leftNode);
            nodes.remove(rightNode);
            //将parent加入List
            nodes.add(parent);
            //重新排序
            Collections.sort(nodes);
        }
        return nodes.get(0);
    }
}

//创建节点类
//为了让Node对象支持排序 让Node实现Comparable<Node>接口
class Node implements Comparable<Node> {
    int value; //节点权值
    Node left; //指向左子节点
    Node right; //指向右子节点

    public Node(int value) {
        this.value = value;
    }
    public String toString() {
        return "Node [value = " + value + "]";
    }
    public int compareTo(Node o) {
        //表示从小到大排序
        return this.value - o.value;
    }
}
赫夫曼编码
基本介绍

通讯领域中信息的处理方式1——定长编码
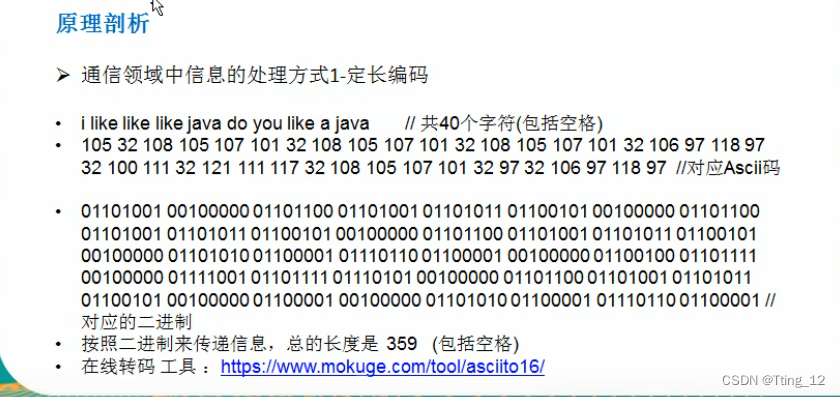
通讯领域中信息的处理方式2——变长编码
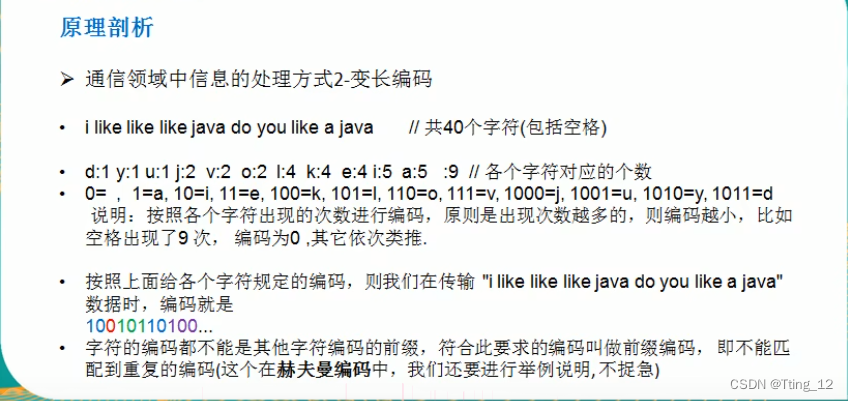
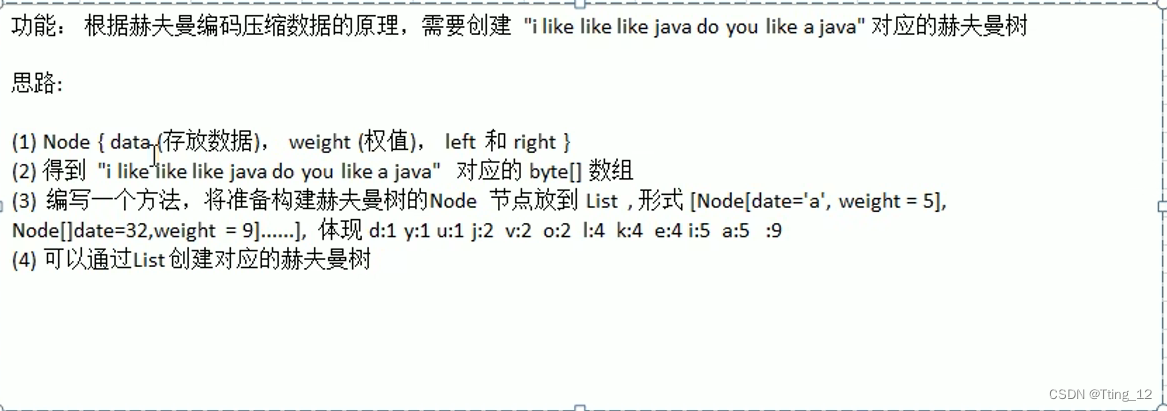
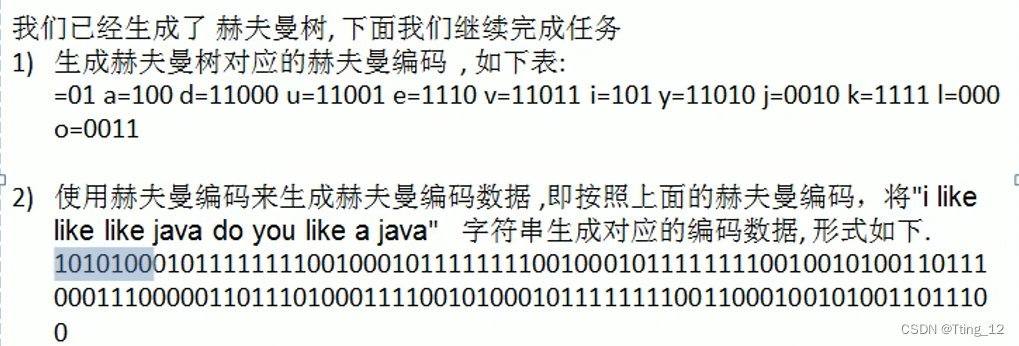
?赫夫曼编码的原理剖析
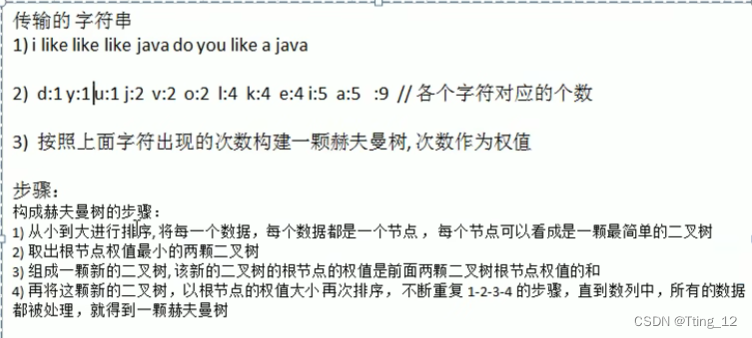
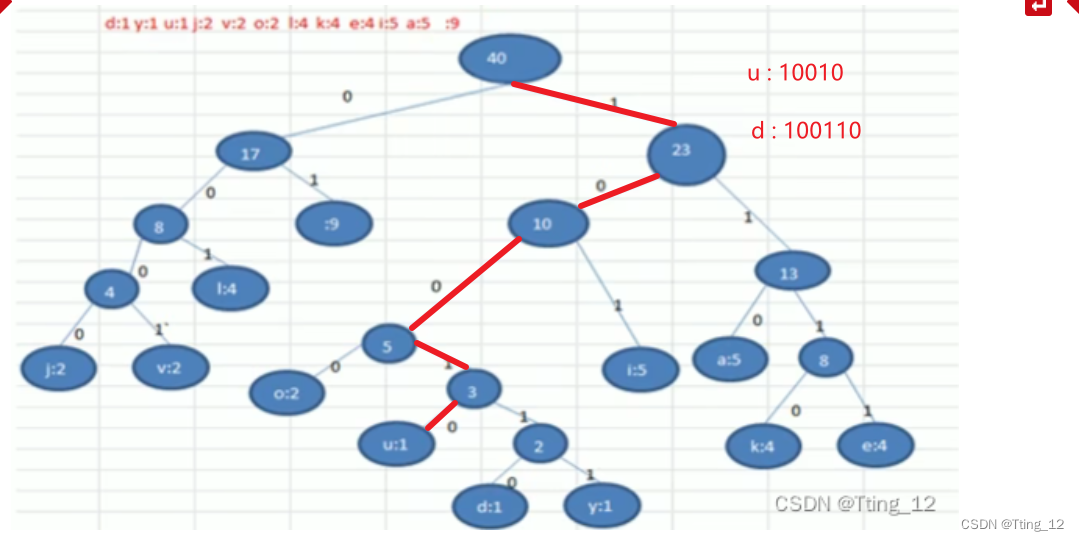
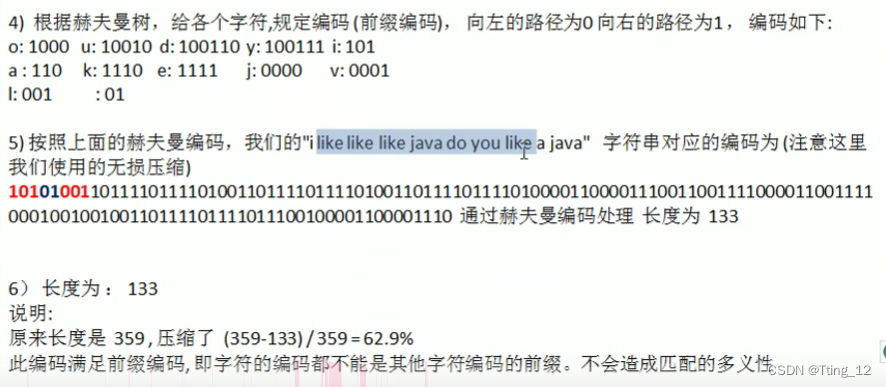
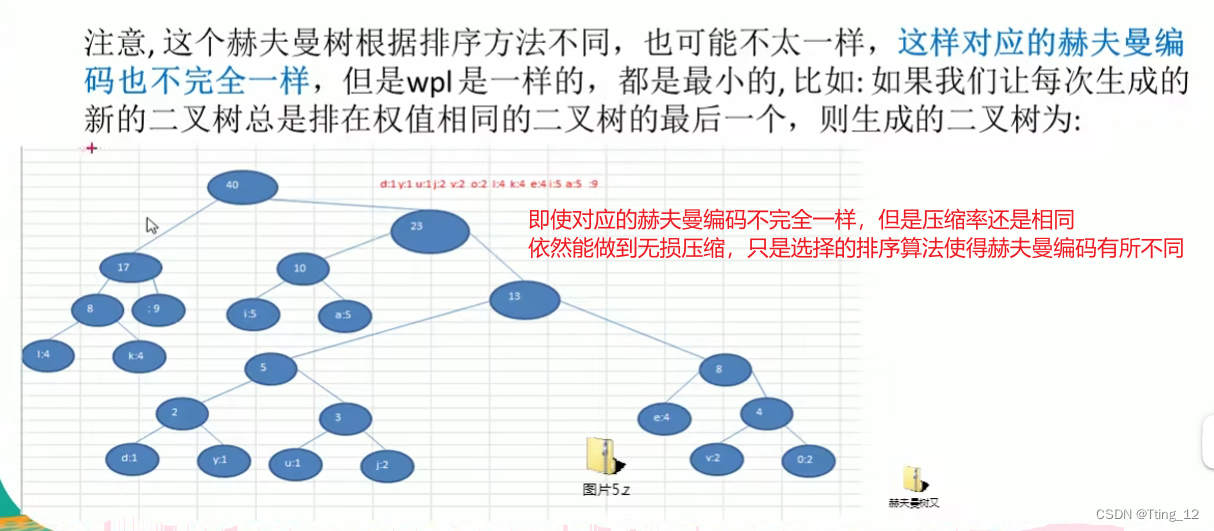 ?创建赫夫曼树

?
