文章目录
LinKedList与链表
?
1. 链表
?
1.1 链表的概念与结构
?
链表 : 就像火车一样, 是节点(车厢)构成的 , 每个节点之间会连接起来。
?
图示:

?
注意 : 我们的链表 虽然 看起来是 节点上全部连接起来的如上面的火车一样一节一节的串起来,但是在物理的成面上, 链表其实是不连续的。
?
图解 :
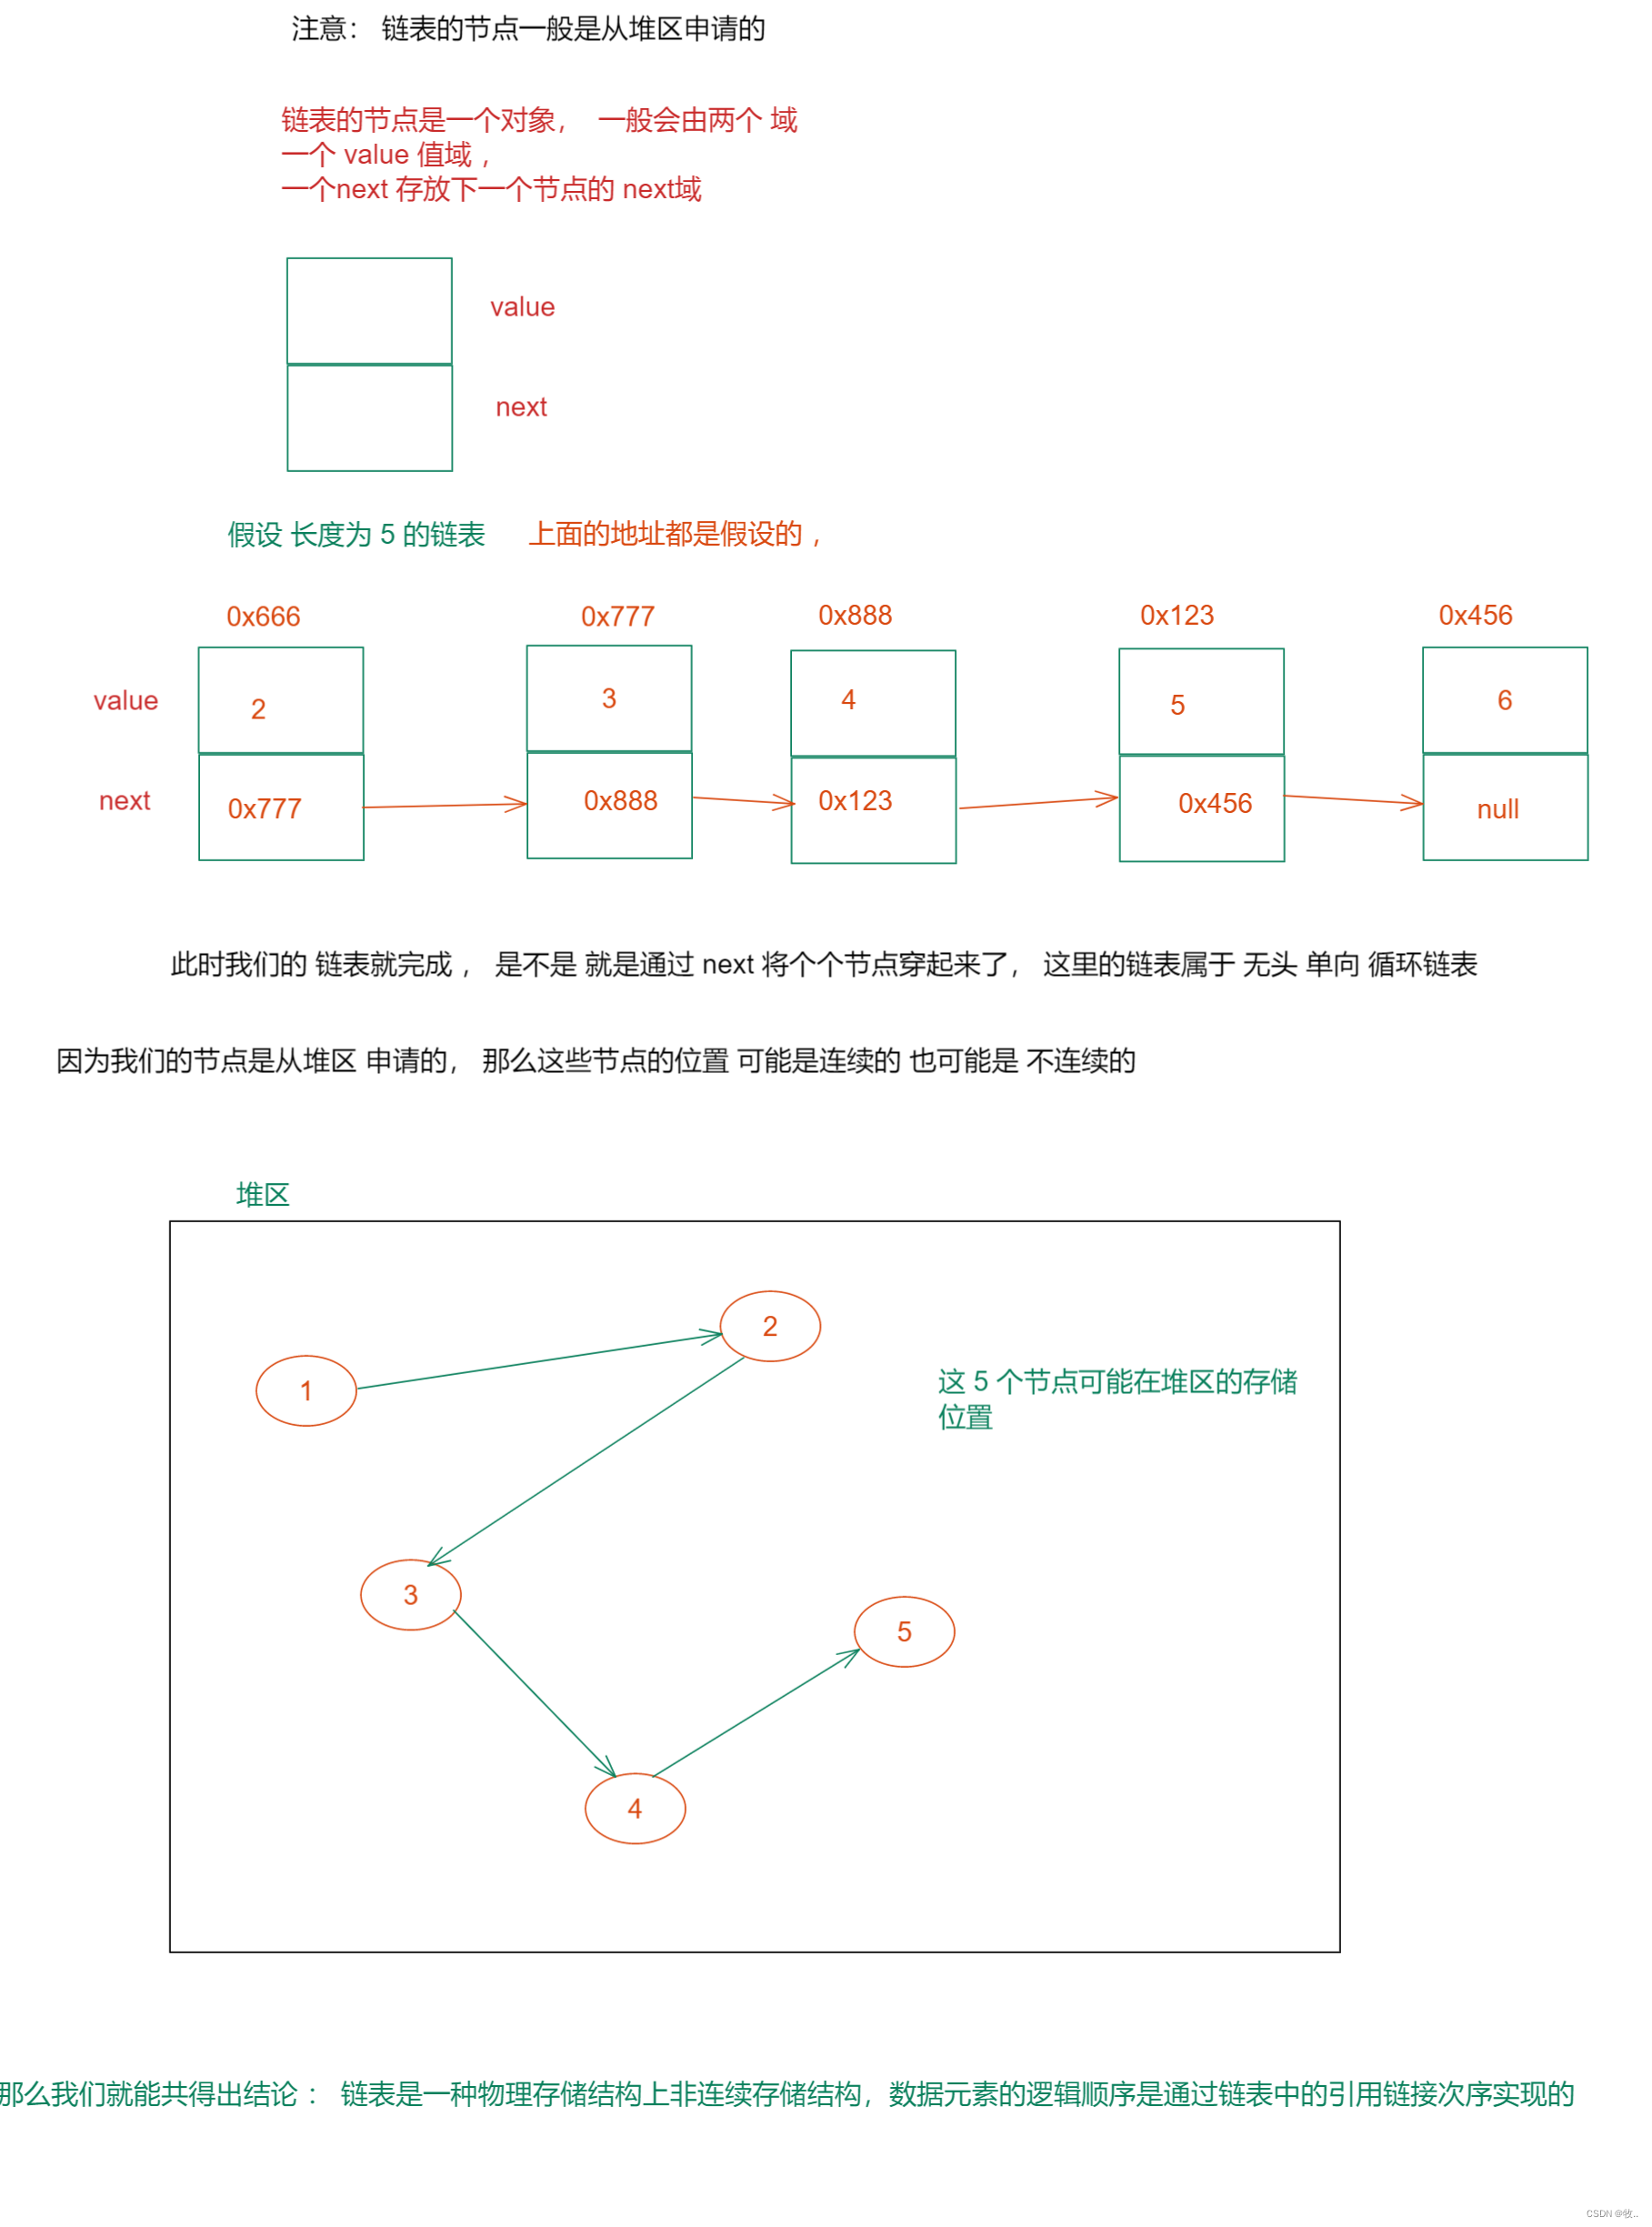
?
关于链表 , 我们现在知道了他是,通过 next 域,来进行 连接的, 那么接下来我们来 了解一下我们 的 链表结构 , 总共由 八种 ,但是不要担心 我们主要学两种即可 。
?
1.2 链表的结构
关于链表 : 我们由 这几个 关键字 单向 , 双向 和 带头 , 不带头 还有 循环 , 不循环
将这几个关键字 排列组合 ,能得到以下
-
单向带头不循环
-
单向带头循环
-
双向带头不循环
-
双向带头循环
-
单向不带头不循环
-
单向不带头循环
-
双向不带头不循环
-
双向不带头循环
?
这里就 看到了我们 链表的 8种结构 , 我们主要学习 单项不带头不循环 和 双向不带头不循环 因为后面我们面试中只要考察的是这两种。
?
2.1 单向带头不循环 和 单向不带头不循环

2.2 单向带头循环 和 单向不带头循环
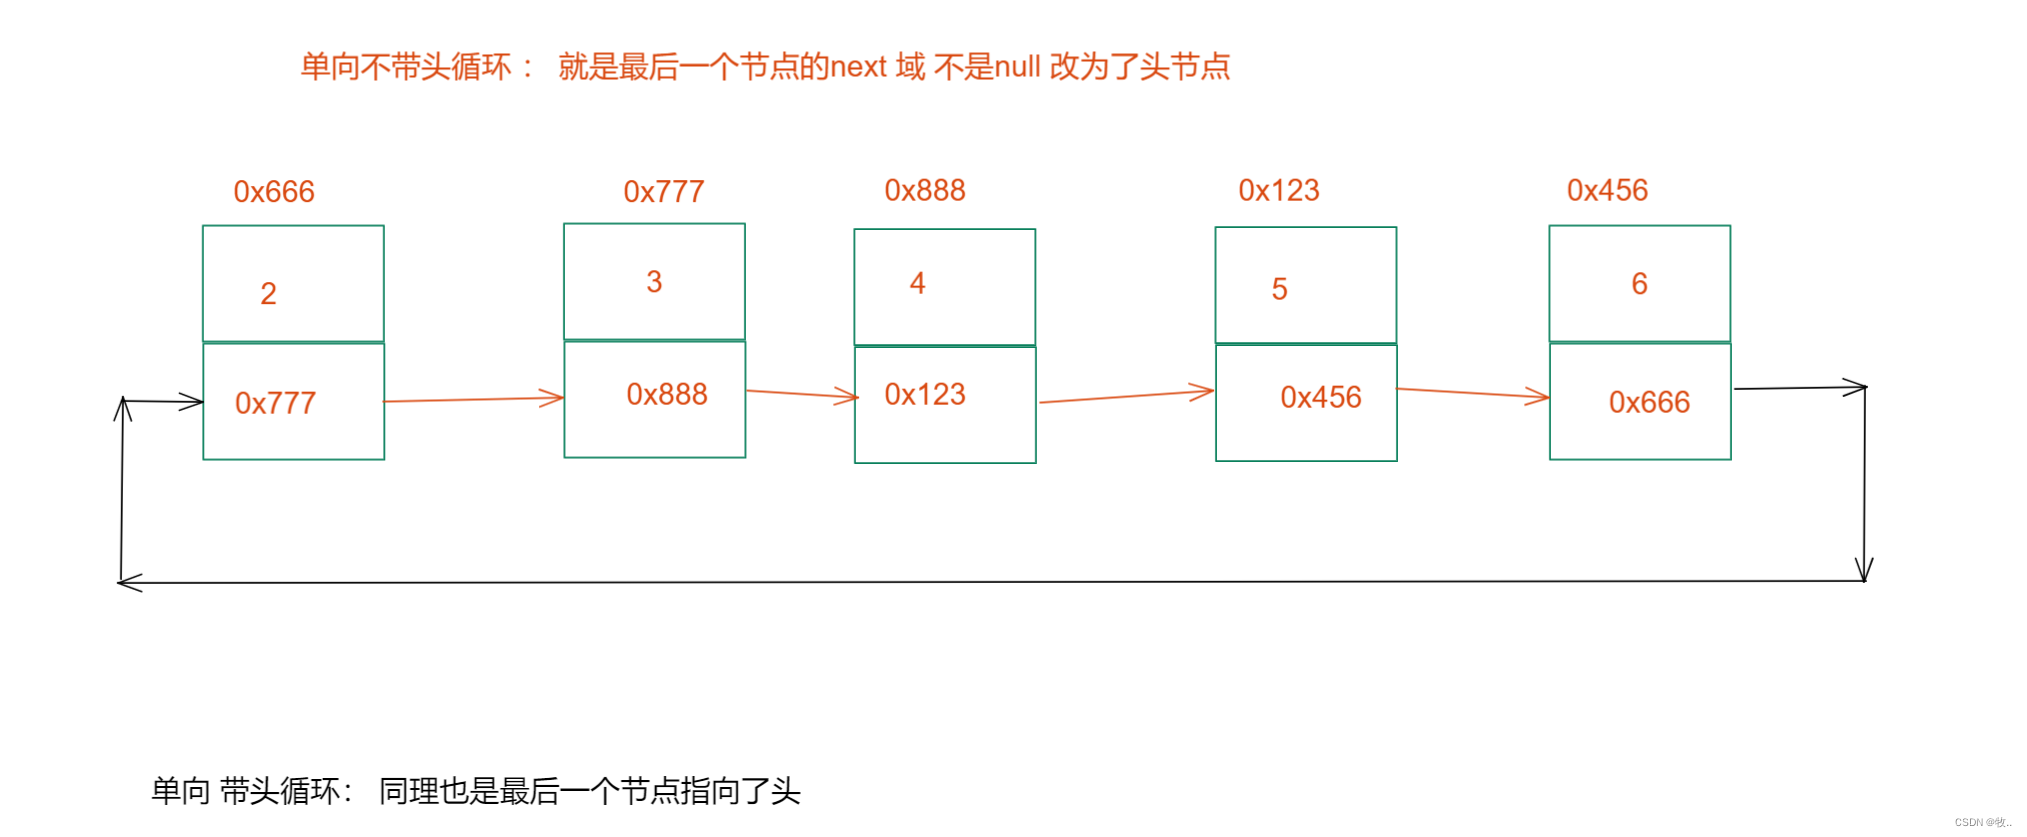
?
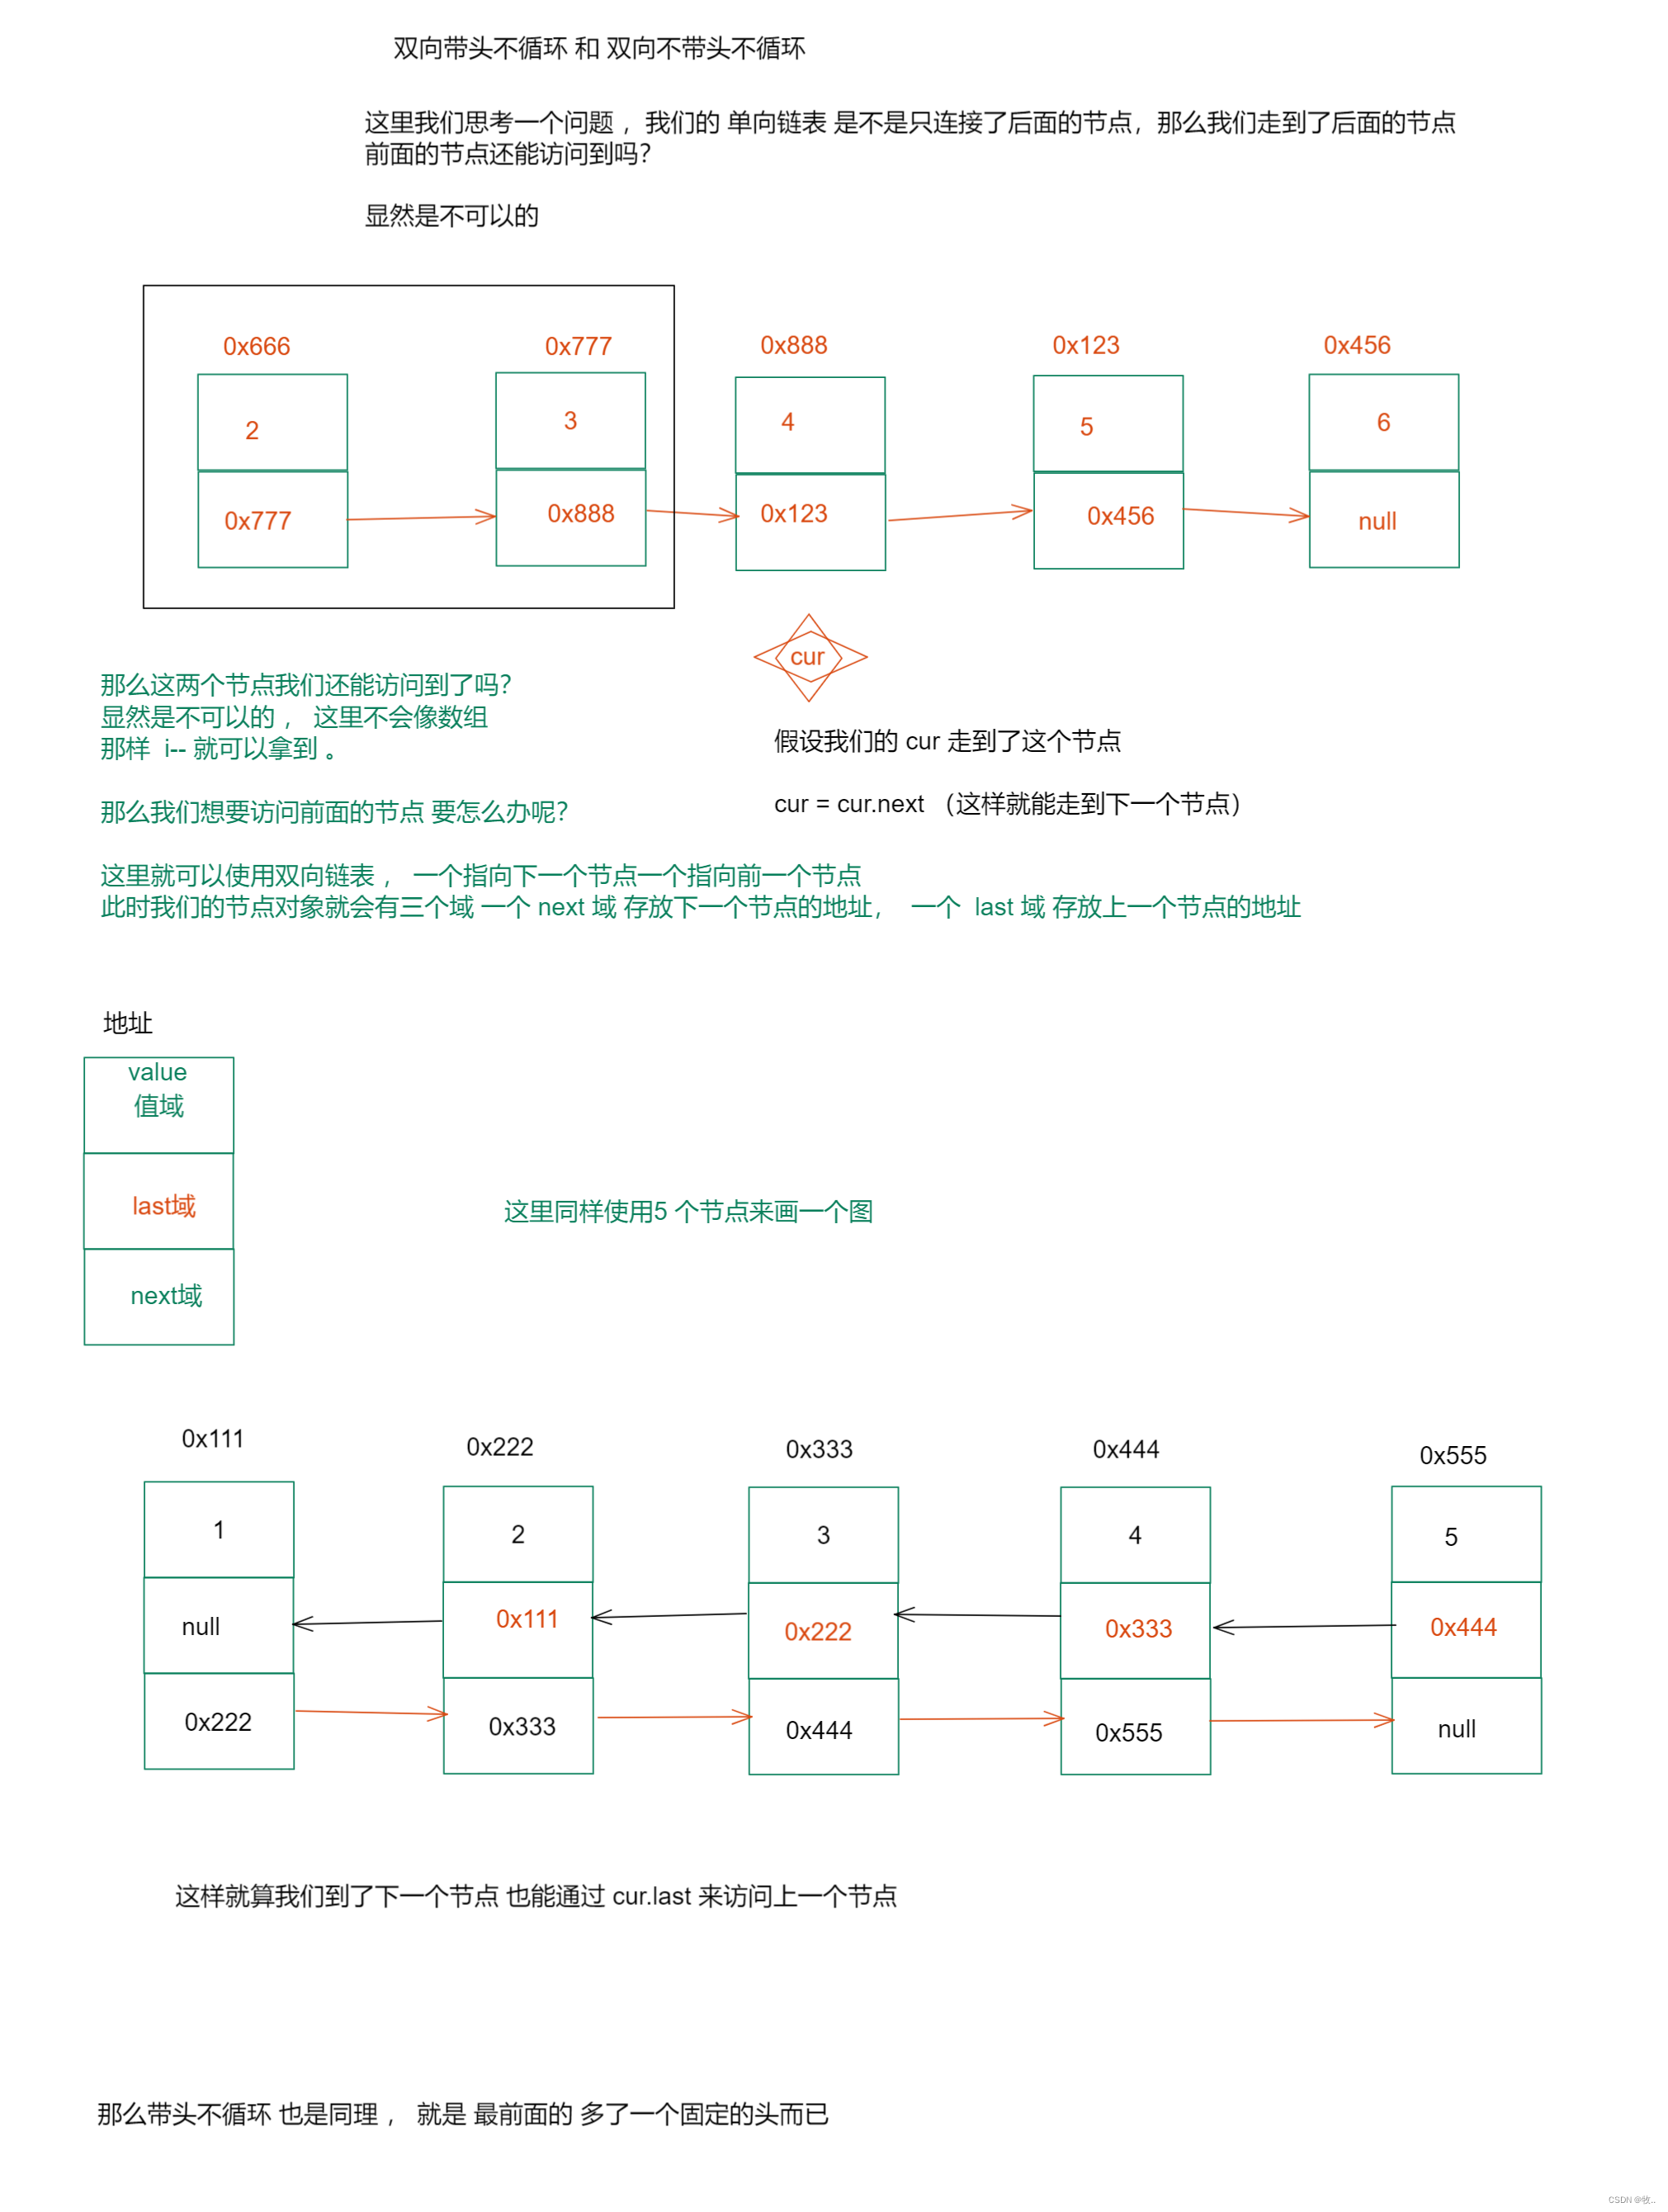
2.3 双向带头不循环 和 双向不带头不循环
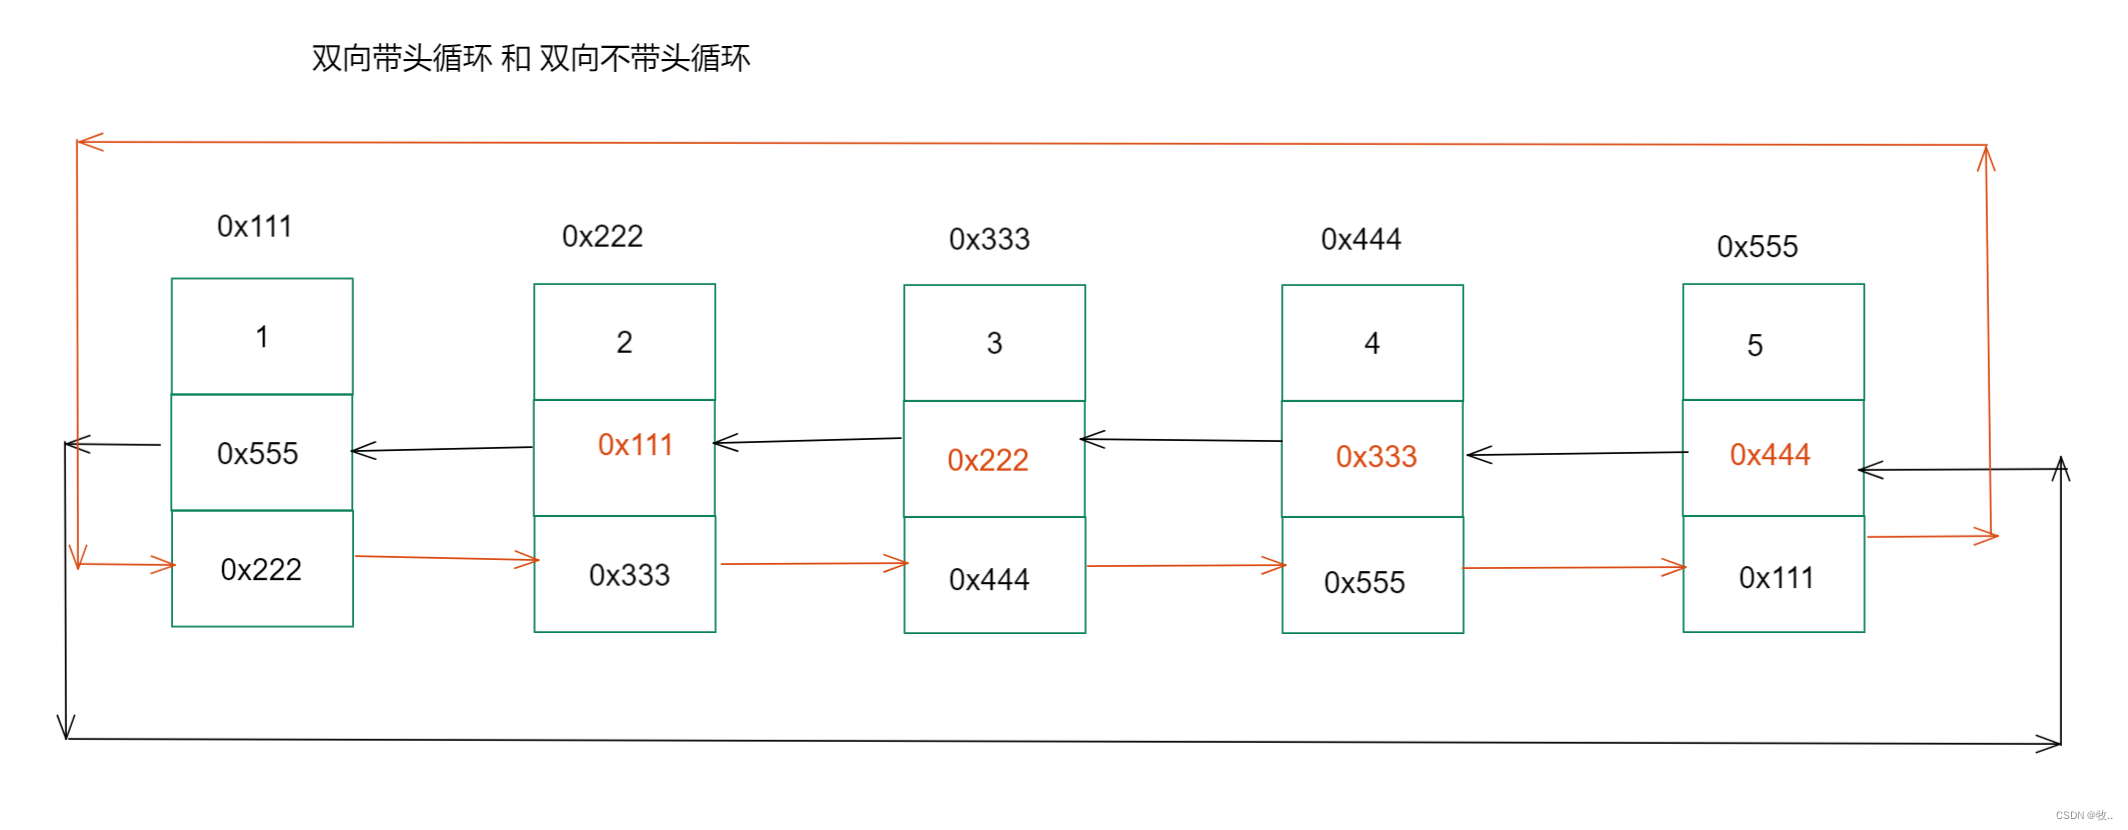
2.4 双向带头循环 和 双向不带头循环
?
这两个就跟 单向带头循环 和 单向不带头循环一样,只不过多了一个last 域而已
?
链表的结构看完, 那么我们下面继续 , 这里还是通过实现 我们自己的链表 , 来慢慢了解我们的链表。
?
2. 链表实现
?
主要实现的方法
// 1、无头单向非循环链表实现
public class SingleLinkedList {

  // 头插法
  public void addFirst(int data);

  // 尾插法
  public void addLast(int data);

  // 任意位置插入,第一个数据节点为0号下标
  public boolean addIndex(int index,int data);

  // 查找是否包含关键字key是否在单链表当中
  public boolean contains(int key);

  // 删除第一次出现关键字为key的节点
  public void remove(int key);

  // 删除所有值为key的节点
  public void removeAllKey(int key);

  // 得到单链表的长度
  public int size();
  // 打印链表
  public void display();
  // 清空链表
  public void clear();
}
?
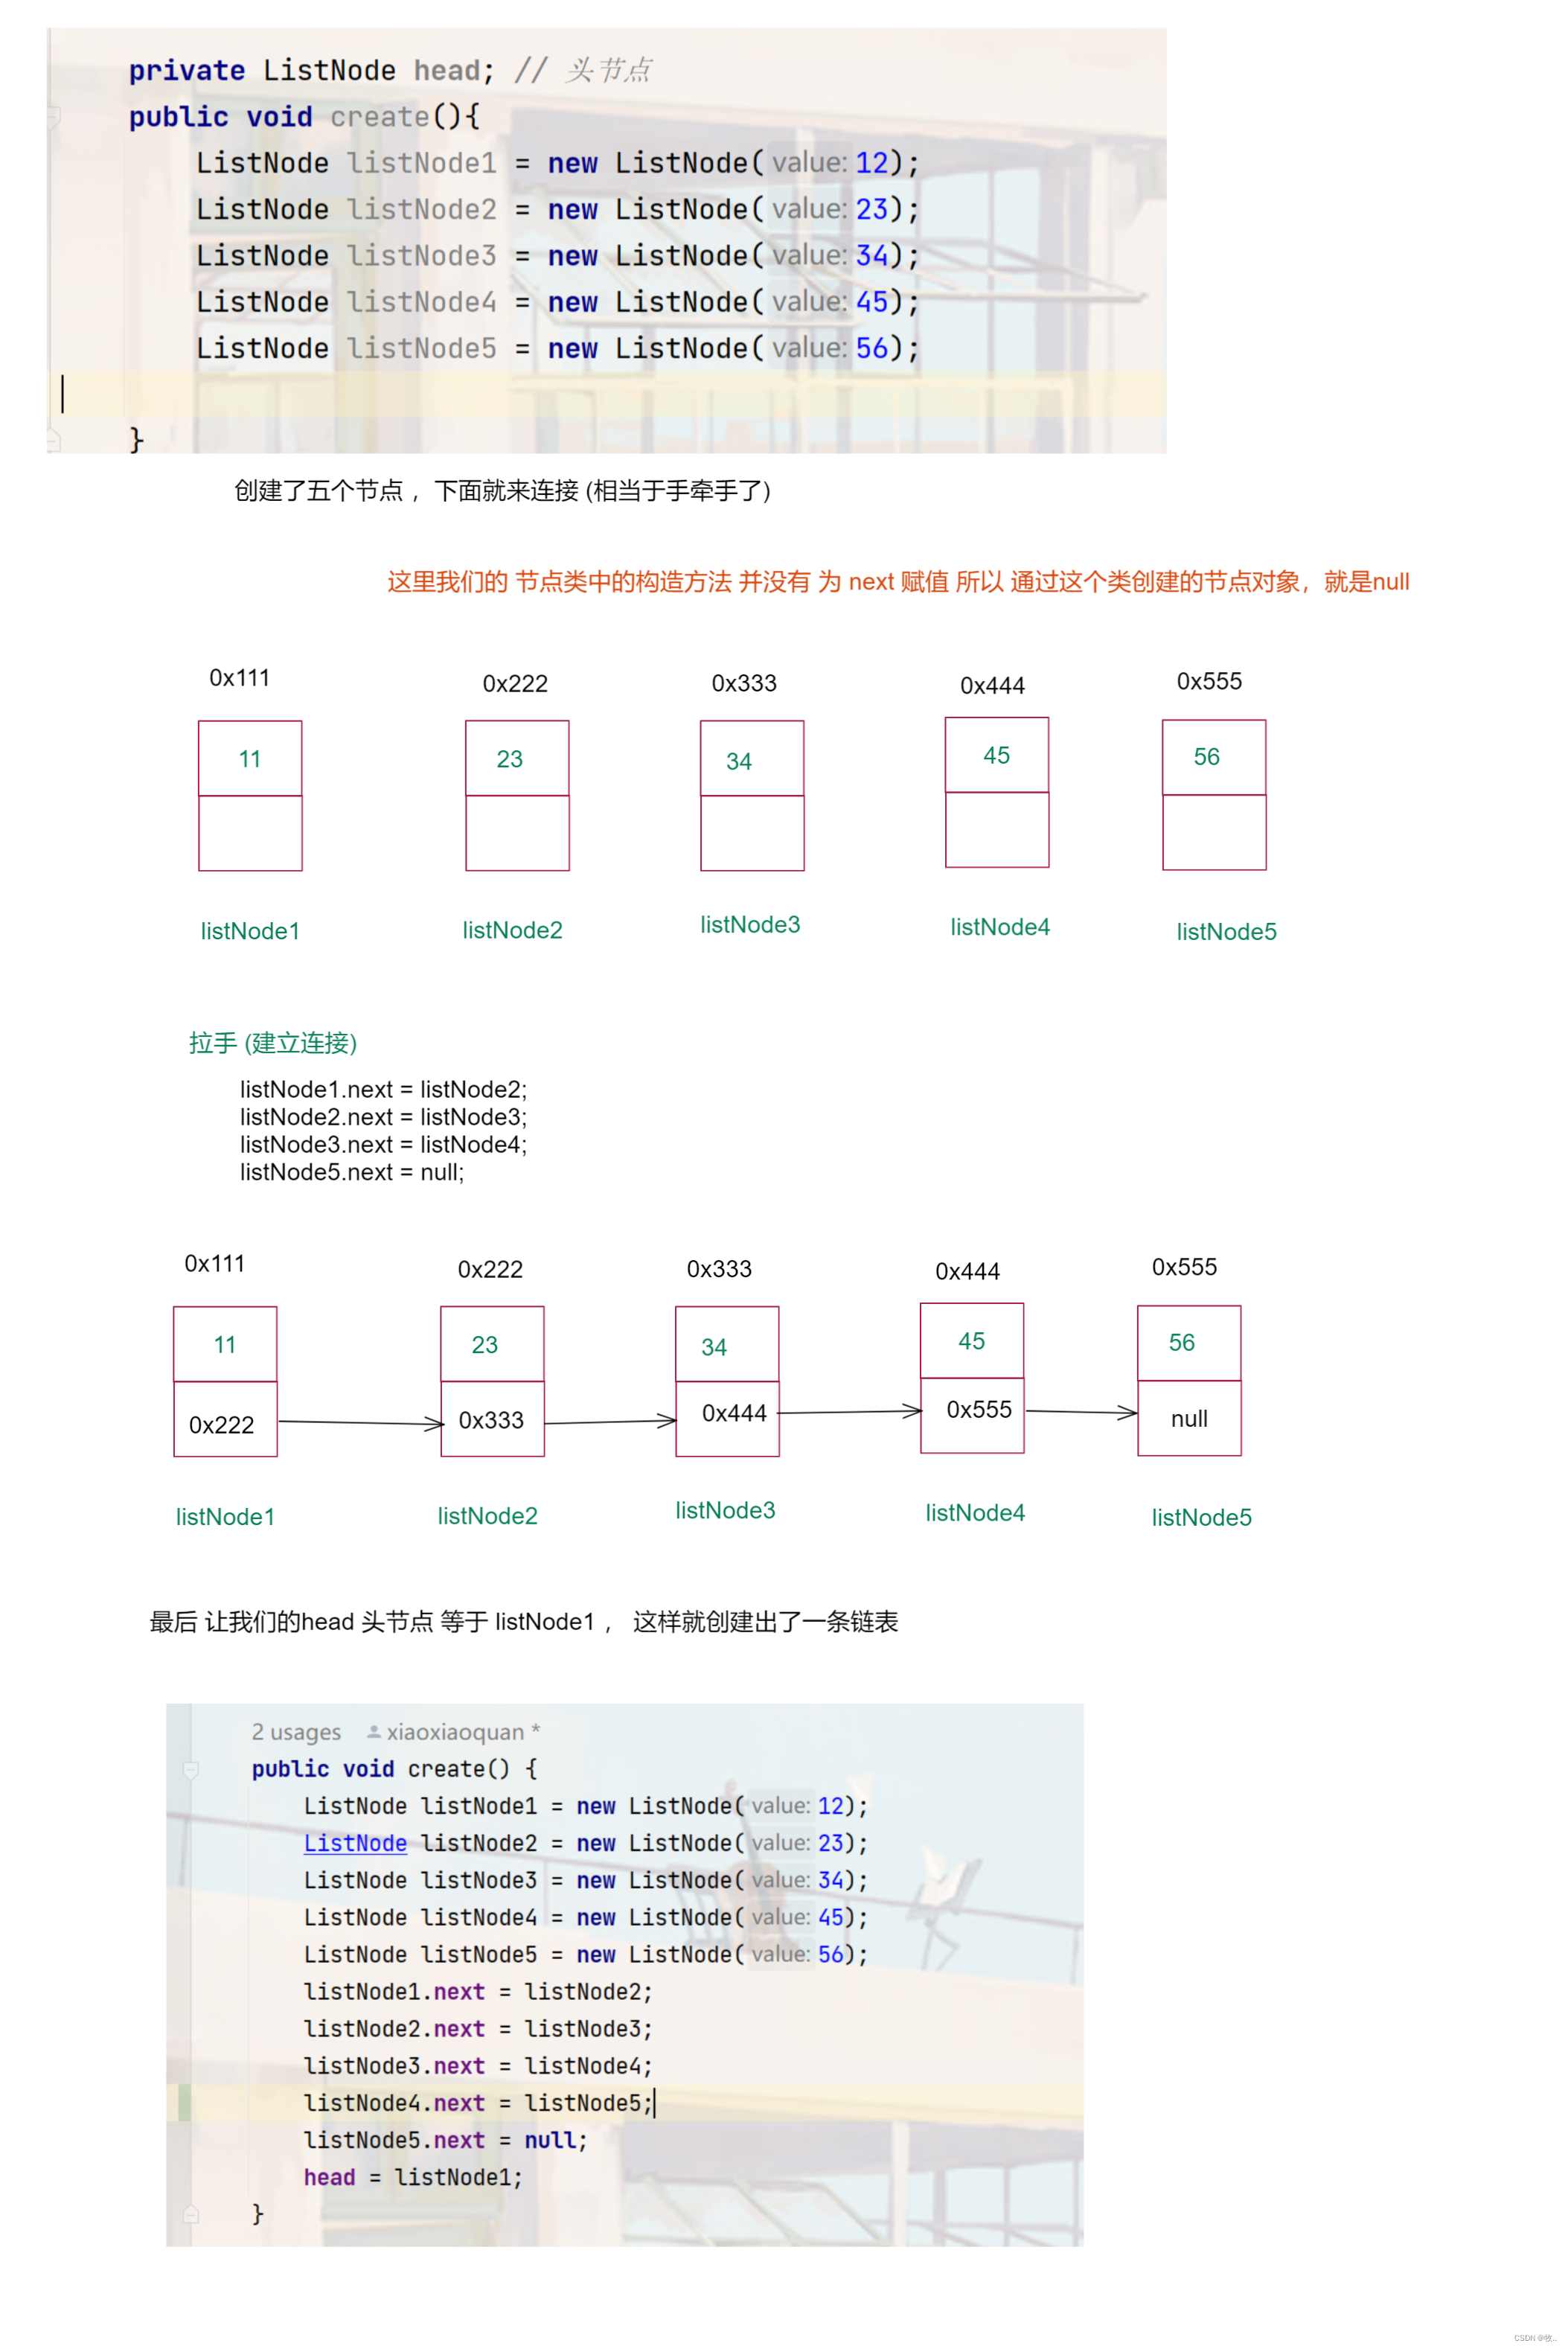
这里我们先来创建 一个链表, 这里采用的 比较low 的方法, 直接穷举 。 (先不使用插入的方法)
?
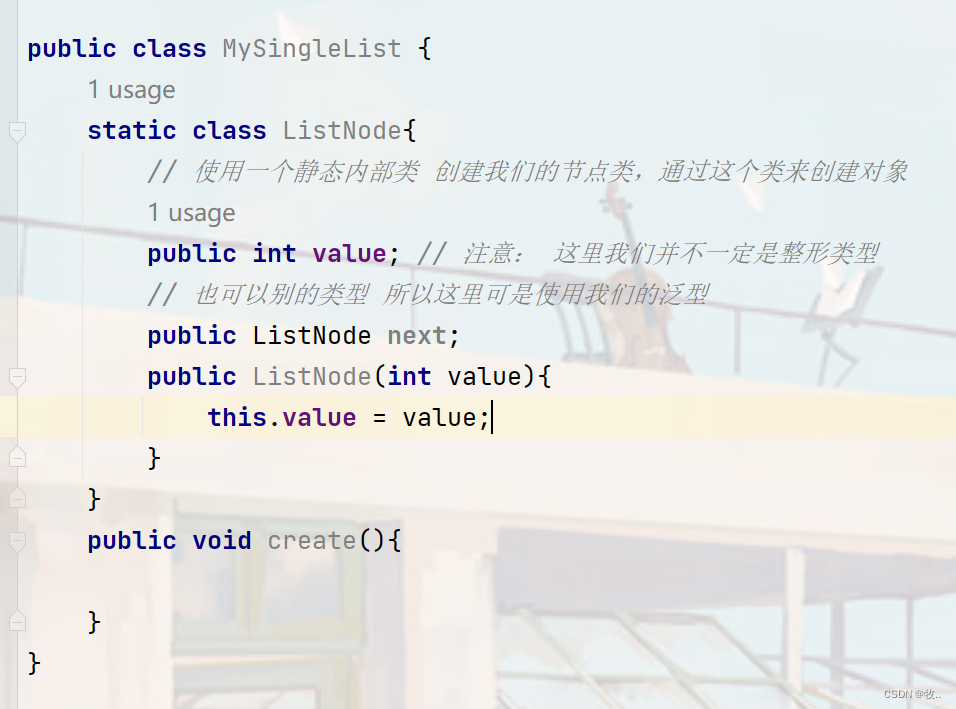
第一步创建一个 MySingleList 类 并且在这个类里面创建一个 内部类(静态也可以) ,这个类是专门的节点类用来创建我们的节点对象。
?
第二步 : 通过 create 创建我们的链表
?
注意 : 我们还要创建一个 head 头节点 (用来存放第一个节点的地址)
?
第三步: 有了链表 接下来我们就来实现我们链表中的方法
?
2.1 打印链表
?
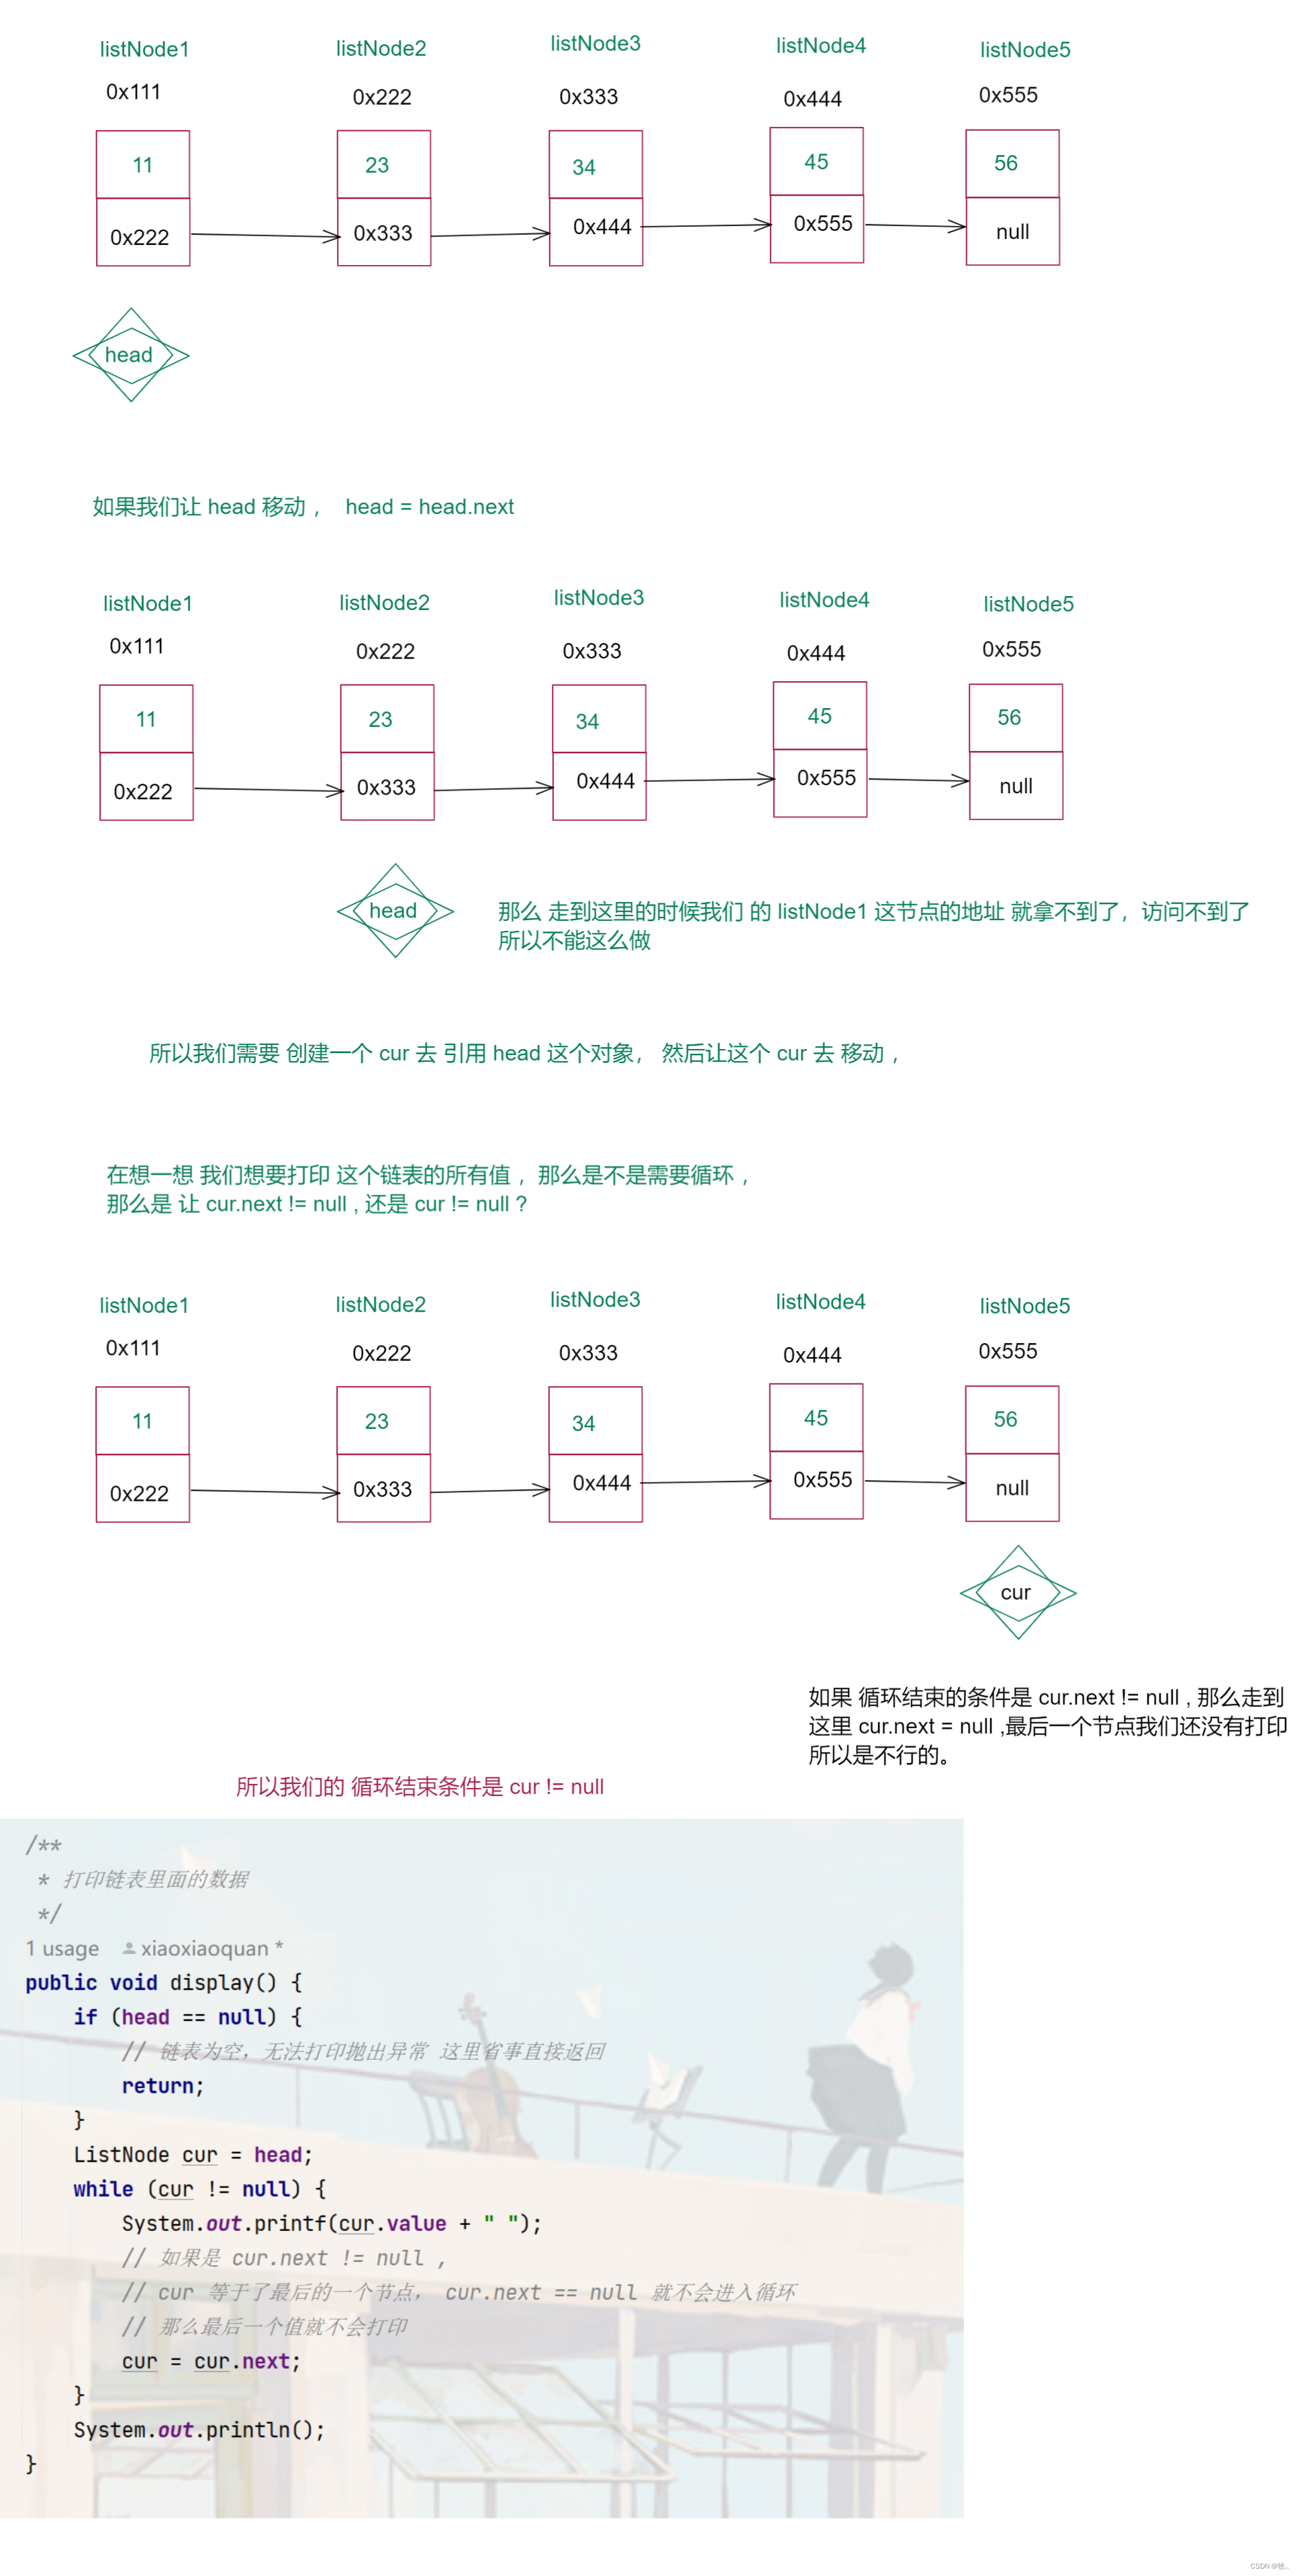
这个方法 可以说 非常简单, 就是创建一个 ListNode cur 让他引用 head 这个引用的 对象,然后 遍历每一个节点 然后打印 。
?
这里主要就只有两个问题 :
1、如何走到下一个节点
解 : cur = cur.next
2、什么时候把链表遍历完
解 : cur != null
?
图解 :
?
注意 : 这我们需要严谨,如果我们的 链表为空我们还能 去打印吗 ? 这里就可以直接返回或抛出异常
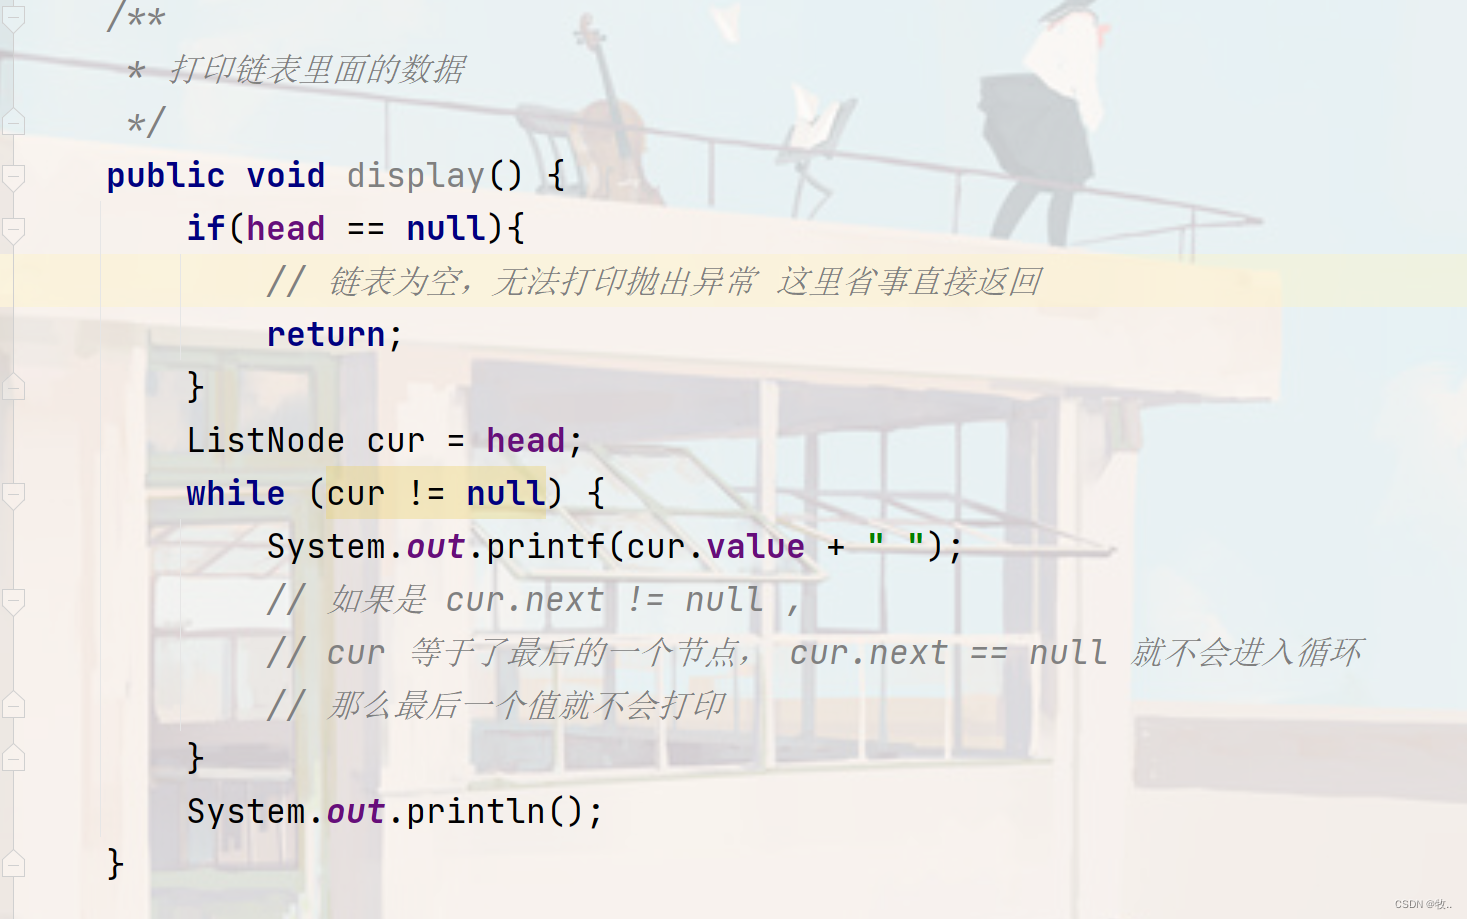
打印方法实现完 ,下面实现 求链表长度 。
?
2.2 返回链表长度
?
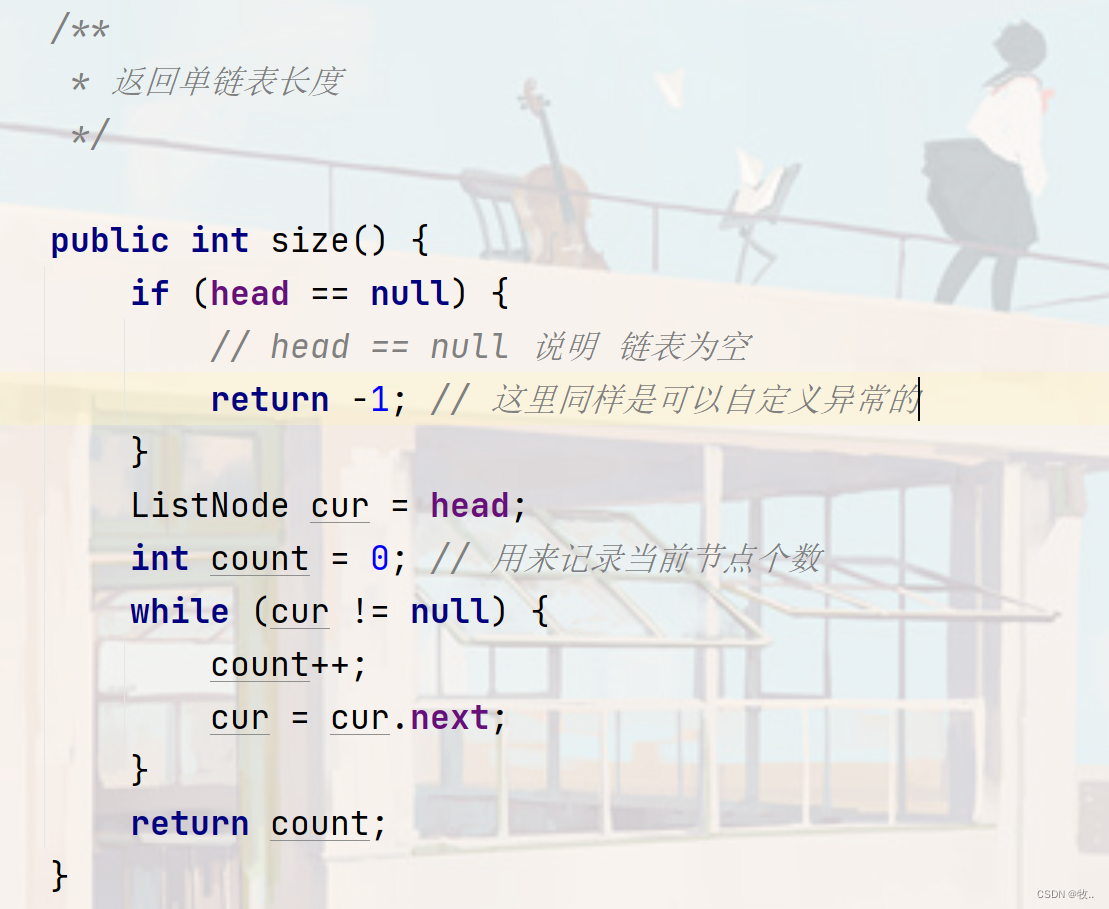
这个方法, 就只需要返回链表中节点的个数 , 这里同样是需要一个循环, 此时就需要思考 我们的循环结束的条件 。
?
想一想 : 我们是不是要数节点的个数,那么是不是需要走到每一个节点,那么 这里同样是要创建一个 cur 让他引用 head的对象,然后结束条件是不是就和打印一样cur != null 如果是 cur.next != null 那么 最后一个节点同样是没有记录的 。
?
分析完我们就可以直接来写代码 :
?
另外 :还有一种方法 ,看到这个size 了吗 ? 我们就可以在 后面些的新增方法中使用,每次添加一个元素 然后 让``size ++` 最后返回的size 就是我们的 链表长度

?
这里这个方法就写完了, 下面来完成我们的 contains 方法 判断 key 是否存在单链表中
?
2.3 查找 key 元素是否存在链表中
?
这个方法我们同样需要使用循环, 这里同样是要遍历 整条链表,那么 我们循环结束的条件就是 cur != null ,同理 我们不能使用head 去遍历, 所以需要创建一个 cur 来代替 head , 这里我们 判断是否纯在,那么 拿 每个节点的value 与当前的 key 比较即可 相等放回 true , 不像等返回 false (注意这里我们是 int 类型,所以 可以直接使用 == , 如果是包装类 ,需要使用 equals 如果是 自定义类型 重写 equals 即可)
?
代码如下 :

?
这里我们是使用非常low 的方法创建了一条链表, 完成了上面这些方法, 其实你创建链表这几个方法 也能实现为啥我创建了呢?
?
是因为 我们可以写完一个方法 在main函数里面去测试 ,但是 上面我并没有去测试 , 这里可以去测试一下 。
?
下面就来学习一下新增方法, 头插和尾插 然后真正的创建一条链表.
?
2.4 新增方法 add
?
新增方法 总共有 3 个 一个是头插, 一个是尾插 ,一个是 任意位置插入
?
2.4.1 头插
?
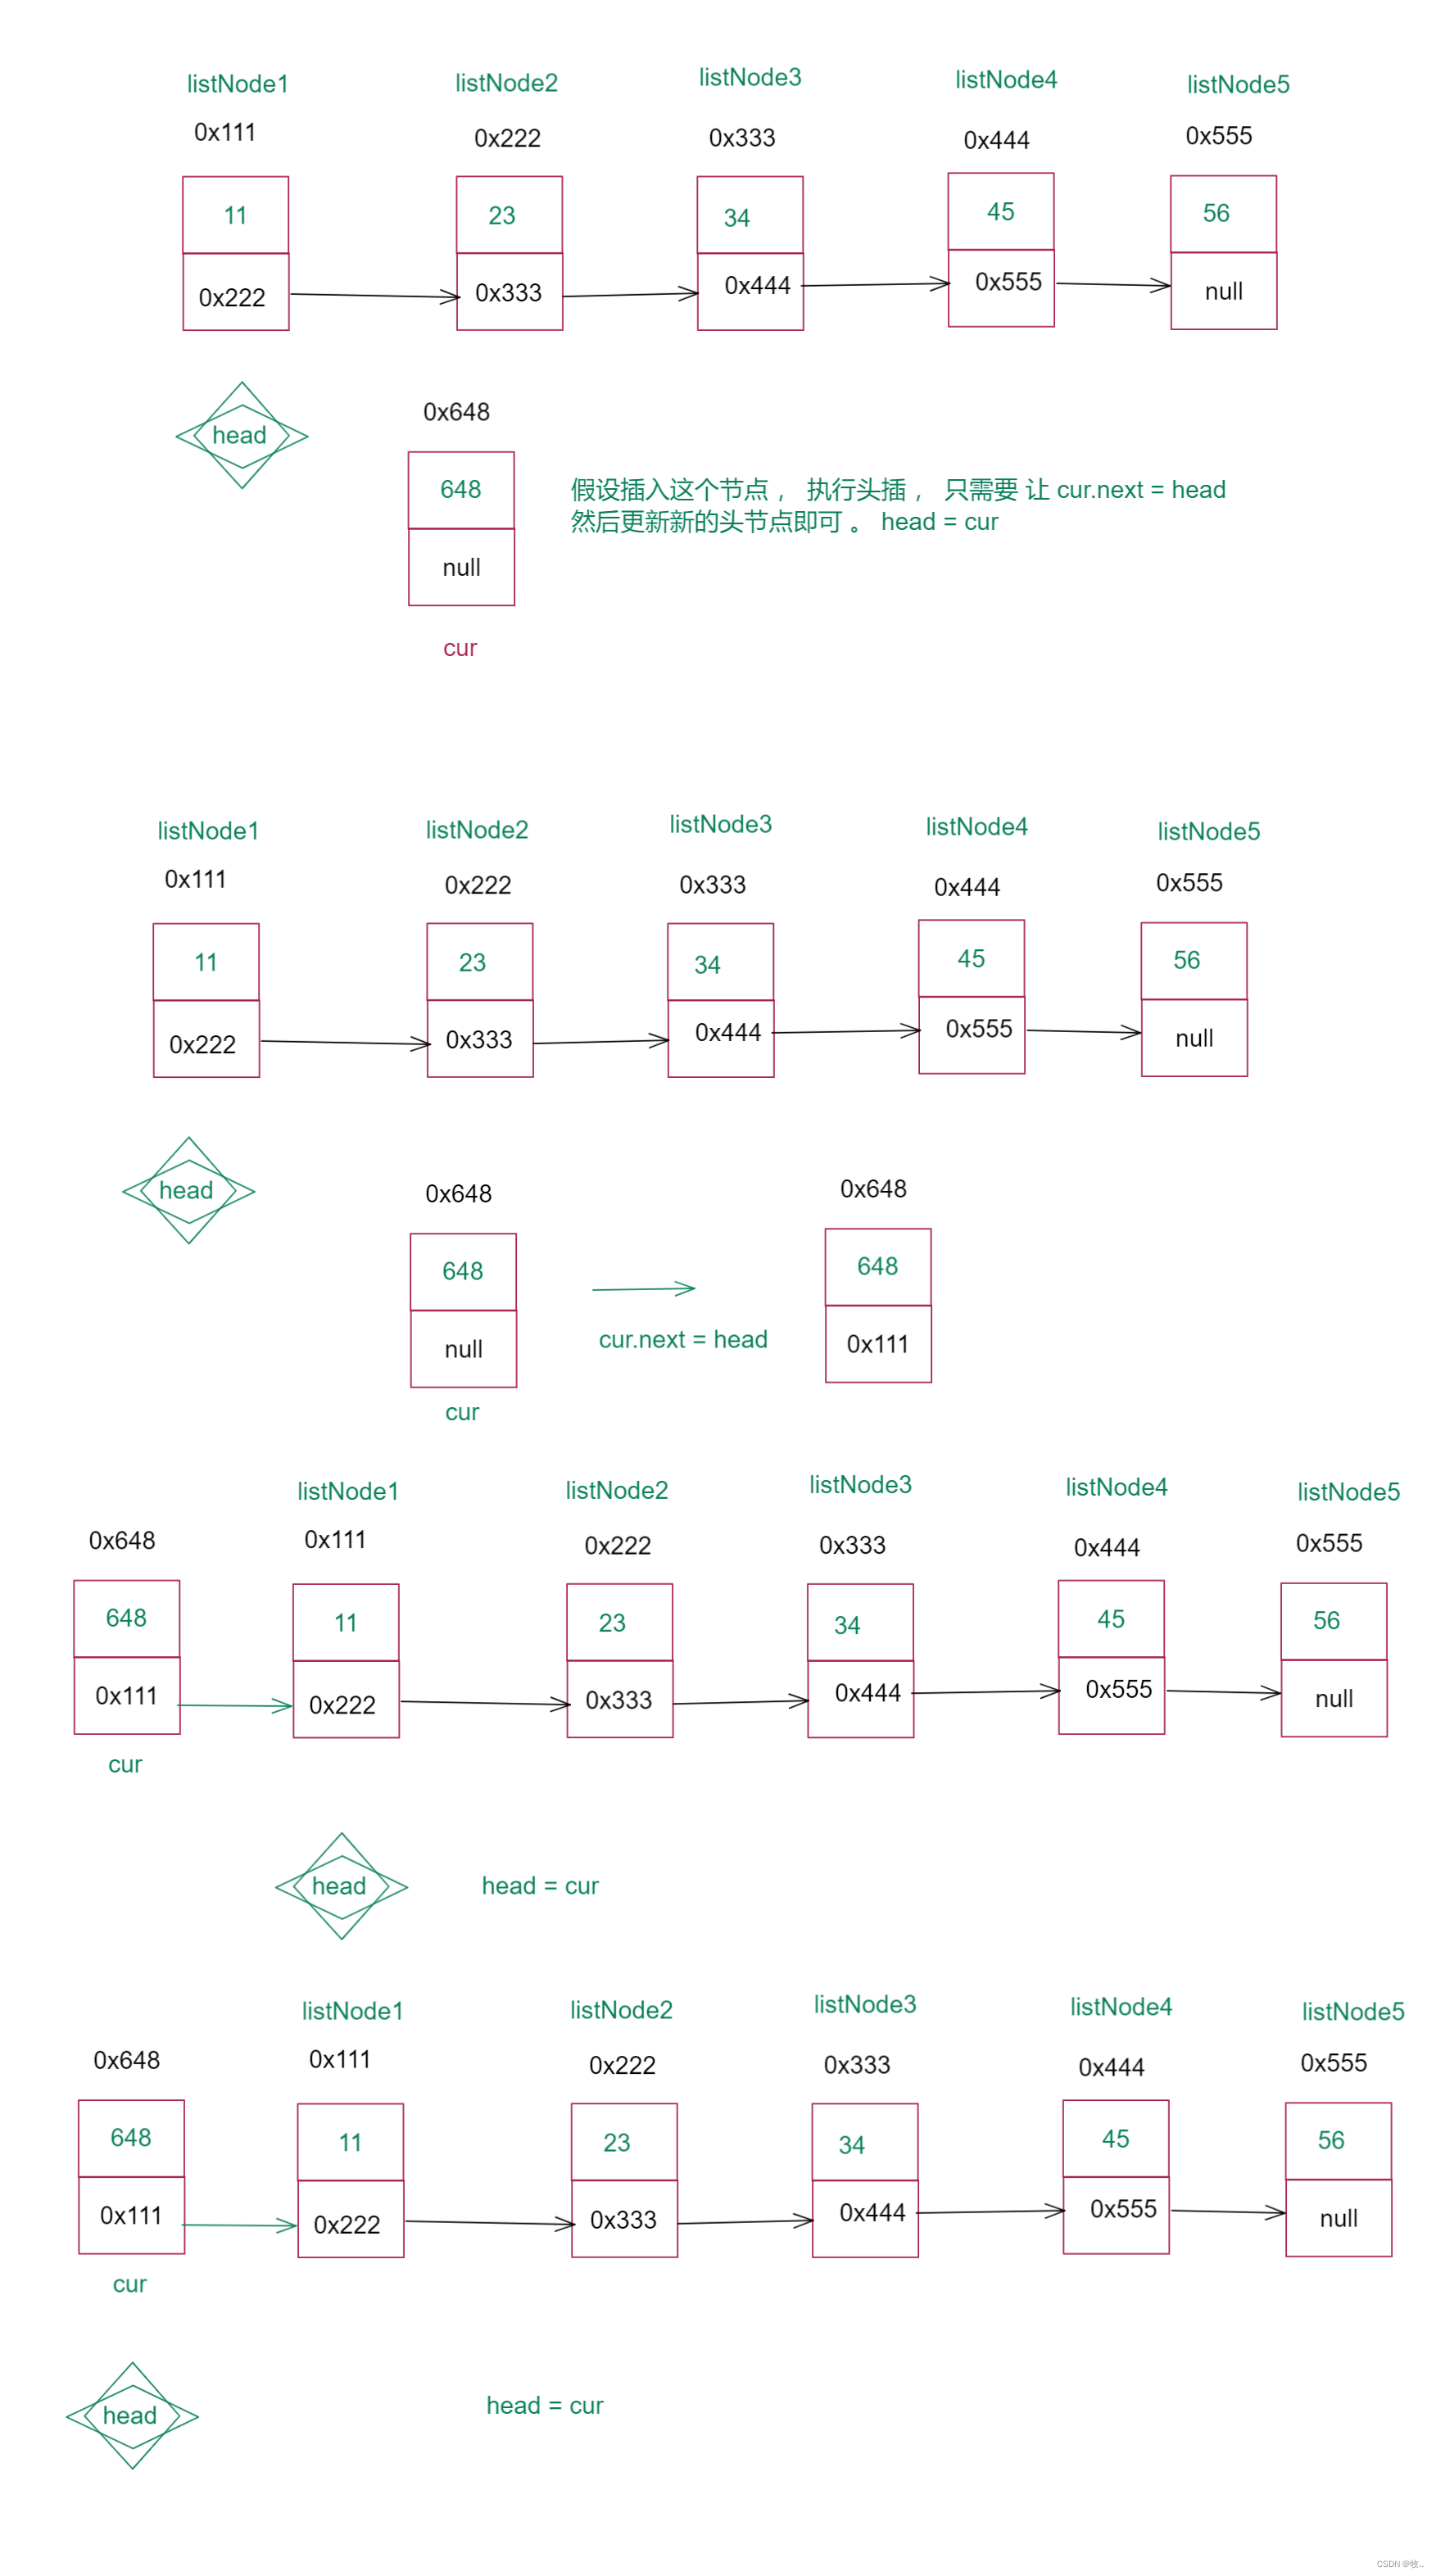
图解 :
?
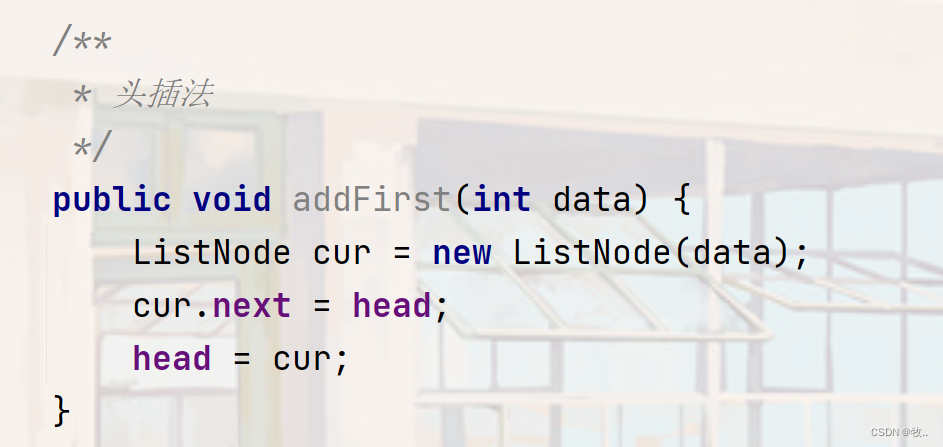
代码实现 :
?
这里 如果 我们的 链表为空, 也不要紧 , 你想 head == null , 那么 cur.next = null , cur.next 本来就是null 在赋值一个 null 也是没有问题的, 最后在让 这个 cur 变为新的head
?
补充: 对比一下 顺序表的插入 ,链表的插入是不是就非常高效, 我们链表插入的数据是不是就不需要挪动 元素,只需要改变指向即可。
?
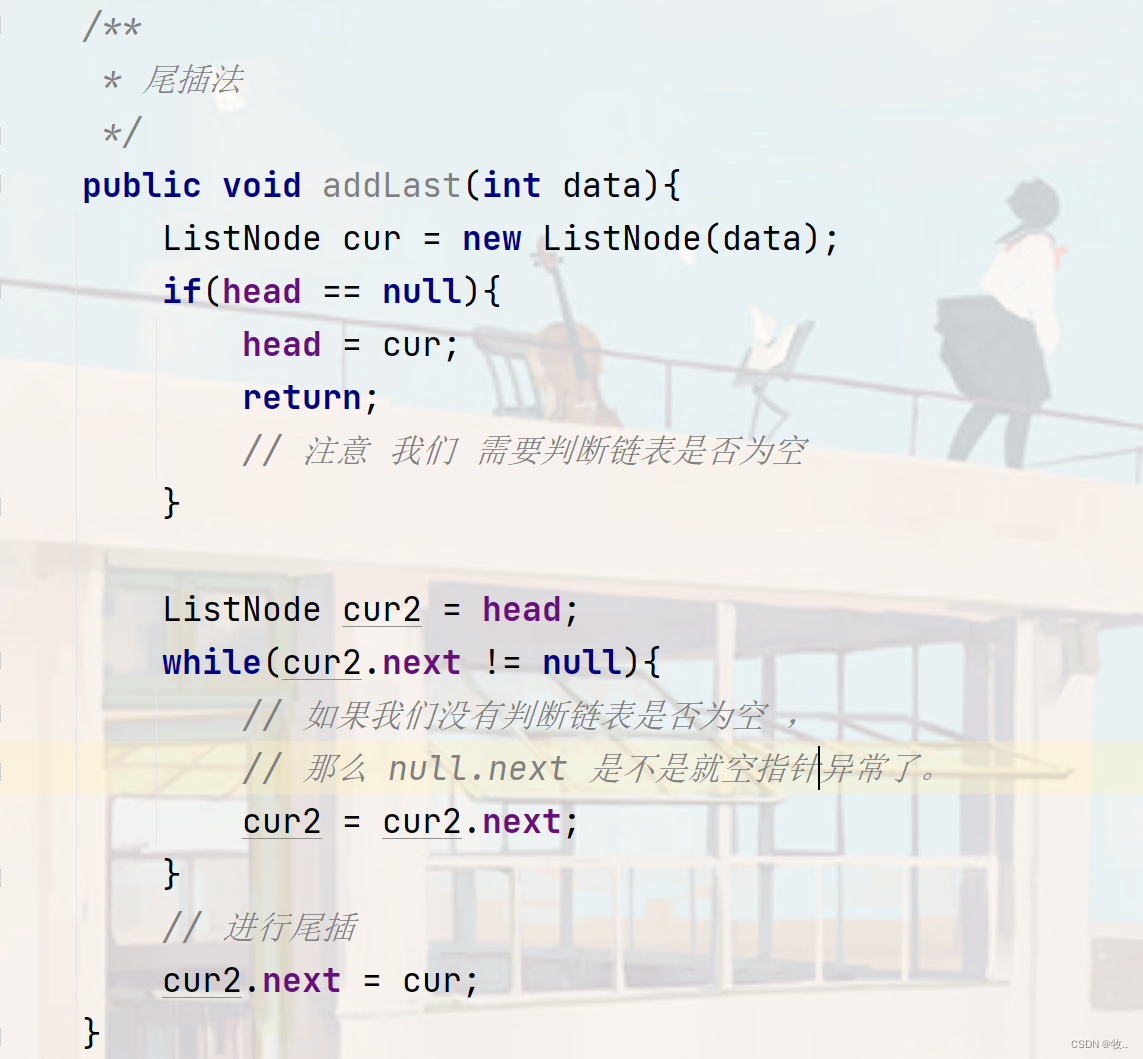
2.4.2 尾插
?
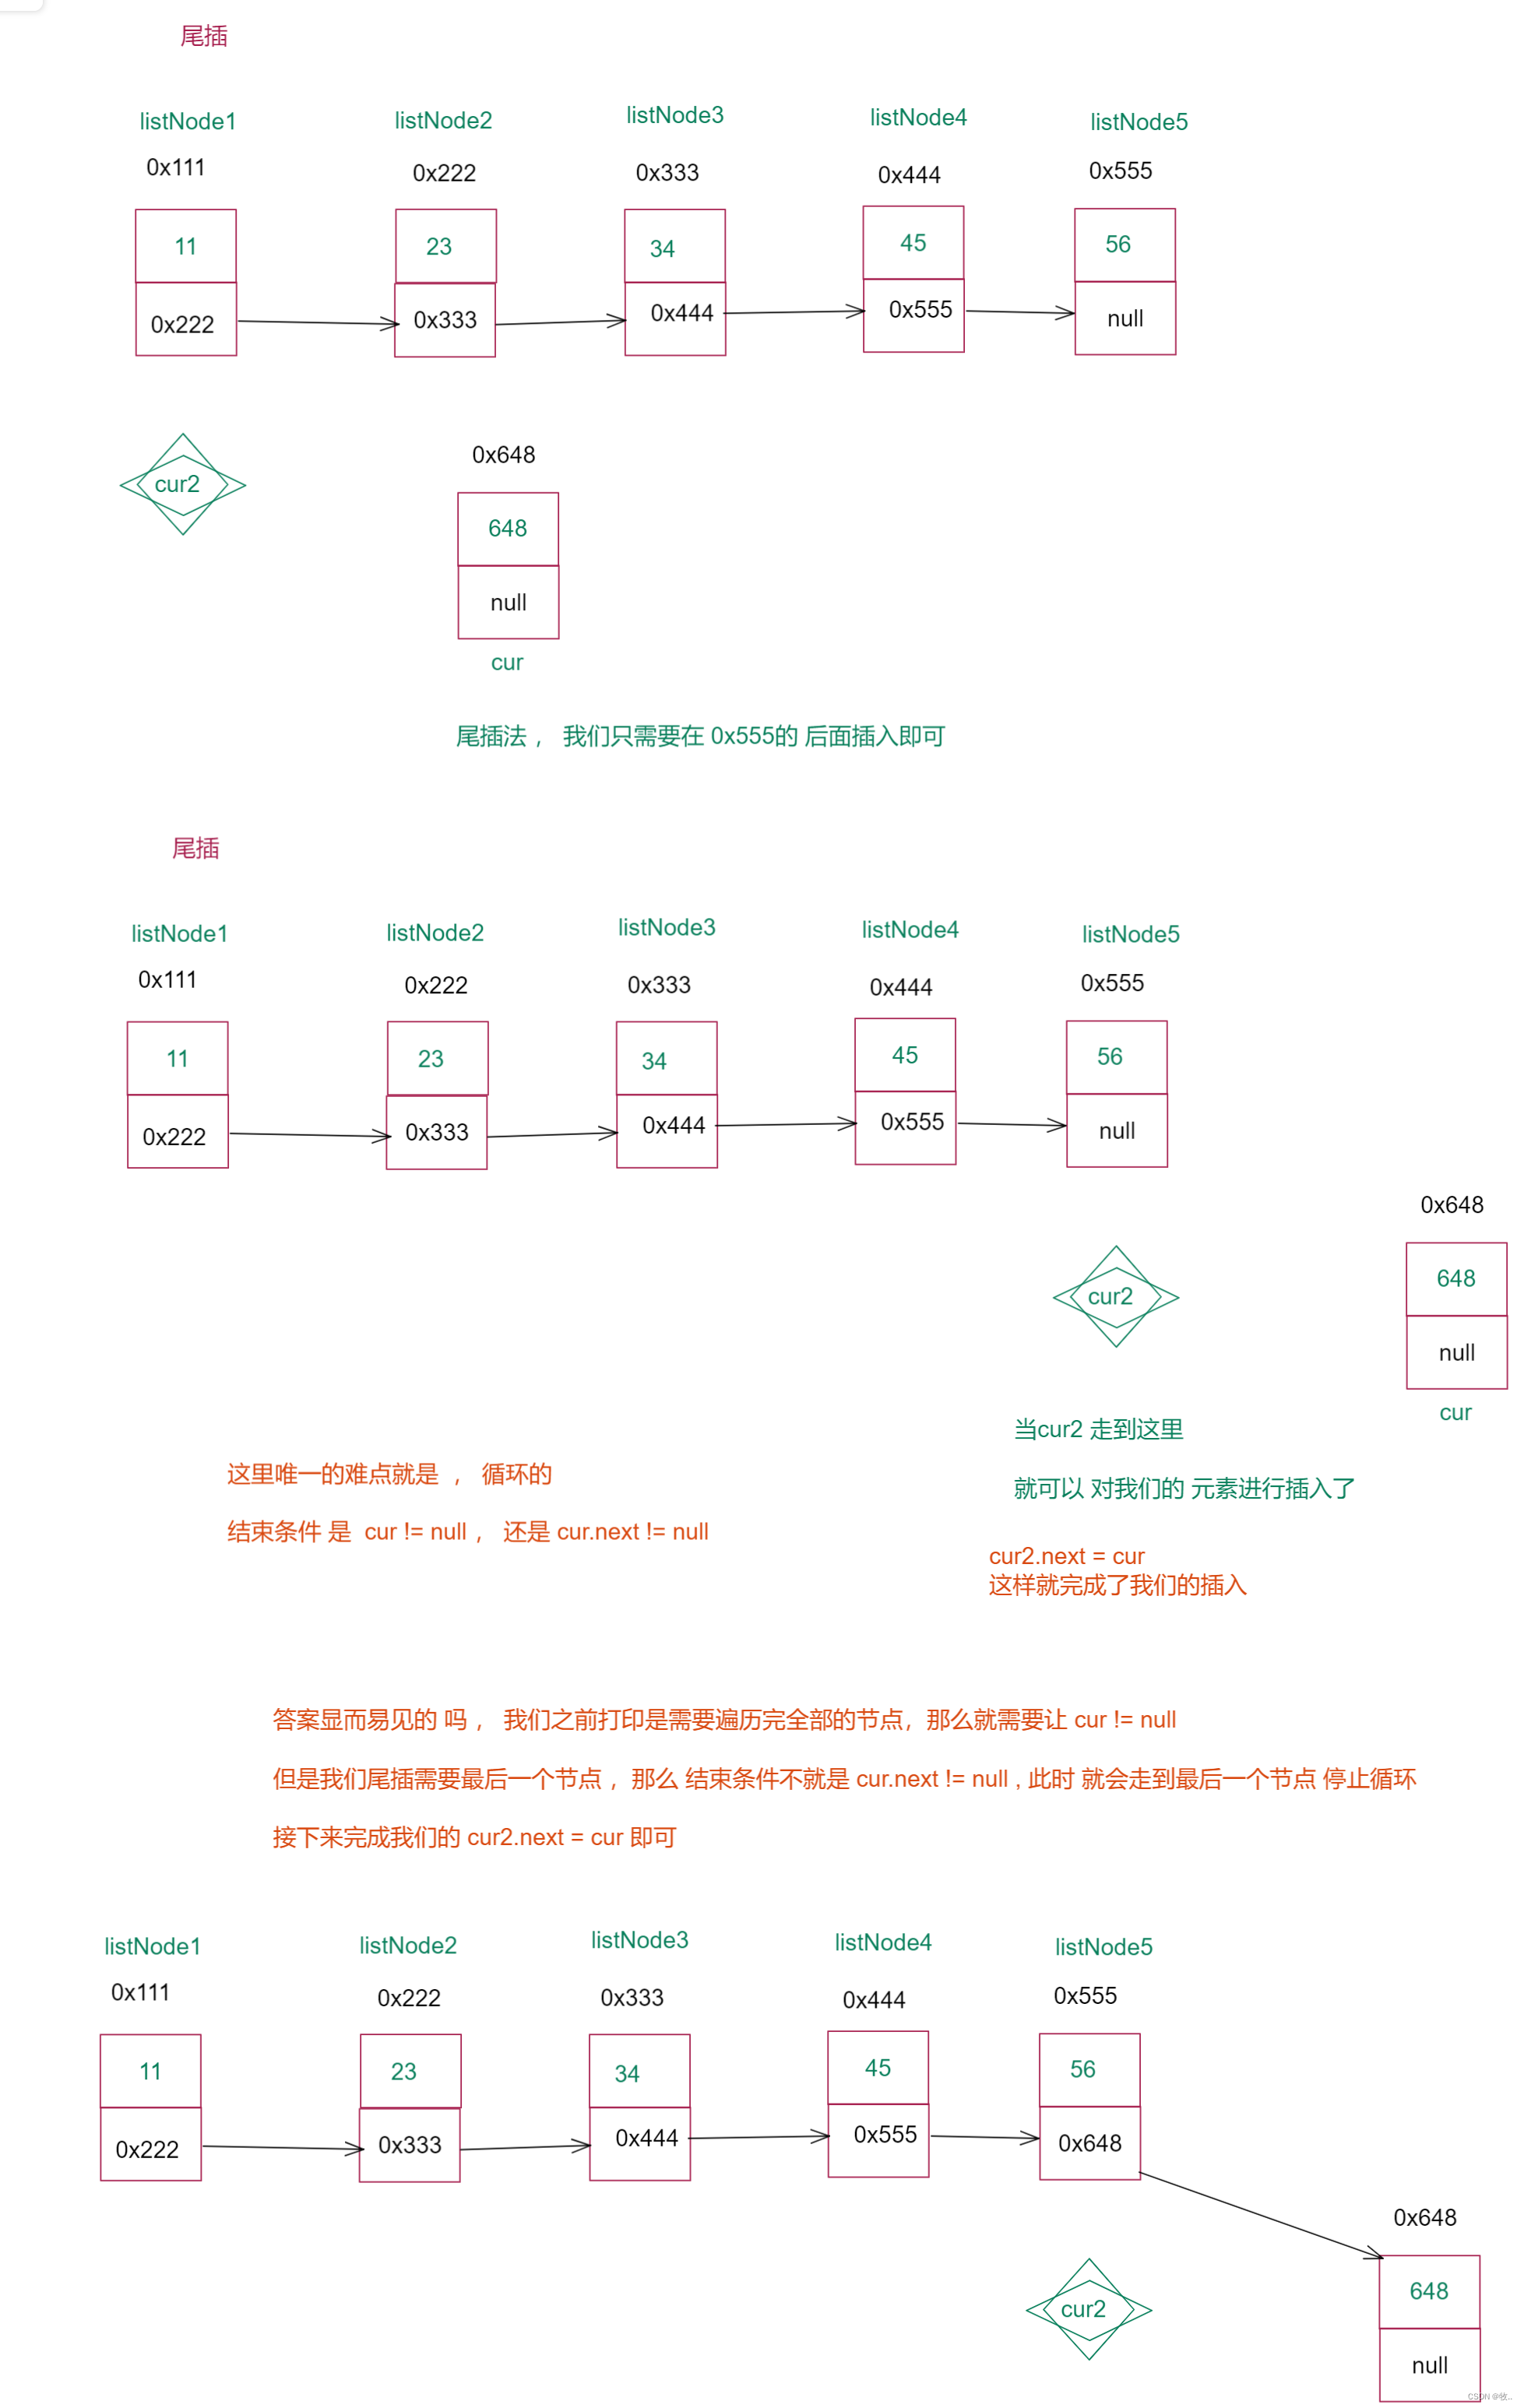
图解 :
?
代码实现 :
?
2.4.3 任意位置插入
?
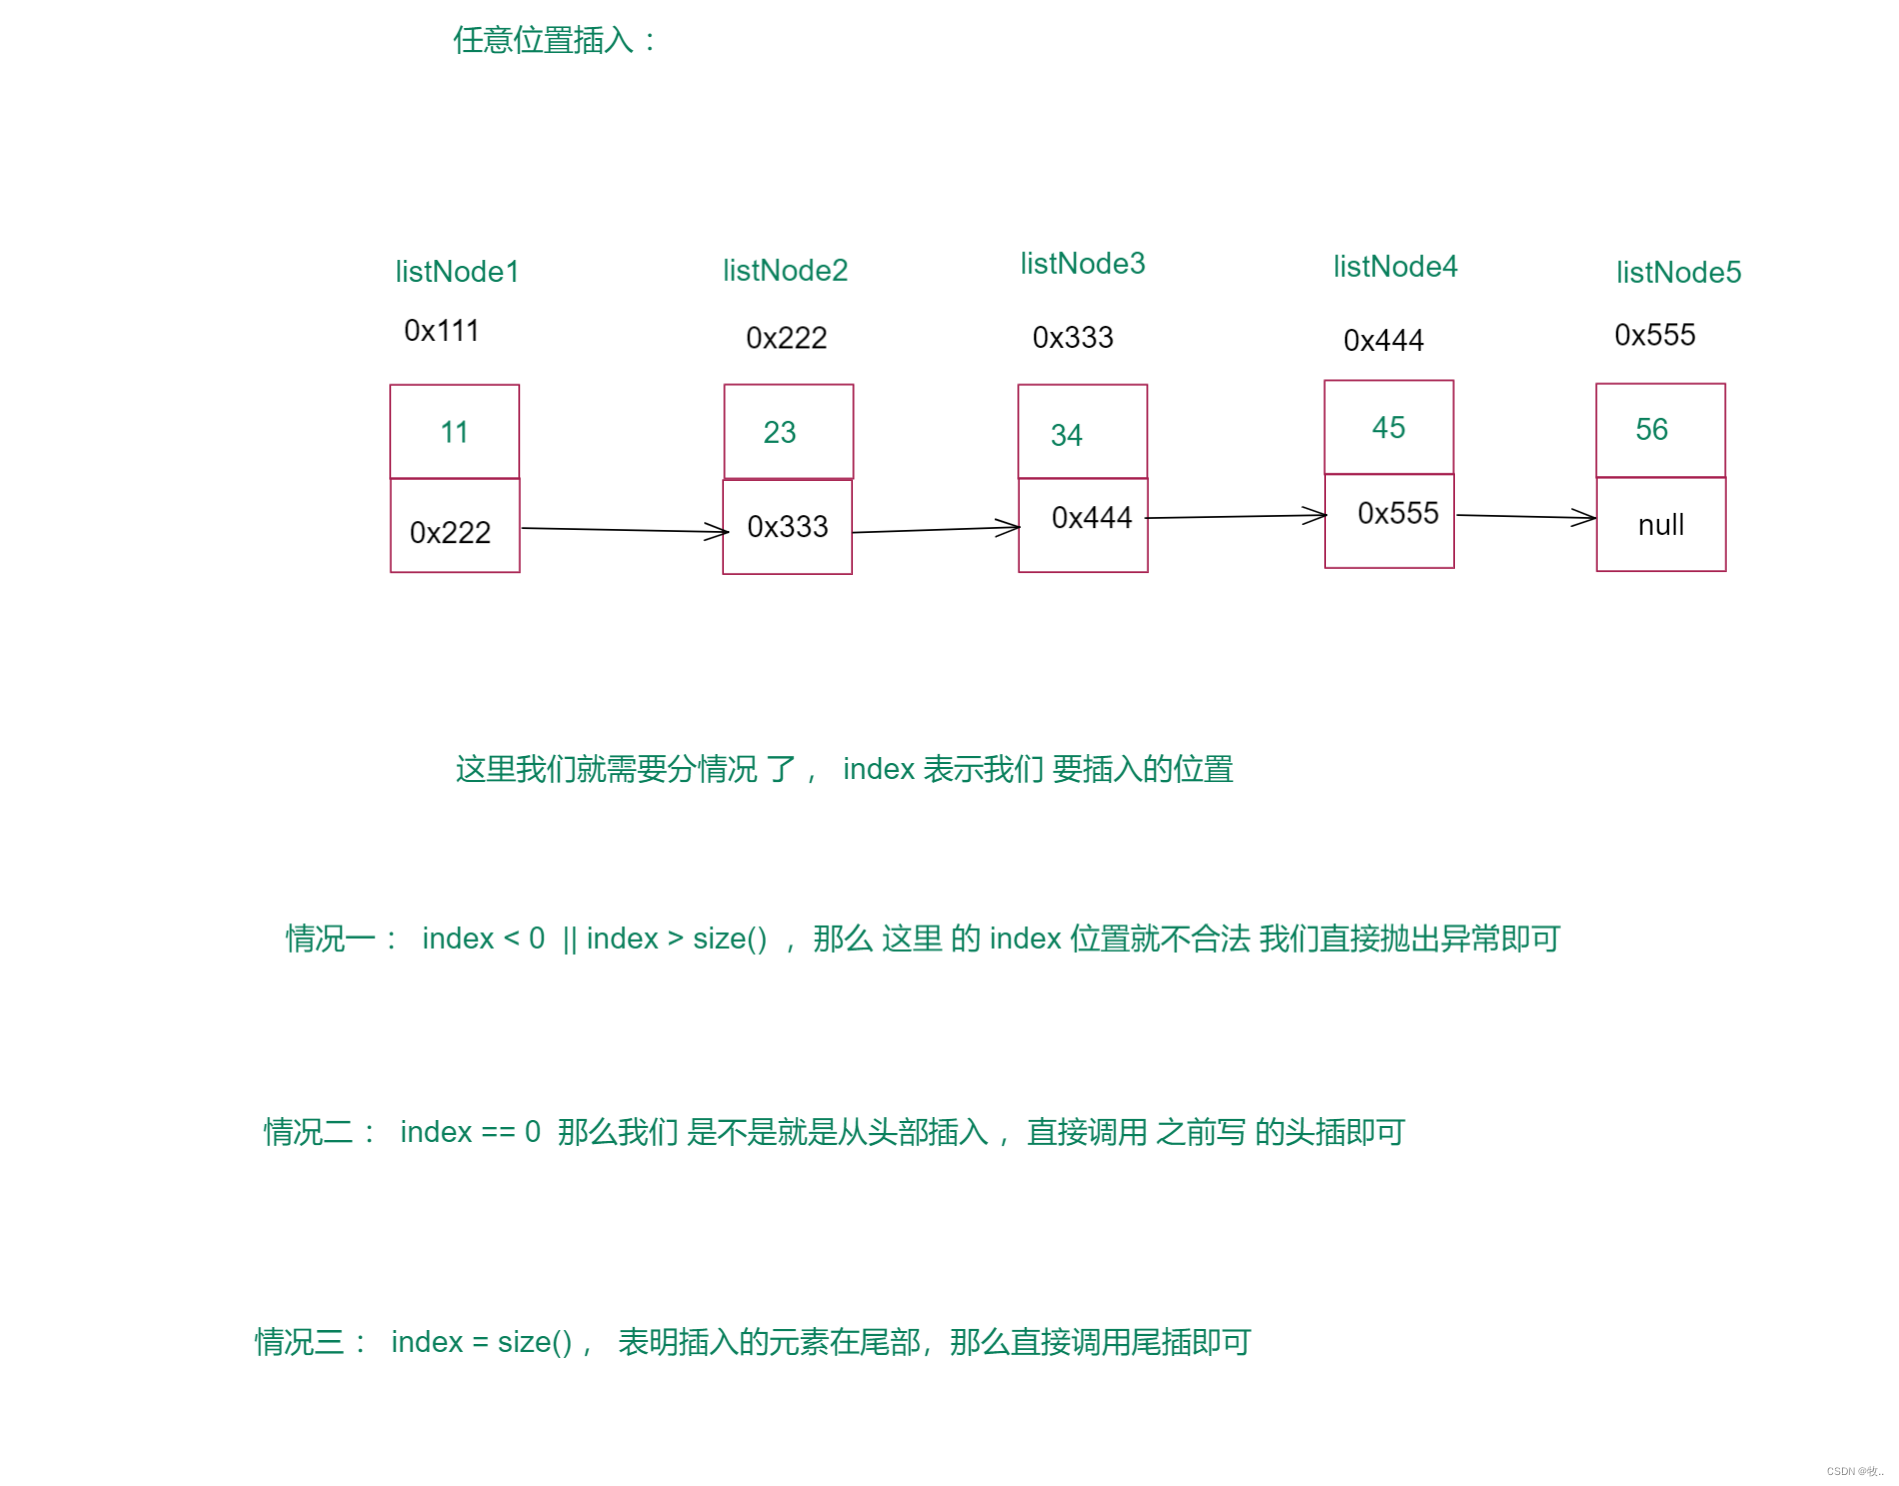
index特殊位置分析
?
index 正常位置插入

代码实现 :
/**
     * 任意节点插入
     * @param index
     * @param data
     */
    public void addIndex(int index, int data) {
        // 创建 新的节点
        ListNode cur = new ListNode(data);
        // 1.判断 index 位置的合法性
        if (index < 0 || index > size()) {
            // 此时我们需要抛出异常
            throw new IndexWrongFulException("index 位置不合法 !!!!");
        }
        // 2.如果 index == 0 头插
        if (index == 0) {
            // 调用头插的方法
            addFirst(data);
            return;
        }
        // 3. 如果 index == size() 尾插
        if (index == size()) {
            addLast(data);
            return;
        }
        // 4.此时 正常情况(中间插入), 将我们 执行的 代码 封装成一个方法(解耦)
        // 先 走 index - 1 步
        // cur2 拿到我们的前一个节点
        ListNode cur2 = findIndexSubOne(index);
        cur.next = cur2.next;
        cur2 = cur;
       // 此时就完成了我们的 插入

    }

    private ListNode findIndexSubOne(int index) {
        ListNode cur = head;
        while (index - 1 != 0) {
            cur = cur.next;
            index--;
        }
        return cur;
    }
?
添加就学完了, 会了添加 那么对应的删除 也是不可少的, 下面就来学习一下删除操作 。
?
2.5 删除操作 remove
?
这里主要实现两种 删除 :
- 第一种 删除 :删除第一次出现的 key 元素
- 第二种 删除 :删除链表中 所有的 key 元素
?
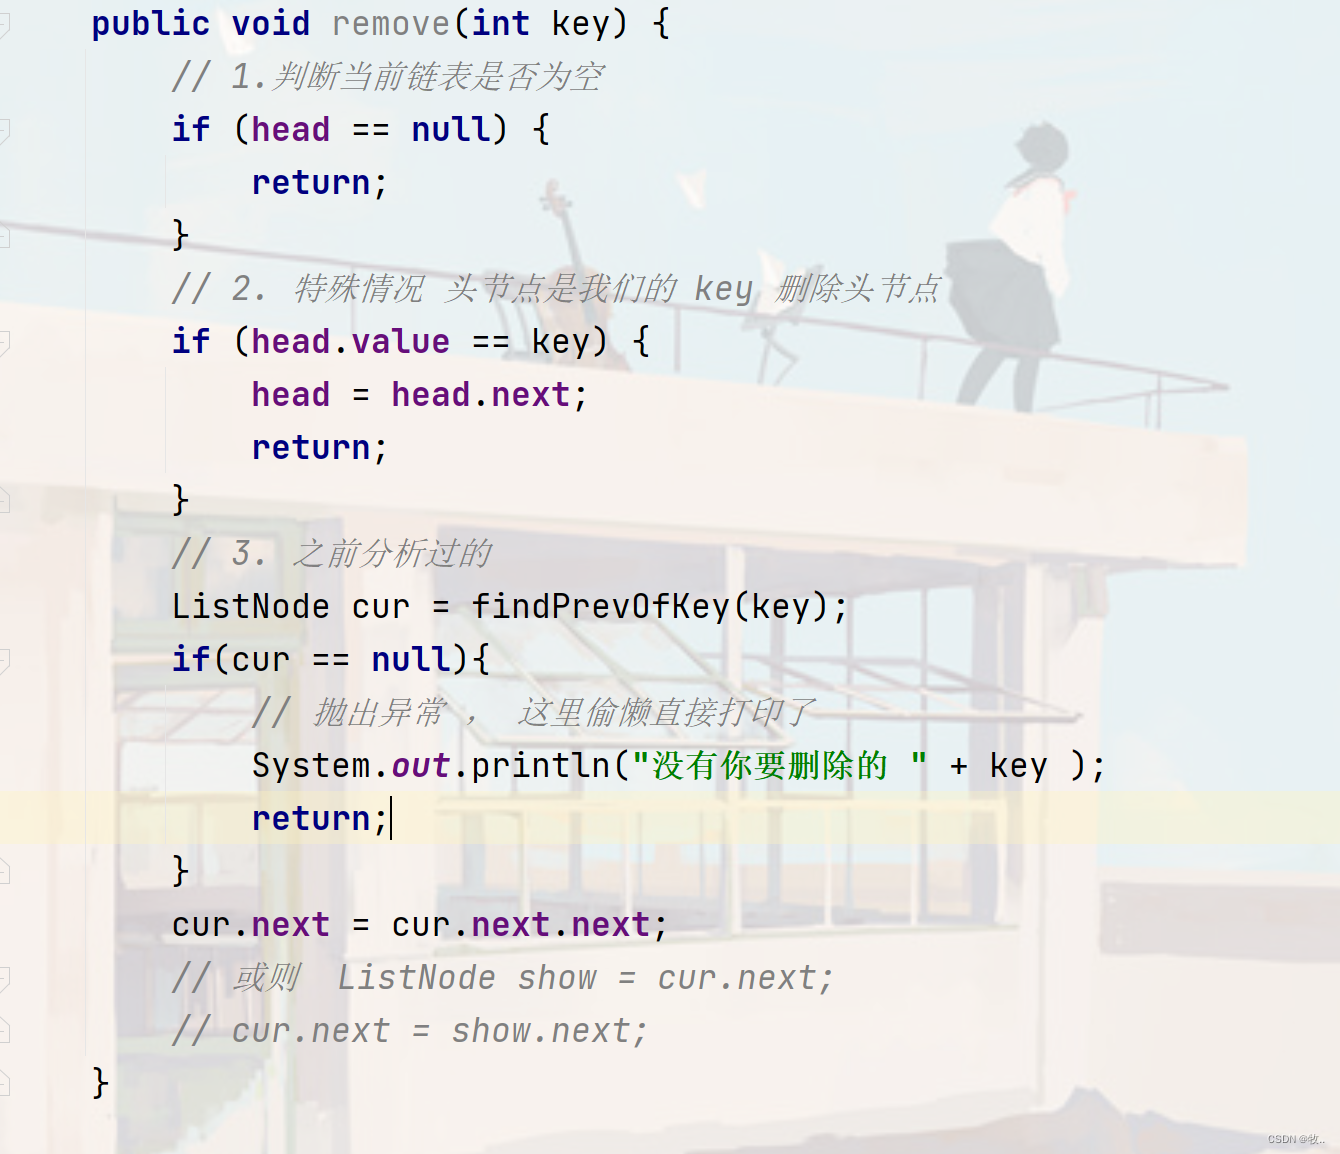
2.5.1 删除第一次出现的 key 元素

?
代码实现 :
这里先来完成我们找前一个节点的方法 。

?
这里的 找前驱 (前一个节点)的方法写完了, 就来完成我们的remove 方法
?
2.5.2 删除链表中所有的 key值
?
解法一 (不推荐): 循环调用 删除第一次出现的key 的方法
?
上面我们写完了删除一个key ,那么删除多个key 还不简单吗?
?
直接 写一个循环 调用 这个方法 , 执行 链表的长度次,这样就能 将 链表中的所有的key 全部删除.
?
为啥不推荐呢 ? 你想我们 删除第一个key 的方法时间复杂度是不是 0(N) , 然后我们有需要循环N 次 (链表长度) ,然后调用这个方法 ,那么时间复杂度是不是就是O(N ^ 2) , 时间复杂度太高了 , 那么 肯定是不推荐的。
?
下面就来学习一下 时间复杂度O(N) 的 方法。
?
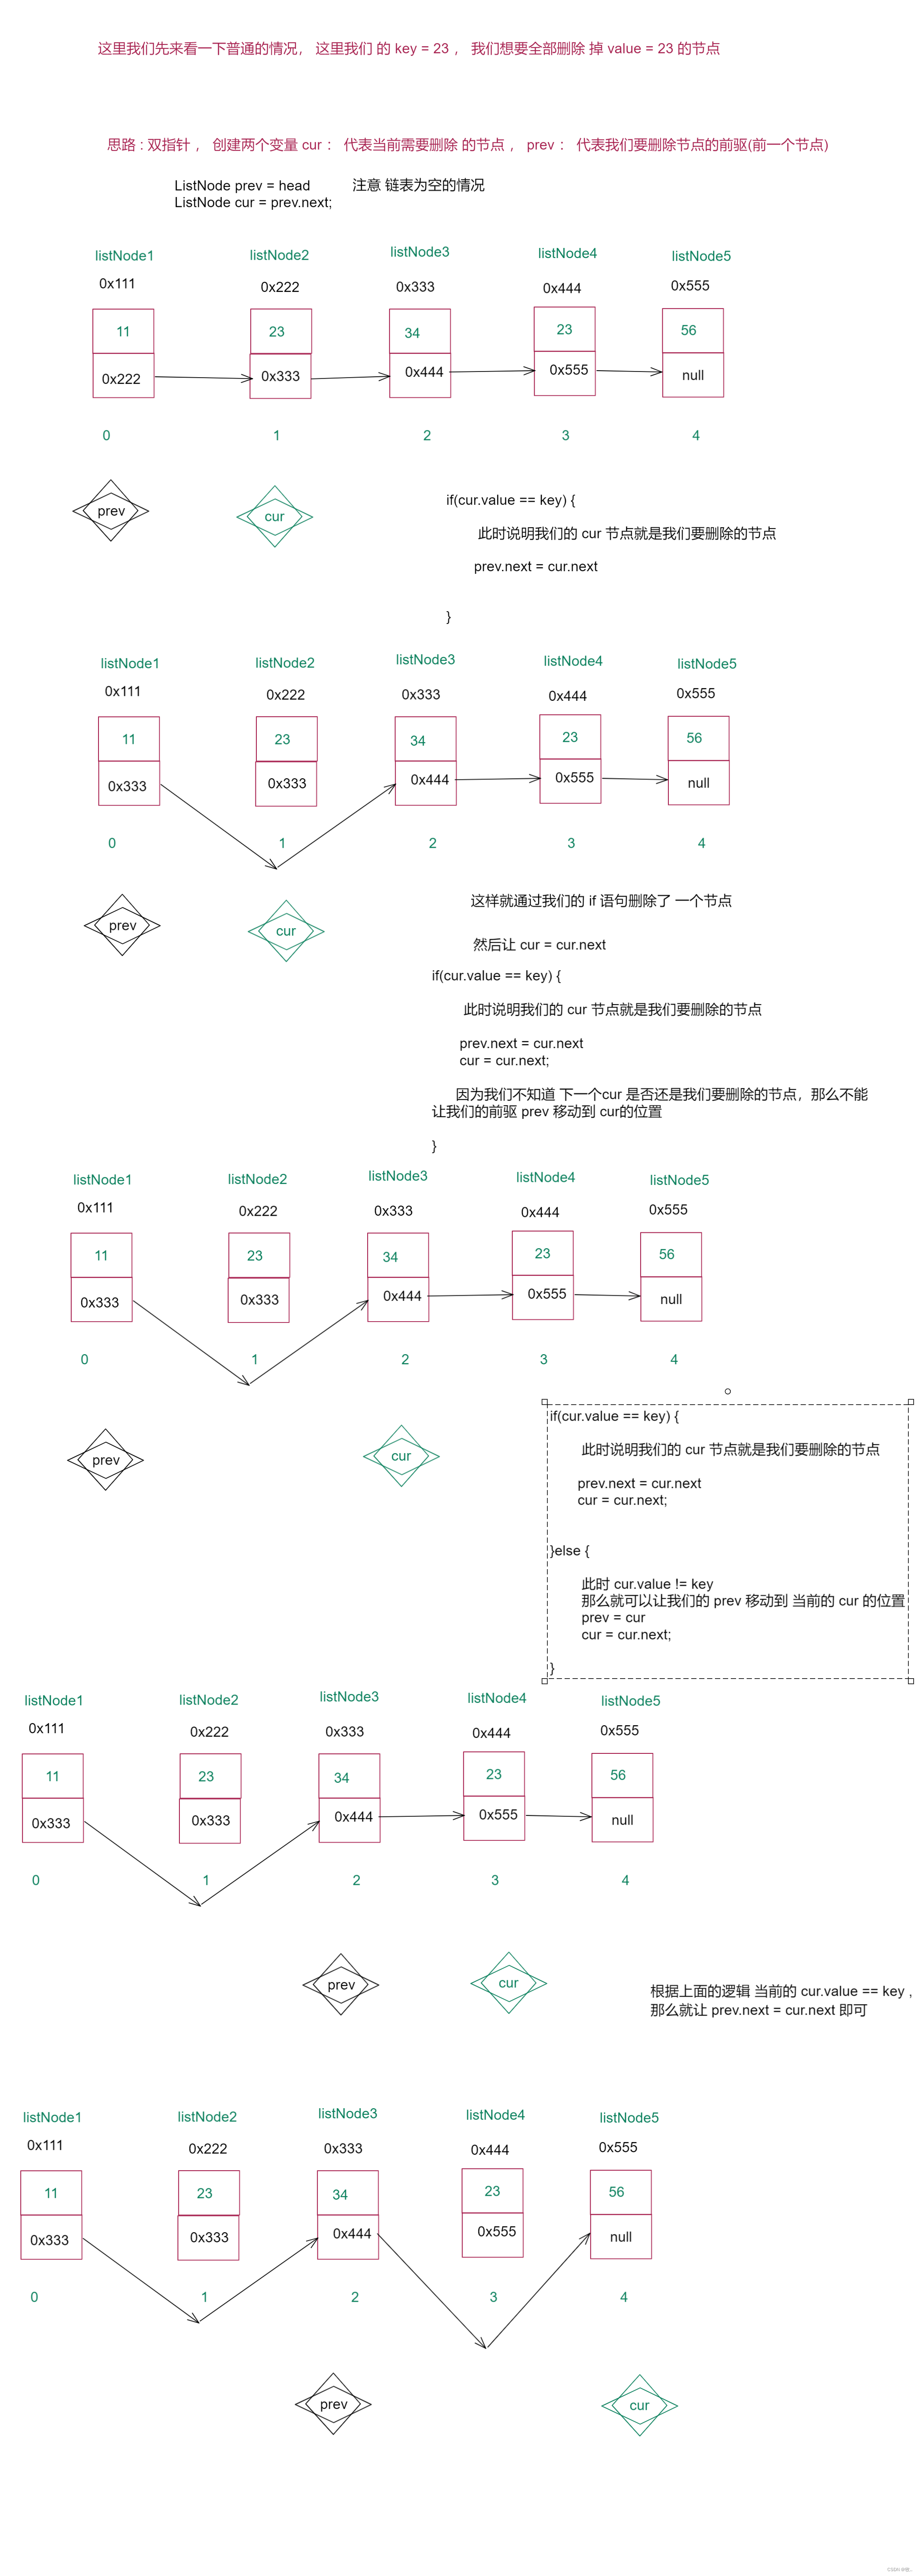
解法二 :
?
图一 :
?
图二 :
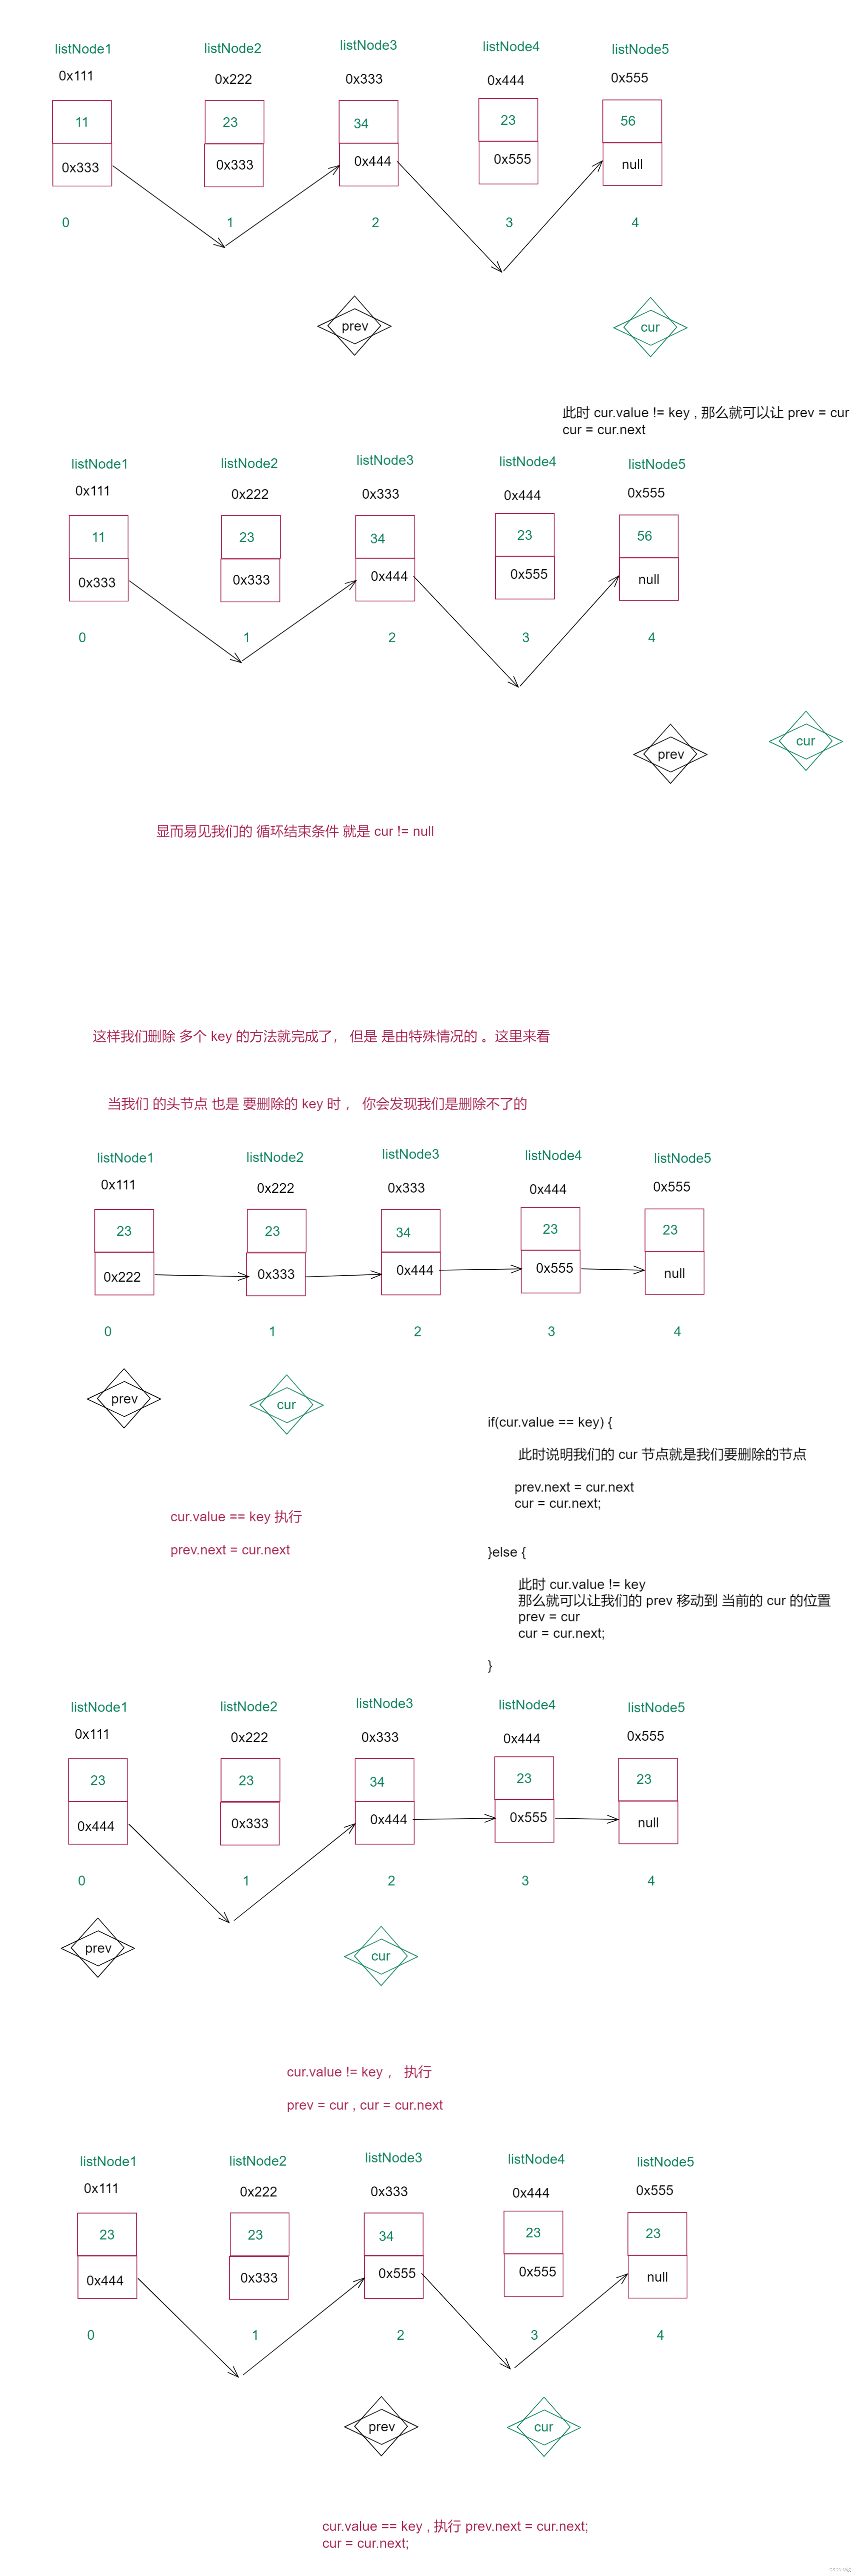
?
图三 :
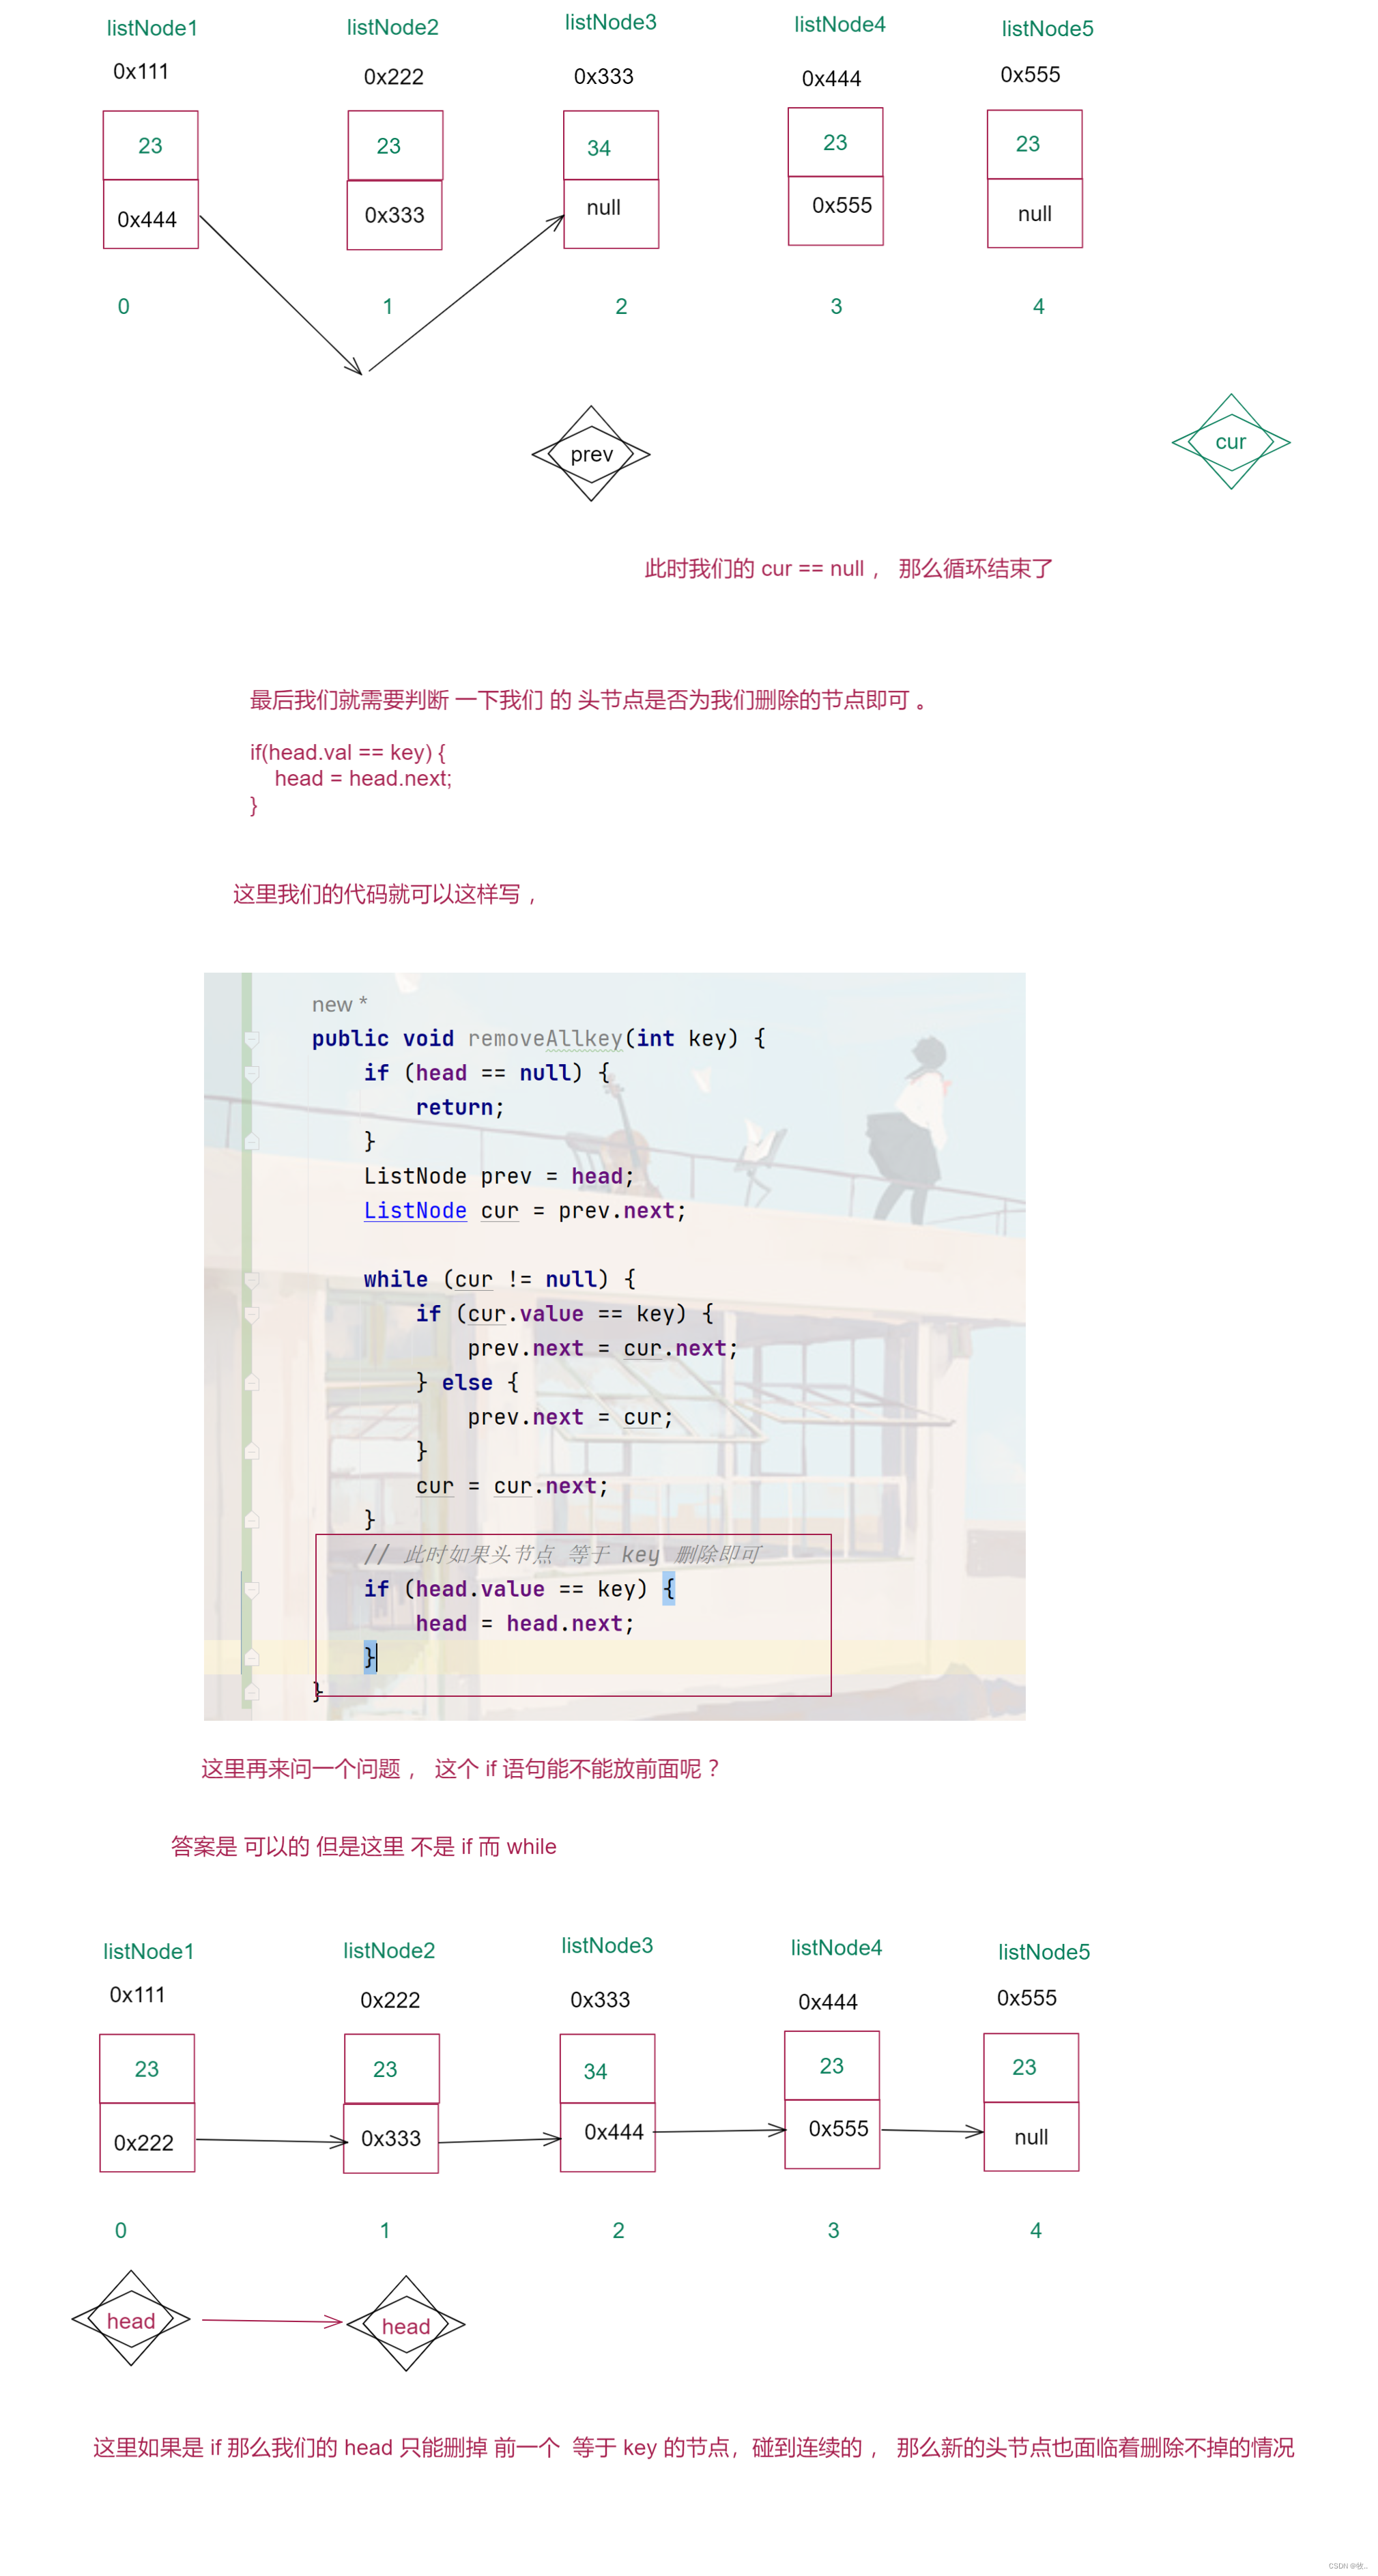
删除方法就完成了, 下面就来完成最后一个方法清空链表
?
2.6 清空操作
?
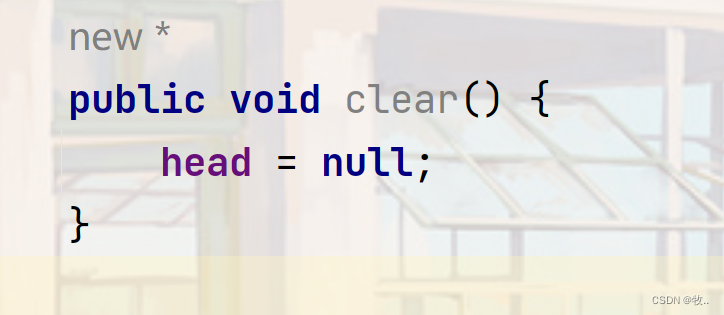
这里清空操作 可以有两种写法 , 一种比较粗暴一点,直接让头节点置为空 这样就没有人引用 这个链表自然我们就达成了清空操纵
?
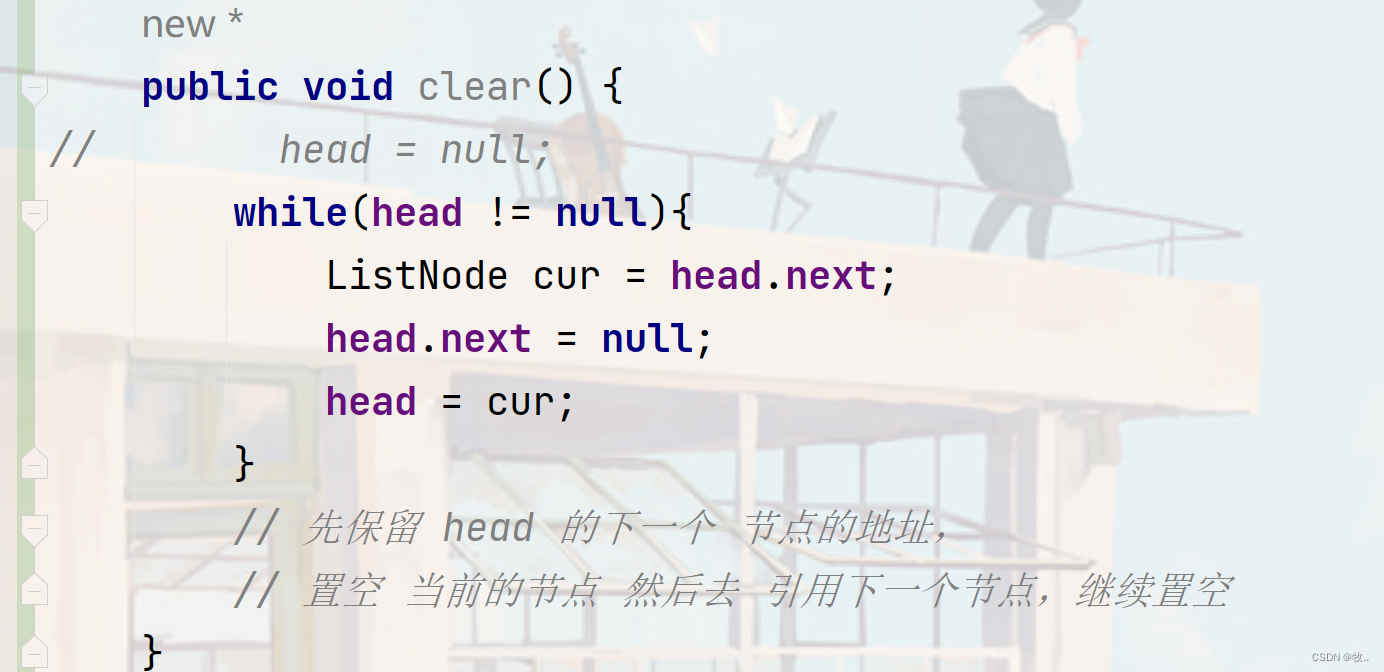
第二种那么就是 ,将每一个节点 的 next 域置为空即可 。
?
2.6.1 粗暴一点的清空方法
?
2.6.2 温柔一点的清空方法
?
附上代码:
import java.util.List;

public class MySingleList {

    private int size;

    static class ListNode {
        // 使用一个静态内部类 创建我们的节点类,通过这个类来创建对象
        public int value; // 注意: 这里我们并不一定是整形类型
        // 也可以别的类型 所以这里可是使用我们的泛型
        public ListNode next;

        public ListNode(int value) {
            this.value = value;
        }
    }

    private ListNode head; // 头节点

    public void create() {
        ListNode listNode1 = new ListNode(12);
        ListNode listNode2 = new ListNode(23);
        ListNode listNode3 = new ListNode(34);
        ListNode listNode4 = new ListNode(45);
        ListNode listNode5 = new ListNode(56);
        listNode1.next = listNode2;
        listNode2.next = listNode3;
        listNode3.next = listNode4;
        listNode5.next = null;
        head = listNode1;
    }

    /**
     * 打印链表里面的数据
     */
    public void display() {
        if (head == null) {
            // 链表为空,无法打印抛出异常 这里省事直接返回
            return;
        }
        ListNode cur = head;
        while (cur != null) {
            System.out.printf(cur.value + " ");
            // 如果是 cur.next != null ,
            // cur 等于了最后的一个节点, cur.next == null 就不会进入循环
            // 那么最后一个值就不会打印
        }
        System.out.println();
    }

    /**
     * 返回单链表长度
     */

    public int size() {
        if (head == null) {
            // head == null 说明 链表为空
            return -1; // 这里同样是可以自定义异常的
        }
        ListNode cur = head;
        int count = 0; // 用来记录当前节点个数
        while (cur != null) {
            count++;
            cur = cur.next;
        }
        return count;
    }

    /**
     * 查找是否包含关键字key是否存在单链表中
     */
    public boolean contains(int key) {
        // 这里我们的 结束循环条件是 cur != null
        // 那么即便 head == null 即 cur == null
        // 那么也进入不了 循环直接返回了 false
        ListNode cur = head;
        while (cur != null) {
            if (cur.value == key) {
                return true;
            }
            cur = cur.next;
        }
        // 走到这里说明 链表已经遍历完成了,还没找到 key 返回false
        return false;
    }

    /**
     * 头插法
     */
    public void addFirst(int data) {
        ListNode cur = new ListNode(data);
        cur.next = head;
        head = cur;
    }

    /**
     * 尾插法
     */
    public void addLast(int data) {
        ListNode cur = new ListNode(data);
        if (head == null) {
            head = cur;
            return;
            // 注意 我们 需要判断链表是否为空
        }

        ListNode cur2 = head;
        while (cur2.next != null) {
            // 如果我们没有判断链表是否为空 ,
            // 那么 null.next 是不是就空指针异常了。
            cur2 = cur2.next;
        }
        // 进行尾插
        cur2.next = cur;
    }

    /**
     * 任意节点插入
     *
     * @param index
     * @param data
     */
    public void addIndex(int index, int data) {
        // 创建 新的节点
        ListNode cur = new ListNode(data);
        // 1.判断 index 位置的合法性
        if (index < 0 || index > size()) {
            // 此时我们需要抛出异常
            throw new IndexWrongFulException("index 位置不合法 !!!!");
        }
        // 2.如果 index == 0 头插
        if (index == 0) {
            // 调用头插的方法
            addFirst(data);
            return;
        }
        // 3. 如果 index == size() 尾插
        if (index == size()) {
            addLast(data);
            return;
        }
        // 4.此时 正常情况(中间插入), 将我们 执行的 代码 封装成一个方法
        // 先 走 index - 1 步
        // cur2 拿到我们的前一个节点
        ListNode cur2 = findIndexSubOne(index);
        cur.next = cur2.next;
        cur2 = cur;
        // 此时就完成了我们的 插入

    }

    private ListNode findIndexSubOne(int index) {
        ListNode cur = head;
        while (index - 1 != 0) {
            cur = cur.next;
            index--;
        }
        return cur;
    }

    public void remove(int key) {
        // 1.判断当前链表是否为空
        if (head == null) {
            return;
        }
        // 2. 特殊情况 头节点是我们的 key 删除头节点
        if (head.value == key) {
            head = head.next;
            return;
        }
        // 3. 之前分析过的
        ListNode cur = findPrevOfKey(key);
        if (cur == null) {
            // 抛出异常 , 这里偷懒直接打印了
            System.out.println("没有你要删除的 " + key);
            return;
        }
        cur.next = cur.next.next;
        // 或则  ListNode show = cur.next;
        // cur.next = show.next;
    }

    // 将找前一个节点 的步骤封装 成一个方法
    public ListNode findPrevOfKey(int key) {
        ListNode cur = head;
        while (cur.next != null) {
            // 这里我们并不需要遍历完
            if (cur.next.value == key) {
                // 此时说明 cur 的下一个节点就是要删除的节点
                return cur;
            }
            cur = cur.next;
        }
        // 此时说明没有找到 返回 null 即可
        return null;
    }


    public void removeAllkey(int key) {
        if (head == null) {
            return;
        }
        ListNode prev = head;
        ListNode cur = prev.next;

        while (cur != null) {
            if (cur.value == key) {
                prev.next = cur.next;
            } else {
                prev.next = cur;
            }
            cur = cur.next;
        }
        // 此时如果头节点 等于 key 删除即可
        if (head.value == key) {
            head = head.next;
        }
    }

    public void clear() {
//        head = null;
        while(head != null){
            ListNode cur = head.next;
            head.next = null;
            head = cur;
        }
        // 先保留 head 的下一个 节点的地址,
        // 置空 当前的节点 然后去 引用下一个节点,继续置空
    }
}
?
这样我们的 单向 不带头不循环的链表就实现完成了, 下面我们就可以来写几道oj题目来看看我们对链表的掌握情况 。
?
链表OJ题目
链接 提供 :
如果上面的题目写完 还 嫌不够的话 ,这里还有 力扣 和牛客 链表的合集 也可以写一些
本文完 : 下文这些 OJ 题目 的讲解。