目录
?2、使用装饰器@pytest.mark.usefixtures()修饰需要运行的用例
用例设计原则
1、文件名以test_*.py文件和*_test.py
2、以test_开头的函数
3、以Test开头的类
4、以test_开头的方法
fixture优势
firture相对于setup和teardown来说应该有以下几点优势
- 命名方式灵活,不局限于setup和teardown这几个命名
- conftest.py 配置里可以实现数据共享,不需要import就能自动找到一些配置
- scope="module" 可以实现多个.py跨文件共享前置, 每一个.py文件调用一次
- scope="session" 以实现多个.py跨文件使用一个session来完成多个用例
- 有独立的命名,并通过声明它们从测试函数、模块、类或整个项目中的使用来激活
- 按模块化的方式实现,每个fixture都可以互相调用
- fixture的范围从简单的单元测试到复杂的功能测试,可以对fixture配置参数,或者跨函数function,类class,模块module或整个测试session范围
fixture的作用范围
fixture里面有个scope参数可以控制fixture的作用范围:session>module>class>function
function:每一个函数或方法都会调用
class:每一个类调用一次,一个类中可以有多个方法
module:每一个.py文件调用一次,该文件内又有多个function和class
session:是多个文件调用一次,可以跨.py文件调用,每个.py文件就是module
fixture源码详解
可以使用装饰器(带或不带参数)来定义fixture功能。 fixture功能的名称可以在以后使用引用它会在运行测试之前调用它:test模块或类可以使用pytest.mark.usefixtures(fixturename)标记。 测试功能可以直接使用fixture名称作为输入参数,在这种情况下,夹具实例从fixture返回功能将被注入。
fixture(scope='function',params=None,autouse=False,ids=None,name=None):
scope:有四个级别参数"function"(默认),"class","module","session"
params:一个可选的参数列表,它将导致多个参数调用fixture功能和所有测试使用它。
autouse:如果True,则为所有测试激活fixture func可以看到它。如果为False则显示需要参考来激活fixture
ids:每个字符串id的列表,每个字符串对应于params这样他们就是测试ID的一部分。如果没有提供ID它们将从params自动生成
name:fixture的名称。这默认为装饰函数的名称。如果fixture在定义它的统一模块中使用,夹具的功能名称将被请求夹具的功能arg遮蔽,解决这个问题的一种方法时将装饰函数命令"fixture_<fixturename>"然后使用"@pytest.fixture(name='<fixturename>')"。
scope四个参数的范围
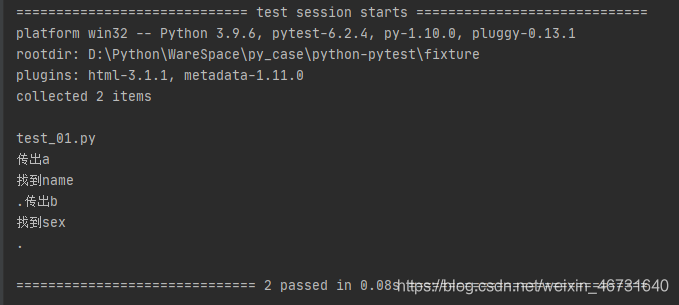
scope="function"
@pytest.fixture()如果不写参数,参数就是scope="function",它的作用范围是每个测试用例来之前运行一次,销毁代码在测试用例之后运行。
示例1:
#scope="function"

import pytest

@pytest.fixture()
def test1():
    a="小明"
    print("\n传出a")
    return a

@pytest.fixture(scope='function')
def test2():
    b="男"
    print("传出b")
    return b

def test3(test1):
    name="小明"
    print("找到name")
    assert test1==name

def test4(test2):
    sex="男"
    print("找到sex")
    assert test2==sex


if __name__ == "__main__":
    pytest.main(["-s", "test_01.py"])
运行结果:

?scope="class"
fixture为class级别的时候,如果一个class里面有多个用例,都调用了次fixture,那么此fixture只在此class里所有用例开始前执行一次。
示例2:
#scope="class"

import pytest

@pytest.fixture(scope="class")
def test1():
    a="小明"
    print("传出了%s,只在class中所有用例只执行一次"%a)
    return a

class Test:
    def test2(self,test1):
        name="小明"
        print("找到name")
        assert test1==name

    def test3(self,test1):
        sex="小明"
        print("找到sex")
        assert test1==sex

if __name__ == "__main__":
    pytest.main(["-s", "test_02.py"])
运行结果:

?scope="module"
fixture为module时,在当前.py脚本里面所有用例开始前只执行一次。
示例3:
#scope="module"

import pytest

@pytest.fixture(scope="module")
def test1():
    a="小明"
    print("\n传出了%s,只在当前py文件中执行一次"%a)
    return a

def test2(test1):
    name="小明"
    print("找到name")
    assert test1==name

class Test():
    def test3(self,test1):
        sex="小明"
        print("找到sex")
        assert test1==sex

if __name__ == "__main__":
    pytest.main(["-s", "test_03.py"])
运行结果:

scope="session"
?fixture为session级别是可以跨.py模块调用的,也就是当我们有多个.py文件的用例的时候,如果多个用例只需调用一次fixture,那就可以设置为scope="session",并且写到conftest.py文件里。
示例4:
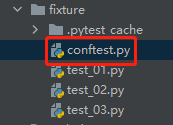
conftest.py文件名称时固定的,pytest会自动识别该文件。放到项目的根目录下就可以全局调用了,如果放到某个package下,那就在改package内有效。
文件目录为:

conftest.py文件:
import pytest

@pytest.fixture(scope="session")
def test1():
    name="小明"
    print("获取到%s"%name)
    return name
新建test_04.py文件:
#scope="session"

import pytest

def test2(test1):
    name="小明"
    print("找到name")
    assert test1==name

if __name__ == "__main__":
    pytest.main(["-s", "test_04.py"])
新建test_05.py文件:
#scope="session"

import pytest

class Test:
    def test3(self,test1):
        sex="小明"
        print("找到sex")
        assert test1==sex

if __name__ == "__main__":
    pytest.main(["-s", "test_04.py"])
需要同时执行两个py文件,?可以在cmd环境下在文件py文件所在目录下执行命令:pytest -s test_04.py test_05.py?
运行结果:

示例5:
如果我想实现以下场景:
用例1需要先登录,用例2不需要登录,用例3需要先登录。自定义测试用例的预置条件。
新建一个文件test_fixture.py:
#coding:utf-8
#实现以下场景:用例1需要先登录,用例2不需要登录,用例3需要先登录

import pytest

# 不带参数时默认scope="function"
@pytest.fixture()
def login():
    print("输入账号、密码先登录")

def test_1(login):
    print("用例1:需要先登录,登录之后进行点击个人中心")
def test_2(login):
    print("用例2:不需要登录")
def test_3(login):
    print("用例3:需要先登录,登录之后点击我的")

if __name__ == "__main__":
    pytest.main(["-s", "test_fixture.py"])
运行结果:

conftest.py
1、配置
1.上面一个案例是在同一个.py文件中,多个用例调用一个登陆功能,如果有多个.py的文件都需要调用这个登陆功能的话,那就不能把登陆写到用例里面去了。
此时应该要有一个配置文件,单独管理一些预置的操作场景,pytest里面默认读取conftest.py里面的配置。
conftest.py配置需要注意以下点:
- conftest.py配置脚本名称是固定的,不能改名称
- conftest.py与运行的用例要在同一个pakage下,并且有__init__.py文件
- 不需要import导入 conftest.py,pytest用例会自动查找
2、作用范围
一个工程下可以建多个conftest.py的文件,一般在工程根目录下设置的conftest文件起到全局作用。在不同子目录下也可以放conftest.py的文件,作用范围只能在改层级以及以下目录生效。
- conftest在不同的层级间的作用域不一样
- conftest是不能跨模块调用的(这里没有使用模块调用)
调用fixture的三种方法
1、函数或类里面方法直接传fixture的函数参数名称
新建test_06.py文件:
#函数或类里面方法直接传fixture的函数参数名称

import pytest

@pytest.fixture()
def test1():
    print("\n开始执行-------")

def test2(test1):
    print("-----用例1执行-----")

class Test:
    def test3(self,test1):
        print("------用例2执行-------")

if __name__ == "__main__":
    pytest.main(["-s", "test_06.py"])
运行结果:
 2、使用装饰器@pytest.mark.usefixtures()修饰需要运行的用例
新建test_07.py文件:
#使用装饰器@pytest.mark.usefixtures()修饰需要运行的用例

import pytest

@pytest.fixture()
def test1():
    print("\n开始执行-------")

@pytest.mark.usefixtures("test1")
def test2():
    print("------用例1开始执行-----")
@pytest.mark.usefixtures("test1")
class Test:
    def test3(self):
        print("------用例2开始执行-----")
    def test4(self):
        print("------用例3开始执行------")

if __name__ == "__main__":
    pytest.main(["-s", "test_07.py"])
运行结果:

3、叠加usefixtures
如果一个方法或者一个class用例想要同时调用多个fixture,可以使用@pytest.mark.usefixture()进行叠加。注意叠加顺序,先执行的放底层,后执行的放上层。
#叠加usefixtures

import pytest

@pytest.fixture()
def test1():
    print("\n开始执行111-------")
@pytest.fixture()
def test2():
    print("\n开始执行222-------")

@pytest.mark.usefixtures("test1")
@pytest.mark.usefixtures("test2")
def test3():
    print("------用例1开始执行-----")

@pytest.mark.usefixtures("test1")
@pytest.mark.usefixtures("test2")
class Test:
    def test4(self):
        print("------用例2开始执行-----")
    def test5(self):
        print("------用例3开始执行------")

if __name__ == "__main__":
    pytest.main(["-s", "test_08.py"])
运行结果:

usefixtures与传fixture区别
?如果fixture有返回值,那么usefixture就无法获取到返回值,这个是装饰器usefixture与用例直接传fixture参数的区别。
当fixture需要用到return出来的参数时,只能讲参数名称直接当参数传入,不需要用到return出来的参数时,两种方式都可以。
fixture自动使用autouse=True
当用例很多的时候,每次都传这个参数,会很麻烦。fixture里面有个参数autouse,默认是False没开启的,可以设置为True开启自动使用fixture功能,这样用例就不用每次都去传参了
autouse设置为True,自动调用fixture功能
新建test_09.py文件:
#fixture自动使用autouse=True

import pytest

@pytest.fixture(scope='module', autouse=True)
def test1():
    print('\n开始执行module-------')

@pytest.fixture(scope='class', autouse=True)
def test2():
    print('\n开始执行class--------')

@pytest.fixture(scope='function', autouse=True)
def test3():
    print('\n开始执行function--------')

def test1():
    print('------用例1执行------')


def test2():
    print('-------用例2执行------')


class Test:
    def test3(self):
        print('------用例3执行------')

    def test4(self):
        print('-------用例4执行-------')


if __name__ == '__main__':
    pytest.main(['-s', 'test_09.py'])
运行结果:
