文章目录
单点登陆系统简介
背景分析
传统的登录系统中,每个站点都实现了自己的专用登录模块。各站点的登录状态相互不认可,各站点需要逐一手工登录。例如:
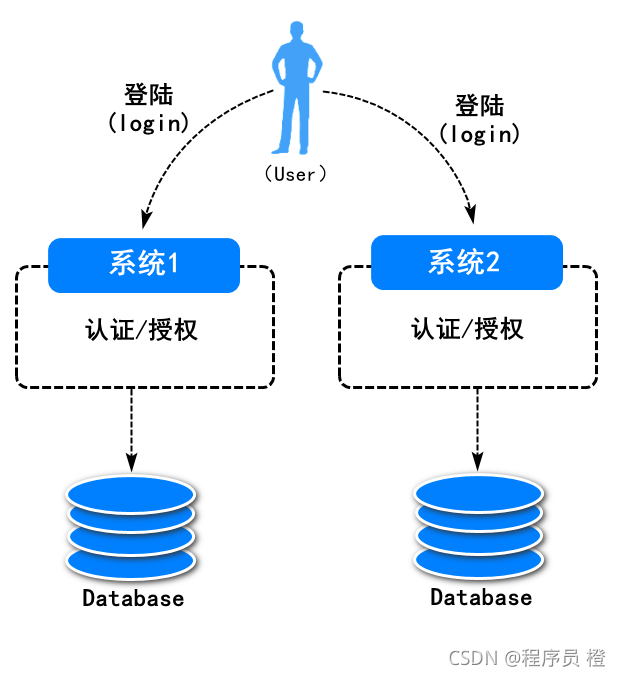
这样的系统,我们又称之为多点登陆系统。应用起来相对繁琐(每次访问资源服务都需要重新登陆认证和授权)。与此同时,系统代码的重复也比较高。由此单点登陆系统诞生。
单点登陆系统概述
单点登录,英文是 Single Sign On(缩写为 SSO)。即多个站点共用一台认证授权服务器,用户在其中任何一个站点登录后,可以免登录访问其他所有站点。而且,各站点间可以通过该登录状态直接交互。例如:
单点登陆系统解决方案设计
解决方案1:用户登陆成功以后,将用户登陆状态存储到redis数据库,例如:
说明,在这套方案中,用户登录成功后,会基于UUID生成一个token,然后与用户信息绑定在一起存储到数据库.后续用户在访问资源时,基于token从数据库查询用户状态,这种方式因为要基于数据库存储和查询用户状态,所以性能表现一般.
解决方案2:用户登陆成功以后,将用户信息存储到token(令牌),然后写到客户端进行存储。(本次设计方案)
说明,在这套方案中,用户登录成功后,会基于JWT技术生成一个token,用户信息可以存储到这个token中.后续用户在访问资源时,对token内容解析,检查登录状态以及权限信息,无须再访问数据库.
单点登录系统初步设计
服务设计
基于单点登陆系统中的业务描述,进行初步服务架构设计,如图所示:
其中,服务基于业务进行划分,系统(system)服务只提供基础数据(例如用户信息,日志信息等),认证服务(auth)负责完成用户身份的校验,密码的比对,资源服务(resource)代表一些业务服务(例如我的订单,我的收藏等等).
工程结构设计
基于服务的划分,设计工程结构如下: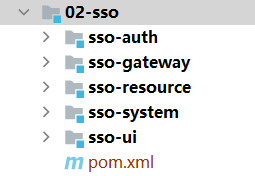
SSO父工程创建及初始化
创建父工程
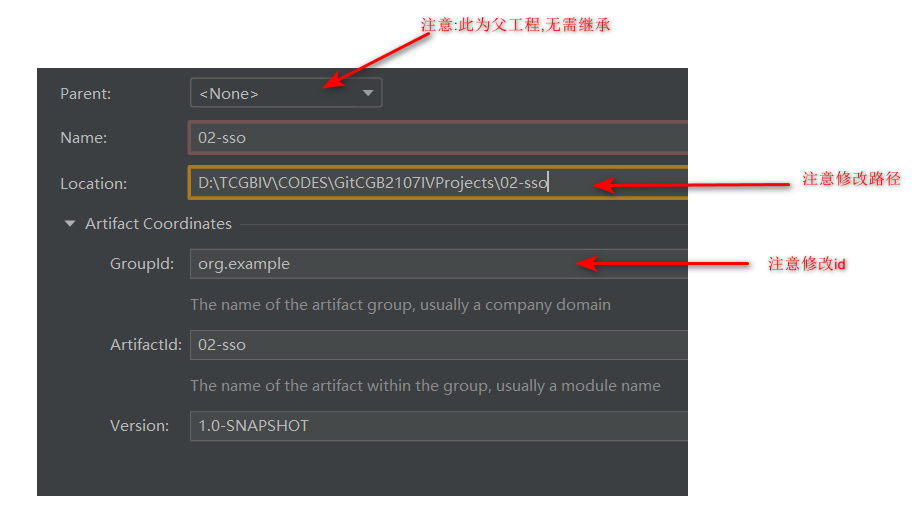
父工程pom文件初始配置
1.添加依赖
    <!--maven父工程的pom文件中一般要定义子模块,
    子工程中所需依赖版本的管理,公共依赖并且父工程的打包方式一般为pom方式-->

    <!--第一步: 定义子工程中核心依赖的版本管理(注意,只是版本管理)-->
    <dependencyManagement>
        <dependencies>
            <!--spring boot 核心依赖版本定义(spring官方定义)-->
            <dependency>
                <groupId>org.springframework.boot</groupId>
                <artifactId>spring-boot-dependencies</artifactId>
                <version>2.3.2.RELEASE</version>
                <type>pom</type>
                <scope>import</scope>
            </dependency>

            <!--Spring Cloud 微服务规范(由spring官方定义)-->
            <dependency>
                <groupId>org.springframework.cloud</groupId>
                <artifactId>spring-cloud-dependencies</artifactId>
                <version>Hoxton.SR9</version>
                <type>pom</type><!--假如scope是import,type必须为pom-->
                <scope>import</scope><!--引入三方依赖的版本设计-->
            </dependency>

            <!--Spring Cloud alibaba 依赖版本管理 (参考官方说明)-->
            <dependency>
                <groupId>com.alibaba.cloud</groupId>
                <artifactId>spring-cloud-alibaba-dependencies</artifactId>
                <version>2.2.6.RELEASE</version>
                <type>pom</type>
                <scope>import</scope>
            </dependency>
        </dependencies>
    </dependencyManagement>
    <!--第二步: 添加子工程的所需要的公共依赖-->
    <dependencies>
        <!--lombok 依赖,子工程中假如需要lombok,不需要再引入-->
        <dependency>
            <groupId>org.projectlombok</groupId>
            <artifactId>lombok</artifactId>
            <scope>provided</scope><!--provided 表示此依赖仅在编译阶段有效-->
        </dependency>
        <!--单元测试依赖,子工程中需要单元测试时,不需要再次引入此依赖了-->
        <dependency>
            <groupId>org.springframework.boot</groupId>
            <artifactId>spring-boot-starter-test</artifactId>
            <scope>test</scope><!--test表示只能在test目录下使用此依赖-->
            <exclusions>
                <exclusion><!--排除一些不需要的依赖-->
                    <groupId>org.junit.jupiter</groupId>
                    <artifactId>junit-jupiter-engine</artifactId>
                </exclusion>
            </exclusions>
        </dependency>
        <!--其它依赖...-->
    </dependencies>
    <!--第三步: 定义当前工程模块及子工程的的统一编译和运行版本-->
    <build><!--项目构建配置,我们基于maven完成项目的编译,测试,打包等操作,
    都是基于pom.xml完成这一列的操作,但是编译和打包的配置都是要写到build元素
    内的,而具体的编译和打包配置,又需要plugin去实现,plugin元素不是必须的,maven
    有默认的plugin配置,常用插件可去本地库进行查看-->
        <plugins>
            <!--通过maven-compiler-plugin插件设置项目
            的统一的jdk编译和运行版本-->
            <plugin>
                <groupId>org.apache.maven.plugins</groupId>
                <artifactId>maven-compiler-plugin</artifactId>
                <!--假如本地库没有这个版本,这里会出现红色字体错误-->
                <version>3.8.1</version>
                <configuration>
                    <source>8</source>
                    <target>8</target>
                </configuration>
            </plugin>
        </plugins>
    </build>
</project>
系统基础服务工程设计及实现
业务描述
本次设计系统服务(System),主要用于提供基础数据服务,例如日志信息,用户信息等。
表结构设计
系统服务模块,基本表结构设计,例如:
添加SQL文件
在02-sso目录下新建一个sql,然后添加jt-sso.sql
添加完之后需要去数据库执行一下sql文件(小黑窗口 source 路径)
创建系统服务工程
1.创建在sso-system目录下创建sso-system工程

2.添加项目依赖
    <dependencies>

        <!--mysql依赖-->
        <dependency>
            <groupId>mysql</groupId>
            <artifactId>mysql-connector-java</artifactId>
        </dependency>

        <!--mybatis plus (简化mybatis操作)-->
        <dependency>
            <groupId>com.baomidou</groupId>
            <artifactId>mybatis-plus-boot-starter</artifactId>
            <version>3.4.3</version>
        </dependency>

        <!--nacos服务注册-->
        <dependency>
            <groupId>com.alibaba.cloud</groupId>
            <artifactId>spring-cloud-starter-alibaba-nacos-discovery</artifactId>
        </dependency>

        <!--nacos服务配置-->
        <dependency>
            <groupId>com.alibaba.cloud</groupId>
            <artifactId>spring-cloud-starter-alibaba-nacos-config</artifactId>
        </dependency>

        <!--SpringWeb 依赖-->
        <dependency>
            <groupId>org.springframework.boot</groupId>
            <artifactId>spring-boot-starter-web</artifactId>
        </dependency>

    </dependencies>
3.在项目中添加bootstrap.yml文件
#端口
server:
  port: 8061

#应用名
spring:
  application:
    name: sso-system

  #服务注册,发现,配置
  cloud:
    nacos:
      discovery:
        server-addr: localhost:8848
      config:
        server-addr: localhost:8848
        file-extension: yml

  #连接数据库的配置
  datasource:
  	#默认端口不为3306时不能使用///来简写,必须写localhost:端口号
    url: jdbc:mysql:///jt-sso?serverTimezone=Asia/Shanghai&characterEncoding=utf8
    username: root
    password: root
    #默认加载
    #driver-class-name: com.mysql.cj.jdbc.Driver

#日志的配置
logging:
  level:
    com.jt: debug
4.创建项目启动类
package com.jt;

import org.springframework.boot.SpringApplication;
import org.springframework.boot.autoconfigure.SpringBootApplication;

/**
 * @author
 * @version 1.0
 * @create 2021/11/19 11:23
 */
@SpringBootApplication
public class SystemApplication {
    public static void main(String[] args) {
        SpringApplication.run(SystemApplication.class,args);
    }
}
然后先启动nacos再启动项目,接着访问nacos网站,检查服务是否注册成功
5.添加数据库测试类,测试数据库是否连接成功
package com.jt;

import org.junit.jupiter.api.Test;
import org.springframework.beans.factory.annotation.Autowired;
import org.springframework.boot.test.context.SpringBootTest;

import javax.sql.DataSource;
import java.sql.Connection;
import java.sql.SQLException;

/**
 * @author
 * @version 1.0
 * @create 2021/11/19 11:31
 *
 * 测试数据库连接
 */
@SpringBootTest
public class DataSourceTests {

    /** HikarDataSource(HikaiCP连接池中的对象)
     *
     * 这里的DataSource为Java官方提供的一个数据源接口,java所有的连接池都会
     * 基于这个接口规范进行设计和实现
     * 这里系统底层会帮我们配置一个HikarCP连接池,因为每次创建链接和销毁链接
     * 占用资源比较多,性能比较差,所以通过连接池实现链接对象的可重用性,所有
     * 池的设计都会采用享元模式(通过池检查对象的创建次数,实现对象的可重用性)
     *
     * 享元模式 */
    @Autowired
    private DataSource dataSource;

    @Test
    void testGetConnection() throws SQLException {
        //从连接池中获取一个连接
        Connection connection = dataSource.getConnection();
        System.out.println(connection);
    }

}
创建Pojo对象逻辑实现类
package com.jt.system.pojo;

import lombok.Data;

import java.io.Serializable;

/**
 * @author
 * @version 1.0
 * @create 2021/11/19 11:49
 */
@Data
public class User implements Serializable {

    /** 生成一个序列化id */
    private static final long serialVersionUID = -7842876778505032479L;
    private Long id;
    private String userName;
    private String password;
    private String status;

}
序列化id生成方法
点击user然后alt加回车,点击第一个选项
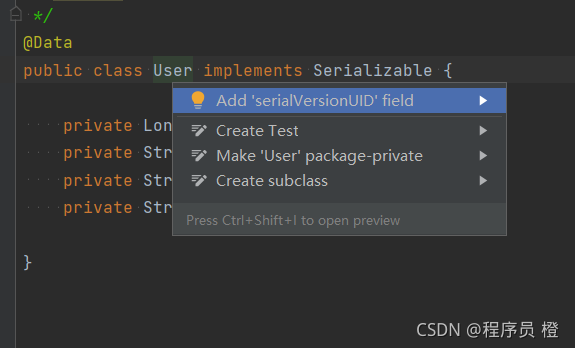
若没有这个选项时:
点击左上角File->Settings->Editor->Inspections 搜索框里查找Seriaizable,找到serialVersionUID打上勾然后应用,然后再试一次

Dao对象逻辑实现
1.创建UserMapper接口,并定义基于用户名查询用户信息
package com.jt.system.dao;

import com.baomidou.mybatisplus.core.mapper.BaseMapper;
import com.jt.system.pojo.User;
import org.apache.ibatis.annotations.Mapper;
import org.apache.ibatis.annotations.Select;

/**
 * @author
 * @version 1.0
 * @create 2021/11/19 14:20
 *
 * dao对象逻辑实现
 */
@Mapper
public interface UserMapper extends BaseMapper<User> {

    /**
     * 基于用户名查询用户信息
     * @param name
     * @return
     */
    @Select("select id,username,password,status  from  tb_users  where  username=#{username}")
    User selectUserByUserName(String name);

}
2.创建UserMapperTests类,对业务方法进行测试
package com.jt;

import com.jt.system.dao.UserMapper;
import com.jt.system.pojo.User;
import org.junit.jupiter.api.Test;
import org.springframework.beans.factory.annotation.Autowired;
import org.springframework.boot.test.context.SpringBootTest;

/**
 * @author
 * @version 1.0
 * @create 2021/11/19 14:25
 */
@SpringBootTest
public class UserMapperTests {

    @Autowired
    private UserMapper userMapper;

    @Test
    void testSelectUserByUsername(){
        User user = userMapper.selectUserByUserName("admin");
        System.out.println(user);
    }

}
Service对象逻辑实现
创建UserService接口及实现类,定义用户及用户权限查询逻辑
1.定义service接口
package com.jt.system.service;

import com.jt.system.pojo.User;

import java.util.List;

/**
 * @author
 * @version 1.0
 * @create 2021/11/19 15:52
 */
public interface UserService {

    /**
     * 基于用户名查询用户信息
     * @param name
     * @return
     */
    User selectUserByUserName(String name);

    /**
     * 基于用户ID查询用户权限
     * @param userId
     * @return
     */
    List<String> selectUserPermissions(Long userId);


}
2.定义service接口实现类
package com.jt.system.service.impl;

import com.jt.system.dao.UserMapper;
import com.jt.system.pojo.User;
import com.jt.system.service.UserService;
import org.springframework.beans.factory.annotation.Autowired;
import org.springframework.stereotype.Service;

import java.util.List;

/**
 * @author
 * @version 1.0
 * @create 2021/11/19 15:54
 */
@Service
public class UserServiceImpl implements UserService {


    @Autowired
    private UserMapper userMapper;

    @Override
    public User selectUserByUserName(String name) {
        return userMapper.selectUserByUserName(name);
    }

    @Override
    public List<String> selectUserPermissions(Long userId) {
        //方案一: 在这里可以调用数据层的单表查询方法,查询三次获取用户信息
        //方案二: 在这里可以调用数据层的多表嵌套或多表关联方法执行1次查询
        return userMapper.selectUserPermissions(userId);
    }
}
Controller对象逻辑实现
package com.jt.system.controller;

import com.jt.system.pojo.User;
import com.jt.system.service.UserService;
import org.springframework.beans.factory.annotation.Autowired;
import org.springframework.web.bind.annotation.GetMapping;
import org.springframework.web.bind.annotation.PathVariable;
import org.springframework.web.bind.annotation.RequestMapping;
import org.springframework.web.bind.annotation.RestController;

import java.util.List;

/**
 * @author
 * @version 1.0
 * @create 2021/11/19 15:57
 */
@RestController
@RequestMapping("/user")
public class UserController {

    @Autowired
    private UserService userService;


    /**
     * 基于用户名查询用户信息,后续在sso-auth服务中会对这个方法进行远程调用
     * @param username
     * @return
     */
    @GetMapping("/login/{username}")
    public User doSelectUserByUsername(@PathVariable("username") String username){
        return userService.selectUserByUserName(username);
    }


    /**
     * 基于yonghuId查询用户权限,后续会在sso-auth工程中对此方法进行远程调用
     * @param userId
     * @return
     */
    @GetMapping("/permission/{userId}")
    public List<String> doSelectUserPermissions(@PathVariable("userId") Long userId ){
        return userService.selectUserPermissions(userId);
    }

}
启动服务访问测试
1.使用postman进行测试


2.使用IDEA进行测试

统一认证工程设计及实现
业务描述
用户登录时调用此工程对用户身份进行统一身份认证和授权
创建工程及初始化
1.创建sso-auth工程

2.添加依赖
   <dependencies>

        <!--SpringWeb-->
        <dependency>
            <groupId>org.springframework.boot</groupId>
            <artifactId>spring-boot-starter-web</artifactId>
        </dependency>

        <!--nacos服务注册-->
        <dependency>
            <groupId>com.alibaba.cloud</groupId>
            <artifactId>spring-cloud-starter-alibaba-nacos-discovery</artifactId>
        </dependency>

        <!--nacos服务配置-->
        <dependency>
            <groupId>com.alibaba.cloud</groupId>
            <artifactId>spring-cloud-starter-alibaba-nacos-config</artifactId>
        </dependency>

        <!--sso技术方案:SpringSecurity+JWT+oauth2-->
        <dependency>
            <groupId>org.springframework.cloud</groupId>
            <artifactId>spring-cloud-starter-oauth2</artifactId>
        </dependency>

        <!--openFeign-->
        <dependency>
            <groupId>org.springframework.cloud</groupId>
            <artifactId>spring-cloud-starter-openfeign</artifactId>
        </dependency>

    </dependencies>
3.添加bootstrap.yml配置文件
#端口
server:
  port: 8071

spring:
  application:
    name: sso-auth
  cloud:
    nacos:
      discovery:
        server-addr: localhost:8848
      config:
        server-addr: localhost:8848
4.创建项目启动类
package com.jt;

import org.springframework.boot.SpringApplication;
import org.springframework.boot.autoconfigure.SpringBootApplication;
import org.springframework.cloud.openfeign.EnableFeignClients;

/**
 * @author
 * @version 1.0
 * @create 2021/11/19 16:54
 */
@EnableFeignClients
@SpringBootApplication
public class AuthApplication {
    public static void main(String[] args) {
        SpringApplication.run(AuthApplication.class,args);
    }
}
启动并访问项目
运行启动类,然后控制台会出现一串密码

然后在浏览器地址栏输入http://localhost:8071,会出现一个登录页面
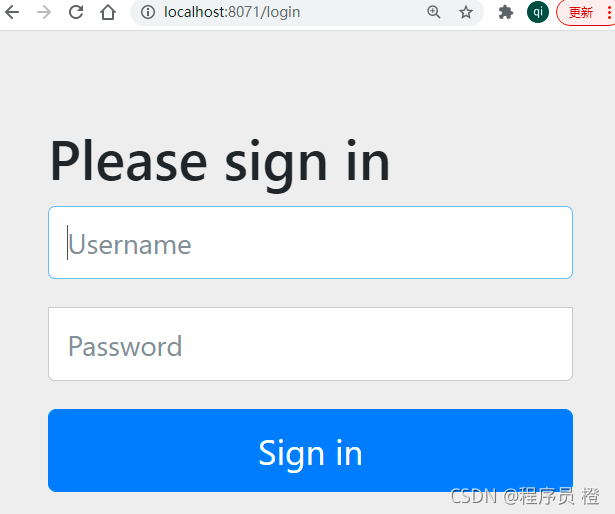
其中,默认用户名为user,密码为系统启动时,在控制台呈现的密码。执行登陆测试,登陆成功进入如下界面(因为没有定义登陆页面,所以会出现404):
若是需要展示页面可以在resources目录下新建一个static目录,并在static目录下新建一个index.html
定义用户信息处理对象
1.定义User对象,用于封装从数据库查询到的用户信息
package com.jt.auth.pojo;

import lombok.AllArgsConstructor;
import lombok.Data;
import lombok.NoArgsConstructor;

import java.io.Serializable;
import java.util.List;

/**
 * @author
 * @version 1.0
 * @create 2021/11/22 9:05
 *
 * Fegin远程调用接口,再次接口中对sso-system服务进行远程调用
 */
@Data
@AllArgsConstructor
@NoArgsConstructor
public class User implements Serializable {

    private static final long serialVersionUID = 1464970784627633041L;
    private Long id;
    private String username;
    private String password;
    private String status;
    private List<String> permissions;

}
2.定义远程Service对象,用于实现远程用户信息调用
package com.jt.auth.service;


import org.springframework.cloud.openfeign.FeignClient;
import org.springframework.web.bind.annotation.GetMapping;
import com.jt.auth.pojo.User;
import org.springframework.web.bind.annotation.PathVariable;

import java.util.List;

/**
 * @author
 * @version 1.0
 * @create 2021/11/22 9:07
 * Feign远程调用接口,在此接口中对sso-system服务进行远程调用.
 *
 */
@FeignClient(value = "sso-system",contextId = "remoteUserService")
public interface RemoteUserService {

    /**
     * 基于用户名查询用户信息
     * @param username
     * @return
     */
    @GetMapping("/user/login/{username}")
    User selectUserByUsername(@PathVariable("username") String username);

    /**
     * 基于用户id查询用户权限
     * @param userId
     * @return
     */
    @GetMapping("/user/permission/{userId}")
    List<String> selectUserPermissions(@PathVariable("userId") Long userId);

}
3.定义用户登录业务逻辑处理对象
package com.jt.auth.service;

import lombok.extern.slf4j.Slf4j;
import org.springframework.beans.factory.annotation.Autowired;
import org.springframework.security.core.authority.AuthorityUtils;
import org.springframework.security.core.userdetails.User;
import org.springframework.security.core.userdetails.UserDetails;
import org.springframework.security.core.userdetails.UserDetailsService;
import org.springframework.security.core.userdetails.UsernameNotFoundException;
import org.springframework.stereotype.Service;

import java.util.List;

/**
 * @author
 * @version 1.0
 * @create 2021/11/22 10:15
 *
 * 在此对象中实现远程服务调用,从sso-system服务中获取用户信息,
 * 并对用户信息进行封装返回,交给认证管理器(AuthenticationManager)
 * 去完成密码的比对操作
 * request->filter->servlet ->handler interceptor->controller
 */
@Slf4j
@Service
public class UserDetailServiceImpl implements UserDetailsService {


    @Autowired
    private RemoteUserService remoteUserService;


    /**
     * 我们执行登录操作时,提交登录按钮系统会调用此方法
     * @param username 来自客户端用户提交的用户名
     * @return 封装了登录用户信息以及用户权限信息的一个对象,
     * 返回的UserDetails对象最终会交给认证管理器.
     * @throws UsernameNotFoundException
     */
    @Override
    public UserDetails loadUserByUsername(String username) throws UsernameNotFoundException {

        //1.基于用户名查找用户信息,判定用户是否存在
        com.jt.auth.pojo.User remoteUser=
                remoteUserService.selectUserByUsername(username);

        if(remoteUser==null) {
            throw new UsernameNotFoundException("user is not exist");
        }

        //2.基于用户id查询用户权限(登录用户不一定可以访问所有资源)
        final List<String> permissions =
                remoteUserService.selectUserPermissions(remoteUser.getId());

        //sys:res:create,sys:res:delete
        log.debug("permissions: {}",permissions.toString());

        //3.封装查询结果并返回.
        return new User(username,remoteUser.getPassword(),
                AuthorityUtils.createAuthorityList(
                        permissions.toArray(new String[]{})));

        //你怎么知道这里可以new User对象?查UserDetailsService接口实现类
    }
}
定义Security配置类
定义Spring Security配置类,在此类中配置认证规则
package com.jt.auth.config;

import org.springframework.context.annotation.Bean;
import org.springframework.context.annotation.Configuration;
import org.springframework.security.config.annotation.web.builders.HttpSecurity;
import org.springframework.security.config.annotation.web.configuration.WebSecurityConfigurerAdapter;
import org.springframework.security.crypto.bcrypt.BCryptPasswordEncoder;
import org.springframework.security.crypto.password.PasswordEncoder;


/**
 * @author
 * @version 1.0
 * @create 2021/11/22 9:31
 */
@Configuration
public class SecurityConfig extends WebSecurityConfigurerAdapter {

    /**
     * HttpSession (user info)
     * Cookie
     * response 将cookie(cookie中的内容为session对象id)写到客户端
     * browser-->request(cookie)-->server-->httpSession-->user
     */

    /**
     * 构建密码加密对象,登录时,系统底层会基于此对象进行密码加密
     * @return
     */
    @Bean
    public PasswordEncoder passwordEncoder(){
        return new BCryptPasswordEncoder();
    }


    @Override
    protected void configure(HttpSecurity http) throws Exception {
        super.configure(http);

        /**
        //1.关闭跨域攻击(先记住就这么写)
        http.csrf().disable();

        //2.放行所有请求url
        http.authorizeRequests().anyRequest().permitAll();
        //这种形式表示要认证
        http.authorizeRequests().mvcMatchers("/**").authenticated();

        //3.配置登录成功和失败处理器
        http.formLogin().successHandler(null).failureHandler(null);
        */
    }

}
基于Postman进行访问测试
启动Nacos,sso-system,sso-auth服务,然后基于postman访问网关,执行登录测试
Security认证流程分析
目前的登陆操作,也就是用户的认证操作,其实现主要基于Spring Security框架其认证简易流程如下:

构建令牌生成及配置对象
本次我们借助JWT(Json Web Token-是一种json格式)方式将用户相关信息进行组织和加密,并作为响应令牌(Token),从服务端响应到客户端,客户端接收到这个JWT令牌之后,将其保存在客户端(例如localStorage),然后携带令牌访问资源服务器,资源服务器获取并解析令牌的合法性,基于解析结果判定是否允许用户访问资源.
package com.jt.auth.config;

import org.springframework.context.annotation.Bean;
import org.springframework.context.annotation.Configuration;
import org.springframework.security.oauth2.provider.token.TokenStore;
import org.springframework.security.oauth2.provider.token.store.JwtAccessTokenConverter;
import org.springframework.security.oauth2.provider.token.store.JwtTokenStore;

/**
 * @author
 * @version 1.0
 * @create 2021/11/23 19:53
 *
 * 构建令牌配置对象,在微服务架构中,登录成功后,可以将用户信息进行存储,常用存储方式有如下几种:
 * 1)产生一个随机字符串(token),然后基于此字符串将用户信息存储到关系数据库(例如mysql)
 * 2)产生一个随机字符串(token),然后基于此字符串将用户信息存储到内存数据库(例如redis)
 * 3)基于JWT创建令牌(Token),在此令牌中存储我们的用户信息,这个令牌不需要写到数据库,在客户端存储即可
 *
 * 基于如上设计方案,Oauth2协议中给出了具体的API实现对象,例如:
 * 1)JdbcTokenStore  (用的比较少,这里是要将token存储到关系型数据库)
 * 2)RedisTokenStore  (中型应用,这是要将token存储到redis数据库-key/value)
 * 3)JwtTokenStore   (对性能要求比较高的分布式架构,  这里是将产生的token信息存储客户端,并且token中可以以自包含的形式存储一些用户信息)
 */
@Configuration
public class TokenConfig {

    /** 这里的签名key将来可以写到配置中心 */
    private static final String SIGNING_KEY = "auth";


    /**
     * 定义令牌存储方案,本次选择基于JWT令牌方式存储用户状态
     * @return
     */
    @Bean
    public TokenStore tokenStore(){
        return new JwtTokenStore(jwtAccessTokenConverter());
    }


    /**
     * 配置JWT令牌创建和解析对象
     * @return
     */
    @Bean
    public JwtAccessTokenConverter jwtAccessTokenConverter(){
        JwtAccessTokenConverter converter = new JwtAccessTokenConverter();
        converter.setSigningKey(SIGNING_KEY);
        return converter;
    }

}
定义Oauth2认证授权配置
第一步:所有零件准备好了开始拼装最后的主体部分,这个主体部分就是授权服务器的核心配置
package com.jt.auth.config;

import lombok.AllArgsConstructor;
import org.springframework.context.annotation.Bean;
import org.springframework.context.annotation.Configuration;
import org.springframework.http.HttpMethod;
import org.springframework.security.authentication.AuthenticationManager;
import org.springframework.security.crypto.password.PasswordEncoder;
import org.springframework.security.oauth2.config.annotation.configurers.ClientDetailsServiceConfigurer;
import org.springframework.security.oauth2.config.annotation.web.configuration.AuthorizationServerConfigurerAdapter;
import org.springframework.security.oauth2.config.annotation.web.configuration.EnableAuthorizationServer;
import org.springframework.security.oauth2.config.annotation.web.configurers.AuthorizationServerEndpointsConfigurer;
import org.springframework.security.oauth2.config.annotation.web.configurers.AuthorizationServerSecurityConfigurer;
import org.springframework.security.oauth2.provider.token.*;

import java.util.Arrays;

/**
 * @author
 * @version 1.0
 * @create 2021/11/23 20:36
 *
 * 在这个对象中负责将所有的认证和授权相关配置进行整合,例如
 * 业务方面:
 * 1)如何认证(认证逻辑的设计)
 * 2)认证通过以后如何颁发令牌(令牌的规范)
 * 3)为谁颁发令牌(客户端标识,client_id,...)
 * 技术方面:
 * 1)SpringSecurity (提供认证和授权的实现)
 * 2)TokenConfig(提供了令牌的生成,存储,校验)
 * 3)Oauth2(定义了一套认证规范,例如为谁发令牌,都发什么,...)
 *
 *
 * @EnableAuthorizationServer 启动认证和授权
 */
@Configuration
@EnableAuthorizationServer
@AllArgsConstructor
public class Oauth2Config extends AuthorizationServerConfigurerAdapter {

    /** 第一种赋值操作 @Autowired
     *  第二种赋值操作 @AllArgsConstructor 全参构造
     * */
    /**  @Autowired  */
    private AuthenticationManager authenticationManager;
    /**  @Autowired
    private UserDetailsService userDetailsService;
     */
    /**  @Autowired  */
    private TokenStore tokenStore;
    /**  @Autowired  */
    private TokenEnhancer  jwtAccessTokenConverter;
    /**  Autowired  */
    private PasswordEncoder passwordEncoder;


    /**
    @Autowired
    public Oauth2Config(AuthenticationManager authenticationManager, UserDetailsService userDetailsService, TokenStore tokenStore, JwtAccessTokenConverter jwtAccessTokenConverter, PasswordEncoder passwordEncoder) {
        this.authenticationManager = authenticationManager;
        this.userDetailsService = userDetailsService;
        this.tokenStore = tokenStore;
        this.jwtAccessTokenConverter = jwtAccessTokenConverter;
        this.passwordEncoder = passwordEncoder;
    } */

    /**
     * 配置认证规则
     * @param endpoints
     * @throws Exception
     */
    @Override
    public void configure(AuthorizationServerEndpointsConfigurer endpoints) throws Exception {
        //super.configure(endpoints);

        endpoints
                //配置由谁完成认证?(认证管理器)
                .authenticationManager(authenticationManager)
                //配置由谁负责查询用户业务数据(认证时需要两部分信息:一部分来自客户端,一部分来自数据库)  可写可不写
                //.userDetailsService(userDetailsService)
                //配置可以处理的认证请求方式(可选,默认只能处理post请求)
                .allowedTokenEndpointRequestMethods(HttpMethod.GET,HttpMethod.POST)
                //配置token生成及存储策略(默认是UUID~随机的字符串)  可选
                .tokenServices(tokenServices());

    }


    @Bean
    public AuthorizationServerTokenServices tokenServices(){

        //1.创建授权令牌服务对象( TokenServices  此对象提供了创建,获取,刷新token的方法)
        DefaultTokenServices tokenServices = new DefaultTokenServices();

        //2.配置令牌的创建和存储对象(TokenStore)
        tokenServices.setTokenStore(tokenStore);

        //3.配置令牌增强(默认令牌的生成非常简单,使用的就是UUID)
        //默认令牌会比较简单,没有业务数据,就是简单随机字符串,但现在希望使用jwt方式)
        TokenEnhancerChain tokenEnhancerChain = new TokenEnhancerChain();
        tokenEnhancerChain.setTokenEnhancers(Arrays.asList(jwtAccessTokenConverter));
        tokenServices.setTokenEnhancer(tokenEnhancerChain);

        //4.设置令牌有效时间  1小时    默认为12小时
        tokenServices.setAccessTokenValiditySeconds(3600);

        //5.设置令牌刷新策略(是否支持使用刷新令牌再生成新令牌)
        tokenServices.setSupportRefreshToken(true);

        //6.设置刷新令牌有效时长?   5小时
        tokenServices.setRefreshTokenValiditySeconds(3600*5);

        return tokenServices;
    }

    //思考:
    //1)你对谁颁发令牌?(对客户端有没有要求,假如有是不是需要进行配置)
    //2)你访问那个路径时帮你颁发令牌?需要对外暴露认证路径(定义颁发令牌的路径,解析令牌的路径,校验令牌的路径)


    /**
     * 我们的认证服务不是对任意客户端都要颁发令牌,是有条件的
     *
     * 通过此方法配置对谁颁发令牌?客户端需要什么特点
     * @param clients   定义客户端的配置
     * @throws Exception
     */
    @Override
    public void configure(ClientDetailsServiceConfigurer clients) throws Exception {
        //super.configure(clients);

        clients.inMemory()
                //客户端要携带的id(客户端访问此服务时要携带的id,这个是自己定义的字符串)
                .withClient("gateway-client")
                //定义客户端要携带的秘钥(这个密钥也是官方定义的一个规则,客户端需要携带,字符串)
                .secret(passwordEncoder.encode("123456"))
                //定义作用范围(所有符合定义规则的客户端,例如client,secret...   all是默认值)  针对所有带有id以及秘钥的客户端
                .scopes("all")
                //定义允许的认证方式(可以基于密码进行认证,也可以基于刷新令牌进行认证)
                .authorizedGrantTypes("password","refresh_token");

    }


    /**
     * 我们登录时要对哪个url发起请求,通过哪个url可以解析令牌等?
     *
     * 配置要对外暴露的认证url,刷新令牌的url,检查令牌的url等
     * @param security
     * @throws Exception
     */
    @Override
    public void configure(AuthorizationServerSecurityConfigurer security) throws Exception {
        //super.configure(security);

        security
                //公开认证的url     系统底层暴露给我们的uri  /oauth/token   可选
                //.tokenKeyAccess("permitAll()")
                //公开检查token有效性的url
                .checkTokenAccess("permitAll()")
                //允许通过表单提交方式进行认证
                .allowFormAuthenticationForClients();

    }
}
启动postman进行访问测试
登陆访问测试

登录成功以后,会在postman控制台显示如下信息:
{
    "access_token": "eyJhbGciOiJIUzI1NiIsInR5cCI6IkpXVCJ9.eyJleHAiOjE2MzgxNjE0MzUsInVzZXJfbmFtZSI6ImFkbWluIiwiYXV0aG9yaXRpZXMiOlsic3lzOnJlczpjcmVhdGUiLCJzeXM6cmVzOmxpc3QiLCJzeXM6cmVzOmRlbGV0ZSJdLCJqdGkiOiI2YTFlM2JlMC00YmRkLTQwYWEtYWUwYi01ZGFlMDc2MGNmMmYiLCJjbGllbnRfaWQiOiJnYXRld2F5LWNsaWVudCIsInNjb3BlIjpbImFsbCJdfQ.fNrcl5wFHxdnm6zTUhCZruEye7IuLa_wxJUSgbSropw",
    "token_type": "bearer",
    "refresh_token": "eyJhbGciOiJIUzI1NiIsInR5cCI6IkpXVCJ9.eyJ1c2VyX25hbWUiOiJhZG1pbiIsInNjb3BlIjpbImFsbCJdLCJhdGkiOiI2YTFlM2JlMC00YmRkLTQwYWEtYWUwYi01ZGFlMDc2MGNmMmYiLCJleHAiOjE2MzgxNzU4MzUsImF1dGhvcml0aWVzIjpbInN5czpyZXM6Y3JlYXRlIiwic3lzOnJlczpsaXN0Iiwic3lzOnJlczpkZWxldGUiXSwianRpIjoiYTg5MGQ1ODQtZGIwMy00NDViLWJhNzktZDJhN2RiYTk5M2QyIiwiY2xpZW50X2lkIjoiZ2F0ZXdheS1jbGllbnQifQ.KCENeV8OSoXpzXN9aGrK2VXd5rx0RC5-FTBm24HjWkU",
    "expires_in": 3599,
    "scope": "all",
    "jti": "6a1e3be0-4bdd-40aa-ae0b-5dae0760cf2f"
}
检查token信息:

请求访问成功会在postman控制台显示如下信息:
{
    "user_name": "admin",
    "scope": [
        "all"
    ],
    "active": true,
    "exp": 1635680023,
    "authorities": [
        "sys:res:create",
        "sys:res:list",
        "sys:res:delete"
    ],
    "jti": "ce4aaee8-031f-4ff8-a0fe-e0cd93e8f374",
    "client_id": "gateway-client"
}
刷新令牌应用测试:

请求访问成功会在postman控制台显示如下信息:
{
    "access_token": "eyJhbGciOiJIUzI1NiIsInR5cCI6IkpXVCJ9.eyJleHAiOjE2MzgxNjk0MTIsInVzZXJfbmFtZSI6ImFkbWluIiwiYXV0aG9yaXRpZXMiOlsic3lzOnJlczpjcmVhdGUiLCJzeXM6cmVzOmxpc3QiLCJzeXM6cmVzOmRlbGV0ZSJdLCJqdGkiOiIzYzczNWZhZi1jZjYzLTRiYmEtOGUxYy1iOTc2MWZmMGU2ZGEiLCJjbGllbnRfaWQiOiJnYXRld2F5LWNsaWVudCIsInNjb3BlIjpbImFsbCJdfQ.NidtPQDK-H_ULL_PDdP4jeL8drgQDXQgTNIZulmKsdA",
    "token_type": "bearer",
    "refresh_token": "eyJhbGciOiJIUzI1NiIsInR5cCI6IkpXVCJ9.eyJ1c2VyX25hbWUiOiJhZG1pbiIsInNjb3BlIjpbImFsbCJdLCJhdGkiOiIzYzczNWZhZi1jZjYzLTRiYmEtOGUxYy1iOTc2MWZmMGU2ZGEiLCJleHAiOjE2MzgxNzU4MzUsImF1dGhvcml0aWVzIjpbInN5czpyZXM6Y3JlYXRlIiwic3lzOnJlczpsaXN0Iiwic3lzOnJlczpkZWxldGUiXSwianRpIjoiYTg5MGQ1ODQtZGIwMy00NDViLWJhNzktZDJhN2RiYTk5M2QyIiwiY2xpZW50X2lkIjoiZ2F0ZXdheS1jbGllbnQifQ.6tZNxdNj4W_dBH6_m28grTDmn9GVpWDp2Q4D353h_Ss",
    "expires_in": 3599,
    "scope": "all",
    "jti": "3c735faf-cf63-4bba-8e1c-b9761ff0e6da"
}
资源服务工程设计及实现
服务描述
资源服务工程为一个业务数据工程,此工程中数据在访问通常情况下时受限访问,例如有些资源有用户,都可以访问,有些资源必须认证后才可以访问,有些资源认证后,有权限才可以访问.
业务设计架构
用户访问资源时的认证,授权流程设计如下: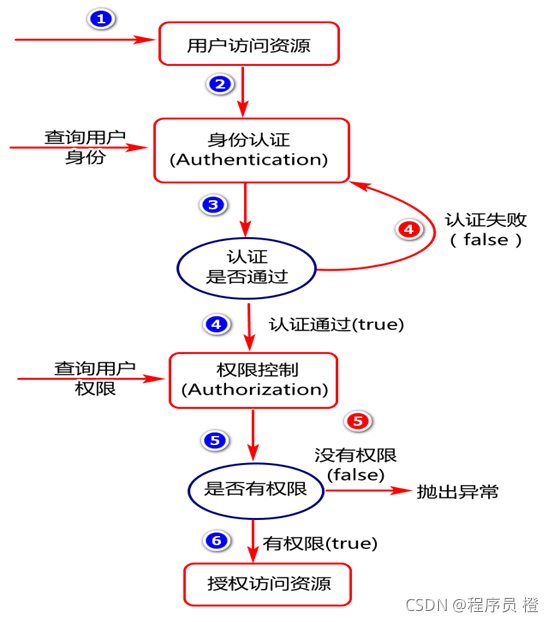
项目创建及初始化
1.创建工程:

2.初始化文件依赖
<dependencies>

            <dependency>
                <groupId>org.springframework.boot</groupId>
                <artifactId>spring-boot-starter-web</artifactId>
            </dependency>

            <dependency>
                <groupId>com.alibaba.cloud</groupId>
                <artifactId>spring-cloud-starter-alibaba-nacos-discovery</artifactId>
            </dependency>

            <dependency>
                <groupId>com.alibaba.cloud</groupId>
                <artifactId>spring-cloud-starter-alibaba-nacos-config</artifactId>
            </dependency>

            <dependency>
                <groupId>com.alibaba.cloud</groupId>
                <artifactId>spring-cloud-starter-alibaba-sentinel</artifactId>
            </dependency>

            <!--在资源服务器添加此依赖,只做授权,不做认证,添加完此依赖以后,
        在项目中我们要做哪些事情?对受限访问的资源可以先判断是否登录了,
        已经认证用户还要判断是否有权限?
        -->
            <dependency>
                <groupId>org.springframework.cloud</groupId>
                <artifactId>spring-cloud-starter-oauth2</artifactId>
            </dependency>

        </dependencies>
3.创建bootstrap.yml配置文件
server:
  port: 8881
spring:
  application:
    name: sso-resource
  cloud:
    nacos:
      discovery:
        server-addr: localhost:8848
      config:
        server-addr: localhost:8848
        file-extension: yml
4.创建启动类
package com.jt;

import org.springframework.boot.SpringApplication;
import org.springframework.boot.autoconfigure.SpringBootApplication;

/**
 * @author
 * @version 1.0
 * @create 2021/11/30 9:34
 *
 *
 * 如何理解这个资源工程?主要是与业务数据数据相关的一个工程
 * 如何设计对这个资源工程访问?
 * 1)有些资源可以直接访问,无需认证
 * 2)有些资源必须认证以后才可以访问
 * 3)有些资源认证以后,还必须有权限才可以访问
 */
@SpringBootApplication
public class ResourceApplication {
    public static void main(String[] args) {
        SpringApplication.run(ResourceApplication.class,args);
    }
}
创建资源Controller对象
package com.jt.resource.controller;

import org.springframework.security.access.prepost.PreAuthorize;
import org.springframework.web.bind.annotation.*;

/**
 * @author
 * @version 1.0
 * @create 2021/11/30 9:39
 */
@RestController
@RequestMapping("/resource")
public class ResourceController {


    /**
     * 查询资源
     * @return
     */
    @PreAuthorize("hasAnyAuthority('sys:res:list')")
    @GetMapping("/select")
    public String doSelect(){
        return "Select Resource OK";
    }


    /**
     * 删除资源
     * @return
     */
    @PreAuthorize("hasAnyAuthority('sys:res:delete')")
    @DeleteMapping("/delete")
    public String doDelete(){
        return "Delete Resource OK";
    }


    /**
     * 新增数据
     * @return
     */
    @PreAuthorize("hasAnyAuthority('sys:res:create')")
    @PostMapping("/insert")
    public String doInsert(){
        return "Insert Resource OK";
    }


    /**
     * 修改数据
     * @return
     */
    @PreAuthorize("hasAnyAuthority('sys:res:update')")
    @PutMapping("/update")
    public String doUpdate(){
        return "Update Resource OK";
    }

}
配置令牌解析器对象
package com.jt.resource.config;

import org.springframework.context.annotation.Bean;
import org.springframework.context.annotation.Configuration;
import org.springframework.security.oauth2.provider.token.TokenStore;
import org.springframework.security.oauth2.provider.token.store.JwtAccessTokenConverter;
import org.springframework.security.oauth2.provider.token.store.JwtTokenStore;

/**
 * @author
 * @version 1.0
 * @create 2021/11/23 19:53
 *
 * 构建令牌配置对象,在微服务架构中,登录成功后,可以将用户信息进行存储,常用存储方式有如下几种:
 * 1)产生一个随机字符串(token),然后基于此字符串将用户信息存储到关系数据库(例如mysql)
 * 2)产生一个随机字符串(token),然后基于此字符串将用户信息存储到内存数据库(例如redis)
 * 3)基于JWT创建令牌(Token),在此令牌中存储我们的用户信息,这个令牌不需要写到数据库,在客户端存储即可
 *
 * 基于如上设计方案,Oauth2协议中给出了具体的API实现对象,例如:
 * 1)JdbcTokenStore  (用的比较少,这里是要将token存储到关系型数据库)
 * 2)RedisTokenStore  (中型应用,这是要将token存储到redis数据库-key/value)
 * 3)JwtTokenStore   (对性能要求比较高的分布式架构,  这里是将产生的token信息存储客户端,并且token中可以以自包含的形式存储一些用户信息)
 */
@Configuration
public class TokenConfig {

    /** 这里的签名key将来可以写到配置中心 */
    private static final String SIGNING_KEY = "auth";


    /**
     * 定义令牌存储方案,本次选择基于JWT令牌方式存储用户状态
     * @return
     */
    @Bean
    public TokenStore tokenStore(){
        return new JwtTokenStore(jwtAccessTokenConverter());
    }


    /**
     * 配置JWT令牌创建和解析对象
     * @return
     */
    @Bean
    public JwtAccessTokenConverter jwtAccessTokenConverter(){
        JwtAccessTokenConverter converter = new JwtAccessTokenConverter();
        converter.setSigningKey(SIGNING_KEY);
        return converter;
    }

}
配置资源认证授权规则
package com.jt.resource.config;

import org.springframework.context.annotation.Configuration;
import org.springframework.security.config.annotation.method.configuration.EnableGlobalMethodSecurity;
import org.springframework.security.config.annotation.web.builders.HttpSecurity;
import org.springframework.security.oauth2.config.annotation.web.configuration.EnableResourceServer;
import org.springframework.security.oauth2.config.annotation.web.configuration.ResourceServerConfigurerAdapter;

/**
 * @author
 * @version 1.0
 * @create 2021/11/30 9:52
 *
 * @EnableResourceServer 启动资源服务默认配置
 * @EnableGlobalMethodSecurity(prePostEnabled = true) 访问资源服务器中的相关方法(@PreAuthorize注解描述的方法)时启动权限检查
 */
@EnableResourceServer
@Configuration
@EnableGlobalMethodSecurity(prePostEnabled = true)
public class ResourceConfig extends ResourceServerConfigurerAdapter {

    @Override
    public void configure(HttpSecurity http) throws Exception {
        //super.configure(http);

        //1.关闭跨域攻击
        http.csrf().disable();

        //2.配置资源的访问方式
        http.authorizeRequests().antMatchers("/resource/doSelect")
                .authenticated()
                .anyRequest().permitAll();

    }
}
启动Postman进行访问测试
不携带令牌访问,例如

携带令牌进行访问,例如

没有访问权限,例如

网关工程设计及实现
业务描述
本次设计中,API网关是服务访问入口,身份认证,资源访问都通过网关进行资源统一转发.
项目创建及初始化
1.创建项目
2.初始化pom文件内容
 <dependencies>
        <dependency>
            <groupId>org.springframework.cloud</groupId>
            <artifactId>spring-cloud-starter-gateway</artifactId>
        </dependency>
        <dependency>
            <groupId>com.alibaba.cloud</groupId>
            <artifactId>spring-cloud-starter-alibaba-nacos-discovery</artifactId>
        </dependency>
        <dependency>
            <groupId>com.alibaba.cloud</groupId>
            <artifactId>spring-cloud-starter-alibaba-nacos-config</artifactId>
        </dependency>
        <!--假如网关层面进行限流,添加如下依赖-->
        <dependency>
            <groupId>com.alibaba.cloud</groupId>
            <artifactId>spring-cloud-starter-alibaba-sentinel</artifactId>
        </dependency>

        <dependency>
            <groupId>com.alibaba.cloud</groupId>
            <artifactId>spring-cloud-alibaba-sentinel-gateway</artifactId>
        </dependency>
    </dependencies>
3.创建bootstrap.yml配置文件并进行路由定义
server:
  port: 9000
spring:
  application:
    name: sso-gateway
  cloud:
    nacos:
      discovery:
        server-addr: localhost:8848
      config:
        server-addr: localhost:8848
        file-extension: yml
    sentinel:
      transport:
        dashboard: localhost:8180
      eager: true
    gateway:
      routes:
        - id: router01
          uri: lb://sso-resource
          predicates:
            - Path=/sso/resource/**
          filters:
            - StripPrefix=1
        - id: router02
          uri: lb://sso-auth
          predicates:
            - Path=/sso/oauth/**
          filters:
            - StripPrefix=1
      globalcors: #跨域配置(写到配置文件的好处是可以将其配置写到配置中心)
        corsConfigurations:
          '[/**]':
            allowedOrigins: "*"
            allowedHeaders: "*"
            allowedMethods: "*"
            allowCredentials: true
4.定义启动类
package com.jt;
import org.springframework.boot.SpringApplication;
import org.springframework.boot.autoconfigure.SpringBootApplication;
@SpringBootApplication
public class ApiGatewayApplication {
    public static void main(String[] args) {
        SpringApplication.run(ApiGatewayApplication.class, args);
    }
}
启动postman进行访问测试
基于网关进行登陆访问测试,例如

基于网关进行资源访问测试


客户端UI工程设计及实现
业务描述
本次项目设计采用前后端分离架构设计,前端工程服务基于springbootWeb服务进行实现
项目创建及初始化
1.创建项目
2.在pom文件中添加依赖
<dependencies>
    <dependency>
        <groupId>org.springframework.boot</groupId>
        <artifactId>spring-boot-starter-web</artifactId>
    </dependency>
</dependencies>
3.创建启动类
package com.jt;

import org.springframework.boot.SpringApplication;
import org.springframework.boot.autoconfigure.SpringBootApplication;

@SpringBootApplication
public class UIApplication {
    public static void main(String[] args) {
        SpringApplication.run(UIApplication.class, args);
    }
}
创建UI工程登陆页面
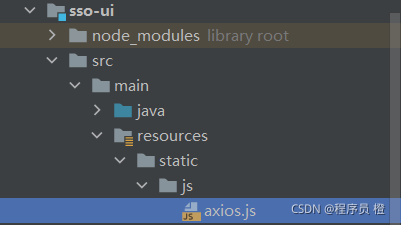
1.在resource目录下创建static目录
2.在static目录下新建js目录
3.在就是目录下添加axios.js
<script src="https://unpkg.com/axios/dist/axios.min.js"></script>
4.在static目录下创建登陆页面login.html
<!doctype html>
<html lang="en">
<head>
  <!-- Required meta tags -->
  <meta charset="utf-8">
  <meta name="viewport" content="width=device-width, initial-scale=1">
  <!-- Bootstrap CSS -->
  <link href="https://cdn.jsdelivr.net/npm/bootstrap@5.0.2/dist/css/bootstrap.min.css" rel="stylesheet" integrity="sha384-EVSTQN3/azprG1Anm3QDgpJLIm9Nao0Yz1ztcQTwFspd3yD65VohhpuuCOmLASjC" crossorigin="anonymous">
  <title>login</title>
</head>
<body>
<div class="container"id="app">
  <h3>Please Login</h3>
  <form>
    <div class="mb-3">
      <label for="usernameId" class="form-label">Username</label>
      <input type="text" v-model="username" class="form-control" id="usernameId" aria-describedby="emailHelp">
    </div>
    <div class="mb-3">
      <label for="passwordId" class="form-label">Password</label>
      <input type="password" v-model="password" class="form-control" id="passwordId">
    </div>
    <button type="button" @click="doLogin()" class="btn btn-primary">Submit</button>
  </form>
</div>
<script src="https://cdn.jsdelivr.net/npm/bootstrap@5.0.2/dist/js/bootstrap.bundle.min.js" integrity="sha384-MrcW6ZMFYlzcLA8Nl+NtUVF0sA7MsXsP1UyJoMp4YLEuNSfAP+JcXn/tWtIaxVXM" crossorigin="anonymous"></script>
<script src="https://cdn.jsdelivr.net/npm/vue/dist/vue.js"></script>
<script src="https://unpkg.com/axios/dist/axios.min.js"></script>
<script src="js/axios.js"></script>
<script>

  var vm=new Vue({
    el:"#app",//定义监控点,vue底层会基于此监控点在内存中构建dom树
    data:{ //此对象中定义页面上要操作的数据
      username:"",
      password:""
    },
    methods: {//此位置定义所有业务事件处理函数
      doLogin() {
        //1.定义url
        let url = "http://localhost:9000/sso/oauth/token"
        //2.定义参数
        let params = new URLSearchParams()
        params.append('username',this.username);
        params.append('password',this.password);
        params.append('client_id',"gateway-client");
        params.append('client_secret',"123456");
        params.append('grant_type',"password");
        //3.发送异步请求
        axios.post(url, params)
                .then((response) => {//ok
                  alert("login ok")
                  let result=response.data;
                  console.log("result",result);
                  //将返回的访问令牌存储到浏览器本地对象中
                  localStorage.setItem("accessToken",result.access_token);
                  location.href="/resource.html";
                  //启动一个定时器,一个小时以后,向认证中心发送刷新令牌
                })
                .catch((e)=>{
                  console.log(e);
                })
      }
    }
  });
</script>
</body>
</html>
5.打开浏览器进行访问测试

创建资源展现页面
1.在UI工程的static目录下创建resource.html
<!DOCTYPE html>
<html lang="en">
<head>
  <meta charset="UTF-8">
  <title>Title</title>
</head>
<body>
<div>
  <h1>The Resource Page</h1>
  <button onclick="doSelect()">查询我的资源</button>
  <button onclick="doUpdate()">修改我的资源</button>
</div>
<script src="https://unpkg.com/axios/dist/axios.min.js"></script>
<script src="js/axios.js"></script>
<script>
  function doSelect(){
    let url="http://localhost:9000/sso/resource/select";
    //获取登录后,存储到浏览器客户端的访问令牌
    let token=localStorage.getItem("accessToken");
    //发送请求时,携带访问令牌
    axios.get(url,{headers:{"Authorization":"Bearer "+token}})
            .then(function (response){
              alert("select ok")
              console.log(response.data);
            })
            .catch(function (e){//失败时执行catch代码块
              if(e.response.status==401){
                alert("请先登录");
                location.href="/login.html";
              }else if(e.response.status==403){
                alert("您没有权限")
              }
              console.log("error",e);
            })
  }
  function doUpdate(){
    let url="http://localhost:9000/sso/resource/update";
    //获取登录后,存储到浏览器客户端的访问令牌
    let token=localStorage.getItem("accessToken");
    console.log("token",token);
    //发送请求时,携带访问令牌
    axios.put(url,"",{headers:{"Authorization":"Bearer "+token}})
            .then(function (response){
              alert("update ok")
              console.log(response.data);
            })
            .catch(function (e){//失败时执行catch代码块
              console.log(e);
              if(e.response.status==401){
                alert("请先登录");
                location.href="/login.html";
              }else if(e.response.status==403){
                alert("您没有权限")
              }
              console.log("error",e);
            })
  }
</script>
</body>
</html>
2.打开浏览器进行访问测试(登陆前和登陆后检查点击如下按钮检测结果)
SSO微服务工程中用户行为日志的记录
系统需求分析
业务描述
用户在sso-resource工程访问我们的资源数据时,获取用户的行为日志信息,然后传递给sso-system工程,将日志信息存储到数据库.
业务架构分析
系统服务中的日志存储服务
业务描述
本次设计中,系统服务负责将其他服务获取的用户行为日志写入到数据库.
Pojo逻辑实现
定义一个Log对象,用于在内存中存储用户行为日志信息
package com.jt.system.pojo;

import com.baomidou.mybatisplus.annotation.IdType;
import com.baomidou.mybatisplus.annotation.TableField;
import com.baomidou.mybatisplus.annotation.TableId;
import com.baomidou.mybatisplus.annotation.TableName;
import com.fasterxml.jackson.annotation.JsonFormat;
import lombok.Data;
import org.springframework.format.annotation.DateTimeFormat;

import java.io.Serializable;
import java.util.Date;

/**
 * @author
 * @version 1.0
 * @create 2021/12/1 14:24
 *
 * 基于此对象封装用户行为日志?
 * 谁在什么时间执行了什么操作,访问了什么方法,传递了什么参数,访问时长
 */
@Data
@TableName("tb_logs")
public class Log implements Serializable {

    private static final long serialVersionUID = 1300330213216486658L;
    @TableId(type = IdType.AUTO)
    private Long id;
    private String username;
    private String operation;
    private String method;
    private String params;
    private Long time;
    private String ip;
    /**
     * @JsonFormat 指定时间格式    pattern指定年月日时分秒   timezone时区
     */
    @JsonFormat(pattern = "yyyy-MM-dd HH:mm:ss",timezone = "GMT+8")
    @TableField("createdTime")
    private Date createdTime ;
    private Integer status;
    private String error;

}
Dao逻辑实现
1.创建用户行为日志数据层对象,用于处理数据持久层逻辑
package com.jt.system.dao;

import com.baomidou.mybatisplus.core.mapper.BaseMapper;
import com.jt.system.pojo.Log;
import org.apache.ibatis.annotations.Mapper;

/**
 * @author
 * @version 1.0
 * @create 2021/12/1 14:41
 *
 * 用行为日志数据层对象户
 */
@Mapper
public interface LogMapper extends BaseMapper<Log> {

    //有自己特有方法时,在这里自己添加

}
2.定义单元测试,对数据层方法进行单元测试
package com.jt;

import com.jt.system.dao.LogMapper;
import com.jt.system.pojo.Log;
import org.junit.jupiter.api.Test;
import org.springframework.beans.factory.annotation.Autowired;
import org.springframework.boot.test.context.SpringBootTest;

import java.util.Date;

/**
 * @author
 * @version 1.0
 * @create 2021/12/1 14:47
 */
@SpringBootTest
public class LogMapperTests {

    @Autowired
    private LogMapper logMapper;


    @Test
    void testInsert(){
        //构建用户行为日志对象(基于此对象存储一些用户行为日志,先用假数据)
        Log log = new Log();
        log.setUsername("cgb2107");
        log.setIp("192.168.122.123");
        log.setOperation("查询资源");
        log.setMethod("pkg.ResourceController.doSelect");
        log.setParams("");
        log.setStatus(1);
        log.setTime(100L);
        log.setCreatedTime(new Date());
        //将日志持久化到数据库
        logMapper.insert(log);
    }

}
Service逻辑实现
1.定义日志业务接口
package com.jt.system.service;

import com.jt.system.pojo.Log;

/**
 * @author
 * @version 1.0
 * @create 2021/12/1 14:43
 */
public interface LogService {

    /**
     * 保存用户行为日志
     * @param log
     */
    void insertLog(Log log);

}
2.定义日志业务接口实现类
package com.jt.system.service.impl;

import com.jt.system.dao.LogMapper;
import com.jt.system.pojo.Log;
import com.jt.system.service.LogService;
import org.springframework.beans.factory.annotation.Autowired;
import org.springframework.scheduling.annotation.Async;
import org.springframework.stereotype.Service;

/**
 * @author
 * @version 1.0
 * @create 2021/12/1 14:44
 */
@Service
public class LogServiceImpl implements LogService {


    @Autowired
    private LogMapper logMapper;


    /**
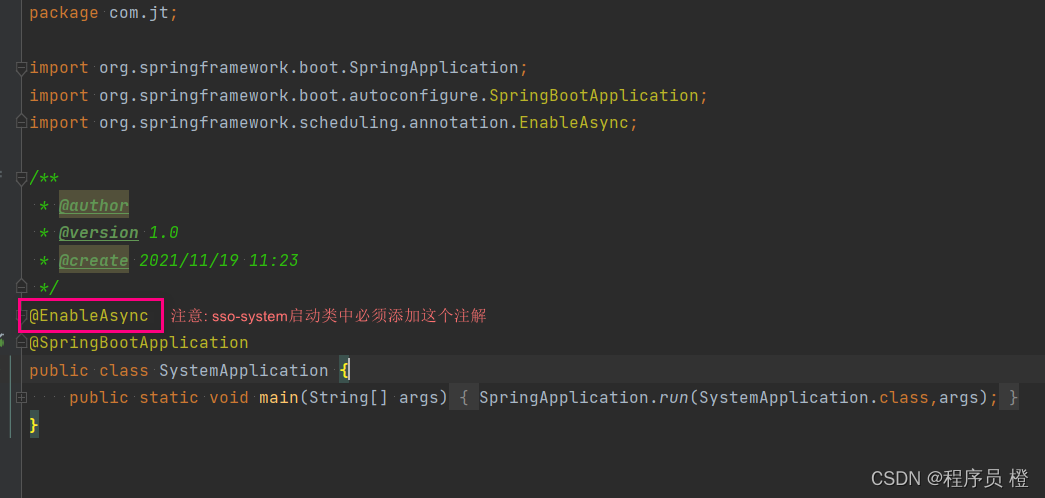
     * @Async 描述的方法底层会异步执行(不由web服务线程执行,而是交给spring自带的线程池中的线程去执行,
     * 但是@Async注解的应用有个前提,需要在启动类上添加启动异步执行注解(@EnableAsync))
     * 优点: 不会长时间阻塞web服务(例如tomcat)线程
     * @param log
     */
    @Async
    @Override
    public void insertLog(Log log) {
        String tName = Thread.currentThread().getName();
        System.out.println("LogServiceImpl.thread.name->"+tName);
        logMapper.insert(log);
    }


}
Controller逻辑实现
package com.jt.system.controller;

import com.jt.system.pojo.Log;
import com.jt.system.service.LogService;
import org.springframework.beans.factory.annotation.Autowired;
import org.springframework.web.bind.annotation.PostMapping;
import org.springframework.web.bind.annotation.RequestBody;
import org.springframework.web.bind.annotation.RequestMapping;
import org.springframework.web.bind.annotation.RestController;

/**
 * @author
 * @version 1.0
 * @create 2021/12/1 15:27
 */
@RestController
@RequestMapping("/log")
public class LogController {

    @Autowired
    private LogService logService;


    @PostMapping
    public void doInsertLog(@RequestBody Log log){
        System.out.println("LogController.doInsertLog->"+Thread.currentThread().getName());
        logService.insertLog(log);
    }

}
2.注意: 在sso-system服务的启动类中添加这个注解
3.启动服务,基于postman进行访问测试

资源服务中行为日志操作设计
业务描述
在不修改目标业务方法代码实现的基础上,访问目标方法时,获取用户行为日志.
Pojo逻辑对象定义
定义日志对象,用户封装获取到的用户行为日志
package com.jt.resource.pojo;

import lombok.Data;

import java.io.Serializable;
import java.util.Date;

/**
 * @author
 * @version 1.0
 * @create 2021/12/1 14:24
 *
 * 基于此对象封装用户行为日志?
 * 谁在什么时间执行了什么操作,访问了什么方法,传递了什么参数,访问时长
 */
@Data
public class Log implements Serializable {

    private static final long serialVersionUID = 1300330213216486658L;
    private Long id;
    private String username;
    private String operation;
    private String method;
    private String params;
    private Long time;
    private String ip;
    private Date createdTime ;
    private Integer status;
    private String error;

}
切入点注解定义
构建一个自定义注解,名字为RequiredLog,后续会基于此注解描述作为切入点,定义切入点方法
package com.jt.resource.annotation;

import java.lang.annotation.ElementType;
import java.lang.annotation.Retention;
import java.lang.annotation.RetentionPolicy;
import java.lang.annotation.Target;

/**
 * @author
 * @version 1.0
 * @create 2021/12/1 16:44
 *
 * 定义RequiredLog注解,通过此注解对需要进行日志记录的方法进行描述
 */
@Retention(RetentionPolicy.RUNTIME)
@Target(ElementType.METHOD)
public @interface RequiredLog {

    String value() default "";

}
AOP方式获取并记录日志
定义一个日志切面,基于此切面中的通知方法实现用户行为日志的获取和记录
package com.jt.resource.aspect;

import com.jt.resource.annotation.RequiredLog;
import com.jt.resource.pojo.Log;
import com.jt.resource.service.RemoteResourceService;
import org.aspectj.lang.ProceedingJoinPoint;
import org.aspectj.lang.annotation.Around;
import org.aspectj.lang.annotation.Aspect;
import org.aspectj.lang.annotation.Pointcut;
import org.aspectj.lang.reflect.MethodSignature;
import org.codehaus.jackson.map.ObjectMapper;
import org.springframework.beans.factory.annotation.Autowired;
import org.springframework.security.core.context.SecurityContextHolder;
import org.springframework.stereotype.Component;
import org.springframework.web.context.request.RequestAttributes;
import org.springframework.web.context.request.RequestContextHolder;
import org.springframework.web.context.request.ServletRequestAttributes;

import java.io.IOException;
import java.lang.reflect.Method;
import java.util.Date;

/**
 * @author
 * @version 1.0
 * @create 2021/12/1 16:48
 *
 * @Aspect 注解描述的类型为一个切面类型,在此类中可以定义:
 * 1)切入点(切入扩展逻辑的位置~例如权限控制,日志记录,事务处理的位置)
 * @Aspect描述的类中,通常使用@Pointcut注解进行定义.
 *
 * 2)通知方法(在切入点对应的目标方法执行前后要执行逻辑需要写到这样的方法中),
 * 在Aspect描述的类中,通过@Before,@After,@Aroud,@AfterReturning,@AfterThrowing
 * 这样的注解进行描述:
 * a: @Before 切入点方法执行之前执行
 * b: @After 切入点方法执行之后执行(不管切入点方法是否执行成功了,它都会执行)
 * c: @Aroud 切入点方法执行之前和之后都可以执行(最重要)
 * d: @AfterReturning 切入点方法成功之后执行
 * e: @AfterThrowing  切入点方法执行时出了异常会执行
 */
@Aspect
@Component
public class LogAspect {


    /** @Pointcut("bean(resourceController)")
     * 粗粒度的表达式,此类中的所有方法都为切入点方法
     *
     *
     * @Pointcut 注解用于定义切入点,此注解中的内容为切入点表达式
     * @annotation 为注解方式的切入点表达式,此方式的表达式为一种细粒度的切入点表达式,
     * 因为它可以精确到方法,例如我们现在使用RequiredLog注解描述的方法时,由它描述的方法
     * 就是一个切入点方法.
     */
    @Pointcut("@annotation(com.jt.resource.annotation.RequiredLog)")
    public void doLog(){
        //此方法中不需要写任何内容,只负责承载@Pointcut注解
    }


    /**
     * @Around 注解描述的方法为Aspect中的一个环绕通知方法,在此方法内部可以控制对目标方法的调用
     *
     * @param joinPoint 连接点对象,此对象封装了你要执行的切入点方法信息,可以基于此对象对切入点方法进行反射调用
     * @param joinPoint
     * @return 目标执行链中切入点方法的返回值
     * @throws Throwable
     */
    @Around("doLog()")
    public Object doAround(ProceedingJoinPoint joinPoint) throws Throwable{


        //4. 定义操作状态及结果
        //状态
        int status = 1;
        //错误信息
        String error = "";
        //执行时长
        long time = 0L;

        //5. 获取切入点方法执行之前的信息
        long t1 = System.currentTimeMillis();
        try {

            //手动调用目标执行链(这个执行链中包含切入点方法~目标方法)
            Object result = joinPoint.proceed();
            //6. 获取切入点方法执行之后的信息
            long t2 = System.currentTimeMillis();
            time = t2 - t1;

            //后续可以在这里通过feign将获取的日志传给system工程,进行日志的记录
            //将获取的用户行为日志,封装到Log对象
            //将Log对象通过Feign或者RestTemplate发送到sso-system工程进行日志记录
            return result;

        }catch (Throwable e){
            long t3 = System.currentTimeMillis();
            time = t3 - t1;
            status = 0;
            error = e.getMessage();
            throw e;
        }finally {
            saveLog(joinPoint,time,status,error);
        }
    }


    /**
     * 存储用户行为日志
     * @param joinPoint
     * @param time
     * @param status
     * @param error
     * @throws NoSuchMethodException
     * @throws IOException
     */
    private void saveLog(ProceedingJoinPoint joinPoint,long time,int status,String error) throws NoSuchMethodException, IOException {

        //1. 获取目标对象类型(切入点方法所在类的类型)
        Class<?> targetClass = joinPoint.getTarget().getClass();
        //1.2 获取目标方法
        //1.2.1 获取目标方法签名(包含方法信息)
        MethodSignature signature = (MethodSignature)joinPoint.getSignature();
        //1.2.2 获取方法对象
        Method targetMethod = targetClass.getDeclaredMethod(signature.getName(),signature.getParameterTypes());
        //1.3 获取方法上的RequiredLog注解内容
        //1.3.1 获取目标方法上注解
        RequiredLog requiredLog = targetMethod.getAnnotation(RequiredLog.class);
        //1.3.2 获取注解中的内容(这个内容为我们定义的操作名)
        String operation = requiredLog.value();
        //1.4 获取目标方法名(类名加方法名)
        String targetMethodName = targetClass.getName() + "." + targetMethod.getName();
        //1.5 获取目标方法执行时传入的参数
        String params = new ObjectMapper().writeValueAsString(joinPoint.getArgs());
        //1.6 获取登录用户信息(参考了Security官方的代码)     用户身份
        String username = (String)SecurityContextHolder
                .getContext()
                .getAuthentication()
                .getPrincipal();
        //1.7 获取ip地址(从当前线程获取request对象,然后基于request获取IP地址)
        //String ip = "192.168.122.123";
        ServletRequestAttributes requestAttributes =
                (ServletRequestAttributes) RequestContextHolder.getRequestAttributes();
        String ip = requestAttributes.getRequest().getRemoteAddr();
        //2 将获取的用户行为日志,封装到Log对象
        Log logInfo = new Log();
        logInfo.setIp(ip);
        logInfo.setUsername(username);
        logInfo.setOperation(operation);
        logInfo.setMethod(targetMethodName);
        logInfo.setParams(params);
        logInfo.setTime(time);
        logInfo.setStatus(status);
        logInfo.setError(error);
        logInfo.setCreatedTime(new Date());
        System.out.println("LogInfo: " + logInfo);
    }

}
启动服务进行访问测试
依次启动nacos,sso-system,sso-auth,sso-resource,sso-gateway,sso-ui工程服务,然后执行登陆,登陆成功后查询我的资源,检测日志输出。
服务中AOP技术应用原理分析
AOP是一种设计思想,它要实现的功能就是"锦上添花",就是在尽量不修改原有目标方法的基础上,添加一些扩展功能,例如日志的记录,权限的控制,事务的控制,异步任务的执行等等,其应用原理如图所示:

说明:当我们在项目中定义了AOP切面以后,系统启动时,会对有@Aspect注解描述的类进行加载分析,基于切入点的描述为目标类型对象,创建代理对象,并在代理对象内部创建一个执行链,这个执行链中包含拦截器(封装了切入点信息),通知(Around,…),目标对象等,我们请求目标对象资源时,会直接按执行链的顺序对资源进行调用。
Fegin方式将日志传递给系统服务
1.确保sso-resource工程中添加了openfign依赖
<dependency>
    <groupId>org.springframework.cloud</groupId>
    <artifactId>spring-cloud-starter-openfeign</artifactId>
</dependency>
2.确保sso-resource工程中的启动类上添加了@EnableFeginClients注解
package com.jt;

import org.springframework.boot.SpringApplication;
import org.springframework.boot.autoconfigure.SpringBootApplication;
import org.springframework.cloud.openfeign.EnableFeignClients;

/**
 * @author
 * @version 1.0
 * @create 2021/11/30 9:34
 *
 *
 * 如何理解这个资源工程?主要是与业务数据数据相关的一个工程
 * 如何设计对这个资源工程访问?
 * 1)有些资源可以直接访问,无需认证
 * 2)有些资源必须认证以后才可以访问
 * 3)有些资源认证以后,还必须有权限才可以访问
 */
@EnableFeignClients
@SpringBootApplication
public class ResourceApplication {
    public static void main(String[] args) {
        SpringApplication.run(ResourceApplication.class,args);
    }
}
3.定义日志远程服务调用接口
package com.jt.resource.service;

import com.jt.resource.pojo.Log;
import org.springframework.cloud.openfeign.FeignClient;
import org.springframework.web.bind.annotation.PostMapping;
import org.springframework.web.bind.annotation.RequestBody;

/**
 * @author
 * @version 1.0
 * @create 2021/12/2 11:54
 */
@FeignClient(name = "sso-system",contextId = "remoteResourceService")
public interface RemoteResourceService {

    /**
     * 调用参数和路径要与被调用者一致
     * @param log
     */
    @PostMapping("/log")
    void insertLog(@RequestBody Log log);
}
4.在LogAspect中注入RemoteLogService对象,并通过此对象将日志对象传递到sso-system服务

5.依次启动服务进行访问测试
小知识扩展
在IDEA里执行SQL语句

在IDEA里测试,发送带有请求头的URL
