pytest 从百草园到三味书屋...
底部会给出完整代码!
开发环境:
- pytest 6.2.5
- python 2.7.16
- allure 2.14.0
- PyCharm 2021.2.3
- system mac
废话不多说,直接上干货!!
pytest简单认识:
pytest的默认规则
定义pytest时,包名,类名,默认必须以test开头.
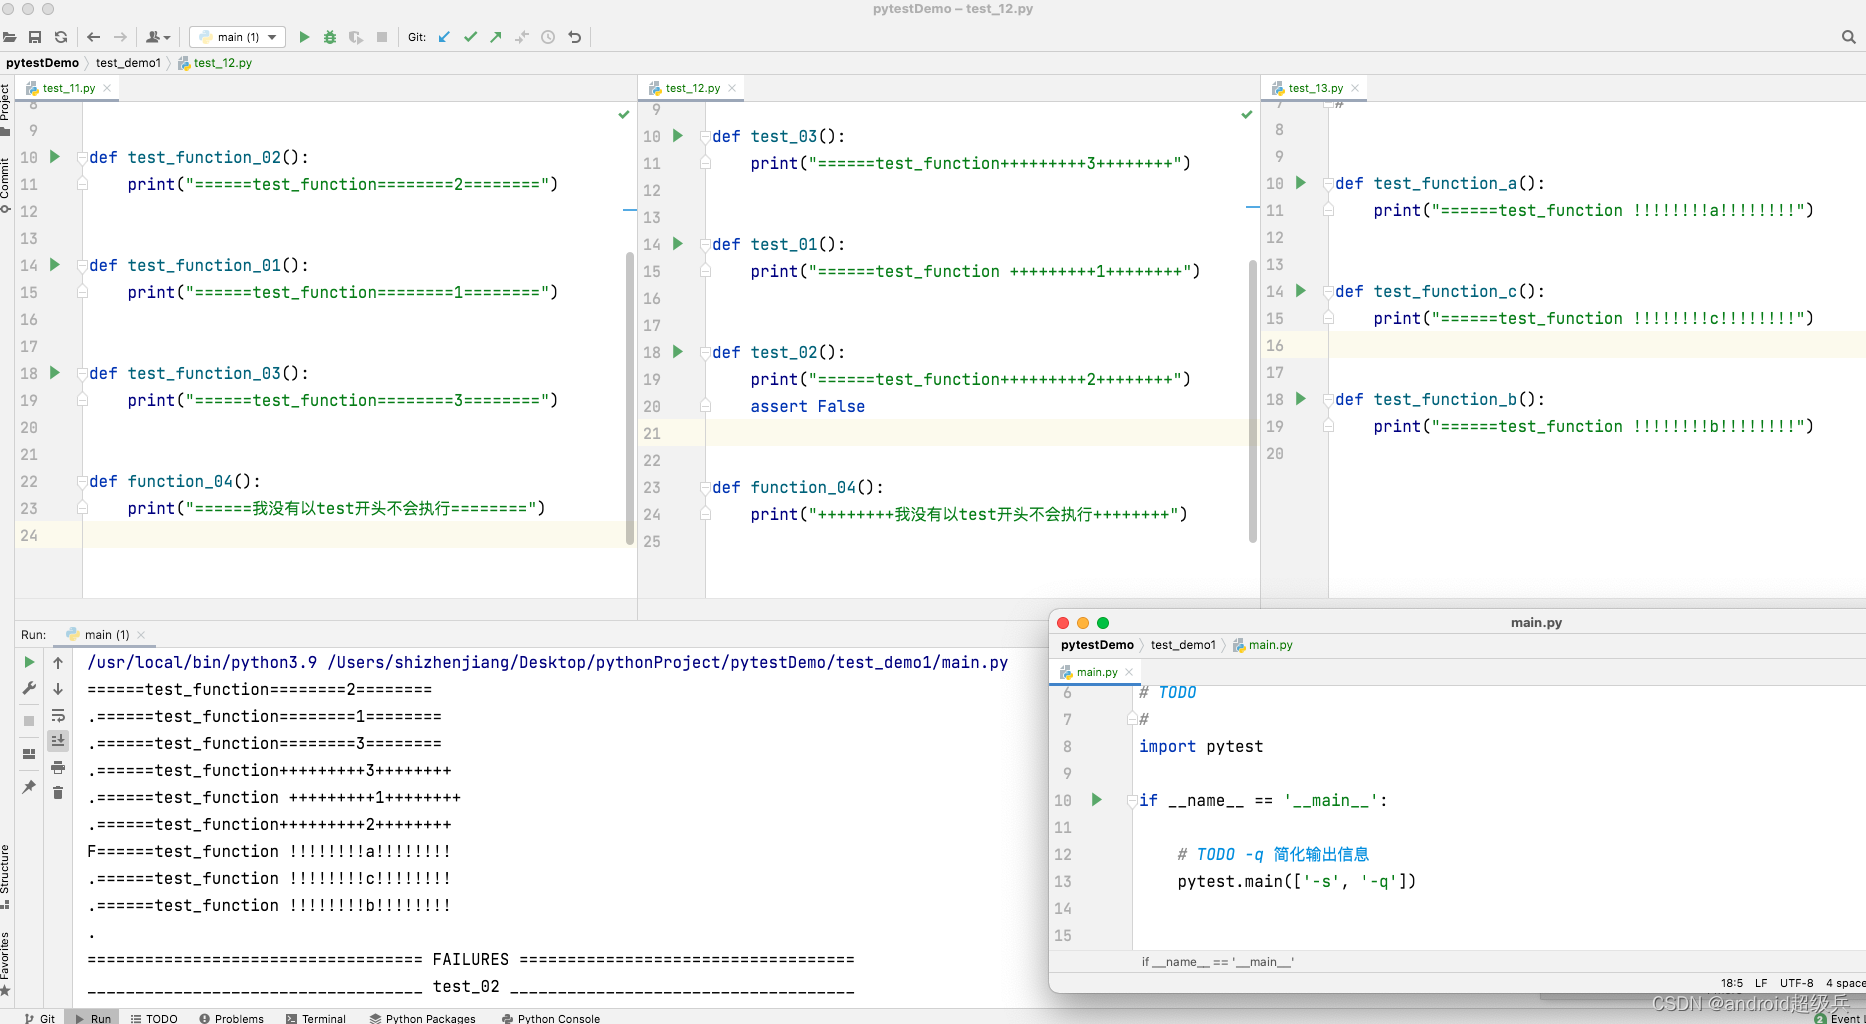
先来看一个简单的例子!

执行结果为:
test_11.py ...                                                           [ 33%]
test_12.py ...                                                           [ 66%]
test_13.py ...                                                           [100%]
可以看出,默认执行是显示的进度
输出详细信息 [-s]
# 用于关闭捕捉信息, 从而输出打印信息
pytest.main(['-s'])

需要注意的是:
- 执行成功用 . 表示
- 执行失败用 F 表示
如果觉得这种方式不明显,可以采用:
显示具体测试用例信息[-v]
#T ODO -s 用于关闭捕捉信息, 从而输出打印信息
# TODO -v 用于显示具体的信息
pytest.main(['-s', '-v'])

简化测试用例信息[-q]
# TODO -q 简化输出信息
pytest.main(['-s', '-q'])

执行特定测试用例[-k]
# TODO -k 运行某个包含特定字符串的测试用例
pytest.main(['-s', '-v', '-k', 'b'])

test_13.py::test_function_b ======test_function !!!!!!!!b!!!!!!!!
PASSED
执行到失败的测试用例就终止[-x]
# TODO -x 只要执行到失败的测试用例就终止测试
pytest.main(['-x'])

执行某个特定用例
场景: test_demo1要执行test_demo2某个测试用例

现在是执行不到的…
# TODO 只执行某个特定用例
pytest.main(['-s', '.', '../test_demo2/test_21.py::test_function_01'])

还有一种简单粗暴的写法:用来执行所有的测试用例
# TODO 执行所有的测试用例
pytest.main(['-s', '..'])

测试用例失败%d个就结束[–maxfail=2]
# TODO 测试用例 失败2个就退出
pytest.main(['--maxfail=2'])

打标记[slow]
# TODO 打标记,只执行标记slow的测试用例
pytest.main(['-m', 'slow'])

注意这里的slow是随便写的,也可以写成其他的,例如这样:
pytest.main(['-m', 'abc'])

pytest最原始的测试报告[–junit-xml=./report/xxx.xml]
# TODO 生成最原始的测试报告
pytest.main(['--junit-xml=./report/最原始的测试报告.xml'])

单独执行某个用例
# TODO 单独执行某个用例
pytest.main(['-s', 'test_11.py'])

错误用例单独执行%d次[–reruns=2]
# TODO 失败用例执行2次
pytest.main(['-s', '--reruns=2', 'test_11.py'])

错误用例单独执行%d次,每次间隔%d秒[’–reruns=2’,’–reruns-delay=3’]
# TODO 失败用例执行2次 每次等待3秒
pytest.main(['-s', '--reruns=2', '--reruns-delay=3', 'test_11.py'])

函数中的 前置函数/后置函数 and 前置module/后置module
# TODO 测试用例最开始前执行
def setup_module():
    print("{}setup_module{}".format("*" * 20, "*" * 20, ))


# TODO 测试用例结束时执行
def teardown_module():
    print("{}teardown_module{}".format("*" * 20, "*" * 20, ))


# TODO 每个测试用例函数开始前执行
def setup_function():
    print("{}setup_function{}".format("-" * 20, "-" * 20, ))


# TODO 每个测试用例结束后执行
def teardown_function():
    print("{}teardown_function{}".format("-" * 20, "-" * 20, ))


# TODO 每个测试用例函数开始前执行 在setup_function() 之后执行
def setup():
    print("{}setup{}".format("+" * 20, "+" * 20, ))


# TODO 每个测试用例结束后执行 在 teardown_function() 之前执行
def teardown():
    print("{}teardown{}".format("+" * 20, "+" * 20, ))


def test_0():
    print("test0")


def test_1():
    print("test1")


def test_2():
    print("test2")


def test_3():
    print("test3")
运行结果为:
test_14.py ********************setup_module********************
--------------------setup_function--------------------
++++++++++++++++++++setup++++++++++++++++++++
test0
.++++++++++++++++++++teardown++++++++++++++++++++
--------------------teardown_function--------------------
--------------------setup_function--------------------
++++++++++++++++++++setup++++++++++++++++++++
test1
.++++++++++++++++++++teardown++++++++++++++++++++
--------------------teardown_function--------------------
--------------------setup_function--------------------
++++++++++++++++++++setup++++++++++++++++++++
test2
.++++++++++++++++++++teardown++++++++++++++++++++
--------------------teardown_function--------------------
--------------------setup_function--------------------
++++++++++++++++++++setup++++++++++++++++++++
test3
.++++++++++++++++++++teardown++++++++++++++++++++
--------------------teardown_function--------------------
********************teardown_module********************
这里都比较无脑,都是一些常规操作…细细品味一下就懂了!!
小结:
| pytest | 说明 |
|---|---|
| -s | 输出详细信息 |
| -v | 显示具体测试用例 |
| -q | 简化测试用例输出 |
| -x | 执行到失败的测试用例就结束 |
| -k | 执行特定的测试用例 |
| -maxfail=2 | 执行2条测试用例失败就结束 |
| ‘-m’ ‘slow’ | 打标记 |
| –junit-xml=./report/xxx.xml | 最原始的测试报告 |
| –reruns=2 | 错误用例单独执行2次 |
| ‘–reruns=2’, ‘–reruns-delay=3’ | 错误用例单独执行2次,每次间隔3秒 |
pytest类中的操作
默认操作也是一样的

注意点:
- 类名默认以Test开头
- 方法名默认以test开头
这里说是默认以test开头,就证明这里可以修改,不要着急,一点点看,后面会介绍!
类中的前置函数/后置函数,and 前置module/后置module
测试代码:
class TestDemo31:
    # TODO 测试用例最开始前执行
    @staticmethod
    def setup_class():
        print("{}setup_class{}".format("*" * 20, "*" * 20, ))

    # TODO 测试用例结束时执行
    @staticmethod
    def teardown_class():
        print("{}teardown_module{}".format("*" * 20, "*" * 20, ))

    # TODO 每个测试用例函数开始前执行
    @staticmethod
    def setup_method():
        print("{}setup_method{}".format("-" * 20, "-" * 20, ))

    # TODO 每个测试用例结束后执行
    @staticmethod
    def teardown_method():
        print("{}teardown_method{}".format("-" * 20, "-" * 20, ))

    # TODO 每个测试用例函数开始前执行 在setup_function(self) 之后执行
    @staticmethod
    def setup():
        print("{}setup{}".format("+" * 20, "+" * 20, ))

    # TODO 每个测试用例结束后执行 在 teardown_function(self) 之前执行
    @staticmethod
    def teardown():
        print("{}teardown{}".format("+" * 20, "+" * 20, ))

    def test_01(self):
        print("测试数据1")

    def test_02(self):
        print("测试数据2")

    def test_03(self):
        print("测试数据3")
使用:
import pytest

if __name__ == '__main__':
    pytest.main(['-s', '-q', 'test_31.py'])
测试结果:
********************setup_class********************
--------------------setup_method--------------------
++++++++++++++++++++setup++++++++++++++++++++
测试数据1
.++++++++++++++++++++teardown++++++++++++++++++++
--------------------teardown_method--------------------
--------------------setup_method--------------------
++++++++++++++++++++setup++++++++++++++++++++
测试数据2
.++++++++++++++++++++teardown++++++++++++++++++++
--------------------teardown_method--------------------
--------------------setup_method--------------------
++++++++++++++++++++setup++++++++++++++++++++
测试数据3
.++++++++++++++++++++teardown++++++++++++++++++++
--------------------teardown_method--------------------
********************teardown_module********************
这里和函数的前置后置类似,就不多解释了…
pytest.fixture
先来看使用:

这里需要注意的就是第一个参数scope,他有几种类型:
- function 函数级 每一个函数或方法都会调用
- class 类级别 每个测试类只运行一次
- module 模块级 每一个.py文件调用一次
- session 会话级 每次会话只需要运行一次,会话内所有方法及类,模块都共享这个方法
skip与skipIf
概念:用@pytest.mark.skip标记的测试用例不执行.

parametrize参数化
概念: 测试用例反复执行.
直接看功能:

写法不固定,例如:

这里需要注意的就是我颜色相同的地方一定要对应上.
全局配置[conftest.py]
什么是全局配置: 就是pytest会优先扫描这个文件,在这里定义的内容可以整个项目都能用,一般配置在根目录.

需要注意的是名字不能随便改:只能是 conftest.py
扩展:修改默认值
先看看现在的目录结构

之前的认知:
如果在根目录执行 pytest.main()的话,会执行到到所有满足条件的测试用例,
例如test_demo4/test_41.py or test_demo4/test_42.py
无论如何test_demo4/a目录下的文件一定不会执行,因为他不满足 包名以test开头的原则
只需要在根目录下创建 pytest.ini 文件,指定要执行的目录即可!

这里需要注意的是 pytest.ini 不能随便起名字,必须保证这个名字,要不然pytest就扫描不到了.
pytest.ini的作用域:当前目录以及子目录
再来看看定义其他规则:

pytest.ini 代码
[pytest]
# 指定要测试的目录
testpaths = test_demo4/a

# 指定特定【文件】规则
python_files = auto*.py test_*.py


# 指定特定【类】规则
python_classes = Auto* PY_TEST_* Test*


# 指定特定【测试用例】规则
python_functions = auto* test_*
allure
什么是allure?
allure是用来生成测试报告的一个非常优雅的工具
他这么优雅那么就必须安装环境
小插曲:allure是基于json与装饰器来实现测试报告的,所以在运行期间会生成很多json文件,并且通过装饰器来使用!
mac 安装环境的话只需要2步,win的同学自行百度[抱拳]
- 第一步:brew install allure
- 第二步:pip install allure-pytest
如何验证安装是否成功:
allure --version # 查看 allure版本
还是老套路,最简单的使用!

可以通过右键的这种方式直接打开

index.html打开的效果:

常见的allure装饰器
等级:
- epic 最大的模块 [1级]
- feature 特点 [2级]
- story 场景 [3级]
- title 用户标题
- testcase 用例 url
- issue bug地址
- step 用例步骤
- severity() 用例等级
epic / feature 如何配合使用

这段代码很多,但是很简单,一定要细品一下哦!!
feature 配合 story 使用也是类似:
直接看效果图就好!

allure.title
allure.title 只是修改这个标题

更高级的用法为:

这里不仅限于修改title,其他的都能够修改:
例如:

其他常用操作
- @allure.severity(“blocker”)
- @allure.feature(“河南省”)
- @allure.story(“郑州市”)
- @allure.testcase(“http://www.kaifa.baidu.com”) # 正确的路径
- @allure.issue(“http://www.baidu.com”) # 错误的路径

用例等级(allure.severity):
- blocker 阻塞缺陷 【功能为实现】
- critical 严重阻塞 【功能有缺陷】
- normal 一般缺陷 【格式错误】
- minor 次要缺陷 【界面与ui不符】
- trivial 轻微缺陷 【不规范】
这里有一个极小的细节可以注意一下:

清空之前生成的jsonData数据[’–clean-alluredir’]
问题所在:

可以看到,有很多的json文件,证明他不会覆盖之前的json数据,这里可以通过一行代码来实现!

只执行某个用例级别的测试用例[’–allure-severities’, ‘blocker’]

记得之前会有很多,例如山西,山东之类的,因为这里设置了河南郑州为blocker级别,所以测试用例只显示这个!
开启本地服务,局域网内共享!
什么是本地服务?
就是让别人能够看到你的测试报告!
os.system('allure serve {}'.format('allure_json_data'))
运行后会生成一个地址,mac是通过java来开启本地服务的!

这里的地址还不正确,你应该给到你真正的ip地址,
mac :终端/控制台输入ifconfig
win:cmd 输入ipconfig
获取到这个号之后最终链接为: http://192.168.3.128:54739/

写了一天了,如果这篇文章帮助到你,请点一下免费的赞,谢谢,
如有疑问或者缺什么东西,请在评论区留言,看到第一时间就加上了!
原创不易,您的点赞就是对我最大的支持!