文章目录
1、Locust实例展示
1.1 官网代码示例
from locust import HttpUser, between, task

class WebsiteUser(HttpUser):
    # 设置等待时间间隔
    wait_time = between(5, 15)

    def on_start(self):
        self.client.post("/login", {

            "username": "test_user",
            "password": ""
        })

    @task
    def index(self):
        self.client.get("/")
        self.client.get("/static/assets.js")

    @task
    def about(self):
        self.client.get("/about/")
1、between: 设置等待时间, 5s~15s;
2、client.get/ client.post: 用法跟request是一样的。
1.2 代码模板及执行顺序
from locust import HttpUser,TaskSet,task
'''
执行顺序:
Locust setup → TaskSet setup → TaskSet on_start →
TaskSet tasks → TaskSet on_stop → TaskSet teardown →
Locust teardown
'''

class UserBehavor(TaskSet):
    #启动locust是运行setup方法
    def setup(self):
        print('task setup')

    def teardown(self):
        print('task teardown')

    #虚拟用户启动task时运行
    def on_start(self):
        print('start')

    #虚拟用户结束task时运行
    def on_stop(self):
        print('end')

    @task(2)
    def index(self):
        self.client.get('/')

    @task(1)
    def profile(self):
        self.client.get('/profile')

class WebsitUser(HttpUser):
    def setup(self):
        print('locust setup')

    def teardown(self):
        print('locust teardown')

    host = 'http://xxx.com'
    task_set = task(UserBehavor)
    min_wait = 100
    max_wait = 5000

if __name__ == '__main__':
    pass
2、Locust类代码分析
2.1 实例代码展示
from locust import HttpUser,task,TaskSet
'''
在版本10.1,已经不再使用HttpLocust 和Locust,
取而代之的是HttpUser 和User
'''

# 定义ScriptTasks类,继承TaskSet类
class ScriptTasks(TaskSet):
    #初始化,每个locust用户开始做的第一件事
    def on_start(self):
        #放置 用户名和密码
        self.client.post('/login', {

        "username":"carl_dj",
        "password":'111111'
        })

    #@task()装饰的方法为一个事务,方法的参数用于指定该行为的执行权重,参数越大每次被虚拟用户执行的概率越高,默认为1
    @task(2)
    #创建index方法,
    def index(self):
        self.client.get('/')

    @task(1)
    def about(self):
        #self.client 属性使用python的request库的方法,调用和使用方法和request一样
        self.client.get('/about')

    @task(2)
    def demo(self):
        payload = {
    }
        headers = {
    }
        self.client.post('/demo', data = payload,headers = headers)

#TaskSet类,该类定义用户任务信息(模拟用户信息),
class WebsitUser(HttpUser):
    #指向一个定义的用户行为
    task_set = task(ScriptTasks)
    #被测系统的host,
    host = 'http://www.xxxxxx.com'
    #每个用户执行两个任务间隔时间最小值,单位是(毫秒,默认是1000ms)
    min_wait = 100
    # 每个用户执行两个任务间隔时间最大值,单位是(毫秒)
    max_wait = 5000
2.2 class TaskSet 用法及展示
2.2.1 定义
1、TaskSet类实现了虚拟用户所执行任务的调度算法,包括:
- 规划任务执行顺序:schedule_task
- 挑选下一个任务:execute_next_task
- 执行任务:execute_task
- 休眠等待:wait
- 中断控制:interrupt
2、在1的基础上,就可以在TaskSet子类中进行以下操作:
- 描述虚拟用户的业务测试场景
- 对虚拟用户的所有行为进行组织和描述
- 对不同任务的权重进行配置
3、 @task
- 通过@task()装饰的方法为一个事务
参数越大每次被虚拟用户执行的概率越高,默认是1
4、TaskSet子类中采用2种方式定义任务信息:
- @task
- tasks属性
2.2.2 代码展示
1、采用@task装饰器定义任务信息:
from locust import task,TaskSet

class UserBehav(TaskSet):
    @task(2)
    def test_case1(self):
        self.client.get("/testcase1")

    @task(4)
    def test_case2(self):
        self.client.get("/testcase2")
2、采用tasks属性定义任务信息:
from locust import TaskSet

def test_case1(self):
    self.client.get("/testcase1")

def test_case2(self):
    self.client.get("/testcase2")

class UserBehav(TaskSet):
    tasks = {
        test_case1:2,
        test_case2:4
    }
    #另一种写法
    # tasks = [(test_case1,1), (test_case2,3)]
3、Locust高级用法
3.1 关联
做过接口或者爬虫的的大佬都知道,传参是必不可少的,而常见的场景有session_id。
对于返回的html页面,可用采用lxml库来定位获取需要的参数。
from locust import HttpUser,task,TaskSet
from lxml import etree

class WebsitTasks(TaskSet):

    #获取session
    def get_session(self,html):
        tags = etree.HTML(html)
        return tags.xpath("输入标签需要定位的到元素")
    #启动
    def on_start(self):
        html = self.client.get('/index')
        session = self.get_session(html.text)
        #设置payload参数
        payload = {

            'username': 'test',
            'password':'111111',
            'session':session

        }
        #设置header参数
        header = { "Mozilla/5.0 (Windows NT 10.0; Win64; x64) AppleWebKit/537.36 (KHTML, like Gecko) Chrome/83.0.4103.61 Safari/537.36"}
        self.client.post('/login',data = payload, headers = header)

    @task(5)
    def index(self):
        self.client.get('/')

    @task(1)
    def  about(self):
        self.client.about('/about/')


class WebsiteUser(HttpUser):
    # 被测系统的host,在终端中启动locust时没有指定--host参数时才会用到
    host = "http://www.xxx.com/user/login"
    # TaskSet类,该类定义用户任务信息,必填。这里就是:WebsiteTasks类名,因为该类继承TaskSet;
    task_set = task(WebsiteTasks)
    # 每个用户执行两个任务间隔时间的上下限(毫秒),具体数值在上下限中随机取值,若不指定默认间隔时间固定为1秒
    min_wait = 5000
    max_wait = 15000
3.2 参数化
3.2.1 参数化的意义
软件测试中,输入相应值,检查期望值,是常见测试方法。
在自动化测试中,一个测试用例对应一个测试点,通常一组测试数据无法完全覆盖测试范围,所以,需要参数化来传递多组数据。
那么,参数化的作用是:循环取数据,数据可重复使用。
3.2.2 三个场景认识参数化
场景1:
模拟3个用户并发请求网页,共有100个URL地址,每个虚拟用户都会依次循环加载100个URL地址
代码展示:
from locust import TaskSet, task, HttpUser

class UserBehav(TaskSet):
    def on_start(self):
        self.index = 0

    @task
    def test_visit(self):
        url = self.locust.share_data[self.index]
        print('visit url: %s' % url)
        self.index = (self.index + 1) % len(self.locust.share_data)
        self.client.get(url)

class WebsiteUser( HttpUser):
    host = 'http://www.xxx.com'
    task_set = task(UserBehav)
    share_data = ['url1', 'url2', 'url3', 'url4', 'url5']
    min_wait = 1000
    max_wait = 15000
场景2:
模拟3用户并发注册账号,共有9个账号,要求注册账号不重复,注册完毕后结束测试
概括:
保证并发测试数据唯一性,不循环取数据
所有并发虚拟用户共享同一份测试数据,并且保证虚拟用户使用的数据不重复;
代码展示:
# 采用队列,队列为空时结束测试
from locust import TaskSet, task, HttpUser
import queue
class UserBehav(TaskSet):
    @task
    def test_register(self):
        try:
            data = self.locust.user_data_queue.get()
        except queue.Empty:
            print('account data run out, test ended.')
            exit(0)
        print('register with user: {}, pwd: {}'.format(data['username'], data['password']))
        payload = {

            'username': data['username'],
            'password': data['password']
        }
        self.client.post('/register', data=payload)

class WebsiteUser(HttpUser):
    host = 'http://www.xxx.com'
    task_set = task(UserBehav)
    user_data_queue = queue.Queue()
    for index in range(100):
        data = {
            "username": "test%04d" % index,
            "password": "pwd%04d" % index,
            "email": "test%04d@debugtalk.test" % index,
            "phone": "186%08d" % index,
        }
        user_data_queue.put_nowait(data)
    min_wait = 1000
    max_wait = 15000
场景3:
模拟3个用户并发登录账号,总共有9个账号,要求并发登录账号不相同,但数据可循环使用;
概括:
保证并发测试数据唯一性,循环取数据;
所有并发虚拟用户共享同一份测试数据,保证并发虚拟用户使用的数据不重复,并且数据可循环重复使用。
代码展示:
from locust import TaskSet, task, HttpUser
import queue
class UserBehav(TaskSet):
    @task
    def test_register(self):
        try:
            data = self.locust.user_data_queue.get()
        except queue.Empty:
            print('account data run out, test ended')
            exit(0)
        print('register with user: {0}, pwd: {1}' .format(data['username'], data['password']))
        payload = {

            'username': data['username'],
            'password': data['password']
        }
        self.client.post('/register', data=payload)
        self.locust.user_data_queue.put_nowait(data)

class WebsiteUser(HttpUser):
    host = 'http://www.xxx.com'
    task_set = task(UserBehav)
    user_data_queue = queue.Queue()
    for index in range(100):
        data = {

            "username": "test%04d" % index,
            "password": "pwd%04d" % index,
            "email": "test%04d@debugtalk.test" % index,
            "phone": "186%08d" % index,
        }
        user_data_queue.put_nowait(data)
    min_wait = 1000
    max_wait = 15000
3.3 检查点
from locust import task

@task
def test_interface(self):
     #直接使用csdn的某一个api
    with  self.client.get("https://editor.csdn.net/md",name = 'fileconfig',catch_response=True) as response:
    	#python断言对接口返回值中的max字段进行断言
        assert response.json()['rating']['max']==100
        #对http响应码是否200进行判断
        if response.status_code ==200:
            response.success()
        else:
            response.failure("Failed!")
-
断言形式:
with self.client.get(“url地址”,catch_response=True) as response; -
response.status_code获取http响应码进行判断,失败后会加到统计错误表中;
如果直接使用python自带assert,则不会进入到locust报表, -
默认不写参数
catch_response=False断言无效,将catch_response=True才生效。
4、Locust运行模式
运行Locust时,通常会使用到两种运行模式:单进程运行和多进程分布式运行。
4.1 单进程运行模式
4.1.1 定义及解析
-
Locust所有的虚拟并发用户均运行在单个Python进程中,由于单进程的原因,并不能完全发挥压力机所有处理器的能力,因此主要用于调试脚本和小并发压测的情况。
-
当并发压力要求较高时,就需要用到Locust的多进程分布式运行模式。
一旦单台计算机不足以模拟所需的用户数量,Locust就会支持运行分布在多台计算机上的负载测试。 -
多进程分布运行情况:
①多台压力机同时运行,每台压力机分担负载一部分的压力生成;
②同一台压力机上开启多个slave的情况。
如果一台压力机有N个处理器内核,那么就在这台压力机上启动一个master,N个slave。
也可以启动N的倍数个slave。
4.1.2 有Web UI模式
Locust默认采用8089端口启动web;如果要使用其它端口,就可以使用如下参数进行指定。
参数说明:
- -P, --port:指定web端口,默认为8089
终端中—>进入到代码目录:locust -f locustfile.py --host = xxxxx.com - -f: 指定性能测试脚本文件
- -host: 被测试应用的URL地址【如果不填写,读取继承(HttpUser)类中定义的host】
注意:
- 如果Locust运行在本机,在浏览器中访问http://localhost:8089即可进入Locust的Web管理页面
- 如果Locust运行在其它机器上,那么在浏览器中访问http://locust_machine_ip:8089即可
4.1.3 无Web UI模式
如果采用no_web形式,则需使用–no-web参数,并会用到如下几个参数。
参数说明:
- -c, --clients:指定并发用户数;
- -n, --num-request:指定总执行测试次数;
- -r, --hatch-rate:指定并发加压速率,默认值位1。
示例展示:
locust -f locustfile.py --host = xxxxx --no-web -c 1 -n 2
4.1.4 启动locust
在Pycharm的 的Terminal 中启动 locust,输入内容:
locust --host =http://localhost -f test.py

也可以在 VScode、WindowsPowserShell中启动
4.2 多进程分布式运行
不管是单机多进程,还是多机负载模式,运行方式都是一样的,都是先运行一个master,再启动多个slave。
4.2.1 master启动
- 启动master时,需要使用–master参数
- 如果要使用8089以外的端口,还需要使用-P, --port参数
示例展示:
locust -f test.py --master --port=8089
4.2.2 slave启动
- 启动slave时需要使用–slave参数
- 在slave中,就不需要再指定端口
- master启动后,还需要启动slave才能执行测试任务
示例展示:
locust -f monitorAgent.py --slave
locust -f monitorAgent.py --slave --master-host=<locust_machine_ip>
master和slave都启动完成,就可以进入到Locust 的web界面。剩下的操作,就是界面操作了~
5、Locust结果分析

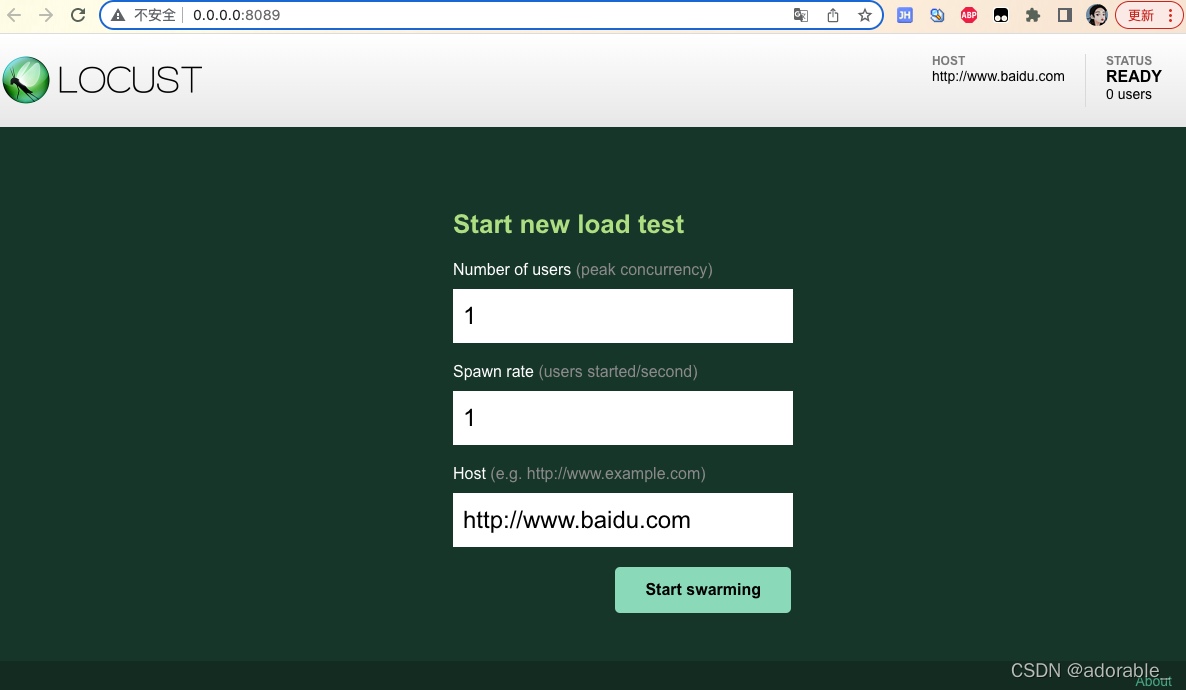
Number of users: 设置虚拟用户数,对应中no_web模式的-c, --clients参数
Spawn rate(users started/second): 每秒产生(启动)的虚拟用户数 , 对应着no_web模式的-r, --hatch-rate参数,默认为1
Host:待测url

性能测试参数:
Type: 请求的类型,例如GET/POST。
Name:请求的路径。这里为百度首页,即:https://www.baidu.com/
requests:当前请求的数量。
fails:当前请求失败的数量。
Median:中间值,单位毫秒,一半的服务器响应时间低于该值,而另一半高于该值。
Average:平均值,单位毫秒,所有请求的平均响应时间。
Min:请求的最小服务器响应时间,单位毫秒。
Max:请求的最大服务器响应时间,单位毫秒。
Average Size:平均单个请求的大小,单位字节。
Current RPS:当前每秒请求。
相比于LoadRunner,Locust的结果展示十分简单,主要就四个指标:并发数、RPS、响应时间、异常率。但对于大多数场景来说,这几个指标已经足够了。

原文链接:https://www.cxybb.com/article/wuyoudeyuer/108596407