
1 前置准备
- 一个正常运行的前端项目
- 一个准备好的git仓库
2 规范
2.1 代码规范
2.1.1 eslint
eslint乃老生常谈,配置上也较为简单
pnpm i eslint --save-dev
pnpm init @eslint/config

基于上边的步骤,我们生成了基础配置;
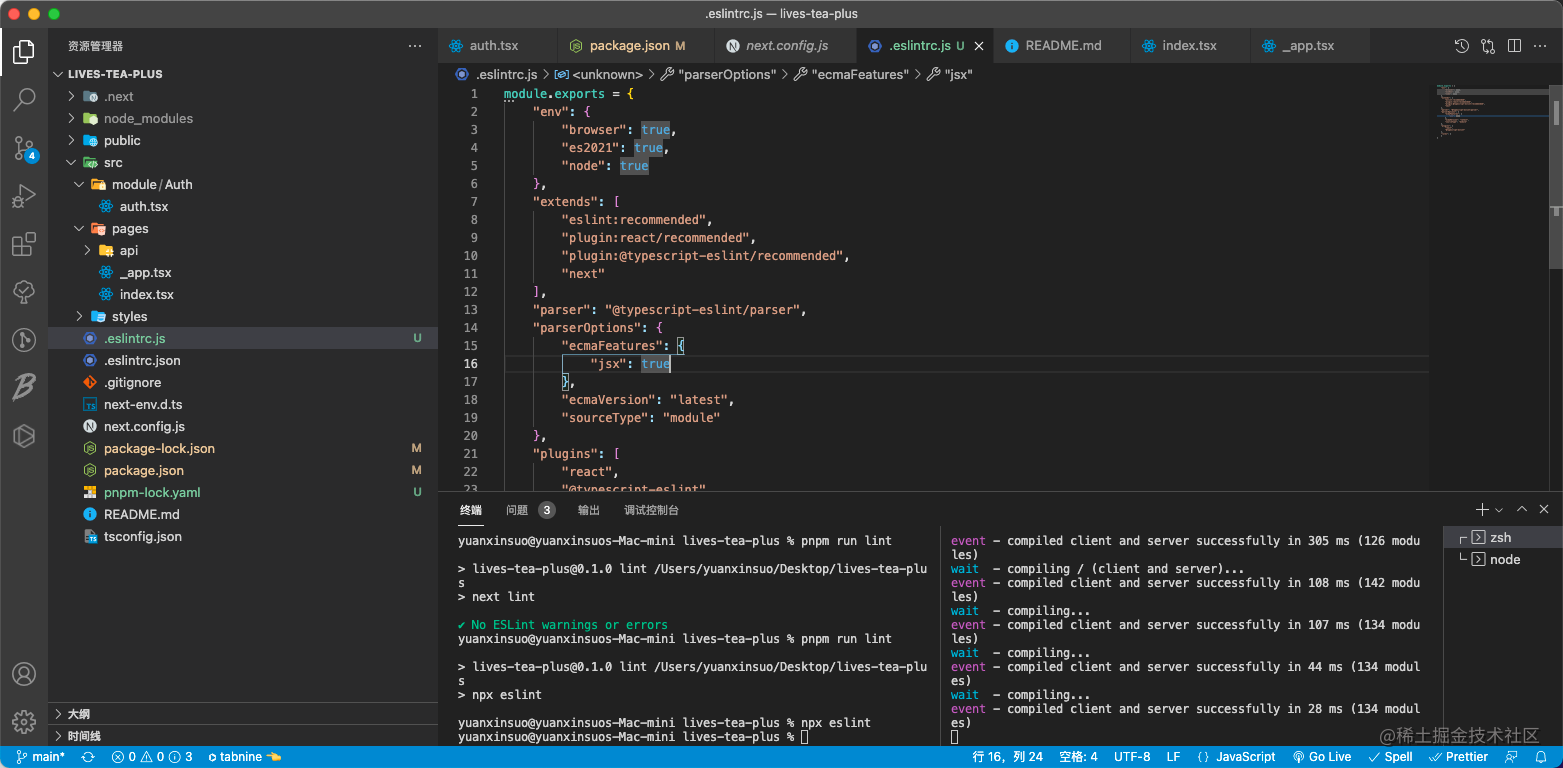
由于我的示例项目使用Next.js框架构建,需要在extends中额外配置"next"。
同时个人建议配置react-hooks插件
2.1.2 prettier
prettier是格式化工具,我个人使用上更偏爱使用prettier做代码格式化,如果你在上一步选择了eslint格式化大可忽略
pnpm i prettier --save-dev
我们需要在根目录配置.prettierrc;
这是我配置的规范,以下指令可以快捷生成
echo \{\"semi\": true,\"tabWidth\": 2,\"trailingComma\": \"es5\",\"singleQuote\": false,\"arrowParens\": \"always\"\} > .prettierrc
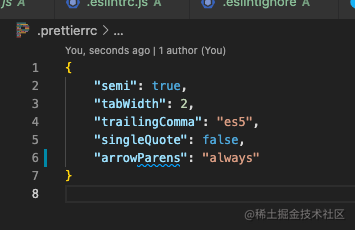
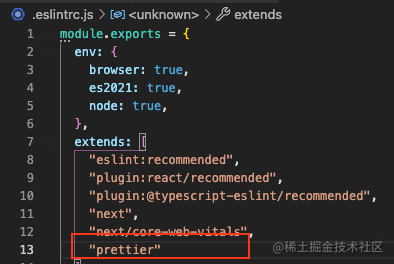
同时建议更新eslint的配置,增加prettier解决冲突
pnpm i eslint-config-prettier --save-dev
2.1.3 stylelint
pnpm install --save-dev stylelint stylelint-config-standard
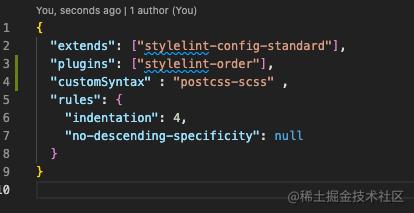
stylelint可以帮助我们检查以及格式化样式文件
{
  "extends": ["stylelint-config-standard"],
  "rules": {
    "indentation": 4,
    "no-descending-specificity": null
  }
}
由于项目启用了scss,需要额外配置
pnpm i -D postcss postcss-scss
2.2 git规范
git规范对于团队开发是非常有利的,在版本出现问题时可以清晰的定位;
2.2.0 husky的配置
做git规范,前置需要配置一下husky,后续的内容都是基于husky
pnpm i husky --save-dev
npm set-script postinstall "npx husky install"
npx husky install
这里有两个地方是可能存在问题的:
npm set-script postinstall "npx husky install":
>> 为package.json文件添加postinstall的脚本,该钩子会在npm运行install命令之后运行
npx husky install:
>> 该命令的意义是初始化husky,将 git hooks 钩子交由,husky执行,缺失这里即便配置好后边的命令也不会生效
同时补充一点:husky install命令必须在.git同目录下运行,如果你的package.json和.git不在同一目录,这是官方的解决方案:
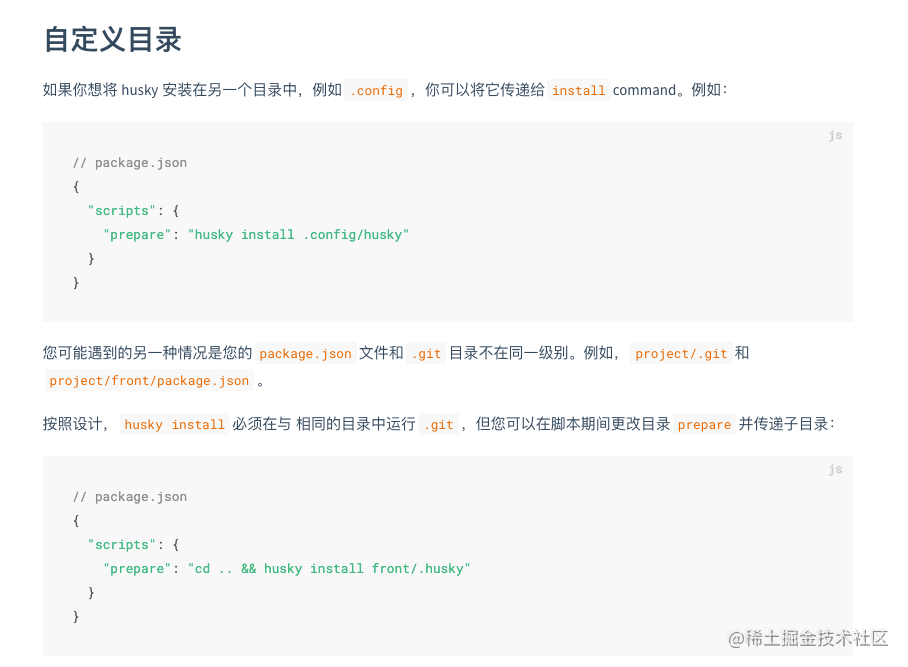
补一手官网链接「https://typicode.github.io/husky」
2.2.1 pre-commit
在代码commit前运行,通过钩子函数,可以判断提交的代码是否符合规范,我们可以在这里做强制格式化
pre-commit可以配合上边制定的eslint与prettier规则运行,我这里的期望是,对于git暂存区的内容做自动规范,所以这里需要用到lint-staged:
pnpm i lint-staged --save-dev
npx husky add .husky/pre-commit "npx lint-staged"
同时在根目录下创建.lintstagedrc,这是我的配置:
{
  "*.{js,jsx,ts,tsx}": ["npx prettier --write", "npx eslint --fix"],
  "*.{css,less,scss}": ["npx prettier --write", "npx stylelint --fix"],
  "*.{json,md}": ["npx prettier --write"]
}
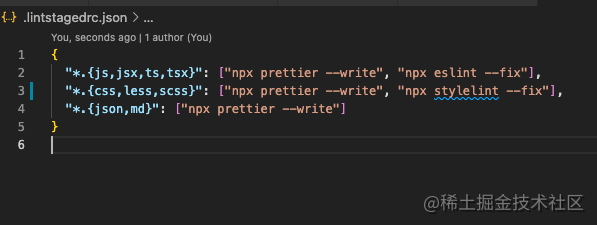
这样一来,在我们commit之前,代码会自动对暂存区指定文件进行格式化
2.2.2 commit-msg
在pre-commit之后运行,会检查commit的内容,做commit规范
pnpm i commitlint --save-dev
pnpm i @commitlint/config-conventional --save-dev
npx husky add .husky/commit-msg 'npx --no-install commitlint --edit "$1"'
@commitlint/config-conventional是Anglar的提交规范
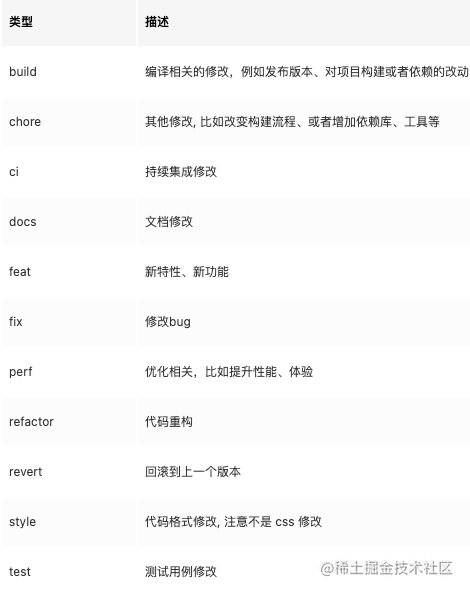
同时在根目录新建.commitlintrc.js
module.exports = {extends: ["@commitlint/config-conventional"]};
2.2.3 commit助手
commit助手可以帮助我们遵循
commit-msg
commit助手这里推荐
- commitizen
- cz-conventional-changelog
- commitlint-config-cz
- cz-customizable
这些包,但是具体的使用可以自行探索,我这里是自己写的,在后边可以看到。
2.2.4 pre-push
pre-push可以在代码push之前运行一些脚本,目前的实践就是在push行为之前做本地编包、测试
npx husky add .husky/pre-push "npm run build && npm test"
3 单元测试「可选」
单元测试中最出名的当属Jest
我这里使用的则是Jest和ReactTestingLibrary
3.1 Jest && ReactTestingLibrary
3.1.1 初始化与安装
项目中使用了ts,需要为Jest额外准备babel和typescript环境包
pnpm i jest -D
pnpm i -D babel-jest @babel/core @babel/preset-env @babel/preset-typescript
pnpm i -D @babel/preset-react react-test-renderer @types/react-test-renderer identity-obj-proxy
pnpm i ts-jest @types/jest -D
接着生成基本配置文件进行初始化
npx ts-jest config:init // ts版本
npx jest --init // js版本

npm set-script test "npx jest"
配置jest.config.js文件:
module.exports = {
  collectCoverageFrom: [
    "**/*.{js,jsx,ts,tsx}",
    "!**/*.d.ts",
    "!**/node_modules/**",
  ],
  moduleNameMapper: {
    "^.+\\.module\\.(css|sass|scss)$": "identity-obj-proxy",
    "^.+\\.(css|sass|scss)$": "<rootDir>/__mocks__/styleMock.js",
    "^.+\\.(jpg|jpeg|png|gif|webp|avif|svg)$": `<rootDir>/__mocks__/fileMock.js`,
    "^@/components/(.*)$": "<rootDir>/components/$1",
  },
  setupFilesAfterEnv: ["<rootDir>/jest.setup.js"],
  testPathIgnorePatterns: ["<rootDir>/node_modules/", "<rootDir>/.next/"],
  testEnvironment: "jsdom",
  transform: {
    "^.+\\.(js|jsx|ts|tsx)$": ["babel-jest", { presets: ["next/babel"] }],
  },
  transformIgnorePatterns: [
    "/node_modules/",
    "^.+\\.module\\.(css|sass|scss)$",
  ],
};
当然如果使用Next框架,这样写就行:
const nextJest = require('next/jest')

const createJestConfig = nextJest({
  dir: './',
})
const customJestConfig = {
  setupFilesAfterEnv: ['<rootDir>/jest.setup.js'],
}

module.exports = createJestConfig(customJestConfig)
接着在根目录创建jest.setup.js,内容可以暂时为空
3.1.2 编写第一个React测试用例 with 「ReactTestingLibrary」
安装依赖包
pnpm i -D @testing-library/jest-dom @testing-library/react
在jest.setup.js写入全局配置
import '@testing-library/jest-dom';
写第一个测试用例:
// home.test.tsx
import Home from "../pages/index";
import React from 'react'
import { render, screen } from '@testing-library/react'

it('renders homepage HelloWorld', () => {
  render(<Home/>)
  const helloworld = screen.getByRole('region', {
    name: /helloworld/i,
  })
  expect(helloworld).toBeInTheDocument()
})
// index.tsx
import type { NextPage } from "next";
import Head from "next/head";
import Image from "next/image";
import styles from "../styles/Home.module.scss";

const Home: NextPage = () => {
  return (
    <div className={styles.container}>
      <Head>
        <title>Create 1 Next App</title>
        <meta name="description" content="Generated by create next app" />
        <link rel="icon" href="/favicon.ico" />
      </Head>
      <main>
        <section className={styles.title} aria-label="helloworld">HelloWorld</section>
        <span className={styles.logo}>
          <Image src="/vercel.svg" alt="Vercel Logo" width={72} height={16} />
        </span>
      </main>
    </div>
  );
};

export default Home;
测试
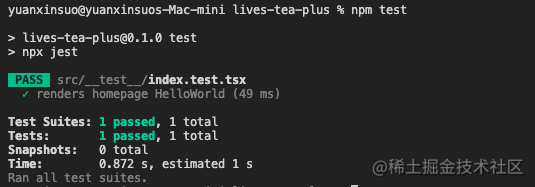
同时在此补上官网链接
- 「https://jestjs.io/docs/getting-started 」
- 「https://testing-library.com/docs/react-testing-library/intro 」
建议有问题还是啃文档吧
再补上一些有用的教程 - 「https://juejin.cn/post/7039108357554176037 」
4 持续集成/持续部署CI/CD
目前已知CI/CD一般要用到Docker/k8s Jenkins,通过git action在git更新的时候向服务器做更新操作
这真做起来就是抢运维饭碗了啊喂…
嗯…图方便,并且由于前端这边只有静态界面,我这里没有使用服务器。而是通过腾讯静态托管(类似CDN)完成一键部署测试环境。
注意这样是有缺陷的,包括但不限于缺少回滚机制、在本地编包的风险
可能更多人的诉求是当代码合并到某个分支后,机器能自动帮我执行完打包和部署这两个步骤,如果是这样后边不用看了哈…周末要结束我要歇歇了有机会额外出,不是一篇文章能搞定的
4.1 前置准备
先留一个官网链接「https://console.cloud.tencent.com/tcb/hosting 」
正常注册一个云开发环境就行,可以选择「按量付费」再买资源包,一般来讲日花费不到1元。
注册完毕后可以拿到云开发的环境ID,记下来
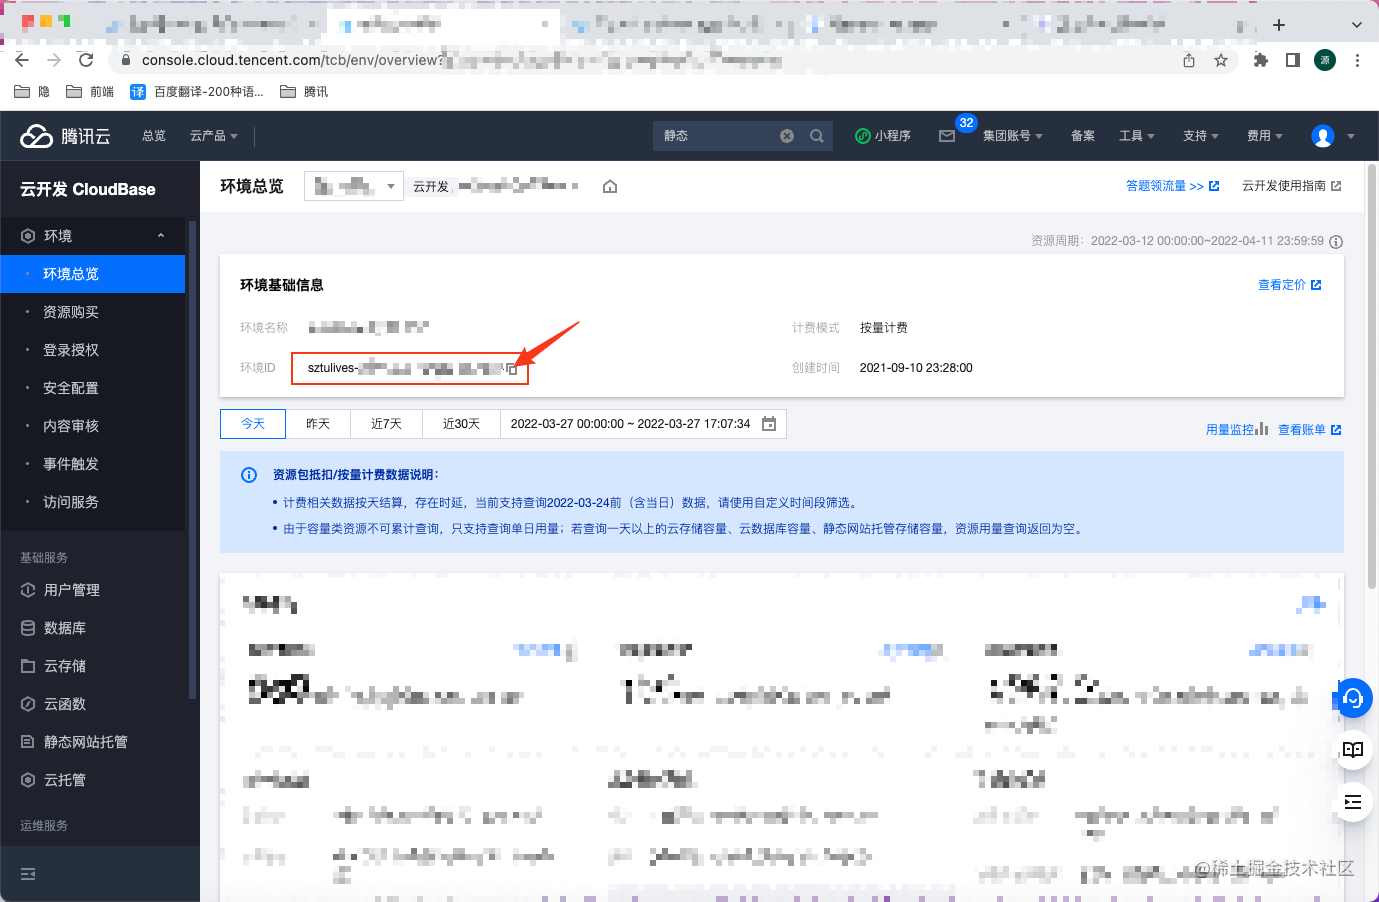
接着我们需要开通「新建云开发环境」-「静态页面托管」
同时全局安装腾讯云提供的cli,并登陆
npm i @cloudbase/cli -g --force
tcb login
登陆后做一下开发环境验证:
tcb hosting detail -e {{你的环境ID}}

确认已上线
4.2 自定义部署脚本
为了便于使用,我们写一个自定义脚本
- utils.js
const { blue } = require("chalk");
const { exec } = require("child_process");
const sys = (command, ...rest) =>
  new Promise((resolve, reject) => {
    exec(command, (err, stdout) => {
      if (err) {
        reject(err);
        return;
      }
      resolve([stdout, ...rest]);
    });
  });

module.exports = {
  blue,
  sys,
};
- publish.js
const { sys, blue } = require("../resources/utils");
const inquirer = require("inquirer");
const ora = require("ora");

const publishCli = (envID) => [
  `tcb hosting deploy ./out ./livestea -e ${envID}`,
];

module.exports = async () => {
  const spinner = ora("代码发布中ing...");
  inquirer
    .prompt([
      {
        type: "confirm",
        name: "build",
        message: "是否先进行静态遍包(默认否)",
        default: false,
      },
      {
        type: "list",
        name: "value",
        choices: [
          {
            name: "测试环境",
            value: {
              envID: "xxx",
              url: "xxx",
            },
          },
          new inquirer.Separator("---无授权请不要发布正式环境---"),
          {
            name: "正式环境",
            value: {
              envID: "xxx",
              url: "xxx",
            },
          },
        ],
        message: "选择发布环境:",
      },
      {
        type: "confirm",
        name: "confirm",
        message: "确认发布?",
      },
    ])

    .then((answers) => {
      if (!answers.build) {
        return answers;
      }
      return sys("npm run export").then(() => answers);
    })
    .then((answers) => {
      const { confirm, value } = answers;
      if (!confirm) {
        return;
      }
      const { envID, url } = value;
      const [command] = publishCli(envID);
      console.log(command);
      spinner.start();
      return sys(command, url);
    })
    .then(([status, url]) => {
      spinner.stop();
      console.log(status);
      spinner.text = "代码发布成功";
      spinner.succeed();
      return url;
    })
    .then((url) => {
      console.log(blue(`${url}?time=${Date.now()}`));
    });
};
- main.js
const [command, ...argvs] = process.argv.splice(2);

switch (command) {
  case "cz":
    require(`./scripts/commitizen`)(...argvs);
    break;
  default:
    require(`./scripts/${command}`)(...argvs);
    break;
}
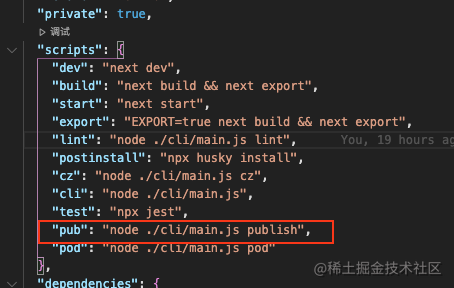
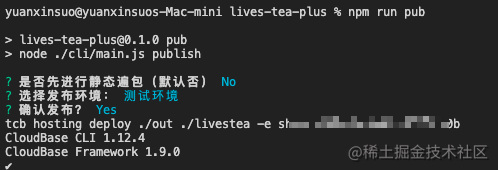
这样我们就可以通过脚本命令一键部署,记得部署之前要确认是否在本地编包哦~
npm run pub

附件
附件1 cli目录结构
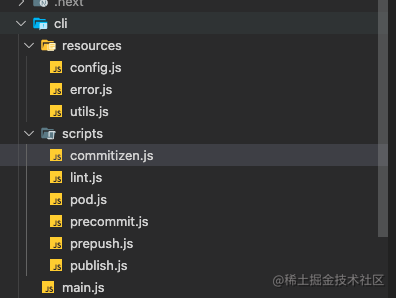
附件2 commit助手自定义
- ora用来加载loading效果

- inquirer用来做命令行交互

- chalk用来给打印信息上色
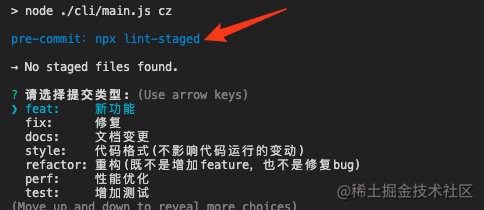
#! /usr/bin/env node
const inquirer = require("inquirer");
const ora = require("ora");
const precommit = require("./precommit");
const { yellow } = require("chalk");
const { errorCodeFunc, errorCode, getError } = require("../resources/error");
const { sys } = require("../resources/utils");
const { CUSTOM_ERR_ERROR, CUSTOM_ERR_INFO, CUSTOM_ERR_IGNORED } = errorCode;

const commitizen = {
  types: [
    { value: "feat", name: "feat:     新功能" },
    { value: "fix", name: "fix:      修复" },
    { value: "docs", name: "docs:     文档变更" },
    { value: "style", name: "style:    代码格式(不影响代码运行的变动)" },
    {
      value: "refactor",
      name: "refactor: 重构(既不是增加feature,也不是修复bug)",
    },
    { value: "perf", name: "perf:     性能优化" },
    { value: "test", name: "test:     增加测试" },
    { value: "chore", name: "chore:    构建过程或辅助工具的变动" },
    { value: "revert", name: "revert:   回退" },
    { value: "build", name: "build:    打包" },
    { value: "ci", name: "ci:       持续集成修改" },
  ],
  messages: {
    type: "请选择提交类型:",
    scope: "请输入修改范围(可选):",
    subject: "请简要描述提交(必填):",
    body: "请输入详细描述(可选):",
    footer: "请输入要关闭的issue(可选):",
    confirmCommit: "确认使用以上信息提交?",
  },
};
const { types, messages } = commitizen;

module.exports = async () => {
  let commit = null;
  const spinner = ora("代码提交中ing...");

  precommit()
    .then((e) => {
      if (!e.code) {
        throw { code: CUSTOM_ERR_IGNORED };
      }
      return inquirer.prompt([
        {
          type: "list",
          name: "type",
          message: messages.type,
          choices: types,
          loop: false,
        },
        {
          type: "input",
          name: "subject",
          message: messages.subject,
        },
        {
          type: "input",
          name: "scope",
          message: messages.scope,
        },
        {
          type: "body",
          name: "body",
          message: messages.body,
        },
        {
          type: "footer",
          name: "footer",
          message: messages.footer,
        },
      ]);
    })
    .then((answers) => {
      const { subject } = answers;
      if (!subject) {
        throw {
          code: CUSTOM_ERR_ERROR,
          msg: "commit信息中必须包含基本的【描述提交】",
        };
      }
      return answers;
    })
    .then(({ type, scope, subject, body, footer }) => {
      const _header = `${type}${scope ? `(${scope})` : ""}: ${subject};`;

      const _body = `${body ? "\n" + body : body}`;

      const _footer = `${footer ? "\n" + footer : footer}`;
      return `${_header}${_body}${_footer}`.replaceAll("`", "\\`");
    })
    .then((str) => {
      console.log(yellow("------------------------"));
      console.log(str.replaceAll("\\`", "`"));
      commit = str;
      console.log(yellow("------------------------"));
      return inquirer.prompt([
        {
          type: "confirm",
          name: "confirm",
          message: messages.confirmCommit,
        },
      ]);
    })
    .then(({ confirm }) => {
      if (!confirm) {
        throw {
          code: CUSTOM_ERR_INFO,
          msg: "取消提交",
        };
      }
      return;
    })
    .then(() => {
      const command = `git commit -m "${commit}"`;
      console.log(`\n${command}\n`);
      spinner.start();
      return sys(command);
    })
    .then(([res]) => {
      spinner.stop();
      console.log(res);
      spinner.text = "代码提交成功";
      spinner.succeed();
    })
    .catch((e) => {
      spinner.stop();
      errorCodeFunc(e.code ?? getError(e).code, e);
      spinner.text = "代码提交失败";
      spinner.start();
      spinner.fail();
      return { code: 0, errMsg: e };
    });
};
总结
写这篇文章一是汇总部分近期学习和了解到的知识,二是希望能完备一下自己的文章库
~~ 🙅 不可能是防止自己有一天忘了
