pytest + allure 生成html报告之入门的一点点踩坑记录
前言
最近给公司写了个python+unittest实现的接口自动化,项目完成后,心里有点空荡荡的,就想不如研究一下pytest + allure吧,据说pytest使用率更高。
一、unittest 和 pytest的区别?
-
官方库与第三方库的区别
Unittest是python的官方库,由python团队开发,兼容性好,但是只有通用的核心功能
Pytest是第三方库,支持第三方插件多,但是和python版本可能存在不兼容问题 -
编写用例方式不同:
unittest用例,必须用类,类必须继承TestCase,方法名和模块名必须test开头
Pytest编写用例,可以用类,也可以用函数,且不需要继承,方法名称和模块名称都支持pytest.ini自定义,默认的是test开头 -
加载用例方式不同:
Unittest加载用例得通过TestSuite,TestRunner去加载用例到套件
Pytest不需要加载用例,会自动查找 -
前后置处理方式不同:
Unittest前置:setUpClass,tearDownClass,setUp,tearDown
Pytest前后置:setup_class,teardown_class,setup,teardown,@pytest,fixture(scope=”class”或者function)修饰,通过yeild区分前后置 -
断言方式不同:
Unittest可以调用封装的assertEqual,和assert,pytest只能用assert -
执行用例顺序不同:
Unittest是根据ASCII码执行
Pytest是从上到下执行
二、pytest入门
1.安装pytest库
安装命令和其他库差不多:
pip install pytest
2.写个小案例
代码如下(示例):
#!/usr/bin/env python
# -*- coding:utf-8 -*-
import pytest


class TestLogin:
    def test_login(self):
        print('---------------login--------------')


if __name__ == '__main__':
    pytest.main(['-vs'])
运行结果如下:

pytest 要想完整的配置起来,还需要配置pytest.ini以及conftest.py 还有各式各样的注解,这里就不多说了,毕竟今天的重点是allure生成报告
三、allure入门
1. 在python库中先安装 allure-pytest
pip install allure-pytest
2. 安装allure
!!! 重点:必须安装java和jdk(安装步骤自行搜索) !!!
allure 下载地址:https://github.com/allure-framework/allure2/releases 官网地址是:http://allure.qatools.ru/ (我访问不了)
我安装的是2.15.0版本
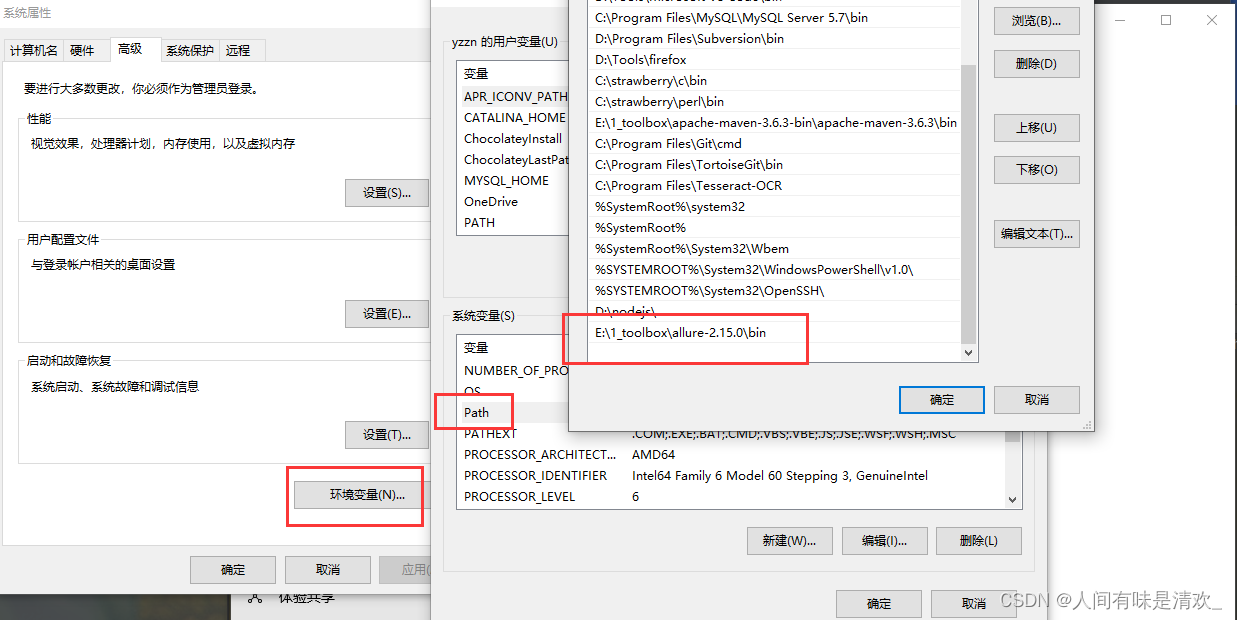
windows系统下,下载好allure后直接解压,注意最好不要放C盘哦。解压后进入文件夹bin中,双击其中的allure.bat文件,会有一个窗口一闪而过,此时安装成功一半了,接下来复制bin目录的地址去配置环境变量:在path中加入allure的bin目录地址,如下图:

安装成功后 win+r 进入cmd命令 输入 allure --version 查看版本信息,显示出来则表示安装成功了

这里如果在python程序中如果还提示allure不是内部或外部命令,请一定要使用重启大法!
接下来讲讲重点(我踩坑无数):
随便百度一下,allure的命令简直不要太多,但是!详细说明的确很少(也正是如此,我一直踩坑,生成的报告一直没得数据)。既然是入门篇,咱们就长话短说:
咱们的项目结构如下,已知想要运行test_login.py项目

首先咱么win+r先进入项目根目录位置:

开始执行命令生成报告:
# 格式为 pytest '执行的文件名或文件夹名' -vs --alluredir '存放json的文件路径'
# 值得注意的是存放json的路径和后面讲到的html路径记得分开,我之前就是没分开然后一直有问题找了一下午
# 这一步是执行用例并生成json文件
pytest case -vs --alluredir ./report/json

如图,表示已经执行成功,这时去查看我们的项目已经生成了report 和 json 文件夹了并生成了json记录

接下来生成完整的allure文件
# 命令 allure generate --clean 'json文件存放路径' -o '测试报告存放路径'
allure generate --clean ./report/json -o ./report/html

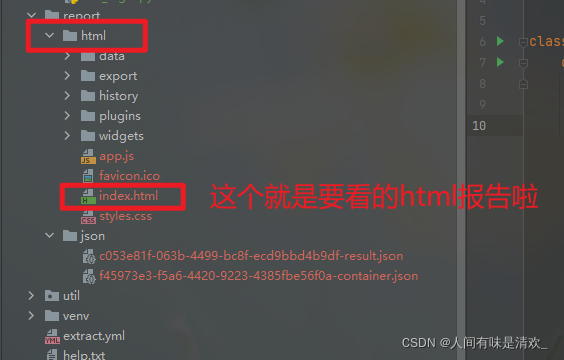
再次查看我们的项目,已经生成了html文件夹及内容了

渲染并访问:
# 命令 allure open 'html文件夹路径'
allure open ./report/html

关键的报告来了,请看报告,已经生成了:


接下来,我们再多加一点点东西,让报告更详细一点点,修改一下test_login.py
#!/usr/bin/env python
# -*- coding:utf-8 -*-
import allure


class TestLogin:
    def test_login(self):
        allure.dynamic.severity(allure.severity_level.BLOCKER)
        allure.dynamic.title('方法1')
        allure.dynamic.story("Case")
        allure.dynamic.description('测试中~~~~~~~~~')
        print('---------------login--------------')

再比如说,想添加一个截图
import os
import time
import allure
from selenium import webdriver

local_dir = os.path.dirname(os.path.dirname(os.path.abspath(__file__)))


class TestLogin:

    def test_baidu_img(self):
        """
        allure报告中添加截图
        """
        # 打开浏览器
        driver = webdriver.Chrome()
        # 最大化
        driver.maximize_window()
        # 访问百度
        driver.get('https://baidu.com')
        time.sleep(3)
        file_dir = os.path.join(local_dir, 'result')
        # 判断文件夹是否存在,否则创建
        if not os.path.exists(file_dir):
            os.mkdir(file_dir)
        # 图片保存完整路径
        file_path = os.path.join(file_dir, time.strftime('%Y%m%d_%H%M%S', time.localtime()) + '.png')
        # 截图
        driver.get_screenshot_as_file(file_path)
        # 获取图片流
        with open(file_path, 'rb') as f_img:
            f = f_img.read()
        # 写入allure
        allure.attach(f, 'Login', allure.attachment_type.PNG)
        # 关闭浏览器
        driver.quit()
allure 报告中样式如下:

3. 自动启动命令
由于每次都要打开cmd命令窗口再输入命令才能执行,就显得很繁琐,下面介绍一下我自己研究出来的一键运行(如有更好的方法欢迎留言)
首先新建一个xx.txt的普通文档,文档里面写入命令(命令前面最好加上call ,否则可能出现最后一行无法运行的情况)
call pytest case -vs --alluredir ./report/json
call allure generate --clean ./report/json -o ./report/html
call allure open ./report/html
再将xx.txt文档的后缀改成xx.bat文件再将该文件放到项目下(如果不愿意放入项目下,则在文档的最前面加入进入文件夹的命令)

下次运行只需要双击start.bat文件就行了,如果还是觉得麻烦,则将执行该文件的命令写入代码,例如我写入了run_all.py文件中,这样我只需要启动该文件就行了
#!/usr/bin/env python
# -*- coding:utf-8 -*-
import os


if __name__ == '__main__':
	# start.bat文件路径
    exe_path = os.path.join(os.getcwd(), 'start.bat')
    # 启动文件
    os.system('start ' + exe_path)
以上是其中的一种思路,或者更简单一点可以直接用os.system()输出全部命令,又或者结合pytest.ini来写
例如 pytest.ini文件中addopts 加入 --alluredir json存放路径(这个有个问题就是:json路径必须存在~所以我还是比较喜欢使用上一种方式):
[pytest]
addopts = -vs --alluredir ./report/json
testpaths = ./case
python_files = test_*.py
python_classes = Test*
python_functions = test_*
markers =
    smoke: test
然后我们再修改执行方法
#!/usr/bin/env python
# -*- coding:utf-8 -*-
import os

import pytest

if __name__ == '__main__':
    # exe_path = os.path.join(os.getcwd(), 'start.bat')
    # os.system('start ' + exe_path)
    pytest.main()
    os.system('allure generate --clean ./report/json -o ./report/html')
四、 关于pytest的一点点额外小知识
1. pytest.main()参数介绍
-v   输出更加详细的运行信息
-s   输出调试信息
-n   多线程运行('-n=3':表示三个线程)
--reruns   失败用例重跑('--reruns=2':表失败后重跑2次)
--html  生成html测试报告('--html=./xxxx.html')
代码如下:
pytest.main(['-vs', '-n=3', '--reruns=2', '--html="./result.html"'])
2. pytest一键安装所有插件
在根目录下创建一个requrements.txt(名字是约定俗成的,建议一致)
然后在文档中写入你需要导入的所有插件库最后执行命令即可一键安装
例如(记得把我写的注释给删掉):
# 生成html测试报告 可以加入版本号:比如 pytest-html = 2.0.1
pytest-html
# 多线程运行
pytest-xdist
# 改变测试用例的执行顺序
pytest-ordering
#  失败用例重跑
pytest-rerunfailures
# 生成allure测试报告
allure-pytest
最后在控制台输入命令一键导入所有库
pip install -r requrements.txt
我已经安装过了~所以提示已满足,正常情况下就是执行安装哈…

3. pytest 夹具
@pytest.fixture(scope=“作用域”, params=“数据驱动”, autouse=“自动执行”, ids=“自定义参数名”, name=“重命名”)
作用域(默认是function):function(函数), class(类), module(模块), package/session (包/会话)
一般情况下@pytest.fixture()会和conftest.py文件一起使用
conftest.py名称是固定的
- conftest.py文件是单独存放@pytest.fixture()方法。可以在多个py文件之间共享前置配置
- conftest.py里面的方法在调用时不需要导入,可以直接使用
- conftest.py可以有多个,也可以有多个不同的层级
例如 在 conftest.py中有如下代码:
该方法会在整个session会话结束后自动执行一次
@pytest.fixture(scope='session', autouse=True)
def clear_extract_yaml():
    """
    作用于session会话,自动执行该方法
    """
    print('运行结束,关闭xxxx')
或者 作用于function:
@pytest.fixture()
def get_token():
    print('执行了get_token,token是:', 123456)
	return 123456
在任意一个与conftest.py同级或下级的文件中使用
def test_01(self, get_token):
	assert get_token == 123456

4. yield 生成器
yield 类似于唤醒teardown的功能,简单理解就是返回,跟return类似,区别在于yield可以返回多次以及多个数据,返回后仍可以执行后续代码,return只能返回一次且后面不能有代码
例如:
@pytest.fixture(scope="function")
def connection_db():
    print('假装我在连数据库')
    yield
    print('假装我关掉了数据库')


def test_01(self, connection_db):
    print('我是:test_01')
执行 test_01函数后输出的结果如下:
    假装我在连数据库
    我是:test_01
    假装我关掉了数据库
总结
好了,到这里就结束了,此文章就只讲一点点入门了,接下来继续摸爬打滚继续学习
