上篇文章我们完成了准备工作,讲了基础的图片资源的使用。现在我们关注脚本的编写以及prefab的使用。
1.结点移动、随机方向
atomMove.ts脚本——实现atom物体的移动,并且我们给atom一个随机的初始方向。
import { _decorator, Component, Node,randomRange, Vec2 } from 'cc';
const { ccclass, property } = _decorator;

@ccclass('AtomMove')
export class AtomMove extends Component {
    //属性声明  该属性会显示在引擎的属性编辑器中
    @property
    moveSpeed = 20.0;

    //私有属性声明 ,记得import相关库
    private randomVec2 : Vec2 = new Vec2();

    //开始函数
    start () {
        //随机方向
        this.getRandomDir();
    }

    //帧刷新
    update (deltaTime: number) {
        let x : number | undefined = this.node.position.x ;
        let newX = x+this.moveSpeed* deltaTime*this.randomVec2.x ;

        let y : number | undefined = this.node.position.y ;
        let newY = y+this.moveSpeed* deltaTime*this.randomVec2.y ;

        //改变node的setPosition是简单的移动方式
        this.node.setPosition(newX,newY);
    }

    getRandomDir() {
        //这里包含了randomRange的使用,数字转角度的写法,normalize()是单位向量化
        this.randomVec2.x = Math.cos(randomRange(-180,180) * ( Math.PI / 180));
        this.randomVec2.y = Math.sin(randomRange(-180,180) * ( Math.PI / 180));
        this.randomVec2.normalize(); //
    }

}
写好后我们将脚本安方到atom结点上,运行游戏可以看见atom在沿着一个方向移动。
2.prefab、计时器
只需要将结点,从层级管理器拖放到资源管理器里就创建好了。prefab可以看作一个模型,创建时结点包含的如何属性,组件都将保留进入prefab中。由此我们创建一个atom包含atomMove脚本的prefab,并构建createAtom.ts脚本用于通过代码创建prefab,并使用计时器来重复调用创建函数。
import { _decorator, Component, Node,Prefab ,instantiate} from 'cc';
const { ccclass, property } = _decorator;

@ccclass('CreateAtom')
export class CreateAtom extends Component {
    //property属性包含很多类型
    @property(Prefab)
    atomPrefab : Prefab = null!; //该声明null!很时奇特

    start () {
        //这里的定时器 每隔0.5秒一次回调,重复50次
        this.schedule(
        function(){
            // @ts-ignore                //该代码不可或缺
            this.createAtom();
        }
            , 0.5, 50, 0.5
        );
    }

    createAtom(){
        //instantiate创建函数
        let netAtom : Node = instantiate(this.atomPrefab) ;
        netAtom.setPosition(0,0);
        //记得要加入到node
        this.node.addChild(netAtom);
    }
}
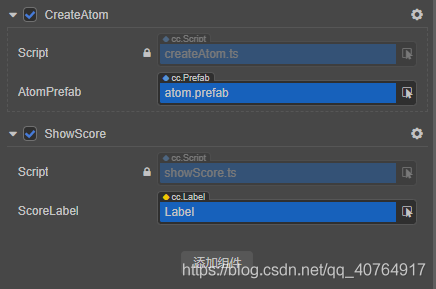
将该脚本添加到Canvas结点下,设置好atom的prefab,运行游戏可以看到页面在不断创建新的atom,atom在随机方向移动。
3.全局变量、鼠标点击、字体显示
增加游戏趣味性,我们在atomMove.ts添加函数,使其能够在被点击的清空下消除自己。并且需要一个全局变量,记录玩家消除atom获取的分数。最后再把字体显示在界面上。
我们先来创建全局变量
//global.d.ts
declare interface Window{
    score : number;
    atomNumber : number;
}在atomMove.ts增加点击事件函数
//atomMove.ts
//开始函数
start () {
    //随机方向
    this.getRandomDir();
    //添加鼠标点击监视器
    this.node.on(Node.EventType.MOUSE_DOWN,this.whenMouseDown,this);
}


whenMouseDown()
{
    this.node.destroy();
    window["score"]++;
}
创建showScore.ts脚本,同样添加入Canva中
import { _decorator, Component, Label } from 'cc';
const { ccclass, property } = _decorator;

@ccclass('ShowScore')
export class ShowScore extends Component {
    @property(Label)
    scoreLabel : Label = null!;

    start () {
        window["score"] = 0;
    }

    update (deltaTime: number) {
        //显示文字
        this.scoreLabel.string = "Score:" + window["score"];
    }
}
创建label结点,放入页面偏上位置,添加入该脚本的lable槽位中

开始游戏我们能够看到不断从中心创建的atom在飘荡,点击atom我们可以获取更高分数。

?
?