目录
一:版本变化
图集Sprite Packer在 Unity 2020.1以及以后的版本不再作为精灵打包模式的可用选项。以后创建的任何新项目在打包纹理时将默认使用 Sprite Atlas打包图集。
二:为什么使用图集?
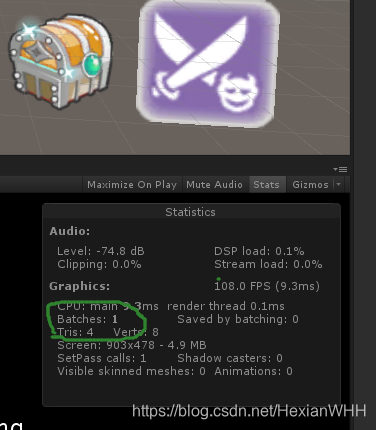
1.减少draw call: 多张图片需要多次draw call,合成了一张大图则只需要一次draw call。
创建两个Image使用不同的图片,Batches是2

如果把两个图片打成一个图集,Batches是1

2.减少内存占用:OpenGL ES中每张贴图都需要设置成2的n次方才能使用。比如你有一张宽高为100x100和一张宽高为10x10的图片,如果不合成大贴图,那么需要使用128x128和16x16的两张图片(分别是2的7次方和2的4次方),但如果使用一张大图的话,可以把100x100和10x10的图片放到128x128的大图中,这样就用一张图片。
先来讲解一下旧版unity?图集Sprite Packer的使用说明,使用unity版本2019.4.29f1c1
二:打包方式
设置打包方式Editor->Project Settings 下面有Sprite Packer的模式

Disabled:在项目中禁用精灵图集打包。当项目进入播放模式或打包时,不会构建精灵图集。Pack Preview 也禁用。
Enabled for Builds (Legacy Sprite Packer):选择此模式将启用旧版 Sprite Packer 并禁用精灵图集,因为二者无法同时启用。仅针对打包,Unity 使用旧版 Sprite Packer 将精灵进行打包。Editor 和播放模式引用原始源纹理而非打包图集中的纹理。
Always Enabled (Legacy Sprite Packer):选择此模式将启用旧版 Sprite Packer 并禁用精灵图集,因为二者无法同时启用。Unity 使用旧版 Sprite Packer 将所选纹理打包到图集中,且精灵在运行时将引用打包的纹理。但是,精灵将在编辑模式期间引用原始未打包的纹理。
Enabled for Builds:仅针对打包,Unity 将精灵打包到精灵图集中。Editor 和播放模式引用原始源纹理而非精灵图集中的纹理。
Always Enabled:默认情况下会启用此选项。Unity 将所选纹理打包到精灵图集中,且精灵在运行时将引用打包的纹理。但是,精灵将在编辑模式期间引用原始未打包的纹理。
简单理解就是Legacy是旧版本的图集,Enabled For Builds打包是才会启用打图集,Always Enabled 永远启用
三:如何使用
- 导入,把美术提供的图片直接拖入unity
- 设置图片类型,导入以后默认是Default,修改成Sprite(2D and UI)设置图集名称PackingTag这里设置的图集名称相同会尽量(有可能不在一起,下面介绍)打包同一个图集。我这里起名为spriteName如果不起名称不会打到图集里面。

- Windows->2D->Sprite Packer打开图集面板图集面板。如果没有,请先检查Project Settings设置是否选择了Always Enabled,点击Pack就可以看到打成的图集了。
四:Sprite Packer面板详解

- Pack打图集
- Repack重新打图集,只有当我们选择了非默认打包策略(DefaultPackerPolicy)时才会可用。
- aa(Group 0)打包的图集名称,点击下来箭头可以看到所有的图集名称,为什么有(Group 0)后面讲解。
- Page1当前图集分好多页可以点击下拉看每一页的具体图片。
- DefaultPackerPolicy打图集策略:

- DefaultPackerPolicy:是默认的打包方式,也是矩形打包方式。他会把所有的小图按照矩形的方式来排列,如果宽高不一样的图片,它们会自动补齐。
- TightPackerPolicy:是紧密打包方式,也就是尽可能的把图片都打包在图集上,这种方式要比DefaultPackerPolicy打包的图片更多一些,也就是更省空间。
- TightRotateEnabledPackerPolicy:是紧密可旋转打包方式,也就是使用紧密打包,并且允许精灵进行旋转。
- 自定义打包方式,需要在一个编辑器脚本类中实现UnityEditor.Sprites.IPackerPolicy接口,并重写GetVersion和OnGroupAtlase两个接口。例如自己想控制图片打包格式,图集大小等等就可以自己写代码控制。例如我这里定义了一个类MyPackerPolicy实现了这个接口再次打开这个面板就会多了一种打图集的方式

- 混合模式,比如当前打包图集是DefaultPackerPolicy 那么小图中[TIGHT]开头的就表示单独这张图采用TightPackerPolicy打包模式。或者当前打包图集是TightPackerPolicy 那么小图中[RECT]开头的就表示单独这张图采用DefaultPackerPolicy打包模式。注意如果当前是DefaultPackerPolicy就不要写[RECT]不然会生成两张图集,TightPackerPolicy同样,例如下图就会产生两个图集

五:打图集的常见问题
- 要打成图集的图片不能放在Resources文件夹下面。设置了打成图集也不行;例如三张图片都设置成图集aa,两张不在Resources里面,一张红花的图片在Resources里面然后打包图集,红花的图片不在图集里面。


- 透明和不透明的图片就算设置成同一个图集也会打成两个。例如两张图片一个透明一个不透明都打到图集aa中。unity会自动生成两个图集用aa(Group 下标)来表示。

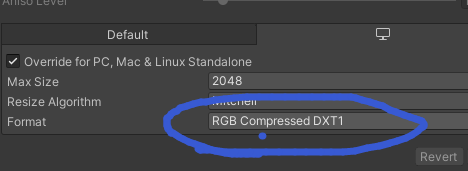
- 压缩格式不同就算设置成同一个图集也会打成两个。android和ios都公用rgba模式,也有各自不同的模式,对于android而言,默认的压缩格式是etc2,当手机不支持etc2时会自动转换成rgba模式,但是所有的android手机都支持etc1模式,只是压缩效果差些;对于ios而言,默认的压缩格式是pvrtc。使用正确的压缩格式内存占用会小但图会被压缩,而使用rgba模式效果是好,但是图集会变大,从而增大内存占用。
例如两张图片一个DXT1一个DXT5都打到图集aa中。unity会自动生成两个图集用aa(Group 下标)来表示。


- 生成的图集保存在了哪里呢?它保存在Libary/AtlasCache里面。你不用管它,也不要删除它,就算你删除了也没用因为只要你打包,它就会生成并且会打到包中。
- 不在Resources里面游戏运行以后如何使用Resources.Load。一般图片都是策划配置路径程序动态加载,不在Resources同时没有引用就不会被打包到安装包里面,所以要使用必须添加一个引用到Resources里面。我这里为每一个Sprite单独做成一个预制体,但是这个手动太麻烦所以需要写一个工具。
六:工具脚本
- 每张图片都需要单独设置图集名称可以使用脚本统计设置,按照文件夹名称每一个大文件夹下面的都打成一个图集。例如直接在Image下面的图集就叫Image,Image1下以及他下面的子文件夹的图集名称都叫Image1,其他文件夹同理。

public class SpritePackerTool { /// <summary> /// 图片在Asset下的路径 /// </summary> const string ImagePathRoot = "Art/Image"; /// <summary> /// 获取所有需要打图集的根文件夹 /// </summary> /// <returns></returns> static string GetImageRootDir() { var imgRootIndex = ImagePathRoot.LastIndexOf("/"); if (imgRootIndex >= 0) { return ImagePathRoot.Substring(imgRootIndex + 1); } else { return ImagePathRoot; } } /// <summary> /// 得到图集名称 /// </summary> /// <param name="assetPath"></param> /// <returns></returns> static string GetPackName(string assetPath) { //把\和/路径都统一成/ var newAssetPath = assetPath.Replace("\\", "/"); int imageRootIndex = newAssetPath.IndexOf(ImagePathRoot); var subImagePath = newAssetPath.Substring(imageRootIndex + ImagePathRoot.Length + 1); var dirIndex = subImagePath.IndexOf("/"); if (dirIndex < 0) { return GetImageRootDir(); } else { return subImagePath.Substring(0, dirIndex); } } /// <summary> /// 按照文件夹设置图片的图集名称 /// </summary> [MenuItem("SpritePackerTool/SetPackerName")] static private void SetPackerName() { //得到所有图片 var projectRoot = Directory.GetParent(Application.dataPath).FullName; var imgetFullPath = Path.Combine(Application.dataPath, ImagePathRoot); int assetPathStartIndex = projectRoot.Length + 1; var allImagePaths = Directory.GetFiles(imgetFullPath, "*.png", SearchOption.AllDirectories); foreach (var imagePath in allImagePaths) { var assetPath = imagePath.Substring(assetPathStartIndex); var textureImport = (TextureImporter)AssetImporter.GetAtPath(assetPath); textureImport.textureType = TextureImporterType.Sprite; textureImport.spritePackingTag = GetPackName(assetPath); } Debug.Log("设置图集名称完成"); } } - 也是设置图集名称可以指定某一个文件夹下面的图片导入以后自动设置,使用和上面同样的起名规则。
public class ImagePost : AssetPostprocessor { /// <summary> /// 图片在Asset下的路径 /// </summary> const string ImagePathRoot = "Assets/Art/Image"; /// <summary> /// 获取所有需要打图集的根文件夹 /// </summary> /// <returns></returns> static string GetImageRootDir() { var imgRootIndex = ImagePathRoot.LastIndexOf("/"); if (imgRootIndex >= 0) { return ImagePathRoot.Substring(imgRootIndex + 1); } else { return ImagePathRoot; } } /// <summary> /// 得到图集名称 /// </summary> /// <param name="assetPath"></param> /// <returns></returns> static string GetPackName(string assetPath) { //把\和/路径都统一成/ var newAssetPath = assetPath.Replace("\\", "/"); int imageRootIndex = newAssetPath.IndexOf(ImagePathRoot); var subImagePath = newAssetPath.Substring(imageRootIndex + ImagePathRoot.Length + 1); var dirIndex = subImagePath.IndexOf("/"); if (dirIndex < 0) { return GetImageRootDir(); } else { return subImagePath.Substring(0, dirIndex); } } //Texture2D导入时执行 void OnPostprocessTexture(Texture2D texture) { //不是指定文件夹下面的图片不需要处理 if (!assetPath.StartsWith(ImagePathRoot)) return; TextureImporter textureImporter = assetImporter as TextureImporter; textureImporter.textureType = TextureImporterType.Sprite; textureImporter.spritePackingTag = GetPackName(assetPath); } } - 为了解决第四条打图集的常见问题的第5个问题Resources的问题需要把打成图集以后的精灵关联到Resources里面,这样打包以后就可以使用Resources.Load加载了。做法是对每一个Sprite都制作成一个预制体放在Resources下面。生成的目录结构和原本图片的结构保持一致,这样方便美术(导入到美术文件夹)策划(配置表)程序(加载)的路径相对统一。
public class SpritePackerTool
{
	/// <summary>
	/// 图片在Asset下的路径
	/// </summary>
	const string ImagePathRoot = "Art/Image";
	const string ImagePrefabPathRoot = "Resources/Image/Sprite";
	/// <summary>
	/// sprite转换为预制体
	/// </summary>
	/// <param name="imagePath">图片路径</param>
	/// <param name="prefabPath">预制体路径</param>
	static void ConvertPrefab(string imagePath, string prefabPath)
	{
		var sprite = AssetDatabase.LoadAssetAtPath<Sprite>(imagePath);
		GameObject go = new GameObject(sprite.name);
		go.AddComponent<SpriteRenderer>().sprite = sprite;
		PrefabUtility.SaveAsPrefabAsset(go, prefabPath);
		GameObject.DestroyImmediate(go);
	}

	[MenuItem("SpritePackerTool/MakeSpritePrefab")]
	static void MakeSpritePrefab()
	{
		if (!Directory.Exists(ImagePrefabPathRoot))
		{
			Directory.CreateDirectory(ImagePrefabPathRoot);
		}
		var imgetFullPath = Path.Combine(Application.dataPath, ImagePathRoot);
		DirectoryInfo imageRootPath = new DirectoryInfo(imgetFullPath);
		var allImagePaths = Directory.GetFiles(imgetFullPath, "*.png", SearchOption.AllDirectories);

		var projectRoot = Directory.GetParent(Application.dataPath).FullName;
		int assetPathStartIndex = projectRoot.Length + 1;

		foreach (var imagePath in allImagePaths)
		{
			var assetPath = imagePath.Substring(assetPathStartIndex);
			//把\和/路径都统一成/
			var newAssetPath = assetPath.Replace("\\", "/");
			int imageRootIndex = newAssetPath.IndexOf(ImagePathRoot);
			var subImagePath = newAssetPath.Substring(imageRootIndex + ImagePathRoot.Length + 1);

			//检查图片对应的预制体的文件夹存不存在,不存在就创建
			var convertPath = Path.Combine(Application.dataPath, ImagePrefabPathRoot, subImagePath);
			FileInfo imagePrefab = new FileInfo(convertPath);
			if (!imagePrefab.Directory.Exists)
			{
				Directory.CreateDirectory(imagePrefab.Directory.FullName);
			}
			var prefabPath = Path.ChangeExtension(Path.Combine("Assets",ImagePrefabPathRoot, subImagePath), ".prefab");
			ConvertPrefab(assetPath, prefabPath);
		}
	}
}
加载图片
void Update() { if (Input.GetKeyDown(KeyCode.A)) { img.sprite = LoadSprite("Image/Sprite/Image1/Image11/38464da9b7a55b32feaa654fbb4fc5c6"); } } private Sprite LoadSprite(string spritePath) { return Resources.Load<GameObject>(spritePath).GetComponent<SpriteRenderer>().sprite; } - 自定义打包方式
public class MyPackerPolicy : IPackerPolicy
{
    public bool AllowSequentialPacking => true;
    /// <summary>
    /// 返回打包程序策略的版本值。如果对策略脚本进行了修改,则该版本应该被触发,并且该策略被保存到版本控制中。
    /// </summary>
    /// <returns></returns>
    public int GetVersion()
    {
        return 1;
    }
    /// <summary>
    /// 在这里实现你的打包逻辑。定义PackerJob上的地址集,并从给定的TextureImporters中分配Sprites。
    /// </summary>
    /// <param name="target"></param>
    /// <param name="job"></param>
    /// <param name="textureImporterInstanceIDs"></param>
    public void OnGroupAtlases(BuildTarget target, UnityEditor.Sprites.PackerJob job, int[] textureImporterInstanceIDs)
    {
    }
}