Cocos CreatorжЦзївЛИіащФтвЁИЫ
1. бнЪО
АцБО:v2.4.3
гябд:TS
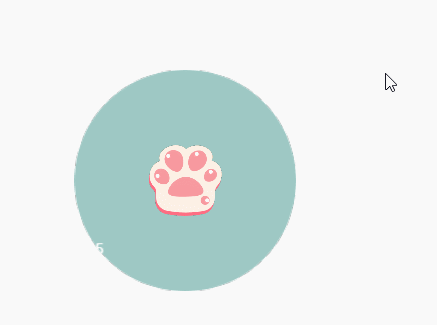
бнЪОGIF

2. ЪЕЯжЙ§ГЬ
ЫиВФ


ЦкЭћаЇЙћ
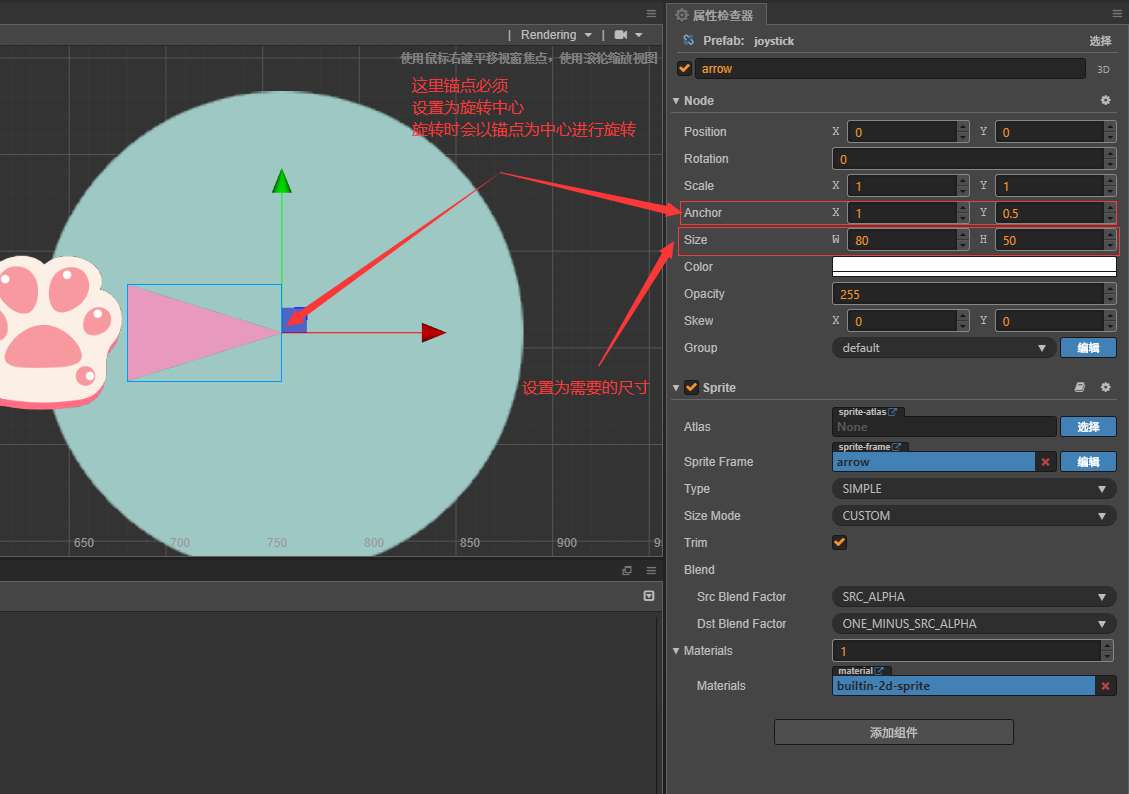
- РрЫЦгкЭѕепШйвЋЕФФЧжжаЁвЁИЫ
- вЁИЫжааФЮЛжУЮЊЦСФЛЕуЛїЕФЮЛжУ
- вЁИЫЕуЛїВПЗжВЛЛсГіНч
Й§ГЬ
(1)вЁИЫИњЫцДЅУў
this.Joystick = this.node.getChildByName("Joystick");
// ДЫДІМрЬ§ЕФjoystickЮЊвЁИЫ
this.Joystick.on(cc.Node.EventType.TOUCH_MOVE, this.onTouchMove, this);
onTouchMove(e: cc.Event.EventTouch) {
this.JoystickMove(e)
}
JoystickMove(e: cc.Event.EventTouch) {
// вЦЖЏ
let delta = e.getDelta();
let moveDistance = cc.v3(delta.x / this.node.scale, delta.y / this.node.scale)
// ДЫДІдіМгЫѕЗХВЮЪ§ЮЊСЫЗНБу,ЪЙгУЪБПЩвджБНгЫѕЗХДѓаЁ
this.Joystick.setPosition(this.Joystick.position.add(moveDistance))
}
ДЫЪБПЩвдЪЕЯжДЅУўЕуИњЫцЪжжИЛђепЪѓБъвЦЖЏЁЃgetDeltaКЏЪ§ЪЧЛёШЁДЅЕуОрРыЩЯвЛДЮЪТМўвЦЖЏЕФОрРыЖдЯѓ,ЗЕЛиЕФЪЧвЛИіVec2ЁЃЕЋДЫЪБвЁИЫВЛЛсздЖЏЙщЮЛЁЃ
(2)вЁИЫздЖЏЙщЮЛ
	this.Joystick.on(cc.Node.EventType.TOUCH_END, this.onTouchEnd, this);
	this.Joystick.on(cc.Node.EventType.TOUCH_CANCEL, this.onTouchCancel, this);
	onTouchEnd(e: cc.Event.EventTouch) {
	    this.JoystickReset()
	}
	onTouchCancel(e: cc.Event.EventTouch) {
	    this.JoystickReset()
	}
	JoystickReset() {
	    cc.tween(this.Joystick)
	        .to(0.05, {x: 0, y: 0})
	        .start()
	}
TOUCH_END, TOUCH_CANCELДњБэЕФзДЬЌЮЊЕБЪжжИдкФПБъНкЕуЧјгђФкРыПЊЦСФЛЪБ,ЕБЪжжИдкФПБъНкЕуЧјгђЭтРыПЊЦСФЛЪБЁЃЪЙгУЛКЖЏЪЙЖЏЛИќСїГЉЁЃ
(3)ЯожЦвЁИЫВЛГіНч
дРэ:
ДЫДІЫМТЗРДдДгкCSDNеТгуза,ЭЈЙ§Ш§НЧаЮЕФЯрЫЦЕШБШЁЃ
ЭъЩЦJoystickMoveДњТы
JoystickMove(e: cc.Event.EventTouch) {
// вЦЖЏ
let delta = e.getDelta();
let moveDistance = cc.v3(delta.x / this.node.scale, delta.y / this.node.scale)
// МгЩЯЫѕЗХВЮЪ§,ИќМгЗНБуЪЕгУ
this.Joystick.setPosition(this.Joystick.position.add(moveDistance))
// зЊЛЛзјБъ
let touchPos = e.getLocation(); // вдЕБЧАЦСФЛзѓЯТНЧЮЊзјБъЯЕдЕуЫљЛёЕУЕФЕФЮЛжУ
let touchPosInNode = this.node.convertToNodeSpaceAR(touchPos)
let distanceBetweenTouchPosToJoystick = touchPosInNode.mag() * this.node.scale; // ДЫДІЫѕЗХВЮЪ§зїгУгыЧАБпЭЌРэ
// ЯожЦвЦЖЏ < АыОЖ
if (distanceBetweenTouchPosToJoystick > this.radius) {
let lengthScale = this.radius / distanceBetweenTouchPosToJoystick;
this.Joystick.x = touchPosInNode.x * lengthScale;
this.Joystick.y = touchPosInNode.y * lengthScale;
}
}
ДЫЪБвЦЖЏВЛЛсГіНч,ЖјЧвПЩвдШЮвтЕїећЫѕЗХБЖЪ§ЖМПЩвдБЃГжВЛГіНчзДЬЌ!
зЂвтgetLocation()КЏЪ§ЗЕЛиЕФзјБъЪЧвдЦСФЛзѓЯТНЧЮЊзјБъжааФЕФзјБъ,ВЂВЛЪЧЪРНчзјБъ!
НкЕу.convertToNodeSpaceAR(ЮЛжУ)ЗЕЛиЕФЪЧетИіЮЛжУдкетИіНкЕуЯТЕФЮЛжУЁЃ
(4)ЬэМгМ§ЭЗ
ЭъЩЦДњТы
onTouchMove(e: cc.Event.EventTouch) {
this.JoystickMove(e)
this.arrowDirection()
}
arrowDirection() {
// ЩшжУМ§ЭЗДѓаЁ
this.setArrowLength()
// МЦЫуМаНЧ
this.setArrow(cc.v2(this.Joystick.position))
}
setArrowLength() {
let arrowParamScale = this.Joystick.position.mag() * this.node.scale / this.radius;
this.arrow.width = this.arrowMaxLenth * arrowParamScale; // М§ЭЗГЄЖШ
this.arrow.opacity = 255 * arrowParamScale; // М§ЭЗЭИУїЖШ
}
/**
*
* @param JoystickPos вЁИЫНкЕузјБъ
*/
setArrow(JoystickPos: cc.Vec2) {
let dir = JoystickPos.sub(cc.v2(0, 0))
let vec = cc.v2(0, 1); // ЫЎЦНЯђгвЕФЖдБШЯђСП
let radian = dir.signAngle(vec); // ЧѓЗНЯђЯђСПгыЖдБШЯђСПМфЕФЛЁЖШ
let rotate = cc.misc.radiansToDegrees(radian); // НЋЛЁЖШзЊЛЛЮЊНЧЖШ
this.arrow.angle = -rotate - 90; // ***ДЫДІrotateе§ИКжЕвдМАМѕШЅЕФНЧЖШИљОнздМКЕФЭМЦЌШЅаоИФ***
}
дйЭъЩЦвЛЯТвЁИЫЛиЕЏЪБЕФЖЏЛ,ШУМ§ЭЗПЩвдИДд!
	JoystickReset() {
        let time: number = 0.05;
        let arrowReset = cc.tween(this.arrow).to(time, {width: 0, opacity: 0})

        cc.tween(this.Joystick)
            .call(() => {
                arrowReset.start()
            })
            .to(time, {x: 0, y: 0})
            .start()
    }
дРэ:
ЪзЯШdirЪЧвЁИЫЕФЯђСПгывЁИЫжааФЕФвЛИіДјЗНЯђЕФЯђСПВю,ШєЪЧЧѓЯђСПМаНЧБиаыгаСэЭтвЛИіВЮПМЯђСП,ДЫДІЖЈвхЮЊ(0, 1),ЧѓГіЕФжЕЮЊЛЁЖШЫљвдашвЊНЋЛЁЖШзЊЛЛЮЊЮвУЧвЊЕФНЧЖШЁЃ
ЛЁЖШзЊНЧЖШЙЋЪН: НЧЖШ = ЛЁЖШ * 180 / PI
cocosжаПЩвджБНгЪЙгУcc.misc.radiansToDegrees()
singAngle()КЏЪ§дДТыВПЗжШчЯТ,ШчЙћЖдЯђСПЕФВцГЫЁЂЕуГЫЕФМИКЮвтвхВЛЪьЯЄПЩвдПДвЛЯТ:
/*
* ДјЗНЯђЕФМаНЧЕФЛЁЖШЁЃИУЗНЗЈНігУзіМцШн 2D МЦЫуЁЃ
*/
signAngle (vector) {
cc.warnID(1408, 'vec3.signAngle', 'v2.1', 'cc.v2(selfVector).signAngle(vector)');
let vec1 = new Vec2(this.x, this.y);
let vec2 = new Vec2(vector.x, vector.y);
return vec1.signAngle(vec2);
}
/*
* ДјЗНЯђЕФМаНЧЕФЛЁЖШЁЃ
*/
signAngle (vector: Vec2): number {
let angle = this.angle(vector);
return this.cross(vector) < 0 ? -angle : angle;
}
/*
* МаНЧЕФЛЁЖШЁЃ
*/
angle (vector: Vec2): number {
var magSqr1 = this.magSqr();
var magSqr2 = vector.magSqr();
if (magSqr1 === 0 || magSqr2 === 0) {
console.warn("Can't get angle between zero vector");
return 0.0;
}
var dot = this.dot(vector);
var theta = dot / (Math.sqrt(magSqr1 * magSqr2));
theta = misc.clampf(theta, -1.0, 1.0);
return Math.acos(theta); // ЗДгрЯвКЏЪ§
}
/*
* ЕБЧАЯђСПгыжИЖЈЯђСПНјааВцГЫЁЃ
*/
cross (vector: Vec2): number {
return this.x * vector.y - this.y * vector.x;
}
/**
*ЕБЧАЯђСПгыжИЖЈЯђСПНјааЕуГЫЁЃ
*/
dot (vector: Vec2): number {
return this.x * vector.x + this.y * vector.y;
}
/*
* ЯоЖЈИЁЕуЪ§ЕФзюДѓзюаЁжЕЁЃ
* Ъ§жЕДѓгк max_inclusive дђЗЕЛи max_inclusiveЁЃ
* Ъ§жЕаЁгк min_inclusive дђЗЕЛи min_inclusiveЁЃ
* ЗёдђЗЕЛиздЩэЁЃ
*/
misc.clampf = function (value, min_inclusive, max_inclusive) {
if (min_inclusive > max_inclusive) {
var temp = min_inclusive;
min_inclusive = max_inclusive;
max_inclusive = temp;
}
return value < min_inclusive ? min_inclusive : value < max_inclusive ? value : max_inclusive;
};
жїНХБОБраД
(1)жїНХБОВПЗжЪЕЯжЙІФм
- ИќИФДЅУўЗЖЮЇЮЊШЋЦС
- ПчНХБОЕїгУвЁИЫ
- вЦЖЏЮяЬх
(2)бнЪО
(3)ЪЕЯж
вЁИЫНХБОВПЗж
// ЗЕЛиИјЕїгУепашвЊгУЕНЕФВЮЪ§
returnArrowAngle() {
let radin = cc.misc.degreesToRadians(-this.arrow.angle - 90);
cc.log(this.arrow.angle)
let vec = cc.v2(0, 1);
let targetVec = vec.rotate(-radin);
let data = {
angle: this.arrow.angle, // НЧЖШ
vec: targetVec,
speedScale: this.arrow.width / this.arrowMaxLenth,
moveState: this.Joystick.x != 0 && this.Joystick.y != 0 ? true : false,
}
return data;
}
дРэгыМЦЫуГЏЯђдРэВюВЛЖр,жЛЪЧетДЮНЋНЧЖШзЊЮЊЛЁЖШ,дйЭЈЙ§НЋВЮПМЕФЯђСПа§зЊжИЖЈЛЁЖШ(radin)Кѓ,МДПЩЕУГіжИЖЈвбжЊНЧЖШЕФЯђСП!
жїНХБОВПЗж
@property({type: cc.Node, displayName: "ПЩЕуЛїЧјгђ"})
touchArea: cc.Node = null;
@property({type: cc.Node, displayName: "вЁИЫ"})
joystick: cc.Node = null;
@property({type: cc.Node, displayName: "вЦЖЏЮяЬх"})
thing: cc.Node = null;
// ДЫНХБОНХБОШЋОжКЏЪ§Чј
joystickCom: joystick;
moveSpeed = 0.5;
moveRotate: number;
// ЩшжУЕуЛїЧјгђМрЬ§
onLoad () {
this.joystickCom = this.joystick.getComponent(joystick);
this.touchArea.on(cc.Node.EventType.TOUCH_START, this.onTouchStart, this);
this.touchArea.on(cc.Node.EventType.TOUCH_MOVE, this.onTouchMove, this);
this.touchArea.on(cc.Node.EventType.TOUCH_END, this.onTouchEnd, this);
}
onTouchStart(e: cc.Event.EventTouch) {
this.joystickCom.onTouchStart(e);
}
onTouchMove(e: cc.Event.EventTouch) {
this.joystickCom.onTouchMove(e);
}
onTouchEnd(e: cc.Event.EventTouch) {
this.joystickCom.onTouchEnd(e);
}
// вЦЖЏЪЕЯж
thingMove() {
let joystickFun = this.joystickCom.returnArrowAngle()
this.thing.angle = joystickFun.angle + 90; // здааЕїећ
if (joystickFun.moveState) {
this.thing.setPosition(this.thing.position.add(
cc.v3(
joystickFun.vec.x * 5 * joystickFun.speedScale,
joystickFun.vec.y * 5 * joystickFun.speedScale
)
))
}
}
update (dt) {
this.thingMove();
}
}
ЕквЛДЮЗЂЮФеТ,ШєгаДэЮѓЭћДѓРаУЧжИе§ЁЃ
дДТы
УмТы: agzg