一、通用的遮挡
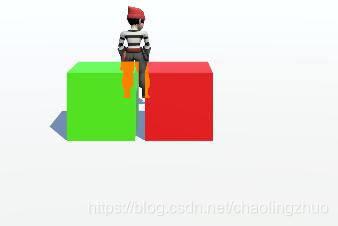
? ? ? ? 主角被任何物体遮挡,显示指定的颜色(或xray等其他效果)。新建shader,俩pass,第一个pass ZTest Greater, ZWrite Off。第二个pass正常渲染,省略。示例Shader如下
Shader "Custom/Character"
{
    Properties
    {
		_Color("Color", Color) = (1,1,1,1)
        _MainTex ("Albedo (RGB)", 2D) = "white" {}
		_OcclusionColor("OcclusionColor",Color) = (1,0.5,0,1)
    }
    SubShader
    {
		Tags { "Queue" = "Geometry+50" "RenderType" = "Opaque" }
		LOD 200
		Pass
		{
			ZTest Greater
			ZWrite Off

			CGPROGRAM
			#pragma vertex vert
			#pragma fragment frag
			#pragma multi_compile_instancing
			#pragma target 3.0
			#include "UnityCG.cginc"


			struct appdata
			{
				UNITY_VERTEX_INPUT_INSTANCE_ID
				float4 vertex : POSITION;
			};

			UNITY_INSTANCING_BUFFER_START(Props)
			UNITY_INSTANCING_BUFFER_END(Props)

			fixed4 _OcclusionColor;
			float4 vert(appdata v) : SV_POSITION {
				UNITY_SETUP_INSTANCE_ID(v)
				return UnityObjectToClipPos(v.vertex);
			}
			fixed4 frag() : SV_Target{
				return _OcclusionColor;
			}
			ENDCG
		}

    Pass{
        //...正常渲染的shader
    }
}
效果图如下,腿被绿box和红box遮挡显示橘色了

二、被指定的物体遮挡,才显示其他颜色。
最近项目碰到奇怪的需求,角色被树木遮挡才显示其他颜色,被其他(例如花、其他角色或者怪物)则正常遮挡。
方案:遮挡物和角色做深度比较。首先建立一个相机,Depth比主相机小就小,因为要先渲染,只渲染遮挡物,通过Camera的Culling Mask设置。暂且叫depthCamera吧。我们只需要获得深度就行,写个只获得深度的Shader
//只写深度,写在R通道
Shader "Custom/DepthWrite"
{
    SubShader
    {
        Tags { "RenderType"="Opaque" }
        Pass
        {
            CGPROGRAM

            #pragma vertex vert
            #pragma fragment frag
            #include "UnityCG.cginc"

            struct v2f
            {
                float4 pos : SV_POSITION;
                float2 depth : TEXCOORD0;
				float2 uv : TEXCOORD1;
            };

			sampler2D _MainTex;

			float4 _MainTex_ST;

            v2f vert (appdata_base v)
            {
                v2f o;
                o.pos = UnityObjectToClipPos (v.vertex);
				o.uv = TRANSFORM_TEX(v.texcoord, _MainTex);
                o.depth = o.pos.zw;
                return o;
            }

            half4 frag(v2f i) : COLOR
            {
                fixed4 color = tex2D(_MainTex, i.uv);
                clip(color.a - 0.2);
                half x = i.depth.x / i.depth.y;
                #if !defined(UNITY_REVERSED_Z)
                    x = 1 - x;
                #endif
                return half4(x, x, x, color.a);
            }
            ENDCG
        }
    }
}
?然后设置摄像机用指定Shader渲染
depthCamera.SetReplacementShader(depthShader, string.Empty);
?第二个参数为空,代表相机所有的物体都用指定渲染渲染。
?相机设置depthCamera.targetTexture,然后把目标纹理提供给角色的Shader用。
接下来写角色的Shader。
hader "Custom/Character"
{

	Properties{
		_MainTex("Base 2D", 2D) = "white"{}
		_OcclusionColor("OcclusionColor", Color) = (1,1,1,1)
	}


	SubShader
	{
		Tags{"Queue" = "Geometry+50"}
		LOD 200

		Pass
		{

			//正常渲染的pass
		}


		Pass
		{
			ZTest Off
			CGPROGRAM
            #include "UnityCG.cginc"

			sampler2D _OcclutionTex;
			fixed4 _OcclusionColor;

			float4 _MainTex_ST;


			struct v2f
			{
				float4 pos : SV_POSITION;
				float4 screenPos : TEXCOORD1;
                float2 depth : TEXCOORD2;
			};


			v2f vert(appdata_base v)
			{
				v2f o;
				o.pos = UnityObjectToClipPos(v.vertex);
                o.depth = o.pos.zw;
                o.screenPos = ComputeScreenPos (o.pos);
				return o;
			}


			fixed4 frag(v2f i) : SV_Target
			{
				half selfDepth = i.depth.x / i.depth.y;
                #if !defined(UNITY_REVERSED_Z)
                    selfDepth = 1 - selfDepth;
                #endif
				float2 screenPos = i.screenPos.xy / i.screenPos.w;
				fixed4 occlutionDepth = tex2D(_OcclutionTex, screenPos);
				if(occlutionDepth.x < selfDepth)
					discard;
				return _OcclusionColor;

			}


			#pragma vertex vert
			#pragma fragment frag

			ENDCG
		}

	}

	FallBack "Diffuse"
}
第一个pass正常渲染,代码省略。第二个pass的_OcclutionTex,是depthCamera.targetTexture,简单点可以通过Shader全局设置。?
Shader.SetGlobalTexture("_OcclutionTex", depthTex);?
首先要获得自己的深度o.depth,然后再_OcclutionTex采样,通过内置函数ComputeScreenPos获取齐次坐标下的屏幕坐标值(看该函数的命名第一直觉是该函数返回的是屏幕空间下的坐标值,其实不是)。对比深度,没有被遮挡就discard。
效果图如下,腿被绿box遮挡显示橘色,被红色box挡住则没有变色

C#代码如下
using UnityEngine;

/// <summary>
///     遮挡关系,通过创建摄像机,进行后处理操作
/// </summary>
public class OcclusionRelation : MonoBehaviour
{
	//遮挡的LayerMask
	public LayerMask OccludeMask;

	//主摄像机
	public Camera MainCamera;
	private Camera depthCamera;
	private Shader depthShader;
	private RenderTexture depthTex;

	private void Start()
	{
		//创建相机,相机属性和主相机一致
		depthCamera = CreateCamera("_DepthCamera");
		depthCamera.cullingMask = OccludeMask;
		depthCamera.depth = MainCamera.depth - 1;

		//只读取深度的Shader
		depthShader = Shader.Find("Custom/DepthWrite");

		//遮挡物体的深度纹理
		depthTex = RenderTexture.GetTemporary(Screen.width, Screen.height, 24, RenderTextureFormat.RHalf);
		depthTex.Create();
		depthCamera.targetTexture = depthTex;

		//替换两个相机绘制的Shader
		depthCamera.SetReplacementShader(depthShader, string.Empty);

		Shader.SetGlobalTexture("_OcclutionTex", depthTex);
	}

	private void OnDestroy()
	{
		if(depthCamera != null)
		{
			depthCamera.targetTexture = null;
		}

		if(depthTex != null)
		{
			RenderTexture.ReleaseTemporary(depthTex);
		}
	}

	private Camera CreateCamera(string name)
	{
		var go = new GameObject(name);
		go.transform.parent = transform;
		go.transform.localPosition = Vector3.zero;
		go.transform.localEulerAngles = Vector3.zero;
		go.transform.localScale = Vector3.one;
		var resultCamera = go.AddComponent<Camera>();
		resultCamera.CopyFrom(MainCamera);
		//设置背景色
		resultCamera.backgroundColor = new Color(0, 0, 0, 0);
		return resultCamera;
	}
}