本教程采用图文教程+视频教程的多元化形式,我会为不同的知识点选择适当的表达方式。
教程内容将同步免费发布于 开发游戏的老王(知乎|CSDN)的专栏《玩转UE4/UE5动画系统》。
教程中使用的资源及工程将以开源项目的形式更新到GitHub:玩转UE4上。
0. 效果演示
基于原地运动的攀爬系统(C++版)
本文主要面向使用C++开发UE的同学。范例项目参考了Advanced Locomotion System V4 C++版(简称 ALS V4 C++版)即Community版的实现方法,部分代码进行了化简。ALS V4 C++版的GitHub地址
1. 概述
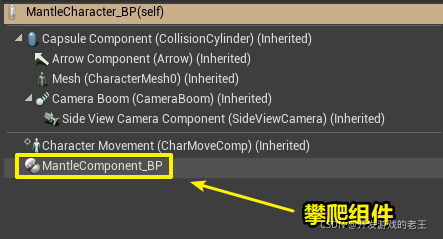
在《玩转UE4/UE5动画系统》系列教程的功能模块部分,我们介绍了蓝图版ALS V4中攀爬系统的实现方法,详见《基于原地运动的攀爬系统(ALS V4实现方案详解)》。C++版的实现原理和蓝图版基本相同,只不过因为语言不同,实现细节有一定差异,其中最大的差异是C++将攀爬系统独立实现成了一个MantleComponent组件。

攀爬系统是ALS V4功能模块角度中最复杂的模块。希望读者在阅读本文之前对UE4/UE5动画系统的基础知识,尤其对CharacterMonvement组件、动画通知状态以及动画蒙太奇等知识有一定的了解。老王也写了一些本章节前导知识的文章,有需要的朋友可以关注一下我的专栏《玩转UE4/UE5动画系统》并阅读相关文章。
1.1 主要功能及亮点
- 可以攀爬低障碍物(Low Mantle)、高障碍物(High Mantle)以及下落时的双手支撑爬(Falling Catch)。
- 可以攀爬移动以及旋转中的障碍物。
- 攀爬过程平滑稳定,目标位置定位准确,并且可以通过曲线精确调节。
- 目标位置没有足够空间时不能攀爬(这是优点)。
- 使用曲线调节适应不同的动画资源,同时也实现了程序和数据解耦合。
1.2 重难点及学习方法
- 为了实现上述功能,开发者设计的数学模型比较复杂,概念也比较多,学习者学习的时候要弄清各个概念的物理意义。
- ALS V4是一个可以用于生产环境的项目,因此开发者使用了很多技巧用以实现逻辑解耦以及数据程序解耦,这也增加了初学者的学习难度。强烈建议大家结合我给出的拆解版攀爬模块的工程学习。
- 要理解整个攀爬系统抽象状态机的切换过程。
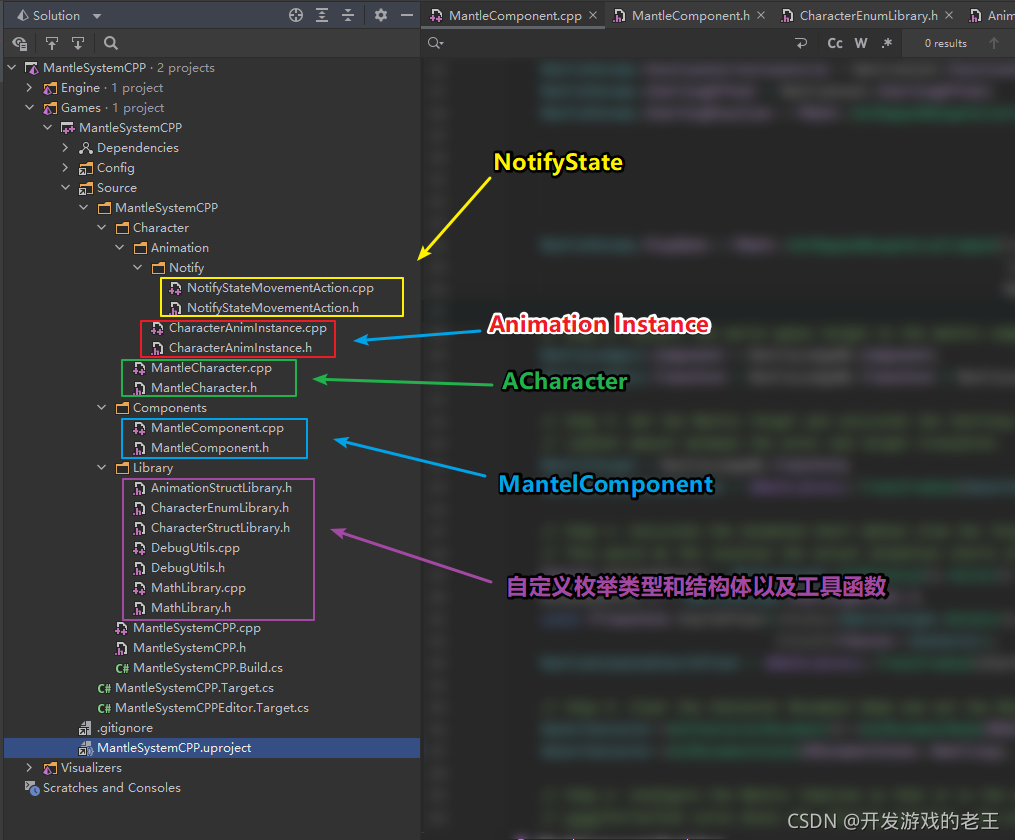
2. 项目文件结构

3. 自定义类型和工具函数
为了便于读者对攀爬系统核心逻辑的理解,我们先来了解一下项目中用到的工具宏和工具函数。
3.1 工具函数
- GetCalpsuleBaseLocation
- GetCapsuleLocationFromBase
- CapsuleHasRoomCheck
- GetMantleAsset
3.1.1 GetCalpsuleBaseLocation
由胶囊体位置计算出胶囊体底部的位置。
注意:通常我们通过
CapsuleCompoent的GetWorldLocation函数获得的是胶囊体的中心位置。
FVector UMathLibrary::GetCapsuleBaseLocation(float ZOffset, UCapsuleComponent* Capsule)
{
	return Capsule->GetComponentLocation() -
	Capsule->GetUpVector() * (Capsule->GetScaledCapsuleHalfHeight() + ZOffset);
}
3.1.2 GetCapsuleLocationFromBase
由胶囊体底部位置计算出胶囊体的位置。即GetCalpsuleBaseLocation的反向计算。之所以要用这个函数,是因为后面我们常常先获取到胶囊体和障碍物的接触点位置,然后反向计算出胶囊体位置,才能够移动角色。
ZOffset是用于微调的变量
FVector UMathLibrary::GetCapsuleLocationFromBase(FVector BaseLocation, float ZOffset, UCapsuleComponent* Capsule)
{
	BaseLocation.Z += Capsule->GetScaledCapsuleHalfHeight() + ZOffset;
	return BaseLocation;
}
3.1.3 CapsuleHasRoomCheck
检测是否有足够的空间容纳胶囊体
HeightOffset和RadiusOffset是用于微调的变量
bool UMathLibrary::CapsuleHasRoomCheck(UCapsuleComponent* Capsule, FVector TargetLocation, float HeightOffset,
	float RadiusOffset)
{
	// Perform a trace to see if the capsule has room to be at the target location.
	const float ZTarget = Capsule->GetScaledCapsuleHalfHeight_WithoutHemisphere() - RadiusOffset + HeightOffset;
	FVector TraceStart = TargetLocation;
	TraceStart.Z += ZTarget;
	FVector TraceEnd = TargetLocation;
	TraceEnd.Z -= ZTarget;
	const float Radius = Capsule->GetUnscaledCapsuleRadius() + RadiusOffset;

	const UWorld* World = Capsule->GetWorld();
	check(World);

	FCollisionQueryParams Params;
	Params.AddIgnoredActor(Capsule->GetOwner());

	FHitResult HitResult;
	const FCollisionShape SphereCollisionShape = FCollisionShape::MakeSphere(Radius);
	const bool bHit = World->SweepSingleByChannel(HitResult, TraceStart, TraceEnd, FQuat::Identity,
												ECC_Visibility, FCollisionShape::MakeSphere(Radius), Params);

	return !(HitResult.bBlockingHit || HitResult.bStartPenetrating);
}
注释:
下图中粉色范围代表着由上述代码构造出的检测区域,可以看到它和胶囊体的范围差不多,之所以这样构造而不直接使用胶囊体,是能进行更灵活的参数微调。

3.1.4 GetMantleAsset
根据MantleType返回对应测Mantle Asset参数预设。
枚举类型
MantleType有3种取值:LowMantle、HighMantle和FallingCatch对应着攀爬系统的三种攀爬方式,注意,HighMantle和FallingCatch是相同的
UFUNCTION(BlueprintImplementableEvent, BlueprintCallable, Category = "Mantle System")
struct FMantleAsset GetMantleAsset(EMantleType MantleType, EOverlayState CurrentOverlayState);
这个函数被定义成了蓝图可实现事件,具体的资源分配在蓝图中实现

4. 工作流程

5. 事件触发及状态控制
5.1 MantleCheck触发
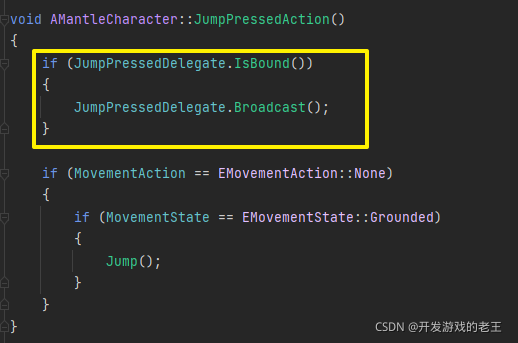
在Character中定义了一个Jump事件的委托JumpPressedDelegate
DECLARE_DYNAMIC_MULTICAST_DELEGATE(FJumpPressedSignature);
	UPROPERTY(BlueprintAssignable, Category = "Input")
	FJumpPressedSignature JumpPressedDelegate;
MantleComponent把自己的OnOwnerJumpInput注册给JumpPressedDelegate
 这样,当玩家按下起跳键,JumpPressedDelegate就将事件派发给了MantleComponent

5.2 Mantle Update和Mantle End触发
Mantle Update 和Mantle End 是由时间轴MantleTime控制并触发的。

5.3 状态控制
状态控制是整个攀爬系统抽象状态机的核心,学习此部分的关键是理解每一种状态标记是如何形成一个状态跳转图,即状态跳转的位置。
5.3.1 Movement Mode
CharacterMovement的Movement Mode标志位的切换比较简单
- 在
MantleStart中切换到None。 - 在
MantleEnd中切换回Walking。
5.3.2 Movement State
- 在
MantleStart中切换到Mantling。 - 通过
Character的自身事件OnMovementModeChange切换回其它状态。
void AMantleCharacter::OnMovementModeChanged(EMovementMode PrevMovementMode, uint8 PreviousCustomMode)
{
	Super::OnMovementModeChanged(PrevMovementMode, PreviousCustomMode);

	if (GetCharacterMovement()->MovementMode == MOVE_Walking ||
		GetCharacterMovement()->MovementMode == MOVE_NavWalking)
	{
		SetMovementState(EMovementState::Grounded);
	}
	else if (GetCharacterMovement()->MovementMode == MOVE_Falling)
	{
		SetMovementState(EMovementState::InAir);
	}
}
6. 攀爬周期函数
- MantleCheck:通过多次射线检测判定角色是否可以攀爬,获取攀爬障碍物的Transform及Compoent攀爬目标的相对高度并确定攀爬类型。
- MantleStart:初始化攀爬所需的参数。
- MantleUpdate:更新攀爬目标(因为攀爬目标是可动的)并更新角色的位置。
- MantleEnd:结束攀爬。
6.1 MantleCheck
Step 1: 向前射线检测,检查前方是否有角色无法直接走上去的障碍物
// Step 1: Trace forward。
	const FVector& TraceDirection = OwnerCharacter->GetActorForwardVector();
	const FVector& CapsuleBaseLocation = UMathLibrary::GetCapsuleBaseLocation(
		2.0f, OwnerCharacter->GetCapsuleComponent());
	FVector TraceStart = CapsuleBaseLocation + TraceDirection * -30.0f;
	TraceStart.Z += (TraceSettings.MaxLedgeHeight + TraceSettings.MinLedgeHeight) / 2.0f;
	const FVector TraceEnd = TraceStart + TraceDirection * TraceSettings.ReachDistance;
	const float HalfHeight = 1.0f + (TraceSettings.MaxLedgeHeight - TraceSettings.MinLedgeHeight) / 2.0f;

	UWorld* World = GetWorld();
	check(World);

	FCollisionQueryParams Params;
	Params.AddIgnoredActor(OwnerCharacter);

	FHitResult HitResult;
	{
		const FCollisionShape CapsuleCollisionShape = FCollisionShape::MakeCapsule(TraceSettings.ForwardTraceRadius, HalfHeight);
		const bool bHit = World->SweepSingleByProfile(HitResult, TraceStart, TraceEnd, FQuat::Identity, MantleObjectDetectionProfile,
	                                                  CapsuleCollisionShape, Params);
	}

	if (!HitResult.IsValidBlockingHit() || OwnerCharacter->GetCharacterMovement()->IsWalkable(HitResult))
	{
		// Not a valid surface to mantle
		return false;
	}

	if (HitResult.GetComponent() != nullptr)
	{
		UPrimitiveComponent* PrimitiveComponent = HitResult.GetComponent();
		if (PrimitiveComponent && PrimitiveComponent->GetComponentVelocity().Size() > AcceptableVelocityWhileMantling)
		{
			// The surface to mantle moves too fast
			return false;
		}
	}

	const FVector InitialTraceImpactPoint = HitResult.ImpactPoint;
	const FVector InitialTraceNormal = HitResult.ImpactNormal;
注释:
射线起点(Trace Start)的高度 = (Max Ledge Height + Min Ledge Height )/2
胶囊体射线的半高(Half Height) = (Max Ledge Height - Min Ledge Height )/2
这样胶囊体射线就正好覆盖了所需检测的空间。
各参数物理意义示意图如下:

Step 2: 从上一个碰撞点上方向下进行射线检测,并检查该碰撞位置角色能不能直接行走上去
// Step 2: Trace downward.
	FVector DownwardTraceEnd = InitialTraceImpactPoint;
	DownwardTraceEnd.Z = CapsuleBaseLocation.Z;
	DownwardTraceEnd += InitialTraceNormal * -15.0f;
	FVector DownwardTraceStart = DownwardTraceEnd;
	DownwardTraceStart.Z += TraceSettings.MaxLedgeHeight + TraceSettings.DownwardTraceRadius + 1.0f;

	{
		const FCollisionShape SphereCollisionShape = FCollisionShape::MakeSphere(TraceSettings.DownwardTraceRadius);
		const bool bHit = World->SweepSingleByChannel(HitResult, DownwardTraceStart, DownwardTraceEnd, FQuat::Identity,
	                                                  WalkableSurfaceDetectionChannel, SphereCollisionShape,
	                                                  Params);
	}


	if (!OwnerCharacter->GetCharacterMovement()->IsWalkable(HitResult))
	{
		// Not a valid surface to mantle
		return false;
	}

	const FVector DownTraceLocation(HitResult.Location.X, HitResult.Location.Y, HitResult.ImpactPoint.Z);
	UPrimitiveComponent* HitComponent = HitResult.GetComponent();
各参数物理意义示意图如下:

Step 3: 检查攀爬点是否有足够空间容纳胶囊体,如果有则将该位置设为目标变换(Target Transform)并且计算障碍物相对高度(Mantle Height)
	const FVector& CapsuleLocationFBase = UMathLibrary::GetCapsuleLocationFromBase(
		DownTraceLocation, 2.0f, OwnerCharacter->GetCapsuleComponent());
	const bool bCapsuleHasRoom = UMathLibrary::CapsuleHasRoomCheck(OwnerCharacter->GetCapsuleComponent(),
	                                                                  CapsuleLocationFBase, 0.0f,
	                                                                  0.0f);

	if (!bCapsuleHasRoom)
	{
		return false;
	}

	const FTransform TargetTransform(
		(InitialTraceNormal * FVector(-1.0f, -1.0f, 0.0f)).ToOrientationRotator(),
		CapsuleLocationFBase,
		FVector::OneVector);

	const float MantleHeight = (CapsuleLocationFBase - OwnerCharacter->GetActorLocation()).Z;
注释:
- 之所以要把
Initial Normal向量乘以(-1,-1,0)并换算后作为Target Transform的Rotation,是因为Target Transform的Rotation会影响角色攀爬完毕后的面朝向,而Initial Normal的方向和角色最终面朝向在X和Y轴是相反的,所以前两个分量为-1;角色最终面朝向的Z朝向由其自身决定,所以Z分量为0。 MantleHeight是目标相对于ActorLocation的相对位置。
Step 4: 通过当前的Movement State以及障碍物高度决定攀爬的类型
EMantleType MantleType;
	if (OwnerCharacter->GetMovementState() == EMovementState::InAir)
	{
		MantleType = EMantleType::FallingCatch;
	}
	else
	{
		MantleType = MantleHeight > 125.0f ? EMantleType::HighMantle : EMantleType::LowMantle;
	}
Step 5: 传递参数,开始攀爬(Mantle Start)
	FComponentAndTransform MantleWS;
	MantleWS.Component = HitComponent;
	MantleWS.Transform = TargetTransform;
	MantleStart(MantleHeight, MantleWS, MantleType);
注释:
- Mantle Height:障碍物实际高度。
- Target Transform:目标Transform(世界坐标系),注意:已经由胶囊体底部位置换算成了胶囊体位置。
- Hit Component:攀爬目标的Component。注意:
Target Transform和Hit Component构成了Mentle Ledge WS结构体参数。 (WS后缀表示World Space)。 - Mantle Type:攀爬类型。
6.2 MantleStart
Step 1: 通过攀爬高度(Mantle Height)将Mantle Asset换算成Mantle Params
	const FMantleAsset MantleAsset = GetMantleAsset(MantleType, OwnerCharacter->GetOverlayState());
	check(MantleAsset.PositionCorrectionCurve)

	MantleParams.AnimMontage = MantleAsset.AnimMontage;
	MantleParams.PositionCorrectionCurve = MantleAsset.PositionCorrectionCurve;
	MantleParams.StartingOffset = MantleAsset.StartingOffset;
	MantleParams.StartingPosition = FMath::GetMappedRangeValueClamped({MantleAsset.LowHeight, MantleAsset.HighHeight},
	                                                                  {
		                                                                  MantleAsset.LowStartPosition,
		                                                                  MantleAsset.HighStartPosition
	                                                                  },
	                                                                  MantleHeight);
	MantleParams.PlayRate = FMath::GetMappedRangeValueClamped({MantleAsset.LowHeight, MantleAsset.HighHeight},
	                                                          {MantleAsset.LowPlayRate, MantleAsset.HighPlayRate},
	                                                          MantleHeight);

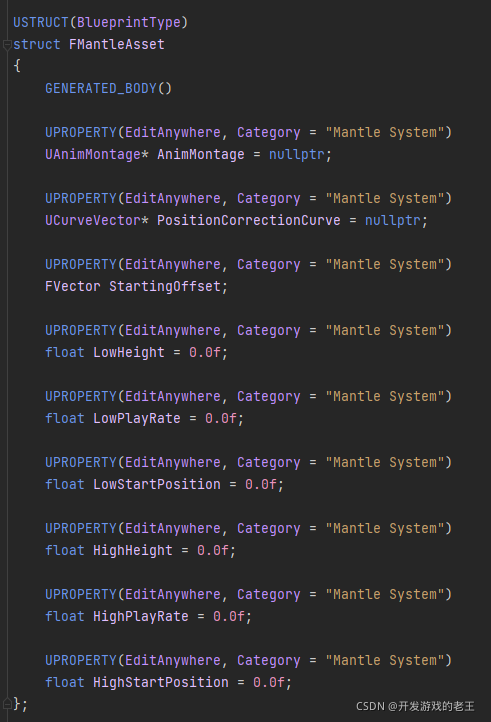
这里顺便要了解一下两个结构体类型Mantle Asset和Mantle Params


注释:
从上图不难看出,它们的内容都是攀爬所需的参数。Mantle Asset定义了每一种类型攀爬最低点和最高点对应的参数,而实际游戏中角色遇到的障碍物都是介于最低点和最高点之间的,所以要以障碍物实际高度Mantle Height做参数换算出实际对应的参数。
此处解释一下Start Position,角色攀爬的实际目标高度是Actual Height,它介于High Height和Low Height之间,而我们为其准备的动画,是完成整个High Height的动画,所以对于Actual Height,我们就从动画的中间位置播放就可以了,这个位置就是Start Position。
其它参数的(物理)意义,我们会在后面的文章中介绍。
Step 2: 将世界坐标系中的攀爬目标的Transform转换成以障碍物Component为基准的局部坐标系Transform
	MantleLedgeLS.Component = MantleLedgeWS.Component;
	MantleLedgeLS.Transform = MantleLedgeWS.Transform * MantleLedgeWS.Component->GetComponentToWorld().Inverse();
注释:
将Mentle Ledge WS(即刚才的Target Transform和Hit Component)中的Transform换算成Hit Component局部坐标系的Transform。Mentle Ledge LS(LS后缀表示 Local Space)。Mentle Ledge LS和Mentle Ledge WS的区别就在于其中的Transform,它们的Hit Component都是障碍物。
为什么要这样做?
换算后Mentle Ledge WS中的Transform分量是相对于Hit Component的常量,如果Hit Component发生了移动,那么用Hit Component和Transform分量就可以计算出新的Mentle Ledge WS。
Step 3: 初始化攀爬目标(Mantle Target)和攀爬实际偏差量(Mantle Actual Start Offset)
MantleTarget = MantleLedgeWS.Transform;
	MantleActualStartOffset = UMathLibrary::TransfromSub(OwnerCharacter->GetActorTransform(), MantleTarget);
各参数物理意义示意图如下:

Step 4: 初始化攀爬动画偏差量(Mantle Animated Start Offset)
FVector RotatedVector = MantleTarget.GetRotation().Vector() * MantleParams.StartingOffset.Y;
	RotatedVector.Z = MantleParams.StartingOffset.Z;
	const FTransform StartOffset(MantleTarget.Rotator(), MantleTarget.GetLocation() - RotatedVector,
	                             FVector::OneVector);
	MantleAnimatedStartOffset = UMathLibrary::TransfromSub(StartOffset, MantleTarget);
注释:
如果直接从角色起始位置过渡到目标位置,一般会出现穿模问题,所以我们希望攀爬路径是一个弧线。

通过动画偏差量(Mantle Animated Start Offset)在时间轴上和目标位置的混合就可以构成这个攀爬弧线。

Step 5: 设置Movement Mode和Movement State
	OwnerCharacter->GetCharacterMovement()->SetMovementMode(MOVE_None);
	OwnerCharacter->SetMovementState(EMovementState::Mantling);
Step 6: 设置Timeline,关键是让Timeline的长度和曲线实际长度(曲线总长减去起点位置)相同, Timeline的PlayRate和动画的PlayRate也必须相同;设置完毕后,开启Timeline
	float MinTime = 0.0f;
	float MaxTime = 0.0f;
	MantleParams.PositionCorrectionCurve->GetTimeRange(MinTime, MaxTime);
	MantleTimeline->SetTimelineLength(MaxTime - MantleParams.StartingPosition);
	MantleTimeline->SetPlayRate(MantleParams.PlayRate);
	MantleTimeline->PlayFromStart();
MantleTimeline设置

0.2秒以前为了平缓过渡由0渐变到1,后续值均为1。
注释:
运行时Mantle Timeline的长度 = 曲线中最远关键帧时间(即曲线的最大时长) - 常量Starting Position
并且Mantle Timeline的播放速率(Play Rate)和蒙太奇动画的(Play Rate)相同,这样在后面的步骤中(Mantle Update Step2),我们通过Starting Position + 实际播放时间(Playback Position)就可以求得当动画播放到某一时间点时,其对应的曲线值。 这里是曲线和动画同步的关键所在。
Step 7: 播放蒙太奇动画
if (IsValid(MantleParams.AnimMontage))
	{
		OwnerCharacter->GetMainAnimInstance()->Montage_Play(MantleParams.AnimMontage, MantleParams.PlayRate,
		                                                    EMontagePlayReturnType::MontageLength,
		                                                    MantleParams.StartingPosition, false);
	}
3.3 MantleUpdate
Step 1: 用本地Transform再换算回世界Transform,然后赋值给Mantle Target
MantleTarget = UMathLibrary::MantleComponentLocalToWorld(MantleLedgeLS);
每一帧,通过Mentle Ledge LS换算出最新的世界坐标系中的Mantle Target。
Step 2: 从每种Mantle的预设Curve中取值,并为Position以及XY/Z Correction Alpha赋值
const FVector CurveVec = MantleParams.PositionCorrectionCurve
	                                     ->GetVectorValue(
		                                     MantleParams.StartingPosition + MantleTimeline->GetPlaybackPosition());
	const float PositionAlpha = CurveVec.X;
	const float XYCorrectionAlpha = CurveVec.Y;
	const float ZCorrectionAlpha = CurveVec.Z;
注释:
如上文所述:Playback Position + ·Starting Position即动画当前帧对应的曲线位置。这三个曲线都用于角色起始位置和目标位置的混合插值(Lerp)。

Step 3: 通过各种Transform的插值获得当前角色的Transform
const FTransform TargetHzTransform(MantleAnimatedStartOffset.GetRotation(),
	                                   {
		                                   MantleAnimatedStartOffset.GetLocation().X,
		                                   MantleAnimatedStartOffset.GetLocation().Y,
		                                   MantleActualStartOffset.GetLocation().Z
	                                   },
	                                   FVector::OneVector);
	const FTransform& HzLerpResult =
		UKismetMathLibrary::TLerp(MantleActualStartOffset, TargetHzTransform, XYCorrectionAlpha);

	// Blend into the animated vertical offset using the Z value of the Position/Correction Curve.
	const FTransform TargetVtTransform(MantleActualStartOffset.GetRotation(),
	                                   {
		                                   MantleActualStartOffset.GetLocation().X,
		                                   MantleActualStartOffset.GetLocation().Y,
		                                   MantleAnimatedStartOffset.GetLocation().Z
	                                   },
	                                   FVector::OneVector);
	const FTransform& VtLerpResult =
		UKismetMathLibrary::TLerp(MantleActualStartOffset, TargetVtTransform, ZCorrectionAlpha);

	const FTransform ResultTransform(HzLerpResult.GetRotation(),
	                                 {
		                                 HzLerpResult.GetLocation().X, HzLerpResult.GetLocation().Y,
		                                 VtLerpResult.GetLocation().Z
	                                 },
	                                 FVector::OneVector);

	// Blend from the currently blending transforms into the final mantle target using the X
	// value of the Position/Correction Curve.
	const FTransform& ResultLerp = UKismetMathLibrary::TLerp(
		UMathLibrary::TransfromAdd(MantleTarget, ResultTransform), MantleTarget,
		PositionAlpha);

	// Initial Blend In (controlled in the timeline curve) to allow the actor to blend into the Position/Correction
	// curve at the midoint. This prevents pops when mantling an object lower than the animated mantle.
	const FTransform& LerpedTarget =
		UKismetMathLibrary::TLerp(UMathLibrary::TransfromAdd(MantleTarget, MantleActualStartOffset), ResultLerp,
		                          BlendIn);
注释:
使用了4个Lerp,其中Lerp3是最核心的,它的A值相当于角色的初始Transform,随时间推移过渡到攀爬终点的Transform。Lerp4的作用是除去当攀爬平面低于角色初始位置(即Falling Catch)的时候出现抖动。
Step 4: 更新角色的Location和Rotation
原版攀爬系统还实现了一个更平滑的
SetActorLocationAndRotation方法,本文简单起见直接使用的是Actor的SetActorLocationAndRotation方法。
OwnerCharacter->SetActorLocationAndRotation(LerpedTarget.GetLocation(), LerpedTarget.GetRotation().Rotator());
3.4 MantleEnd
攀爬完毕,将Movement Mode设为Walking即可。Movement Action的状态已经在动画的NotifyState中切换回None。
void UMantleComponent::MantleEnd()
{
	// Set the Character Movement Mode to Walking
	if (OwnerCharacter)
	{
		OwnerCharacter->GetCharacterMovement()->SetMovementMode(MOVE_Walking);
		if (OwnerCharacter->IsA(AMantleCharacter::StaticClass()))
		{
			Cast<AMantleCharacter>(OwnerCharacter)->UpdateHeldObject();
		}
	}
	// Enable ticking back after mantle ends
	SetComponentTickEnabledAsync(true);
}
7. 蒙太奇
IBM系统攀爬动画依然是使用蒙太奇实现,动画蓝图部分只是在OutPose前添加了一个Slot就可以了。

8. 小结
C++攀爬系统就介绍完毕了,总的来说和蓝图版原理相同,大家把两种实现方法对比着学习,选择适合自己的方案!感谢ALS V4原作者以及 Community版的作者!
